automatic transmission CADILLAC XT5 2020 Owner's Manual
[x] Cancel search | Manufacturer: CADILLAC, Model Year: 2020, Model line: XT5, Model: CADILLAC XT5 2020Pages: 384, PDF Size: 6.52 MB
Page 7 of 384
6 INTRODUCTION
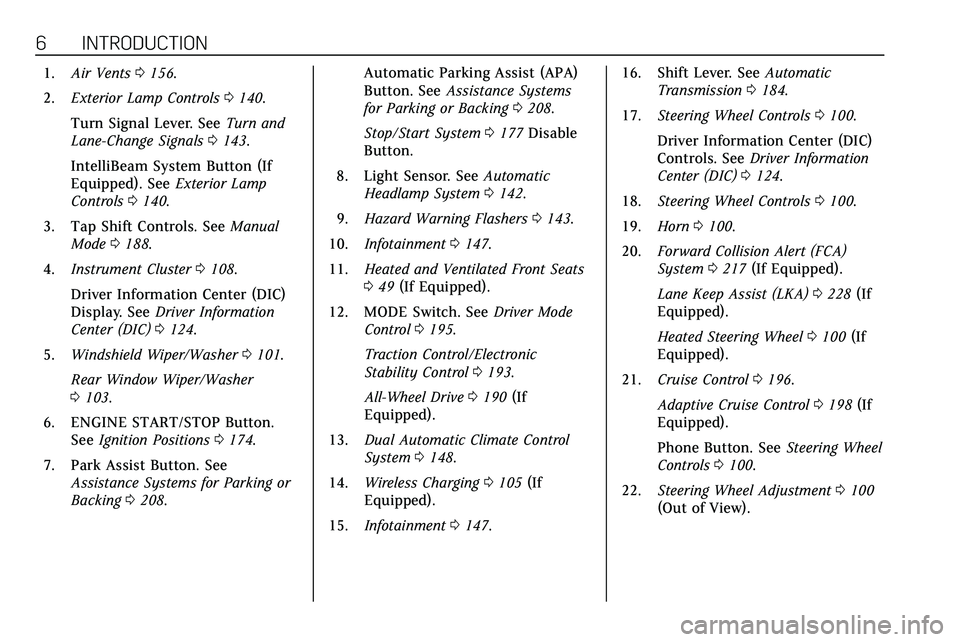
1.Air Vents 0156.
2. Exterior Lamp Controls 0140.
Turn Signal Lever. See Turn and
Lane-Change Signals 0143.
IntelliBeam System Button (If
Equipped). See Exterior Lamp
Controls 0140.
3. Tap Shift Controls. See Manual
Mode 0188.
4. Instrument Cluster 0108.
Driver Information Center (DIC)
Display. See Driver Information
Center (DIC) 0124.
5. Windshield Wiper/Washer 0101.
Rear Window Wiper/Washer
0 103.
6. ENGINE START/STOP Button. See Ignition Positions 0174.
7. Park Assist Button. See Assistance Systems for Parking or
Backing 0208. Automatic Parking Assist (APA)
Button. See
Assistance Systems
for Parking or Backing 0208.
Stop/Start System 0177 Disable
Button.
8. Light Sensor. See Automatic
Headlamp System 0142.
9. Hazard Warning Flashers 0143.
10. Infotainment 0147.
11. Heated and Ventilated Front Seats
049 (If Equipped).
12. MODE Switch. See Driver Mode
Control 0195.
Traction Control/Electronic
Stability Control 0193.
All-Wheel Drive 0190 (If
Equipped).
13. Dual Automatic Climate Control
System 0148.
14. Wireless Charging 0105 (If
Equipped).
15. Infotainment 0147. 16. Shift Lever. See
Automatic
Transmission 0184.
17. Steering Wheel Controls 0100.
Driver Information Center (DIC)
Controls. See Driver Information
Center (DIC) 0124.
18. Steering Wheel Controls 0100.
19. Horn 0100.
20. Forward Collision Alert (FCA)
System 0217 (If Equipped).
Lane Keep Assist (LKA) 0228 (If
Equipped).
Heated Steering Wheel 0100 (If
Equipped).
21. Cruise Control 0196.
Adaptive Cruise Control 0198 (If
Equipped).
Phone Button. See Steering Wheel
Controls 0100.
22. Steering Wheel Adjustment 0100
(Out of View).
Page 23 of 384
22 KEYS, DOORS, AND WINDOWS
Automatic Door Locks
The doors will lock automatically
when all doors are closed, the ignition
is on, and the vehicle is shifted out of
P (Park).
If a vehicle door is unlocked and then
opened and closed, the doors will lock
either when your foot is removed from
the brake or the vehicle speed
becomes faster than 13 km/h (8 mph).
To unlock the doors:
.Press
Kon the power door lock
switch.
. Shift the transmission into
P (Park).
Automatic door locking cannot be
disabled. Automatic door unlocking
can be programmed. See Vehicle
Personalization 0131.
Lockout Protection
If the ignition is on or in ACC/
ACCESSORY and the power door lock
switch is pressed with the driver door
open, all the doors will lock and only
the driver door will unlock. If the vehicle is off and locking is
requested while a door is open, when
all doors are closed the vehicle will
check for RKE transmitters inside.
If an RKE transmitter is detected and
the number of RKE transmitters inside
has not reduced, the driver door will
unlock and the horn will chirp three
times.
Lockout Protection can be manually
overridden with the driver door open
by pressing and holding
Qon the
power door lock switch.
Open Door Anti-Lockout
If Open Door Anti Lockout is turned
on and the vehicle is off, the driver
door is open, and locking is requested,
all the doors will lock and the driver
door will remain unlocked. The Open
Door Anti Lockout feature can be
turned on or off. See Vehicle
Personalization 0131.
Safety Locks
The rear door safety locks prevent
passengers from opening the rear
doors from inside the vehicle.
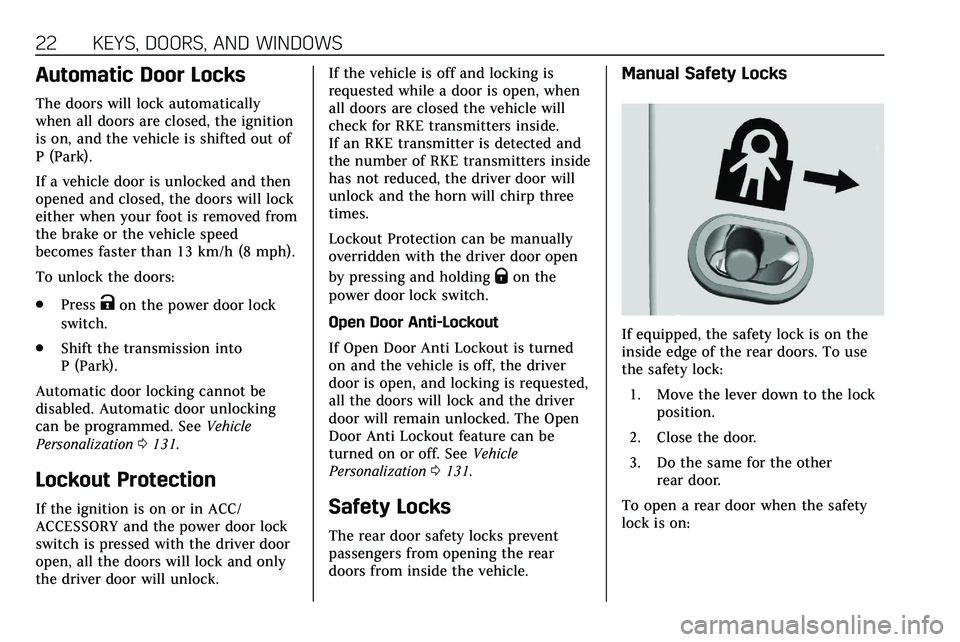
Manual Safety Locks
If equipped, the safety lock is on the
inside edge of the rear doors. To use
the safety lock:
1. Move the lever down to the lock position.
2. Close the door.
3. Do the same for the other rear door.
To open a rear door when the safety
lock is on:
Page 104 of 384
INSTRUMENTS AND CONTROLS 103
To turn the Rainsense feature on or
off, see“Rain Sense Wipers ”under
Vehicle Personalization 0131.
Wiper Arm Assembly Protection
When using an automatic car wash,
move the windshield wiper lever to
OFF. This disables the automatic
Rainsense windshield wipers.
With Rainsense, if the transmission is
in N (Neutral) and the vehicle speed is
very slow, the wipers will
automatically stop at the base of the
windshield.
The wiper operations return to normal
when the transmission is no longer in
N (Neutral) or the vehicle speed has
increased.Rear Window Wiper/
Washer
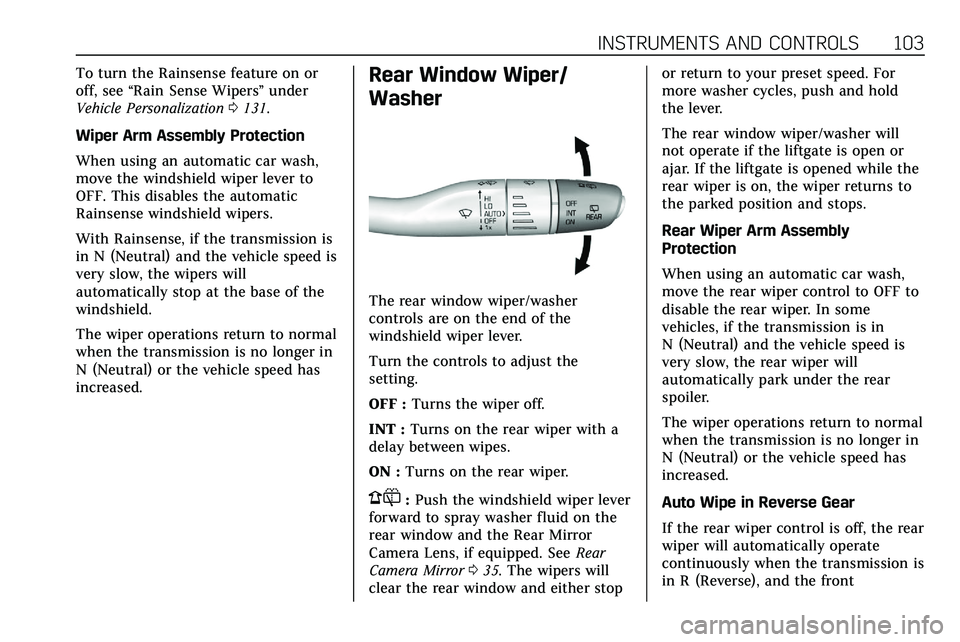
The rear window wiper/washer
controls are on the end of the
windshield wiper lever.
Turn the controls to adjust the
setting.
OFF : Turns the wiper off.
INT : Turns on the rear wiper with a
delay between wipes.
ON : Turns on the rear wiper.
1:Push the windshield wiper lever
forward to spray washer fluid on the
rear window and the Rear Mirror
Camera Lens, if equipped. See Rear
Camera Mirror 035. The wipers will
clear the rear window and either stop or return to your preset speed. For
more washer cycles, push and hold
the lever.
The rear window wiper/washer will
not operate if the liftgate is open or
ajar. If the liftgate is opened while the
rear wiper is on, the wiper returns to
the parked position and stops.
Rear Wiper Arm Assembly
Protection
When using an automatic car wash,
move the rear wiper control to OFF to
disable the rear wiper. In some
vehicles, if the transmission is in
N (Neutral) and the vehicle speed is
very slow, the rear wiper will
automatically park under the rear
spoiler.
The wiper operations return to normal
when the transmission is no longer in
N (Neutral) or the vehicle speed has
increased.
Auto Wipe in Reverse Gear
If the rear wiper control is off, the rear
wiper will automatically operate
continuously when the transmission is
in R (Reverse), and the front
Page 105 of 384
104 INSTRUMENTS AND CONTROLS
windshield wiper is performing low or
high speed wipes. If the rear wiper
control is off, the transmission is in
R (Reverse), and the front windshield
wiper is performing INT wipes, then
the rear wiper automatically performs
INT wipes.
This feature can be turned on or off.
SeeVehicle Personalization 0131.
The windshield washer reservoir is
used for the windshield, rear window,
and rear mirror camera, if equipped.
See Rear Camera Mirror 035. Check
the fluid level in the reservoir if either
washer is not working. See Washer
Fluid 0266.
Rear Camera Washer
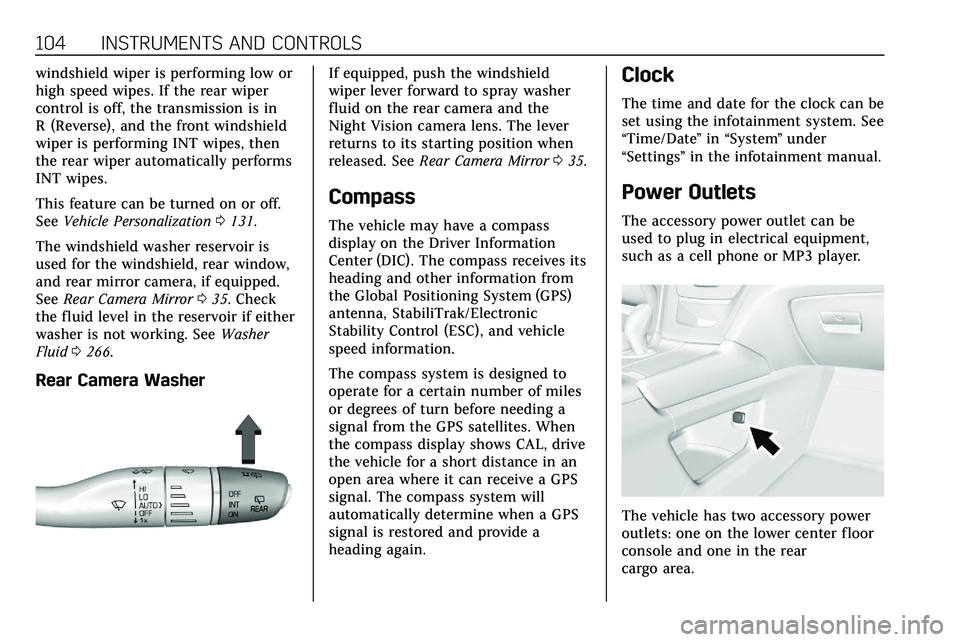
If equipped, push the windshield
wiper lever forward to spray washer
fluid on the rear camera and the
Night Vision camera lens. The lever
returns to its starting position when
released. See Rear Camera Mirror 035.
Compass
The vehicle may have a compass
display on the Driver Information
Center (DIC). The compass receives its
heading and other information from
the Global Positioning System (GPS)
antenna, StabiliTrak/Electronic
Stability Control (ESC), and vehicle
speed information.
The compass system is designed to
operate for a certain number of miles
or degrees of turn before needing a
signal from the GPS satellites. When
the compass display shows CAL, drive
the vehicle for a short distance in an
open area where it can receive a GPS
signal. The compass system will
automatically determine when a GPS
signal is restored and provide a
heading again.
Clock
The time and date for the clock can be
set using the infotainment system. See
“Time/Date ”in “System ”under
“Settings ”in the infotainment manual.
Power Outlets
The accessory power outlet can be
used to plug in electrical equipment,
such as a cell phone or MP3 player.
The vehicle has two accessory power
outlets: one on the lower center floor
console and one in the rear
cargo area.
Page 128 of 384
INSTRUMENTS AND CONTROLS 127
Transmission Fluid Temperature :
Shows the temperature of the
automatic transmission fluid in either
degrees Celsius (°C) or degrees
Fahrenheit (°F).
Off Road :Displays vehicle pitch and
roll information, road wheel angle,
and four-wheel drive (4WD) status.
Engine Boost : Displays engine
manifold pressure relative to ambient
air pressure. It will display boost
pressure generated by the
turbocharging system.
Info Page Options : Scroll to choose
which info pages appear on the DIC.
Press SEL to select or deselect.
Blank Page : Allows for no
information to be displayed in the
cluster info display areas.Head-Up Display (HUD)
{Warning
If the HUD image is too bright or
too high in your field of view, it
may take you more time to see
things you need to see when it is
dark outside. Be sure to keep the
HUD image dim and placed low in
your field of view.
If equipped with HUD, some
information concerning the operation
of the vehicle is projected onto the
windshield. The image is projected
through the HUD lens on top of the
instrument panel. The information
appears as an image focused out
toward the front of the vehicle.
Caution
If you try to use the HUD image as
a parking aid, you may misjudge
the distance and damage your
vehicle. Do not use the HUD image
as a parking aid. The HUD information can be
displayed in various languages. The
speedometer reading and other
numerical values can be displayed in
either English or metric units.
The language selection is changed
through the radio and the units of
measurement is changed through the
instrument cluster. See
Vehicle
Personalization 0131 and "Options"
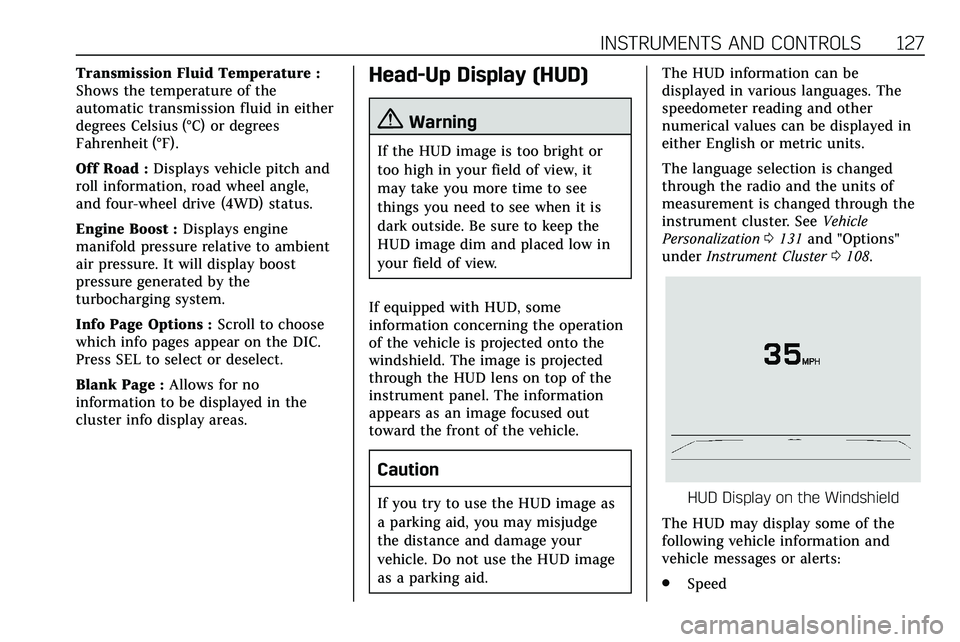
under Instrument Cluster 0108.HUD Display on the Windshield
The HUD may display some of the
following vehicle information and
vehicle messages or alerts:
. Speed
Page 144 of 384

LIGHTING 143
light outside when the vehicle leaves
the garage, there is a slight delay
before the automatic headlamp
system changes to the Daytime
Running Lamps (DRL). During that
delay, the instrument cluster may not
be as bright as usual. Make sure the
instrument panel brightness control is
in the full bright position. See
Instrument Panel Illumination Control
0144.
When it is bright enough outside, the
headlamps will turn off or may change
to DRL.
The automatic headlamp system turns
off when the exterior lamp control is
turned to
Oor the ignition is off.
For vehicles sold in Canada, this
control only works when the
transmission is in P (Park).
Lights On with Wipers
If the windshield wipers are activated
in daylight with the engine on, and
the exterior lamp control is in AUTO,
the headlamps, parking lamps, and
other exterior lamps come on. The
transition time for the lamps coming
on varies based on wiper speed. When the wipers are not operating, these
lamps turn off. Move the exterior
lamp control to
Oor;to disable
this feature.
Hazard Warning Flashers
|: Touch|on the center stack to
make the front and rear turn signal
lamps flash on and off. Touch again to
turn the flashers off.
The hazard warning flashers turn on
automatically if the airbags deploy.
Turn and Lane-Change
Signals
Move the lever all the way up or down
to signal a turn.
An arrow on the instrument cluster
flashes in the direction of the turn or
lane change.
Raise or lower the lever until the
arrow starts to flash to signal a lane
change. Hold it there until the lane
change is completed. If the lever is
briefly pressed and released, the turn
signal flashes three times.
The turn and lane-change signal can
be turned off manually by moving the
lever back to its original position.
Page 159 of 384
158 DRIVING AND OPERATING
Driving and
Operating
Driving Information
Driving for Better FuelEconomy . . . . . . . . . . . . . . . . . . . . . . . . 159
Distracted Driving . . . . . . . . . . . . . . . . 159
Defensive Driving . . . . . . . . . . . . . . . . 160
Drunk Driving . . . . . . . . . . . . . . . . . . . . 160
Control of a Vehicle . . . . . . . . . . . . . . 160
Braking . . . . . . . . . . . . . . . . . . . . . . . . . . . . 161
Steering . . . . . . . . . . . . . . . . . . . . . . . . . . . 161
Off-Road Recovery . . . . . . . . . . . . . . . . 162
Loss of Control . . . . . . . . . . . . . . . . . . . 162
Off-Road Driving . . . . . . . . . . . . . . . . . 163
Driving on Wet Roads . . . . . . . . . . . 167
Hill and Mountain Roads . . . . . . . . 168
Winter Driving . . . . . . . . . . . . . . . . . . . . 168
If the Vehicle Is Stuck . . . . . . . . . . . 170
Vehicle Load Limits . . . . . . . . . . . . . . 170
Starting and Operating
New Vehicle Break-In . . . . . . . . . . . . 174
Ignition Positions . . . . . . . . . . . . . . . . 174
Starting the Engine . . . . . . . . . . . . . . 176
Stop/Start System . . . . . . . . . . . . . . . . 177
Engine Heater . . . . . . . . . . . . . . . . . . . . 178 Retained Accessory
Power (RAP) . . . . . . . . . . . . . . . . . . . . 180
Shifting Into Park . . . . . . . . . . . . . . . . 180
Shifting out of Park . . . . . . . . . . . . . . 180
Parking over Things That Burn . . . . . . . . . . . . . . . . . . . . . . . 182
Active Fuel Management . . . . . . . . 182
Extended Parking . . . . . . . . . . . . . . . . . 183
Engine Exhaust
Engine Exhaust . . . . . . . . . . . . . . . . . . . 183
Running the Vehicle While Parked . . . . . . . . . . . . . . . . . . . . . . . . . . . 183
Automatic Transmission
Automatic Transmission . . . . . . . . . 184
Manual Mode . . . . . . . . . . . . . . . . . . . . . 188
Drive Systems
All-Wheel Drive . . . . . . . . . . . . . . . . . . 190
Brakes
Electric Brake Boost . . . . . . . . . . . . . . 190
Antilock Brake System (ABS) . . . . 190
Electric Parking Brake . . . . . . . . . . . . 191
Brake Assist . . . . . . . . . . . . . . . . . . . . . . . 192
Hill Start Assist (HSA) . . . . . . . . . . . 193
Ride Control Systems
Traction Control/ElectronicStability Control . . . . . . . . . . . . . . . . 193
Driver Mode Control . . . . . . . . . . . . . 195
Cruise Control
Cruise Control . . . . . . . . . . . . . . . . . . . . 196
Adaptive Cruise Control . . . . . . . . . 198
Driver Assistance Systems
Driver Assistance Systems . . . . . . . 207
Assistance Systems for Parking
or Backing . . . . . . . . . . . . . . . . . . . . . . . 208
Rear Pedestrian Alert . . . . . . . . . . . . 216
Assistance Systems for Driving . . . . . . . . . . . . . . . . . . . . . . . . . . 217
Forward Collision Alert (FCA) System . . . . . . . . . . . . . . . . . . . . . . . . . . 217
Automatic Emergency Braking (AEB) . . . . . . . . . . . . . . . . . . . 220
Front Pedestrian Braking (FPB) System . . . . . . . . . . . . . . . . . . . . . . . . . . 221
Night Vision System . . . . . . . . . . . . . 223
Side Blind Zone Alert (SBZA) . . . . 226
Lane Change Alert (LCA) . . . . . . . . 226
Lane Keep Assist (LKA) . . . . . . . . . . 228
Fuel
Top Tier Fuel . . . . . . . . . . . . . . . . . . . . . 230
Recommended Fuel (2.0L L4
Engine) . . . . . . . . . . . . . . . . . . . . . . . . . . 230
Recommended Fuel (3.6L V6 Engine) . . . . . . . . . . . . . . . . . . . . . . 230
Prohibited Fuels . . . . . . . . . . . . . . . . . . 231
Fuels in Foreign Countries . . . . . . . 231
Fuel Additives . . . . . . . . . . . . . . . . . . . . 231
Page 177 of 384
176 DRIVING AND OPERATING
continue until the engine starts. The
ignition will then remain on. See
Starting the Engine0176.
Service Mode
This mode is available to verify the
proper operation of the malfunction
indicator lamp as may be required for
emissions inspection purposes and for
service and diagnostics. See Automatic
Transmission 0184.
With the vehicle off, and the brake
pedal not applied, pressing and
holding ENGINE START/STOP for
more than five seconds will place the
vehicle in Service Mode. The
instruments and audio systems will
operate as they do in ON/RUN, but
the vehicle will not be able to be
driven. The engine will not start in
Service Mode. Press ENGINE START/
STOP again to turn the vehicle off.
Starting the Engine
Place the transmission in the proper
gear, P (Park) or N (Neutral). To restart
the engine when the vehicle is already
moving, use N (Neutral).
Caution
Do not try to shift to P (Park) if the
vehicle is moving. If you do, you
could damage the transmission.
Shift to P (Park) only when the
vehicle is stopped.
Caution
If you add electrical parts or
accessories, you could change the
way the engine operates. Any
resulting damage would not be
covered by the vehicle warranty. See
Add-On Electrical Equipment 0246.
To start the vehicle: 1. With the Keyless Access system, the RKE transmitter must be in
the vehicle. Press ENGINE
START/STOP with the brake
pedal applied. When the engine
begins cranking, let go of the
button. The idle speed will go down as the engine warms up.
Do not race the engine
immediately after starting it.
If the RKE transmitter is not in
the vehicle, if there is
interference, or if the RKE
battery is low, a Driver
Information Center (DIC)
message will display. See
Remote
Keyless Entry (RKE) System
Operation 010.Caution
Cranking the engine for long
periods of time, by pressing
ENGINE START/STOP immediately
after cranking has ended, can
overheat and damage the cranking
motor, and drain the battery. Wait
at least 15 seconds between each
try, to let the cranking motor
cool down.
2. If the engine does not start after five to 10 seconds, especially in
very cold weather (below −18 °C
or 0 °F), it could be flooded with
too much gasoline. Try pushing
Page 178 of 384
DRIVING AND OPERATING 177
the accelerator pedal all the way
to the floor and hold it there,
then press ENGINE START/STOP
for up to a maximum of
15 seconds. Wait at least
15 seconds between each try, to
allow the cranking motor to cool
down. When the engine starts,
let go of the button and the
accelerator. If the vehicle starts
briefly but then stops again, do
the same thing. This clears the
extra gasoline from the engine.
Do not race the engine
immediately after starting it.
Operate the engine and
transmission gently until the oil
warms up and lubricates all
moving parts.
Stop/Start System
The Stop/Start system will shut off
the engine to help conserve fuel.
It has components designed for the
increased number of starts.
{Warning
The automatic engine Stop/Start
feature causes the engine to shut
off while the vehicle is still on. Do
not exit the vehicle before shifting
to P (Park). The vehicle may restart
and move unexpectedly. Always
shift to P (Park), and then turn the
ignition off before exiting the
vehicle.
Auto Engine Stop/Start
When the brakes are applied and the
vehicle is at a complete stop, the
engine may turn off. When stopped,
the tachometer displays AUTO STOP.
See Tachometer 0111. When the brake
pedal is released or the accelerator
pedal is pressed, the engine will
restart.
To maintain vehicle performance,
other conditions may cause the engine
to automatically restart before the
brake pedal is released.
Auto Stops may not occur and/or Auto
Starts may occur because: .
The climate control settings
require the engine to be running
to cool or heat the vehicle interior.
. The vehicle battery charge is low.
. The vehicle battery has recently
been disconnected.
. Minimum vehicle speed has not
been reached since the last
Auto Stop.
. The accelerator pedal is pressed.
. The engine or transmission is not
at the required operating
temperature.
. The outside temperature is not in
the required operating range.
. The vehicle is in any gear other
than D (Drive).
. Driver modes have been selected.
. The vehicle is on a steep hill or
grade.
. The driver door has been opened
or the driver seat belt has been
unbuckled.
. The hood has been opened.
Page 181 of 384
180 DRIVING AND OPERATING
The length of time the heater should
remain plugged in depends on several
factors. Ask a dealer in the area where
you will be parking the vehicle for the
best advice on this.
Retained Accessory
Power (RAP)
When the ignition is turned from on
to off, the following features (if
equipped) will continue to function
for up to 10 minutes, or until the
driver door is opened. These features
will also work when the ignition is in
RUN or ACC/ACCESSORY:
.Infotainment System
. Power Windows (during RAP this
functionality will be lost when any
door is opened)
. Sunroof (during RAP this
functionality will be lost when any
door is opened)
. Auxiliary Power Outlet
. Audio System
. OnStar System
Shifting Into Park
To shift into P (Park):
1. Hold the brake pedal down and set the parking brake. See Electric
Parking Brake 0191.
2. Press the button on top of the shift lever to shift into P (Park).
See Automatic Transmission
0 184.
3. The P indicator on the shift lever will turn red when the vehicle is
in P (Park).
Leaving the Vehicle with the
Engine Running
{Warning
It can be dangerous to leave the
vehicle with the engine running.
It could overheat and catch fire.
It is dangerous to get out of the
vehicle if the vehicle is not in
P (Park) with the parking brake set.
The vehicle can roll.
(Continued)
Warning (Continued)
Do not leave the vehicle when the
engine is running. If you have left
the engine running, the vehicle can
move suddenly. You or others could
be injured. To be sure the vehicle
will not move, even when you are
on fairly level ground, always set
the parking brake and shift to
P (Park). SeeShifting Into Park 0180
. If you are towing a trailer, see
Driving Characteristics and Towing
Tips 0234.
If you have to leave the vehicle with
the engine running, be sure the
vehicle is in P (Park) and the parking
brake is set before you leave it.
If you are towing a trailer and parking
on a hill, see Driving Characteristics
and Towing Tips 0234.
Shifting out of Park
This vehicle is equipped with an
electronic transmission. The shift lock
release button is designed to prevent