engine overheat CADILLAC XT5 2020 Owner's Manual
[x] Cancel search | Manufacturer: CADILLAC, Model Year: 2020, Model line: XT5, Model: CADILLAC XT5 2020Pages: 384, PDF Size: 6.52 MB
Page 50 of 384
SEATS AND RESTRAINTS 49
.Power steering wheel, if equipped
Obstructions
If something has blocked the driver
seat and/or power steering wheel
while recalling a memory position, the
recall may stop. Remove the
obstruction and try the recall again.
If the memory position still does not
recall, see your dealer.
Heated and Ventilated
Front Seats
{Warning
If temperature change or pain to
the skin cannot be felt, the seat
heater may cause burns. To reduce
the risk of burns, use care when
using the seat heater, especially for
long periods of time. Do not place
anything on the seat that insulates
against heat, such as a blanket,
cushion, cover, or similar item. This
may cause the seat heater to (Continued)
Warning (Continued)
overheat. An overheated seat heater
may cause a burn or may damage
the seat.
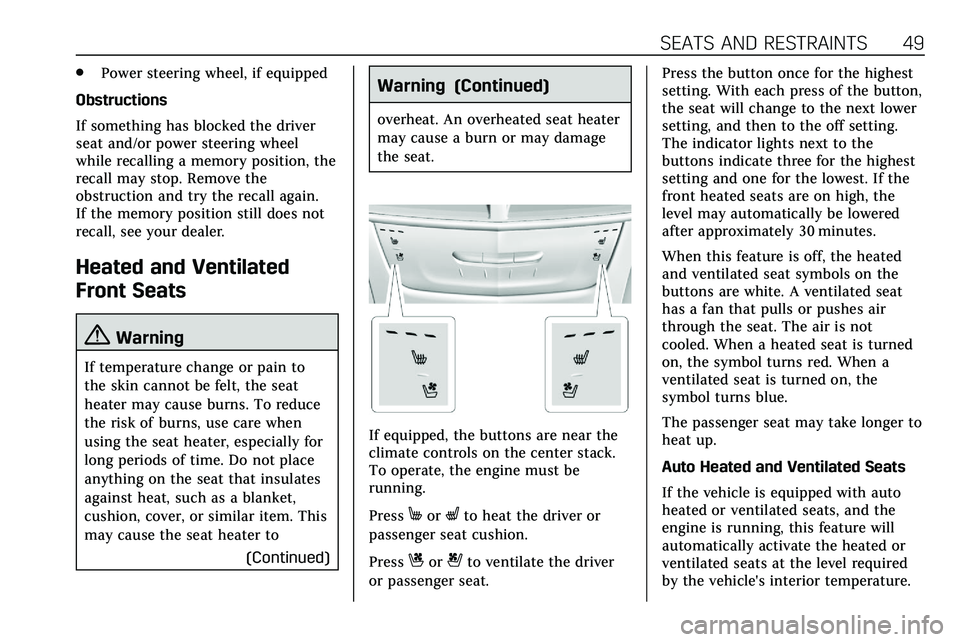
If equipped, the buttons are near the
climate controls on the center stack.
To operate, the engine must be
running.
Press
MorLto heat the driver or
passenger seat cushion.
Press
Cor{to ventilate the driver
or passenger seat. Press the button once for the highest
setting. With each press of the button,
the seat will change to the next lower
setting, and then to the off setting.
The indicator lights next to the
buttons indicate three for the highest
setting and one for the lowest. If the
front heated seats are on high, the
level may automatically be lowered
after approximately 30 minutes.
When this feature is off, the heated
and ventilated seat symbols on the
buttons are white. A ventilated seat
has a fan that pulls or pushes air
through the seat. The air is not
cooled. When a heated seat is turned
on, the symbol turns red. When a
ventilated seat is turned on, the
symbol turns blue.
The passenger seat may take longer to
heat up.
Auto Heated and Ventilated Seats
If the vehicle is equipped with auto
heated or ventilated seats, and the
engine is running, this feature will
automatically activate the heated or
ventilated seats at the level required
by the vehicle's interior temperature.
Page 122 of 384
INSTRUMENTS AND CONTROLS 121
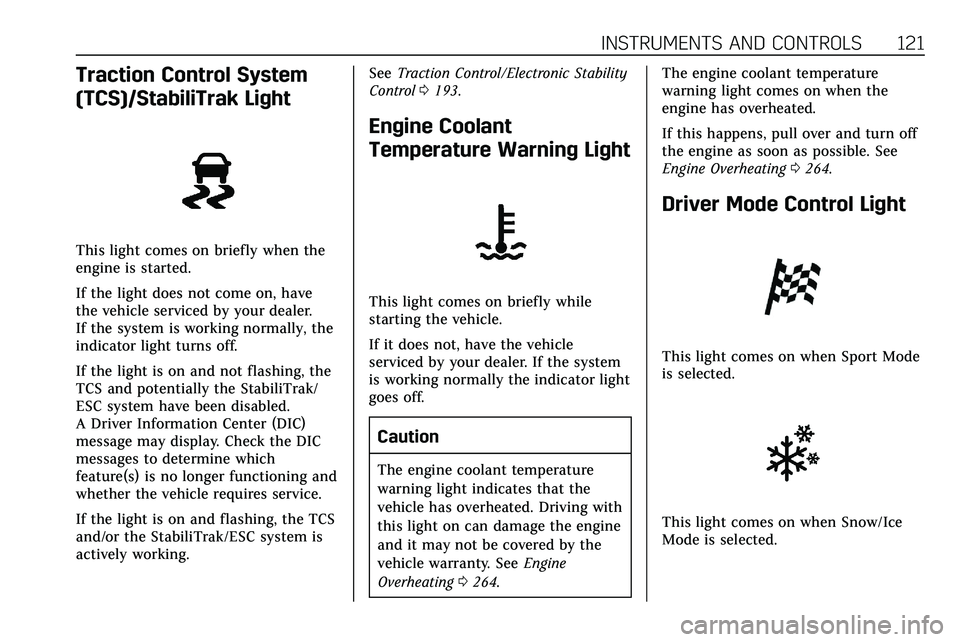
Traction Control System
(TCS)/StabiliTrak Light
This light comes on briefly when the
engine is started.
If the light does not come on, have
the vehicle serviced by your dealer.
If the system is working normally, the
indicator light turns off.
If the light is on and not flashing, the
TCS and potentially the StabiliTrak/
ESC system have been disabled.
A Driver Information Center (DIC)
message may display. Check the DIC
messages to determine which
feature(s) is no longer functioning and
whether the vehicle requires service.
If the light is on and flashing, the TCS
and/or the StabiliTrak/ESC system is
actively working.See
Traction Control/Electronic Stability
Control 0193.
Engine Coolant
Temperature Warning Light
This light comes on briefly while
starting the vehicle.
If it does not, have the vehicle
serviced by your dealer. If the system
is working normally the indicator light
goes off.
Caution
The engine coolant temperature
warning light indicates that the
vehicle has overheated. Driving with
this light on can damage the engine
and it may not be covered by the
vehicle warranty. See Engine
Overheating 0264. The engine coolant temperature
warning light comes on when the
engine has overheated.
If this happens, pull over and turn off
the engine as soon as possible. See
Engine Overheating
0264.
Driver Mode Control Light
This light comes on when Sport Mode
is selected.
This light comes on when Snow/Ice
Mode is selected.
Page 166 of 384
DRIVING AND OPERATING 165
.When possible, drive straight up
or down the hill.
. Slow down when approaching the
top of the hill.
. Use headlamps even during the
day to make the vehicle more
visible.
{Warning
Driving to the top of a hill at high
speed can cause a crash. There
could be a drop-off, embankment,
cliff, or even another vehicle. You
could be seriously injured or killed.
As you near the top of a hill, slow
down and stay alert.
. Never go downhill forward or
backward with the transmission in
N (Neutral). The brakes could
overheat and you could lose
control.
. When driving down a hill, keep
the vehicle headed straight down.
Use a low gear because the engine will work with the brakes to slow
the vehicle and help keep the
vehicle under control.
{Warning
Heavy braking when going down a
hill can cause your brakes to
overheat and fade. This could cause
loss of control and you or others
could be injured or killed. Apply the
brakes lightly when descending a
hill and use a low gear to keep
vehicle speed under control.
If the vehicle stalls on a hill: 1. Apply the brakes to stop the vehicle, and then apply the
parking brake.
2. Shift into P (Park) and then restart the engine.
.If driving uphill when the
vehicle stalls, shift to
R (Reverse), release the
parking brake, and back
straight down. .
Never try to turn the vehicle
around. If the hill is steep
enough to stall the vehicle, it
is steep enough to cause it to
roll over.
. If you cannot make it up the
hill, back straight down
the hill.
. Never back down a hill in
N (Neutral) using only the
brake.
. The vehicle can roll backward
quickly and you could lose
control.
. If driving downhill when the
vehicle stalls, shift to a lower
gear, release the parking
brake, and drive straight
down the hill.
3. If the vehicle cannot be restarted after stalling, set the parking
brake, shift into P (Park), and
turn the vehicle off.
3.1. Leave the vehicle and seek help.
Page 169 of 384
168 DRIVING AND OPERATING
and you are going fast enough. When
the vehicle is hydroplaning, it has
little or no contact with the road.
There is no hard and fast rule about
hydroplaning. The best advice is to
slow down when the road is wet.
Other Rainy Weather Tips
Besides slowing down, other wet
weather driving tips include:
.Allow extra following distance.
. Pass with caution.
. Keep windshield wiping equipment
in good shape.
. Keep the windshield washer fluid
reservoir filled.
. Have good tires with proper tread
depth. See Tires0282.
. Turn off cruise control.
Hill and Mountain Roads
Driving on steep hills or through
mountains is different than driving on
flat or rolling terrain. Tips include:
.
Keep the vehicle serviced and in
good shape. .
Check all fluid levels, brakes, tires,
cooling system, and transmission.
. Shift to a lower gear when going
down steep or long hills.
{Warning
Using the brakes to slow the vehicle
on a long downhill slope can cause
brake overheating, can reduce brake
performance, and could result in a
loss of braking. Shift the
transmission to a lower gear to let
the engine assist the brakes on a
steep downhill slope.
{Warning
Coasting downhill in N (Neutral) or
with the ignition off is dangerous.
This can cause overheating of the
brakes and loss of steering assist.
Always have the engine running
and the vehicle in gear. .
Drive at speeds that keep the
vehicle in its own lane. Do not
swing wide or cross the
center line.
. Be alert on top of hills; something
could be in your lane (e.g., stalled
car, crash).
. Pay attention to special road signs
(e.g., falling rocks area, winding
roads, long grades, passing or
no-passing zones) and take
appropriate action.
Winter Driving
Driving on Snow or Ice
Snow or ice between the tires and the
road creates less traction or grip, so
drive carefully. Wet ice can occur at
about 0 °C (32 °F) when freezing rain
begins to fall. Avoid driving on wet ice
or in freezing rain until roads can be
treated.
For Slippery Road Driving:
.
Accelerate gently. Accelerating too
quickly causes the wheels to spin
and makes the surface under the
tires slick.
Page 171 of 384

170 DRIVING AND OPERATING
This keeps the battery charged to
restart the vehicle and to signal for
help with the headlamps. Do this as
little as possible, to save fuel.
If the Vehicle Is Stuck
Slowly and cautiously spin the wheels
to free the vehicle when stuck in sand,
mud, ice, or snow.
If stuck too severely for the traction
system to free the vehicle, turn the
traction system off and use the
rocking method. SeeTraction Control/
Electronic Stability Control 0193.
{Warning
If the vehicle's tires spin at high
speed, they can explode, and you or
others could be injured. The vehicle
can overheat, causing an engine
compartment fire or other damage.
Spin the wheels as little as possible
and avoid going above 56 km/h
(35 mph). For All-Wheel Drive (AWD), select
Off-Road or AWD mode. See
Driver
Mode Control 0195 and
All-Wheel Drive 0190.
Rocking the Vehicle to Get it Out
Turn the steering wheel left and right
to clear the area around the front
wheels. Turn off any traction system.
Shift back and forth between
R (Reverse) and a low forward gear,
spinning the wheels as little as
possible. To prevent transmission
wear, wait until the wheels stop
spinning before shifting gears. Release
the accelerator pedal while shifting,
and press lightly on the accelerator
pedal when the transmission is in
gear. Slowly spinning the wheels in
the forward and reverse directions
causes a rocking motion that could
free the vehicle. If that does not get
the vehicle out after a few tries, it
might need to be towed out. If the
vehicle does need to be towed out, see
Towing the Vehicle 0319.
Vehicle Load Limits
It is very important to know how
much weight the vehicle can carry.
This weight is called the vehicle
capacity weight and includes the
weight of all occupants, cargo, and
all nonfactory-installed options.
Two labels on the vehicle may
show how much weight it may
properly carry, the Tire and
Loading Information label and the
Certification/Tire label.
{Warning
Do not load the vehicle any
heavier than the Gross Vehicle
Weight Rating (GVWR),
or either the maximum front or
rear Gross Axle Weight Rating
(GAWR). This can cause
systems to break and change
the way the vehicle handles.
This could cause loss of control
and a crash. Overloading can
(Continued)
Page 177 of 384
176 DRIVING AND OPERATING
continue until the engine starts. The
ignition will then remain on. See
Starting the Engine0176.
Service Mode
This mode is available to verify the
proper operation of the malfunction
indicator lamp as may be required for
emissions inspection purposes and for
service and diagnostics. See Automatic
Transmission 0184.
With the vehicle off, and the brake
pedal not applied, pressing and
holding ENGINE START/STOP for
more than five seconds will place the
vehicle in Service Mode. The
instruments and audio systems will
operate as they do in ON/RUN, but
the vehicle will not be able to be
driven. The engine will not start in
Service Mode. Press ENGINE START/
STOP again to turn the vehicle off.
Starting the Engine
Place the transmission in the proper
gear, P (Park) or N (Neutral). To restart
the engine when the vehicle is already
moving, use N (Neutral).
Caution
Do not try to shift to P (Park) if the
vehicle is moving. If you do, you
could damage the transmission.
Shift to P (Park) only when the
vehicle is stopped.
Caution
If you add electrical parts or
accessories, you could change the
way the engine operates. Any
resulting damage would not be
covered by the vehicle warranty. See
Add-On Electrical Equipment 0246.
To start the vehicle: 1. With the Keyless Access system, the RKE transmitter must be in
the vehicle. Press ENGINE
START/STOP with the brake
pedal applied. When the engine
begins cranking, let go of the
button. The idle speed will go down as the engine warms up.
Do not race the engine
immediately after starting it.
If the RKE transmitter is not in
the vehicle, if there is
interference, or if the RKE
battery is low, a Driver
Information Center (DIC)
message will display. See
Remote
Keyless Entry (RKE) System
Operation 010.Caution
Cranking the engine for long
periods of time, by pressing
ENGINE START/STOP immediately
after cranking has ended, can
overheat and damage the cranking
motor, and drain the battery. Wait
at least 15 seconds between each
try, to let the cranking motor
cool down.
2. If the engine does not start after five to 10 seconds, especially in
very cold weather (below −18 °C
or 0 °F), it could be flooded with
too much gasoline. Try pushing
Page 180 of 384
DRIVING AND OPERATING 179
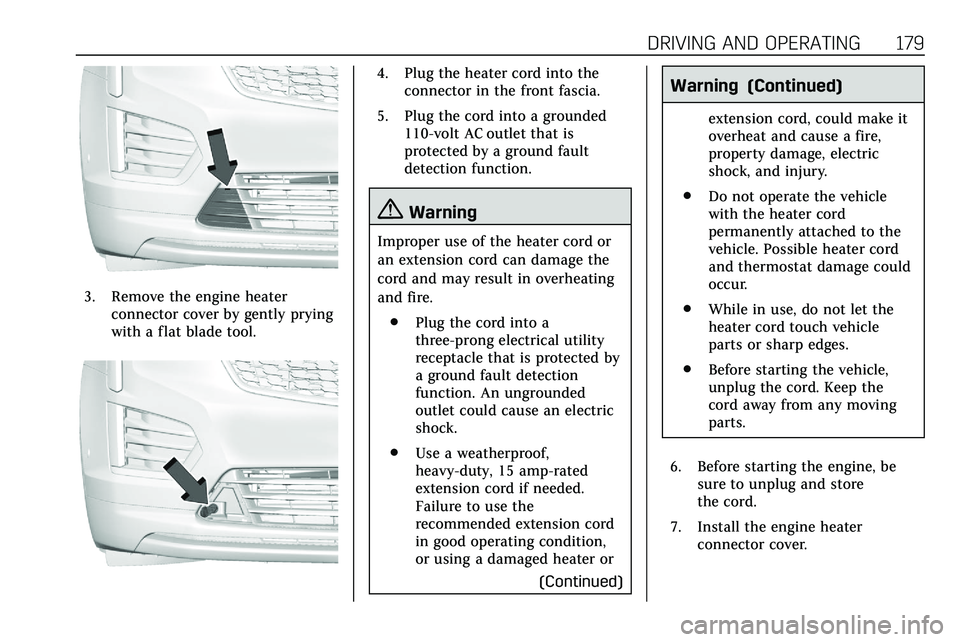
3. Remove the engine heaterconnector cover by gently prying
with a flat blade tool.
4. Plug the heater cord into theconnector in the front fascia.
5. Plug the cord into a grounded 110-volt AC outlet that is
protected by a ground fault
detection function.
{Warning
Improper use of the heater cord or
an extension cord can damage the
cord and may result in overheating
and fire.
. Plug the cord into a
three-prong electrical utility
receptacle that is protected by
a ground fault detection
function. An ungrounded
outlet could cause an electric
shock.
. Use a weatherproof,
heavy-duty, 15 amp-rated
extension cord if needed.
Failure to use the
recommended extension cord
in good operating condition,
or using a damaged heater or
(Continued)
Warning (Continued)
extension cord, could make it
overheat and cause a fire,
property damage, electric
shock, and injury.
. Do not operate the vehicle
with the heater cord
permanently attached to the
vehicle. Possible heater cord
and thermostat damage could
occur.
. While in use, do not let the
heater cord touch vehicle
parts or sharp edges.
. Before starting the vehicle,
unplug the cord. Keep the
cord away from any moving
parts.
6. Before starting the engine, be sure to unplug and store
the cord.
7. Install the engine heater connector cover.
Page 181 of 384
180 DRIVING AND OPERATING
The length of time the heater should
remain plugged in depends on several
factors. Ask a dealer in the area where
you will be parking the vehicle for the
best advice on this.
Retained Accessory
Power (RAP)
When the ignition is turned from on
to off, the following features (if
equipped) will continue to function
for up to 10 minutes, or until the
driver door is opened. These features
will also work when the ignition is in
RUN or ACC/ACCESSORY:
.Infotainment System
. Power Windows (during RAP this
functionality will be lost when any
door is opened)
. Sunroof (during RAP this
functionality will be lost when any
door is opened)
. Auxiliary Power Outlet
. Audio System
. OnStar System
Shifting Into Park
To shift into P (Park):
1. Hold the brake pedal down and set the parking brake. See Electric
Parking Brake 0191.
2. Press the button on top of the shift lever to shift into P (Park).
See Automatic Transmission
0 184.
3. The P indicator on the shift lever will turn red when the vehicle is
in P (Park).
Leaving the Vehicle with the
Engine Running
{Warning
It can be dangerous to leave the
vehicle with the engine running.
It could overheat and catch fire.
It is dangerous to get out of the
vehicle if the vehicle is not in
P (Park) with the parking brake set.
The vehicle can roll.
(Continued)
Warning (Continued)
Do not leave the vehicle when the
engine is running. If you have left
the engine running, the vehicle can
move suddenly. You or others could
be injured. To be sure the vehicle
will not move, even when you are
on fairly level ground, always set
the parking brake and shift to
P (Park). SeeShifting Into Park 0180
. If you are towing a trailer, see
Driving Characteristics and Towing
Tips 0234.
If you have to leave the vehicle with
the engine running, be sure the
vehicle is in P (Park) and the parking
brake is set before you leave it.
If you are towing a trailer and parking
on a hill, see Driving Characteristics
and Towing Tips 0234.
Shifting out of Park
This vehicle is equipped with an
electronic transmission. The shift lock
release button is designed to prevent
Page 237 of 384
236 DRIVING AND OPERATING
the trailer, which mainly occurs
during cornering. This is normal when
towing heavier trailers.
Following Distance
Stay at least twice as far behind the
vehicle ahead as you would when
driving without a trailer. This can help
to avoid heavy braking and sudden
turns.
Passing
More passing distance is needed when
towing a trailer. The combination will
not accelerate as quickly and is much
longer so it is necessary to go much
farther beyond the passed vehicle
before returning to the lane. Pass on
level roadways. Avoid passing on hills
if possible.
Backing Up
Hold the bottom of the steering wheel
with one hand. To move the trailer to
the left, move that hand to the left. To
move the trailer to the right, move
that hand to the right. Always back up
slowly and, if possible, have someone
guide you.
Making TurnsCaution
Turn more slowly and make wider
arcs when towing a trailer to
prevent damage to your vehicle.
Making very sharp turns could
cause the trailer to contact the
vehicle.
Make wider turns than normal when
towing, so trailer will not go over soft
shoulders, over curbs, or strike road
signs, trees, or other objects. Always
signal turns well in advance. Do not
steer or brake suddenly.
Driving on Grades
Reduce speed and shift to a lower gear
before starting down a long or steep
downhill grade. If the transmission is
not shifted down, the brakes may
overheat and result in reduced braking
efficiency.
The vehicle can tow in D (Drive). Shift
the transmission to a lower gear if the
transmission shifts too often under
heavy loads and/or hilly conditions. When towing at higher altitudes,
engine coolant will boil at a lower
temperature than at lower altitudes.
If the engine is turned off immediately
after towing at high altitude on steep
uphill grades, the vehicle could show
signs similar to engine overheating. To
avoid this, let the engine run,
preferably on level ground, with the
transmission in P (Park) for a few
minutes before turning the engine off.
If the overheat warning comes on, see
Engine Overheating
0264.
Parking on Hills
{Warning
To prevent serious injury or death,
always park your vehicle and trailer
on a level surface when possible.
When parking your vehicle and your
trailer on a hill: 1. Press the brake pedal, but do not shift into P (Park) yet. Turn the
wheels into the curb if facing
downhill or into traffic if facing
uphill.
Page 238 of 384
DRIVING AND OPERATING 237
2. Have someone place chocksunder the trailer wheels.
3. When the wheel chocks are in place, gradually release the brake
pedal to allow the chocks to
absorb the load of the trailer.
4. Reapply the brake pedal. Then apply the parking brake and shift
into P (Park).
5. Release the brake pedal.
Leaving After Parking on a Hill
1. Apply and hold the brake pedal. .Start the engine.
. Shift into a gear.
. Release the parking brake.
2. Let up on the brake pedal.
3. Drive slowly until the trailer is clear of the chocks.
4. Stop and have someone pick up and store the chocks.
Maintenance When Trailer
Towing
The vehicle needs service more often
when used to tow trailers. See
Maintenance Schedule 0332. It is
especially important to check the
engine oil, axle lubricant, belts,
cooling system, and brake system
before and during each trip.
Check periodically that all nuts and
bolts on the trailer hitch are tight.
Engine Cooling When Trailer
Towing
The cooling system may temporarily
overheat during severe operating
conditions. See Engine Overheating
0 264.
Trailer Towing
Caution
Towing a trailer improperly can
damage the vehicle and result in
costly repairs not covered by the
vehicle warranty. To tow a trailer
(Continued)
Caution (Continued)
correctly, follow the directions in
this section and see your dealer for
important information about
towing a trailer with the vehicle.
Trailer Weight
{Warning
Never exceed the towing capacity
for your vehicle.
Safe trailering requires monitoring the
weight, speed, altitude, road grades,
outside temperature, dimensions of
the front of the trailer, and how
frequently the vehicle is used to tow a
trailer.
Trailer Weight Ratings
When towing a trailer, the combined
weight of the vehicle, vehicle contents,
trailer, and trailer contents must be
below all of the maximum weight
ratings for the vehicle, including: