tow CADILLAC XT5 2020 Owner's Manual
[x] Cancel search | Manufacturer: CADILLAC, Model Year: 2020, Model line: XT5, Model: CADILLAC XT5 2020Pages: 384, PDF Size: 6.52 MB
Page 35 of 384
34 KEYS, DOORS, AND WINDOWS
Memory Mirrors
The vehicle may have memory
mirrors. SeeMemory Seats 046.
Side Blind Zone Alert (SBZA)
The vehicle may have SBZA. See Side
Blind Zone Alert (SBZA) 0226.
Lane Change Alert (LCA)
The vehicle may have LCA. See Lane
Change Alert (LCA) 0226.
Turn Signal Indicator
The vehicle may have a turn signal
indicator lamp built into the mirror
housing. The turn signal lamp flashes
when the turn signals or hazard
flashers are used.
Puddle Light
The vehicle may have a puddle light
on the mirror housings. The light will
illuminate the ground when the door
is opened.Folding Mirrors
Manual Folding Mirrors
If equipped, manually fold the mirrors
inward toward the vehicle to prevent
damage when going through an
automatic car wash. Push the mirror
outward to return it to the original
position.
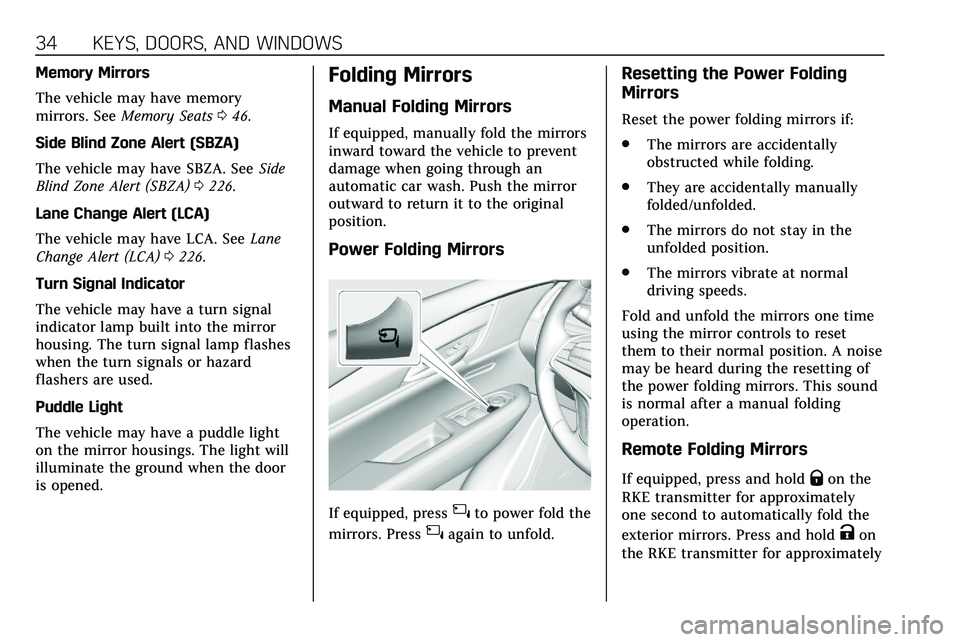
Power Folding Mirrors
If equipped, press{to power fold the
mirrors. Press
{again to unfold.
Resetting the Power Folding
Mirrors
Reset the power folding mirrors if:
. The mirrors are accidentally
obstructed while folding.
. They are accidentally manually
folded/unfolded.
. The mirrors do not stay in the
unfolded position.
. The mirrors vibrate at normal
driving speeds.
Fold and unfold the mirrors one time
using the mirror controls to reset
them to their normal position. A noise
may be heard during the resetting of
the power folding mirrors. This sound
is normal after a manual folding
operation.
Remote Folding Mirrors
If equipped, press and holdQon the
RKE transmitter for approximately
one second to automatically fold the
exterior mirrors. Press and hold
Kon
the RKE transmitter for approximately
Page 36 of 384
KEYS, DOORS, AND WINDOWS 35
one second to unfold. SeeRemote
Keyless Entry (RKE) System Operation
0 10.
This feature is turned on or off
through vehicle personalization. See
Vehicle Personalization 0131.
Heated Mirrors
K:Press to heat the mirrors.
See “Rear Window Defogger” under
Dual Automatic Climate Control System
0 148.
Automatic Dimming Mirror
If the vehicle has the automatic
dimming mirror, the driver outside
mirror automatically adjusts for the
glare of headlamps behind you.
Reverse Tilt Mirrors
If equipped with memory seats, the
passenger and/or driver mirror tilts to
a preselected position when the
vehicle is in R (Reverse). This allows
the curb to be seen when parallel
parking. The mirror(s) return to the original
position when:
.
The vehicle is shifted out of
R (Reverse), or remains in
R (Reverse) for about 30 seconds.
. The ignition is turned off.
. The vehicle is driven in
R (Reverse) above a set speed.
To turn this feature on or off, see
Vehicle Personalization 0131.
Interior Mirrors
Interior Rearview Mirrors
Adjust the rearview mirror for a clear
view of the area behind the vehicle.
Do not spray glass cleaner directly on
the mirror. Use a soft towel dampened
with water.
Manual Rearview Mirror
Push the tab forward for daytime use
and pull it rearward for nighttime use
to avoid glare of the headlamps from
behind.
Automatic Dimming
Rearview Mirror
If equipped, automatic dimming
reduces the glare of headlamps from
behind. The dimming feature comes
on when the vehicle is started.
Rear Camera Mirror
If equipped, this automatic dimming
mirror provides a wide angle camera
view of the area behind the vehicle.
Page 52 of 384
SEATS AND RESTRAINTS 51
vehicle through the rear door and left
the vehicle without the vehicle being
shut off.
The feature can be turned on or off.
SeeVehicle Personalization 0131.
Rear Seat Adjustment
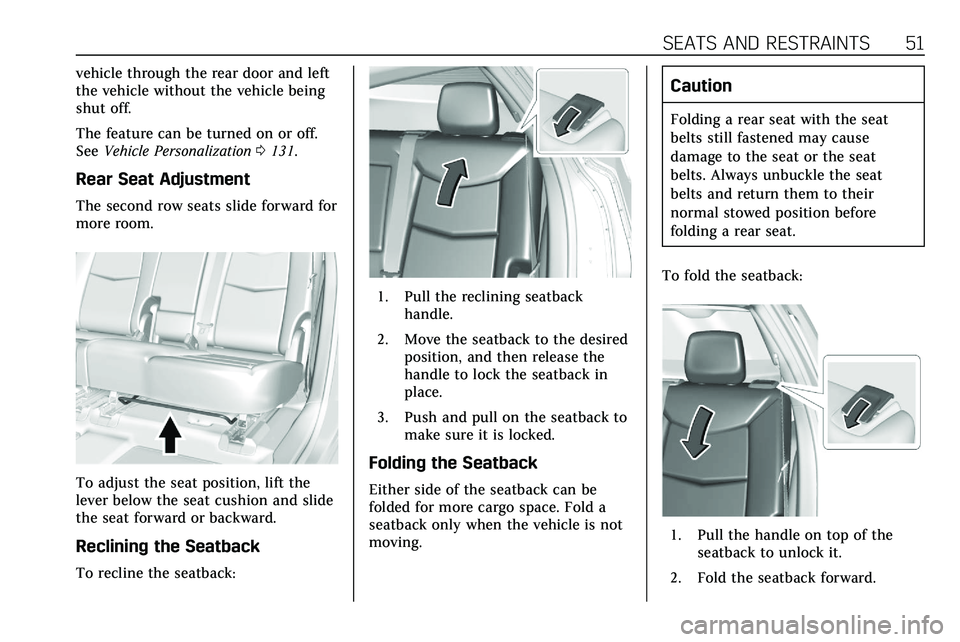
The second row seats slide forward for
more room.
To adjust the seat position, lift the
lever below the seat cushion and slide
the seat forward or backward.
Reclining the Seatback
To recline the seatback:
1. Pull the reclining seatback
handle.
2. Move the seatback to the desired position, and then release the
handle to lock the seatback in
place.
3. Push and pull on the seatback to make sure it is locked.
Folding the Seatback
Either side of the seatback can be
folded for more cargo space. Fold a
seatback only when the vehicle is not
moving.
Caution
Folding a rear seat with the seat
belts still fastened may cause
damage to the seat or the seat
belts. Always unbuckle the seat
belts and return them to their
normal stowed position before
folding a rear seat.
To fold the seatback:
1. Pull the handle on top of the seatback to unlock it.
2. Fold the seatback forward.
Page 58 of 384

SEATS AND RESTRAINTS 57
2. Pick up the latch plate and pullthe belt across you. Do not let it
get twisted.
The lap-shoulder belt may lock if
you pull the belt across you very
quickly. If this happens, let the
belt go back slightly to unlock it.
Then pull the belt across you
more slowly.
If the shoulder portion of a
passenger belt is pulled out all
the way, the child restraint
locking feature may be engaged.
See Child Restraint Systems 077.
If this occurs, let the belt go back
all the way and start again. If the
locking feature stays engaged after letting the belt go back to
stowed position on the seat,
move the seat rearward or recline
the seat until the shoulder belt
retractor lock releases.
Engaging the child restraint
locking feature in the front
outboard seating position may
affect the passenger sensing
system. See
Passenger Sensing
System 067.
If the webbing locks in the latch
plate before it reaches the
buckle, tilt the latch plate flat to
unlock.
3. Push the latch plate into the
buckle until it clicks.
Pull up on the latch plate to
make sure it is secure. If the belt
is not long enough, see Seat Belt
Extender 060.
Position the release button on
the buckle so that the seat belt
could be quickly unbuckled if
necessary.
4. If equipped with a shoulder belt height adjuster, move it to the
height that is right for you. See
“Shoulder Belt Height Adjuster”
Page 59 of 384

58 SEATS AND RESTRAINTS
later in this section for
instructions on use and
important safety information.
5. To make the lap part tight, pullup on the shoulder belt.
To unlatch the belt, push the button
on the buckle. The belt should return
to its stowed position.
Always stow the seat belt slowly. If the
seat belt webbing returns quickly to
the stowed position, the retractor may
lock and cannot be pulled out. If this
happens, pull the seat belt straight out
firmly to unlock the webbing, and
then release it. If the webbing is still
locked in the retractor, see your
dealer.
Before a door is closed, be sure the
seat belt is out of the way. If a door is
slammed against a seat belt, damage
can occur to both the seat belt and
the vehicle.
Shoulder Belt Height Adjuster
The vehicle has a shoulder belt height
adjuster for the driver and front
outboard passenger seating positions.
Adjust the height so that the shoulder
portion of the belt is on the shoulder
and not falling off of it. The belt
should be close to, but not contacting,
the neck. Improper shoulder belt
height adjustment could reduce the
effectiveness of the seat belt in a
crash. See How to Wear Seat Belts
Properly 054.
Press and hold the release button
while raising or lowering the height
adjuster to the desired position.
Page 66 of 384

SEATS AND RESTRAINTS 65
Frontal airbags may inflate at
different crash speeds depending on
whether the vehicle hits an object
straight on or at an angle, and
whether the object is fixed or moving,
rigid or deformable, narrow or wide.
Frontal airbags are not intended to
inflate during vehicle rollovers, in rear
impacts, or in many side impacts.
In addition, the vehicle has advanced
technology frontal airbags. Advanced
technology frontal airbags adjust the
restraint according to either crash
severity or occupant interaction.
Knee airbags are designed to inflate in
moderate to severe frontal or near
frontal impacts. Knee airbags are not
designed to inflate during vehicle
rollovers, in rear impacts, or in many
side impacts.
Seat-mounted side impact airbags are
designed to inflate in moderate to
severe side crashes, depending on the
location of the impact. These airbags
are also designed to inflate in some
moderate to severe frontal or
near-frontal impacts that could result
in the occupant moving toward the
side of the vehicle. Seat-mounted sideimpact airbags are not designed to
inflate in rollovers, or rear impacts.
A seat-mounted side impact airbag is
designed to inflate on the side of the
vehicle that is struck.
Roof-rail airbags are designed to
inflate in moderate to severe side
crashes depending on the location of
the impact. In addition, these roof-rail
airbags are designed to inflate during
a rollover or in a severe frontal
impact. Roof-rail airbags are not
designed to inflate in rear impacts.
Both roof-rail airbags will inflate when
either side of the vehicle is struck,
if the sensing system predicts that the
vehicle is about to roll over on its
side, or in a severe frontal impact.
In any particular crash, no one can
say whether an airbag should have
inflated simply because of the vehicle
damage or repair costs.
What Makes an Airbag
Inflate?
In a deployment event, the sensing
system sends an electrical signal
triggering a release of gas from the
inflator. Gas from the inflator fills the
airbag causing the bag to break out of
the cover. The inflator, the airbag, and
related hardware are all part of the
airbag module.
For airbag locations, see
Where Are the
Airbags? 063.
How Does an Airbag
Restrain?
In moderate to severe frontal or near
frontal collisions, even belted
occupants can contact the steering
wheel or the instrument panel. In
moderate to severe side collisions,
even belted occupants can contact the
inside of the vehicle.
Airbags supplement the protection
provided by seat belts by distributing
the force of the impact more evenly
over the occupant's body.
Rollover capable roof-rail airbags are
designed to help contain the head and
chest of occupants in the outboard
seating positions in the first and
second rows. The rollover capable
roof-rail airbags are designed to help
reduce the risk of full or partial
Page 67 of 384

66 SEATS AND RESTRAINTS
ejection in rollover events, although
no system can prevent all such
ejections.
But airbags would not help in many
types of collisions, primarily because
the occupant's motion is not toward
those airbags. SeeWhen Should an
Airbag Inflate? 064.
Airbags should never be regarded as
anything more than a supplement to
seat belts.
What Will You See after an
Airbag Inflates?
After frontal, knee, and seat-mounted
side impact airbags inflate, they
quickly deflate, so quickly that some
people may not even realize the
airbags inflated. Roof-rail airbags may
still be at least partially inflated for
some time after they inflate. Some
components of the airbag module may
be hot for several minutes. For
location of the airbags, see Where Are
the Airbags? 063.
The parts of the airbag that come into
contact with you may be warm, but
not too hot to touch. There may be some smoke and dust coming from
the vents in the deflated airbags.
Airbag inflation does not prevent the
driver from seeing out of the
windshield or being able to steer the
vehicle, nor does it prevent people
from leaving the vehicle.
{Warning
When an airbag inflates, there may
be dust in the air. This dust could
cause breathing problems for
people with a history of asthma or
other breathing trouble. To avoid
this, everyone in the vehicle should
get out as soon as it is safe to do
so. If you have breathing problems
but cannot get out of the vehicle
after an airbag inflates, then get
fresh air by opening a window or a
door. If you experience breathing
problems following an airbag
deployment, you should seek
medical attention.
The vehicle has a feature that may
automatically unlock the doors, turn
on the interior lamps and hazard warning flashers, and shut off the fuel
system after the airbags inflate. The
feature may also activate, without
airbag inflation, after an event that
exceeds a predetermined threshold.
After turning the ignition off and then
on again, the fuel system will return
to normal operation; the doors can be
locked, the interior lamps can be
turned off, and the hazard warning
flashers can be turned off using the
controls for those features. If any of
these systems are damaged in the
crash they may not operate as normal.
{Warning
A crash severe enough to inflate the
airbags may have also damaged
important functions in the vehicle,
such as the fuel system, brake and
steering systems, etc. Even if the
vehicle appears to be drivable after
a moderate crash, there may be
concealed damage that could make
it difficult to safely operate the
vehicle.
(Continued)
Page 72 of 384
SEATS AND RESTRAINTS 71
A thick layer of additional material,
such as a blanket or cushion,
or aftermarket equipment such as seat
covers, seat heaters, and seat
massagers can affect how well the
passenger sensing system operates.
We recommend that you not use seat
covers or other aftermarket equipment
except when approved by GM for your
specific vehicle. SeeAdding Equipment
to the Airbag-Equipped Vehicle 071 for
more information about modifications
that can affect how the system
operates.
The ON indicator may be lit if an
object, such as a briefcase, handbag,
grocery bag, laptop, or other electronic
device, is put on an unoccupied seat.
If this is not desired, remove the
object from the seat.
{Warning
Stowing articles under the
passenger seat or between the
passenger seat cushion and
seatback may interfere with the
proper operation of the passenger
sensing system.
Servicing the
Airbag-Equipped Vehicle
Airbags affect how the vehicle should
be serviced. There are parts of the
airbag system in several places around
the vehicle. Your dealer and the
service manual have information
about servicing the vehicle and the
airbag system. To purchase a service
manual, see Publication Ordering
Information 0358.
{Warning
For up to 10 seconds after the
vehicle is turned off and the battery
is disconnected, an airbag can still
inflate during improper service. You
can be injured if you are close to an
airbag when it inflates. Avoid
yellow connectors. They are
probably part of the airbag system.
Be sure to follow proper service
procedures, and make sure the
person performing work for you is
qualified to do so.
Adding Equipment to the
Airbag-Equipped Vehicle
Adding accessories that change the
vehicle's frame, bumper system,
height, front end, or side sheet metal
may keep the airbag system from
working properly.
The operation of the airbag system
can also be affected by changing,
including improperly repairing or
replacing, any parts of the following:
.
Airbag system, including airbag
modules, front or side impact
sensors, sensing and diagnostic
module, or airbag wiring
. Front seats, including stitching,
seams or zippers
. Seat belts
. Steering wheel, instrument panel,
overhead console, ceiling trim,
or pillar garnish trim
. Inner door seals, including
speakers
Your dealer and the service manual
have information about the location of
the airbag modules and sensors,
Page 85 of 384
84 SEATS AND RESTRAINTS
Warning (Continued)
restraint to a single anchor could
cause the anchor or attachment to
come loose or even break during a
crash. A child or others could be
injured.
{Warning
Children can be seriously injured or
strangled if a shoulder belt is
wrapped around their neck. The
shoulder belt can tighten but
cannot be loosened if it is locked.
The shoulder belt locks when it is
pulled all the way out of the
retractor. It unlocks when the
shoulder belt is allowed to go all
the way back into the retractor, but
it cannot do this if it is wrapped
around a child’s neck. If the
shoulder belt is locked and(Continued)
Warning (Continued)
tightened around a child’s neck, the
only way to loosen the belt is to
cut it.
Buckle any unused seat belts
behind the child restraint so
children cannot reach them. Pull
the shoulder belt all the way out of
the retractor to set the lock, and
tighten the belt behind the child
restraint after the child restraint
has been installed.
Caution
Do not let the LATCH attachments
rub against the vehicle’s seat belts.
This may damage these parts.
If necessary, move buckled seat
belts to avoid rubbing the LATCH
attachments.(Continued)
Caution (Continued)
Do not fold the rear seatback when
the seat is occupied. Do not fold the
empty rear seat with a seat belt
buckled. This could damage the
seat belt or the seat. Unbuckle and
return the seat belt to its stowed
position, before folding the seat.
Do not attach more than one child
restraint to a single anchor. Attaching
more than one child restraint to a
single anchor could cause the anchor
or attachment to come loose or even
break during a crash. A child or others
could be injured. To reduce the risk of
serious or fatal injuries during a crash,
attach only one child restraint per
anchor.
If you need to secure more than one
child restraint in the rear seat, see
Where to Put the Restraint 079.
1. Attach and tighten the lower attachments to the lower
anchors. If the child restraint
does not have lower attachments
or the desired seating position
Page 89 of 384

88 SEATS AND RESTRAINTS
5. To tighten the belt, push downon the child restraint, pull the
shoulder portion of the belt to
tighten the lap portion of the
belt, and feed the shoulder belt
back into the retractor. When
installing a forward-facing child
restraint, it may be helpful to use
your knee to push down on the
child restraint as you tighten
the belt.
Try to pull the belt out of the
retractor to make sure the
retractor is locked. If the
retractor is not locked, repeat
Steps 4 and 5. 6. If the child restraint has a top
tether, follow the child restraint
manufacturer's instructions
regarding the use of the top
tether. See Lower Anchors and
Tethers for Children (LATCH
System) 080.
7. Before placing a child in the child restraint, make sure it is
securely held in place. To check,
grasp the child restraint at the
seat belt path and attempt to
move it side to side and back
and forth. When the child
restraint is properly installed,
there should be no more than
2.5 cm (1 in) of movement.
To remove the child restraint,
unbuckle the vehicle seat belt and let
it return to the stowed position. If the
top tether is attached to a top tether
anchor, disconnect it.
Securing Child Restraints
(With the Seat Belt in the
Front Seat)
This vehicle has airbags. A rear seat is
a safer place to secure a
forward-facing child restraint. See
Where to Put the Restraint 079.
In addition, the vehicle has a
passenger sensing system which is
designed to turn off the front
outboard passenger frontal airbag
under certain conditions. See
Passenger Sensing System 067 and
Passenger Airbag Status Indicator 0114
for more information, including
important safety information.
Never put a rear-facing child seat in
the front. This is because the risk to
the rear-facing child is so great, if the
airbag deploys.
{Warning
A child in a rear-facing child
restraint can be seriously injured or
killed if the front outboard
(Continued)