light CADILLAC XT5 2021 Convenience & Personalization Guide
[x] Cancel search | Manufacturer: CADILLAC, Model Year: 2021, Model line: XT5, Model: CADILLAC XT5 2021Pages: 20, PDF Size: 3.37 MB
Page 6 of 20

6
STEERING WHEEL CONTROLS
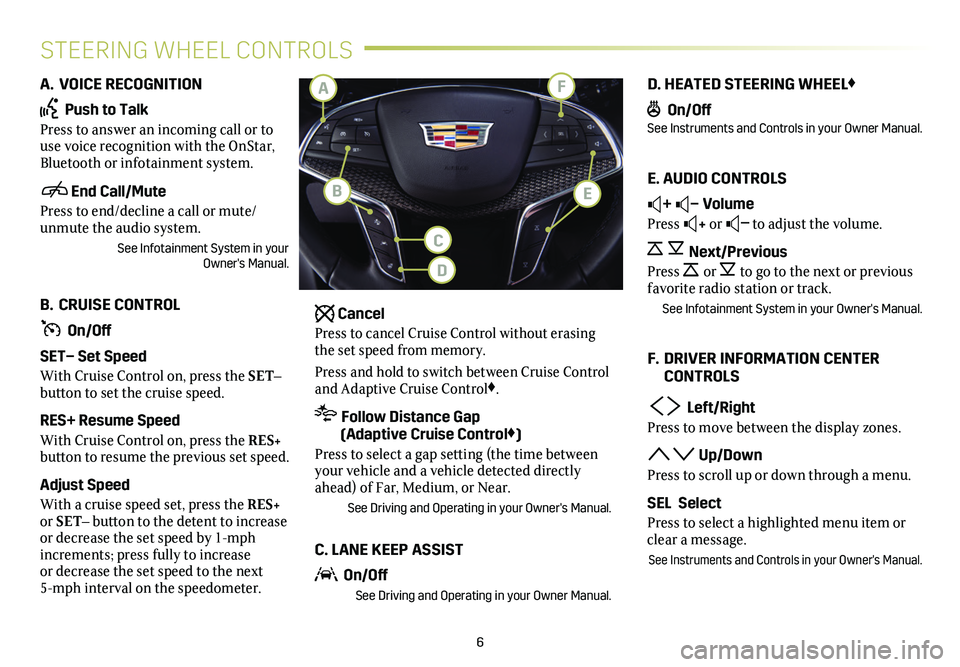
A. VOICE RECOGNITION
Push to Talk
Press to answer an incoming call or to use voice recognition with the OnStar, Bluetooth or infotainment system.
End Call/Mute
Press to end/decline a call or mute/unmute the audio system.
See Infotainment System in your Owner's Manual.
B. CRUISE CONTROL
On/Off
SET– Set Speed
With Cruise Control on, press the SET– button to set the cruise speed.
RES+ Resume Speed
With Cruise Control on, press the RES+ button to resume the previous set speed.
Adjust Speed
With a cruise speed set, press the RES+ or SET– button to the detent to increase or decrease the set speed by 1-mph increments; press fully to increase or decrease the set speed to the next 5-mph interval on the speedometer.
Cancel
Press to cancel Cruise Control without erasing the set speed from memory.
Press and hold to switch between Cruise Control and Adaptive Cruise Control♦.
Follow Distance Gap (Adaptive Cruise Control♦)
Press to select a gap setting (the time between your vehicle and a vehicle detected directly ahead) of Far, Medium, or Near.
See Driving and Operating in your Owner's Manual.
C. LANE KEEP ASSIST
On/Off
See Driving and Operating in your Owner Manual.
D. HEATED STEERING WHEEL♦
On/OffSee Instruments and Controls in your Owner Manual.
E. AUDIO CONTROLS
+ – Volume
Press + or – to adjust the volume.
Next/Previous
Press or to go to the next or previous
favorite radio station or track.
See Infotainment System in your Owner's Manual.
F. DRIVER INFORMATION CENTER CONTROLS
Left/Right
Press to move between the display zones.
Up/Down
Press to scroll up or down through a menu.
SEL Select
Press to select a highlighted menu item or clear a message.
See Instruments and Controls in your Owner's Manual.
F
C
D
A
EB
Page 11 of 20

11
4G LTE WI-FI® HOTSPOT
VEHICLE CUSTOMIZATIONWIRELESS CHARGING♦
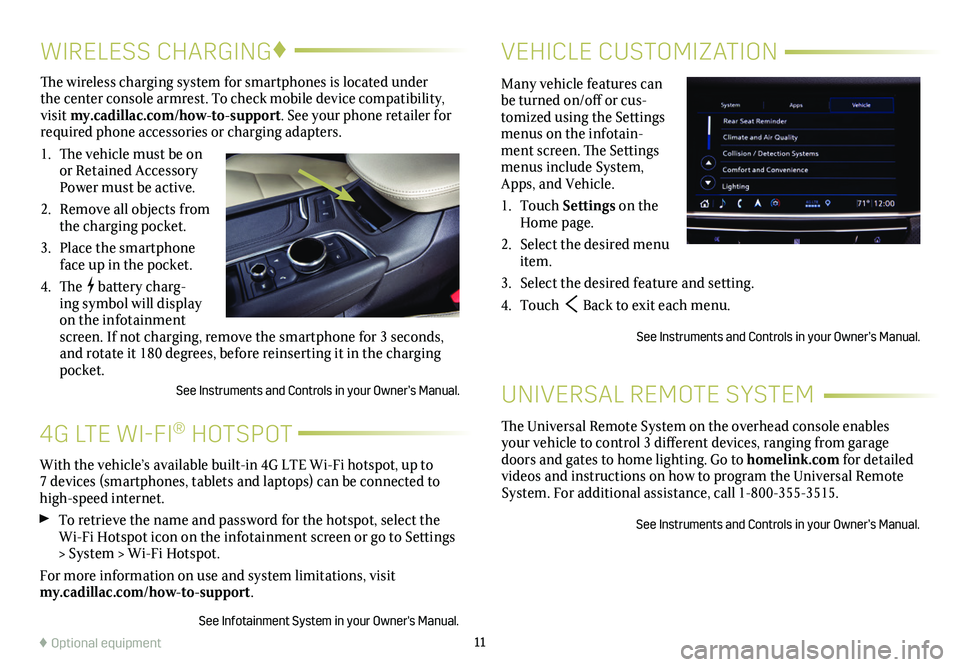
Many vehicle features can be turned on/off or cus-tomized using the Settings menus on the infotain-ment screen. The Settings menus include System, Apps, and Vehicle.
1. Touch Settings on the Home page.
2. Select the desired menu item.
3. Select the desired feature and setting.
4. Touch Back to exit each menu.
See Instruments and Controls in your Owner’s Manual.
The wireless charging system for smartphones is located under the center console armrest. To check mobile device compatibility, visit my.cadillac.com/how-to-support. See your phone retailer for required phone accessories or charging adapters.
1. The vehicle must be on or Retained Accessory Power must be active.
2. Remove all objects from the charging pocket.
3. Place the smartphone face up in the pocket.
4. The battery charg-ing symbol will display on the infotainment screen. If not charging, remove the smartphone for 3 seconds, and rotate it 180 degrees, before reinserting it in the charging pocket.
See Instruments and Controls in your Owner’s Manual.
With the vehicle’s available built-in 4G LTE Wi-Fi hotspot, up to 7 devices (smartphones, tablets and laptops) can be connected to high-speed internet.
To retrieve the name and password for the hotspot, select the Wi-Fi Hotspot icon on the infotainment screen or go to Settings > System > Wi-Fi Hotspot.
For more information on use and system limitations, visit my.cadillac.com/how-to-support.
See Infotainment System in your Owner's Manual.
♦ Optional equipment
The Universal Remote System on the overhead console enables your vehicle to control 3 different devices, ranging from garage doors and gates to home lighting. Go to homelink.com for detailed videos and instructions on how to program the Universal Remote System. For additional assistance, call 1-800-355-3515.
See Instruments and Controls in your Owner’s Manual.
UNIVERSAL REMOTE SYSTEM
Page 13 of 20

13
EXTERIOR LIGHTINGWINDSHIELD WIPERS
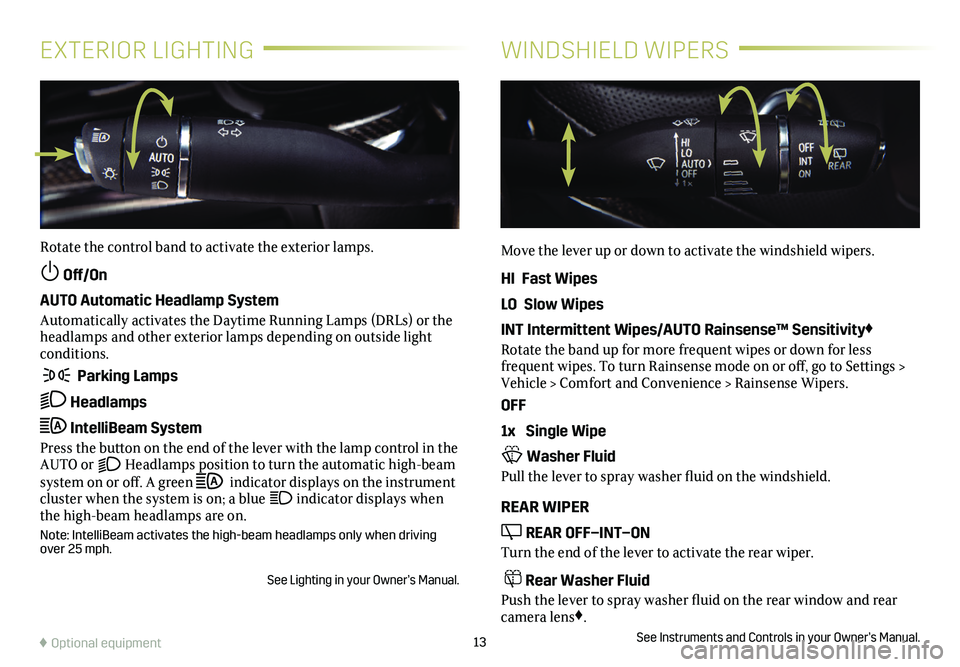
Rotate the control band to activate the exterior lamps.
Off/On
AUTO Automatic Headlamp System
Automatically activates the Daytime Running Lamps (DRLs) or the headlamps and other exterior lamps depending on outside light conditions.
Parking Lamps
Headlamps
IntelliBeam System
Press the button on the end of the lever with the lamp control in the AUTO or Headlamps position to turn the automatic high-beam system on or off. A green indicator displays on the instrument cluster when the system is on; a blue indicator displays when the high-beam headlamps are on.
Note: IntelliBeam activates the high-beam headlamps only when driving over 25 mph.
See Lighting in your Owner’s Manual.
Move the lever up or down to activate the windshield wipers.
HI Fast Wipes
LO Slow Wipes
INT Intermittent Wipes/AUTO Rainsense™ Sensitivity♦
Rotate the band up for more frequent wipes or down for less
frequent wipes. To turn Rainsense mode on or off, go to Settings > Vehicle > Comfort and Convenience > Rainsense Wipers.
OFF
1x Single Wipe
Washer Fluid
Pull the lever to spray washer fluid on the windshield.
REAR WIPER
REAR OFF–INT–ON
Turn the end of the lever to activate the rear wiper.
Rear Washer Fluid
Push the lever to spray washer fluid on the rear window and rear camera lens♦.
See Instruments and Controls in your Owner’s Manual.♦ Optional equipment
Page 19 of 20

19
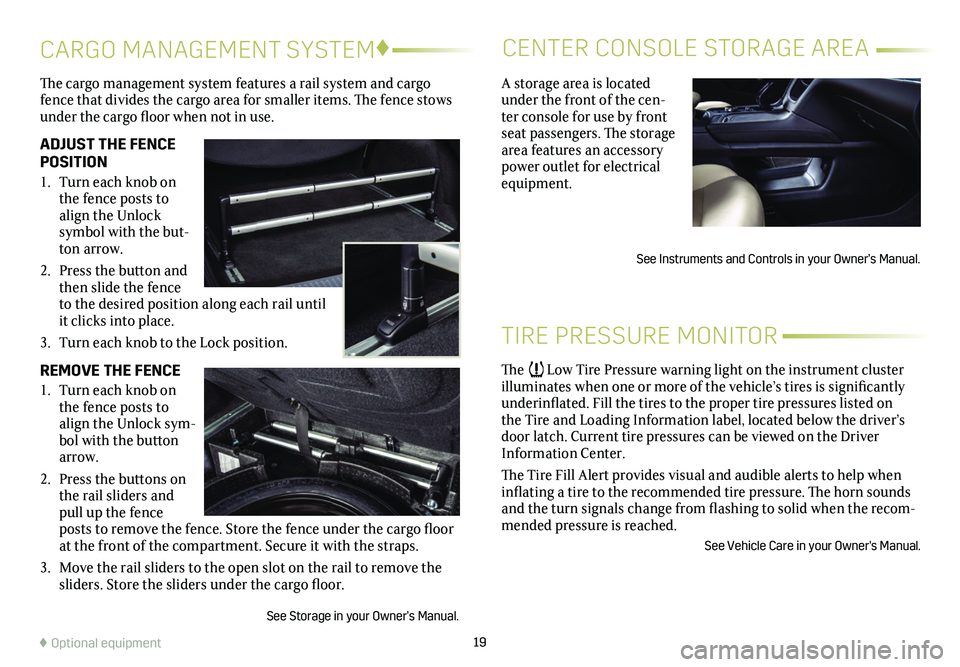
The cargo management system features a rail system and cargo fence that divides the cargo area for smaller items. The fence stows under the cargo floor when not in use.
ADJUST THE FENCE POSITION
1. Turn each knob on the fence posts to align the Unlock
symbol with the but-ton arrow.
2. Press the button and then slide the fence to the desired position along each rail until it clicks into place.
3. Turn each knob to the Lock position.
REMOVE THE FENCE
1. Turn each knob on the fence posts to align the Unlock sym-bol with the button arrow.
2. Press the buttons on the rail sliders and pull up the fence posts to remove the fence. Store the fence under the cargo floor at the front of the compartment. Secure it with the straps.
3. Move the rail sliders to the open slot on the rail to remove the sliders. Store the sliders under the cargo floor.
See Storage in your Owner’s Manual.
CARGO MANAGEMENT SYSTEM♦CENTER CONSOLE STORAGE AREA
♦ Optional equipment
A storage area is located under the front of the cen-ter console for use by front seat passengers. The storage area features an accessory power outlet for electrical equipment.
See Instruments and Controls in your Owner’s Manual.
TIRE PRESSURE MONITOR
The Low Tire Pressure warning light on the instrument cluster illuminates when one or more of the vehicle’s tires is significantly underinflated. Fill the tires to the proper tire pressures listed on the Tire and Loading Information label, located below the driver’s door latch. Current tire pressures can be viewed on the Driver Information Center.
The Tire Fill Alert provides visual and audible alerts to help when inflating a tire to the recommended tire pressure. The horn sounds and the turn signals change from flashing to solid when the recom-mended pressure is reached.
See Vehicle Care in your Owner's Manual.