Front seats CADILLAC XT5 2021 Owner's Manual
[x] Cancel search | Manufacturer: CADILLAC, Model Year: 2021, Model line: XT5, Model: CADILLAC XT5 2021Pages: 426, PDF Size: 8.73 MB
Page 6 of 426
Cadillac XT5 Owner Manual (GMNA-Localizing-U.S./Canada/Mexico-
14590481) - 2021 - CRC - 10/22/20
INTRODUCTION 5
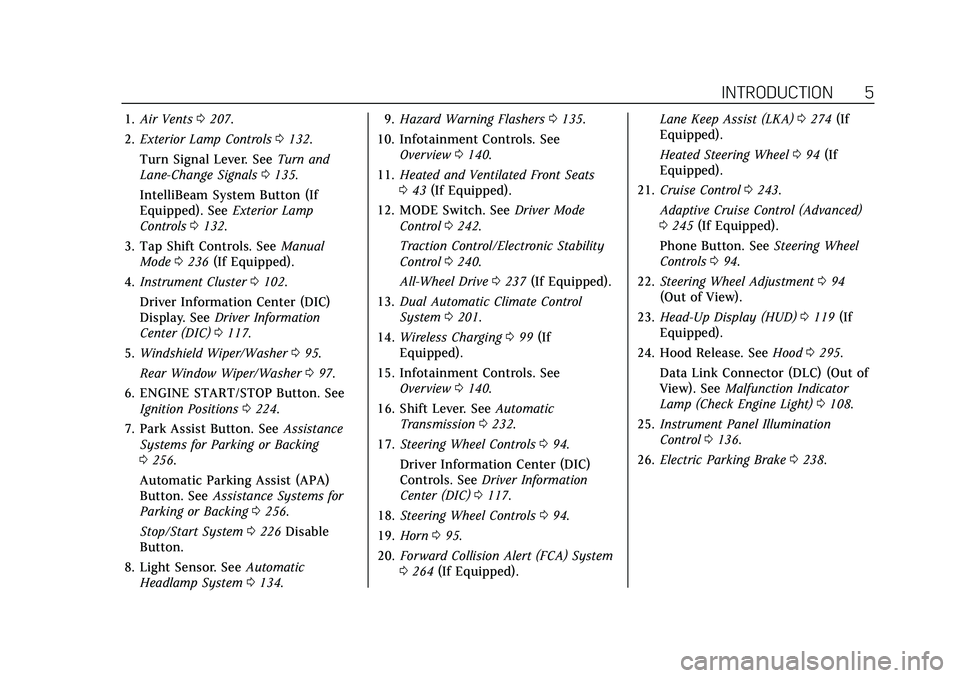
1.Air Vents 0207.
2. Exterior Lamp Controls 0132.
Turn Signal Lever. See Turn and
Lane-Change Signals 0135.
IntelliBeam System Button (If
Equipped). See Exterior Lamp
Controls 0132.
3. Tap Shift Controls. See Manual
Mode 0236 (If Equipped).
4. Instrument Cluster 0102.
Driver Information Center (DIC)
Display. See Driver Information
Center (DIC) 0117.
5. Windshield Wiper/Washer 095.
Rear Window Wiper/Washer 097.
6. ENGINE START/STOP Button. See Ignition Positions 0224.
7. Park Assist Button. See Assistance
Systems for Parking or Backing
0 256.
Automatic Parking Assist (APA)
Button. See Assistance Systems for
Parking or Backing 0256.
Stop/Start System 0226 Disable
Button.
8. Light Sensor. See Automatic
Headlamp System 0134. 9.
Hazard Warning Flashers 0135.
10. Infotainment Controls. See Overview 0140.
11. Heated and Ventilated Front Seats
043 (If Equipped).
12. MODE Switch. See Driver Mode
Control 0242.
Traction Control/Electronic Stability
Control 0240.
All-Wheel Drive 0237 (If Equipped).
13. Dual Automatic Climate Control
System 0201.
14. Wireless Charging 099 (If
Equipped).
15. Infotainment Controls. See Overview 0140.
16. Shift Lever. See Automatic
Transmission 0232.
17. Steering Wheel Controls 094.
Driver Information Center (DIC)
Controls. See Driver Information
Center (DIC) 0117.
18. Steering Wheel Controls 094.
19. Horn 095.
20. Forward Collision Alert (FCA) System
0264 (If Equipped). Lane Keep Assist (LKA)
0274 (If
Equipped).
Heated Steering Wheel 094 (If
Equipped).
21. Cruise Control 0243.
Adaptive Cruise Control (Advanced)
0 245 (If Equipped).
Phone Button. See Steering Wheel
Controls 094.
22. Steering Wheel Adjustment 094
(Out of View).
23. Head-Up Display (HUD) 0119 (If
Equipped).
24. Hood Release. See Hood0295.
Data Link Connector (DLC) (Out of
View). See Malfunction Indicator
Lamp (Check Engine Light) 0108.
25. Instrument Panel Illumination
Control 0136.
26. Electric Parking Brake 0238.
Page 12 of 426
Cadillac XT5 Owner Manual (GMNA-Localizing-U.S./Canada/Mexico-
14590481) - 2021 - CRC - 10/22/20
KEYS, DOORS, AND WINDOWS 11
3. Place the new transmitter into thetransmitter pocket. The transmitter
pocket is inside the center console
storage area between the driver and
front passenger seats. The storage
area will need to be opened and the
storage tray lifted up to access the
transmitter pocket.
4. Press ENGINE START/STOP. When the transmitter is learned the DIC
display will show that it is ready to
program the next transmitter.
5. Remove the transmitter from the transmitter pocket and press the
transmitter
KorQbutton.
To program additional transmitters,
repeat Steps 3–5.
When all additional transmitters
are programmed, press and hold
ENGINE START/STOP for
12 seconds to exit
programming mode.
6. Return the key back into the transmitter.
7. Replace the key lock cylinder cap. See Door Locks 015. Programming without Recognized
Transmitters
If two currently recognized
transmitters are not available, follow
this procedure to program up to eight
transmitters. This feature is not
available in Canada. This procedure
will take approximately 30 minutes to
complete. The vehicle must be off and
all of the transmitters you wish to
program must be with you.
1. Remove the key lock cylinder cap on the driver door handle. See Door
Locks 015. Insert the vehicle key of
the transmitter into the key lock
cylinder on the driver door handle
and turn the key counterclockwise,
to the unlock position, five times
within 10 seconds.
The DIC displays REMOTE LEARN
PENDING, PLEASE WAIT.
2. Wait for 10 minutes until the DIC displays PRESS ENGINE START
BUTTON TO LEARN and then
press ENGINE START/STOP.
The DIC display will again show
REMOTE LEARN PENDING,
PLEASE WAIT. 3. Repeat Step 2 two additional times.
After the third time all previously
known transmitters will no longer
work with the vehicle. Remaining
transmitters can be relearned
during the next steps.
The DIC display should now show
READY FOR REMOTE # 1.
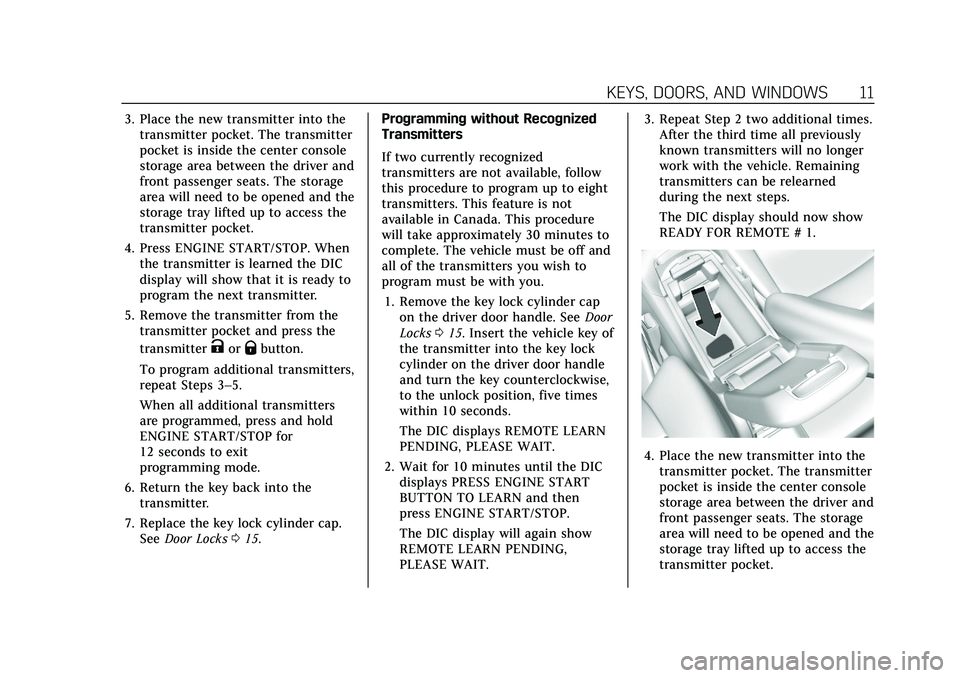
4. Place the new transmitter into thetransmitter pocket. The transmitter
pocket is inside the center console
storage area between the driver and
front passenger seats. The storage
area will need to be opened and the
storage tray lifted up to access the
transmitter pocket.
Page 15 of 426
Cadillac XT5 Owner Manual (GMNA-Localizing-U.S./Canada/Mexico-
14590481) - 2021 - CRC - 10/22/20
14 KEYS, DOORS, AND WINDOWS
The climate control system will use
the previous settings during a remote
start. The rear window defogger may
come on during remote start based on
cold ambient conditions. The rear
window defogger indicator light does
not come on during remote start.
If the vehicle has auto heated or
ventilated seats they may come on
during a remote start. SeeHeated and
Ventilated Front Seats 043.
Laws in some local communities may
restrict the use of remote starters. For
example, some laws may require a
person using remote start to have the
vehicle in view. Check local
regulations for any requirements.
Do not use the remote start feature if
the vehicle is low on fuel. The vehicle
could run out of fuel.
Other conditions can affect the
performance of the transmitter. See
Remote Keyless Entry (RKE) System
0 7.
Starting the Engine Using Remote
Start
1. Press and release
Qon the RKE
transmitter. 2. Immediately press and hold
/for
at least four seconds or until the
turn signal lamps flash. The turn
signal lamps flashing confirms the
request to remote start the vehicle
has been received.
During the remote start the doors
will be locked and the parking
lamps will remain on as long as the
engine is running.
The engine will shut off after
15 minutes unless a time extension
is done or the ignition is turned on.
3. With the RKE transmitter in the vehicle, press the brake pedal and
start the vehicle to drive.
Extending Engine Run Time
The engine run time can also be
extended by another 15 minutes,
if during the first 15 minutes
Steps 1 and 2 are repeated while the
engine is still running. An extension
can be requested 30 seconds after
starting. This provides a total of
30 minutes.
The remote start can only be
extended once. When the remote start is extended,
the second 15-minute period is added
on to the first 15 minutes for a total
of 30 minutes.
A maximum of two remote starts, or a
remote start with an extension, are
allowed between ignition cycles.
The ignition must be turned on and
then off before the remote start
procedure can be used again.
Canceling a Remote Start
To cancel a remote start, do any of
the following:
.Press and hold/until the parking
lamps turn off.
.Turn on the hazard warning
flashers.
.Turn the vehicle on and then off.
Conditions in Which Remote Start
Will Not Work
The remote start will not operate if
any of the following occur:
.The RKE transmitter is in the
vehicle.
.The ignition is on.
.The hood is not closed.
Page 38 of 426
Cadillac XT5 Owner Manual (GMNA-Localizing-U.S./Canada/Mexico-
14590481) - 2021 - CRC - 10/22/20
SEATS AND RESTRAINTS 37
Seats and Restraints
Head Restraints
Head Restraints . . . . . . . . . . . . . . . . . . . . 38
Front Seats
Seat Adjustment . . . . . . . . . . . . . . . . . . . 39
Lumbar Adjustment . . . . . . . . . . . . . . . 40
Reclining Seatbacks . . . . . . . . . . . . . . . 40
Memory Seats . . . . . . . . . . . . . . . . . . . . . . 41
Heated and Ventilated FrontSeats . . . . . . . . . . . . . . . . . . . . . . . . . . . . . . 43
Rear Seats
Rear Seats . . . . . . . . . . . . . . . . . . . . . . . . . . 45
Rear Seat Armrest . . . . . . . . . . . . . . . . . 47
Heated Rear Seats . . . . . . . . . . . . . . . . . 47
Seat Belts
Seat Belts . . . . . . . . . . . . . . . . . . . . . . . . . . . 48
How to Wear Seat BeltsProperly . . . . . . . . . . . . . . . . . . . . . . . . . . . 49
Lap-Shoulder Belt . . . . . . . . . . . . . . . . . . 51
Seat Belt Use During
Pregnancy . . . . . . . . . . . . . . . . . . . . . . . . . 54
Seat Belt Extender . . . . . . . . . . . . . . . . . 54
Safety System Check . . . . . . . . . . . . . . 55 Seat Belt Care . . . . . . . . . . . . . . . . . . . . . . 55
Replacing Seat Belt System Parts
after a Crash . . . . . . . . . . . . . . . . . . . . . . 55
Airbag System
Airbag System . . . . . . . . . . . . . . . . . . . . . 56
Where Are the Airbags? . . . . . . . . . . . 57
When Should an AirbagInflate? . . . . . . . . . . . . . . . . . . . . . . . . . . . 58
What Makes an Airbag Inflate? . . . 59
How Does an Airbag Restrain? . . . 59
What Will You See after an Airbag Inflates? . . . . . . . . . . . . . . . . . . . . . . . . . . 60
Passenger Sensing System . . . . . . . . 61
Servicing the Airbag-Equipped Vehicle . . . . . . . . . . . . . . . . . . . . . . . . . . . . 65
Adding Equipment to the
Airbag-Equipped Vehicle . . . . . . . . 65
Airbag System Check . . . . . . . . . . . . . . 66
Replacing Airbag System Parts after a Crash . . . . . . . . . . . . . . . . . . . . . . 66
Child Restraints
Older Children . . . . . . . . . . . . . . . . . . . . . 67
Infants and Young Children . . . . . . 68
Child Restraint Systems . . . . . . . . . . . 70
Where to Put the Restraint . . . . . . . 72 Lower Anchors and Tethers for
Children (LATCH System) . . . . . . . 74
Replacing LATCH System Parts After a Crash . . . . . . . . . . . . . . . . . . . . . 80
Securing Child Restraints (With
the Seat Belt in the
Rear Seat) . . . . . . . . . . . . . . . . . . . . . . . . 80
Securing Child Restraints (With the Seat Belt in the
Front Seat) . . . . . . . . . . . . . . . . . . . . . . . 82
Page 39 of 426
Cadillac XT5 Owner Manual (GMNA-Localizing-U.S./Canada/Mexico-
14590481) - 2021 - CRC - 10/22/20
38 SEATS AND RESTRAINTS
Head Restraints
The vehicle’s front seats have
adjustable head restraints in the
outboard seating positions.
{Warning
With head restraints that are not
installed and adjusted properly,
there is a greater chance that
occupants will suffer a neck/spinal
injury in a crash. Do not drive until
the head restraints for all occupants
are installed and adjusted properly.
If your vehicle has rear head
restraints that fold down, always
return them to the full upright
position whenever an occupant is
seated in the seat.
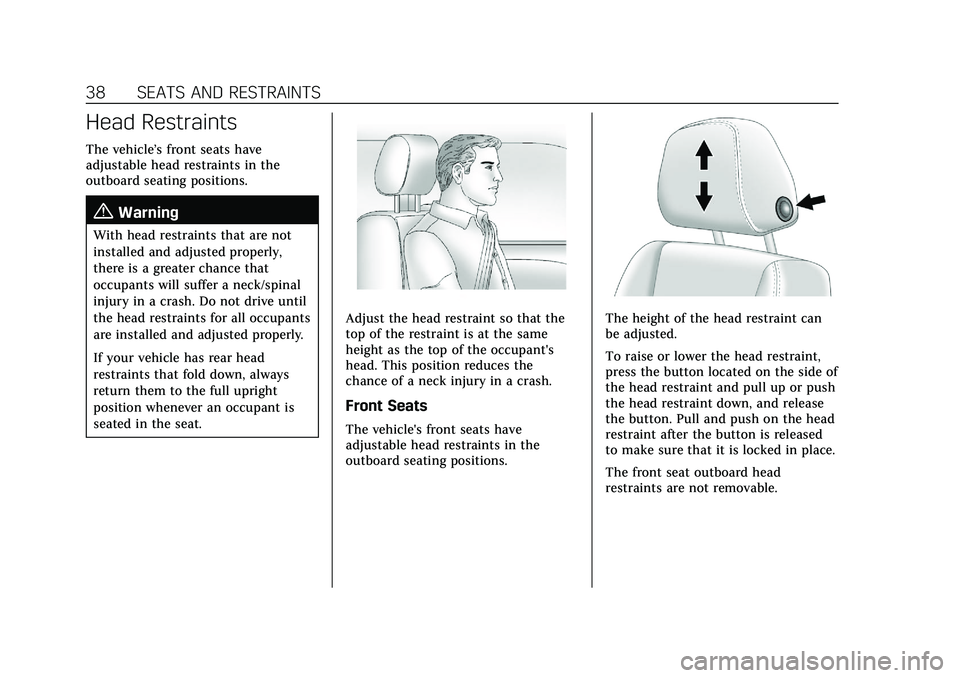
Adjust the head restraint so that the
top of the restraint is at the same
height as the top of the occupant's
head. This position reduces the
chance of a neck injury in a crash.
Front Seats
The vehicle's front seats have
adjustable head restraints in the
outboard seating positions.
The height of the head restraint can
be adjusted.
To raise or lower the head restraint,
press the button located on the side of
the head restraint and pull up or push
the head restraint down, and release
the button. Pull and push on the head
restraint after the button is released
to make sure that it is locked in place.
The front seat outboard head
restraints are not removable.
Page 40 of 426
Cadillac XT5 Owner Manual (GMNA-Localizing-U.S./Canada/Mexico-
14590481) - 2021 - CRC - 10/22/20
SEATS AND RESTRAINTS 39
Rear Seats
Rear Head Restraint Adjustment
The vehicle's rear seats have
adjustable head restraints in the
outboard seating positions.
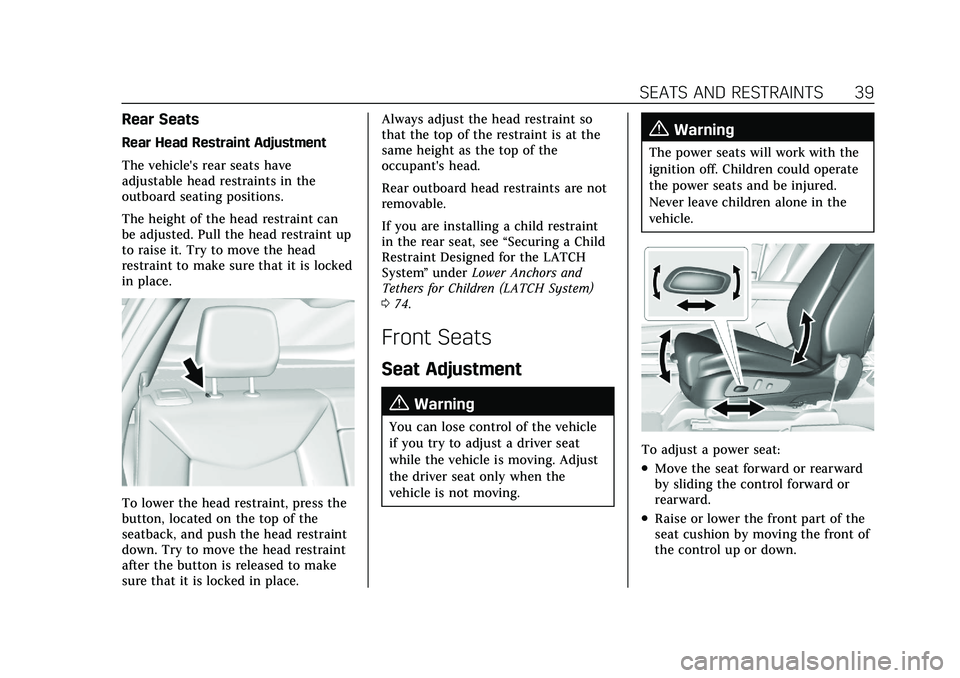
The height of the head restraint can
be adjusted. Pull the head restraint up
to raise it. Try to move the head
restraint to make sure that it is locked
in place.
To lower the head restraint, press the
button, located on the top of the
seatback, and push the head restraint
down. Try to move the head restraint
after the button is released to make
sure that it is locked in place.Always adjust the head restraint so
that the top of the restraint is at the
same height as the top of the
occupant's head.
Rear outboard head restraints are not
removable.
If you are installing a child restraint
in the rear seat, see
“Securing a Child
Restraint Designed for the LATCH
System ”under Lower Anchors and
Tethers for Children (LATCH System)
0 74.
Front Seats
Seat Adjustment
{Warning
You can lose control of the vehicle
if you try to adjust a driver seat
while the vehicle is moving. Adjust
the driver seat only when the
vehicle is not moving.
{Warning
The power seats will work with the
ignition off. Children could operate
the power seats and be injured.
Never leave children alone in the
vehicle.
To adjust a power seat:
.Move the seat forward or rearward
by sliding the control forward or
rearward.
.Raise or lower the front part of the
seat cushion by moving the front of
the control up or down.
Page 41 of 426

Cadillac XT5 Owner Manual (GMNA-Localizing-U.S./Canada/Mexico-
14590481) - 2021 - CRC - 10/22/20
40 SEATS AND RESTRAINTS
.Raise or lower the entire seat by
moving the rear of the control up
or down.
To adjust the seatback, see Reclining
Seatbacks 040.
To adjust the lumbar support, see
Lumbar Adjustment 040.
Some vehicles are equipped with a
feature that activates a vibration in
the driver seat to help the driver avoid
crashes. See Driver Assistance Systems
0 254.
Lumbar Adjustment
Press and hold the control forward to
increase or rearward to decrease
support.
Reclining Seatbacks
{Warning
Sitting in a reclined position when
the vehicle is in motion can be
dangerous. Even when buckled up,
the seat belts cannot do their job.
The shoulder belt will not be
against your body. Instead, it will be
in front of you. In a crash, you
could go into it, receiving neck or
other injuries.
The lap belt could go up over your
abdomen. The belt forces would be
there, not at your pelvic bones. This
could cause serious internal
injuries.
For proper protection when the
vehicle is in motion, have the
seatback upright. Then sit well back
in the seat and wear the seat belt
properly.
Do not have a seatback reclined if the
vehicle is moving.
To adjust:
Page 44 of 426
Cadillac XT5 Owner Manual (GMNA-Localizing-U.S./Canada/Mexico-
14590481) - 2021 - CRC - 10/22/20
SEATS AND RESTRAINTS 43
The shift lever must be in P (Park) to
start Seat Entry Memory. Seat Entry
Memory recall will complete if the
vehicle is shifted out of P (Park) prior
to reaching the saved memory
position.
To stop Seat Entry Memory recall
movement, turn the vehicle off or
press any of the following controls:
.Power seat
.Memory SET, 1, 2, orB
.Power mirror, with the driver or
passenger side mirror selected
.Power steering wheel, if equipped
If the saved memory seat position
does not automatically recall or recalls
to the wrong positions, the driver’s
RKE transmitter number (1 or 2) may
not match the memory button
number that positions were saved to.
Try storing the position to the other
memory button or try the other RKE
transmitter.
Seat Exit Memory
Seat Exit Memory is not linked to an
RKE transmitter. The position saved to
Bis used for all drivers. To turn Seat Exit Memory on or off, see "Vehicle
Personalization Settings" previously in
this section and
Vehicle Personalization
0 123.
If turned on, the position saved to
B
is automatically recalled when one of
the following occurs:
.The vehicle is turned off and the
driver door is opened within a
short time.
.The vehicle is turned off with the
driver door open.
To stop Seat Exit Memory movement,
press any of the following memory
controls:
.Power seat
.Memory SET, 1, 2, orB
.Power mirror, with the driver or
passenger side mirror selected
.Power steering wheel, if equipped
Obstructions
If something has blocked the driver
seat while recalling a memory
position, the recall may stop. Remove
the obstruction and try the recall
again. If the memory position still
does not recall, see your dealer.
Heated and Ventilated
Front Seats
{Warning
If temperature change or pain to
the skin cannot be felt, the seat
heater may cause burns. To reduce
the risk of burns, use care when
using the seat heater, especially for
long periods of time. Do not place
anything on the seat that insulates
against heat, such as a blanket,
cushion, cover, or similar item. This
may cause the seat heater to
overheat. An overheated seat heater
may cause a burn or may damage
the seat.
Page 45 of 426
Cadillac XT5 Owner Manual (GMNA-Localizing-U.S./Canada/Mexico-
14590481) - 2021 - CRC - 10/22/20
44 SEATS AND RESTRAINTS
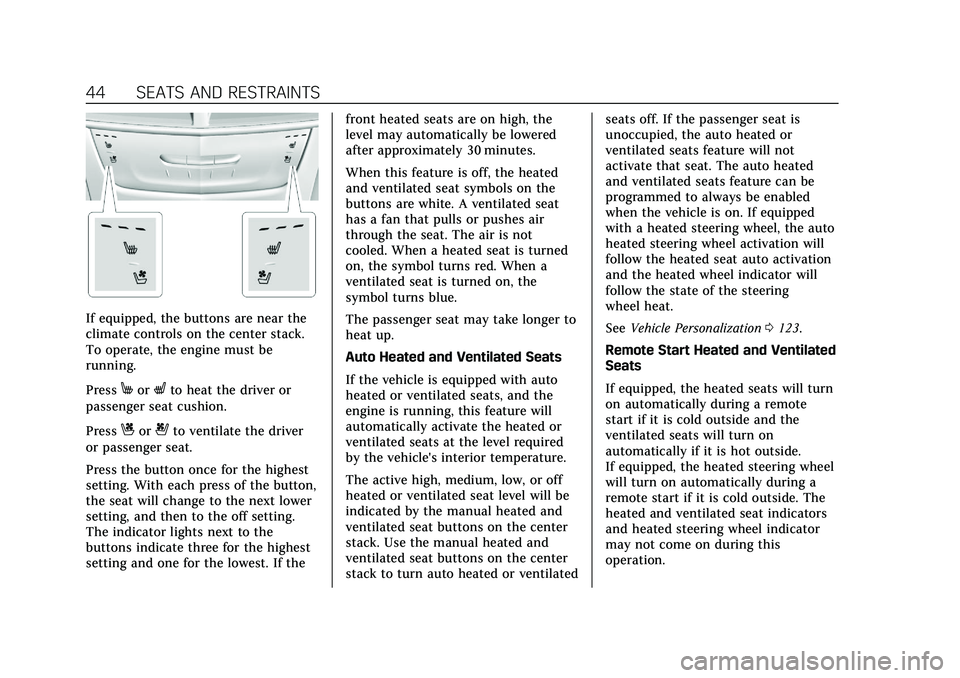
If equipped, the buttons are near the
climate controls on the center stack.
To operate, the engine must be
running.
Press
MorLto heat the driver or
passenger seat cushion.
Press
Cor{to ventilate the driver
or passenger seat.
Press the button once for the highest
setting. With each press of the button,
the seat will change to the next lower
setting, and then to the off setting.
The indicator lights next to the
buttons indicate three for the highest
setting and one for the lowest. If the front heated seats are on high, the
level may automatically be lowered
after approximately 30 minutes.
When this feature is off, the heated
and ventilated seat symbols on the
buttons are white. A ventilated seat
has a fan that pulls or pushes air
through the seat. The air is not
cooled. When a heated seat is turned
on, the symbol turns red. When a
ventilated seat is turned on, the
symbol turns blue.
The passenger seat may take longer to
heat up.
Auto Heated and Ventilated Seats
If the vehicle is equipped with auto
heated or ventilated seats, and the
engine is running, this feature will
automatically activate the heated or
ventilated seats at the level required
by the vehicle's interior temperature.
The active high, medium, low, or off
heated or ventilated seat level will be
indicated by the manual heated and
ventilated seat buttons on the center
stack. Use the manual heated and
ventilated seat buttons on the center
stack to turn auto heated or ventilatedseats off. If the passenger seat is
unoccupied, the auto heated or
ventilated seats feature will not
activate that seat. The auto heated
and ventilated seats feature can be
programmed to always be enabled
when the vehicle is on. If equipped
with a heated steering wheel, the auto
heated steering wheel activation will
follow the heated seat auto activation
and the heated wheel indicator will
follow the state of the steering
wheel heat.
See
Vehicle Personalization 0123.
Remote Start Heated and Ventilated
Seats
If equipped, the heated seats will turn
on automatically during a remote
start if it is cold outside and the
ventilated seats will turn on
automatically if it is hot outside.
If equipped, the heated steering wheel
will turn on automatically during a
remote start if it is cold outside. The
heated and ventilated seat indicators
and heated steering wheel indicator
may not come on during this
operation.
Page 48 of 426
Cadillac XT5 Owner Manual (GMNA-Localizing-U.S./Canada/Mexico-
14590481) - 2021 - CRC - 10/22/20
SEATS AND RESTRAINTS 47
{Warning
A seat belt that is improperly
routed, not properly attached,
or twisted will not provide the
protection needed in a crash. The
person wearing the belt could be
seriously injured. After raising the
rear seatback, always check to be
sure that the seat belts are properly
routed and attached, and are not
twisted.
To raise a seatback: 1. Lift the seatback up and push it rearward to lock it in place.
2. Push and pull the top of the seatback to be sure it is locked into
position.
3. Repeat the steps to raise the other seatback, if necessary.
When the seat is not in use, it should
be kept in the upright, locked position.
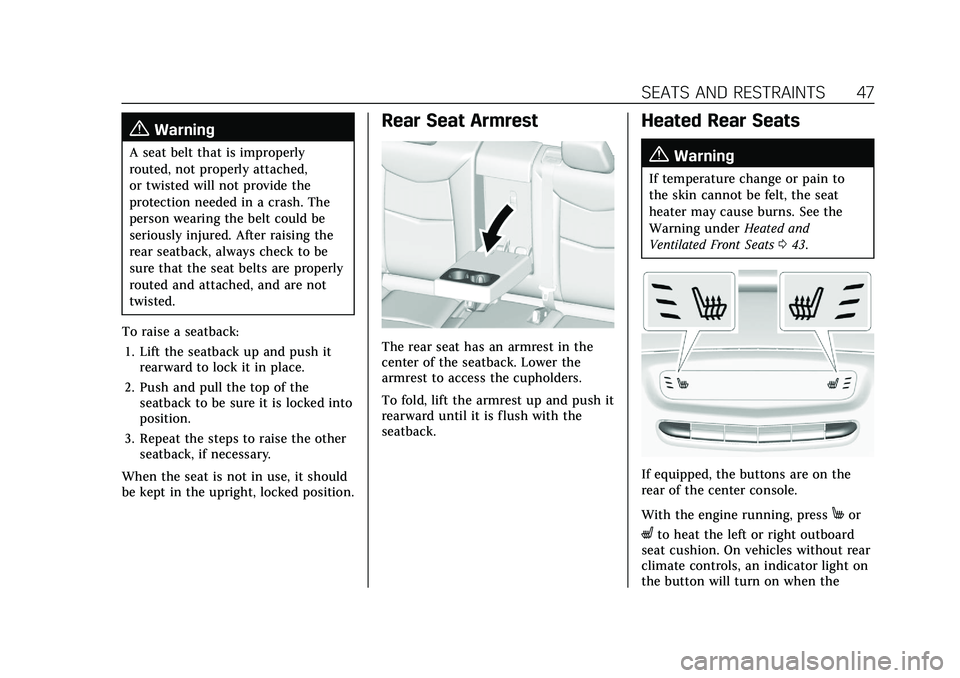
Rear Seat Armrest
The rear seat has an armrest in the
center of the seatback. Lower the
armrest to access the cupholders.
To fold, lift the armrest up and push it
rearward until it is flush with the
seatback.
Heated Rear Seats
{Warning
If temperature change or pain to
the skin cannot be felt, the seat
heater may cause burns. See the
Warning under Heated and
Ventilated Front Seats 043.
If equipped, the buttons are on the
rear of the center console.
With the engine running, press
Mor
Lto heat the left or right outboard
seat cushion. On vehicles without rear
climate controls, an indicator light on
the button will turn on when the