How to c CADILLAC XT5 2021 Owner's Manual
[x] Cancel search | Manufacturer: CADILLAC, Model Year: 2021, Model line: XT5, Model: CADILLAC XT5 2021Pages: 426, PDF Size: 8.73 MB
Page 3 of 426
Cadillac XT5 Owner Manual (GMNA-Localizing-U.S./Canada/Mexico-
14590481) - 2021 - CRC - 10/22/20
2 INTRODUCTION
Using this Manual
To quickly locate information about
the vehicle, use the Index in the back
of the manual. It is an alphabetical
list of what is in the manual and the
page number where it can be found.
Danger, Warning, and
Caution
Warning messages found on vehicle
labels and in this manual describe
hazards and what to do to avoid or
reduce them.
{Danger
Danger indicates a hazard with a
high level of risk which will result
in serious injury or death.
{Warning
Warning indicates a hazard that
could result in injury or death.
Caution
Caution indicates a hazard that
could result in property or vehicle
damage.
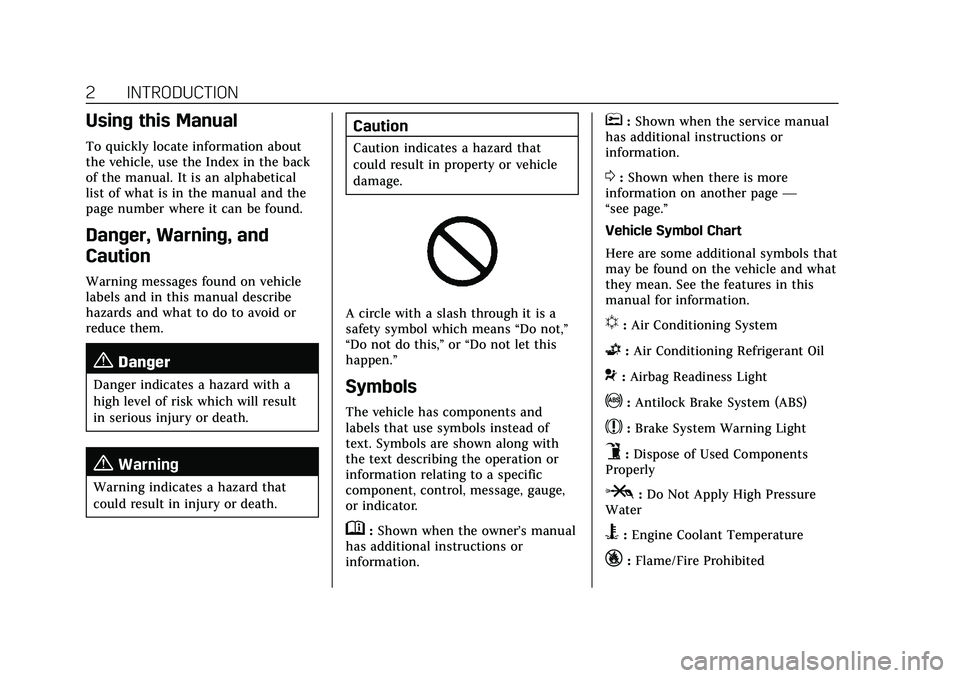
A circle with a slash through it is a
safety symbol which means“Do not,”
“Do not do this,” or“Do not let this
happen.”
Symbols
The vehicle has components and
labels that use symbols instead of
text. Symbols are shown along with
the text describing the operation or
information relating to a specific
component, control, message, gauge,
or indicator.
M: Shown when the owner’s manual
has additional instructions or
information.
*: Shown when the service manual
has additional instructions or
information.
0: Shown when there is more
information on another page —
“see page.”
Vehicle Symbol Chart
Here are some additional symbols that
may be found on the vehicle and what
they mean. See the features in this
manual for information.
u: Air Conditioning System
G:Air Conditioning Refrigerant Oil
9:Airbag Readiness Light
!:Antilock Brake System (ABS)
$:Brake System Warning Light
9:Dispose of Used Components
Properly
P: Do Not Apply High Pressure
Water
B: Engine Coolant Temperature
_:Flame/Fire Prohibited
Page 10 of 426
Cadillac XT5 Owner Manual (GMNA-Localizing-U.S./Canada/Mexico-
14590481) - 2021 - CRC - 10/22/20
KEYS, DOORS, AND WINDOWS 9
Keyless Access Operation
With the Keyless Access system, you
can lock and unlock the doors and
access the liftgate without removing
the RKE transmitter from your pocket,
purse, briefcase, etc. The RKE
transmitter should be within 1 m (3 ft)
of the liftgate or door being opened.
Keyless Access can be programmed to
unlock all doors on the first lock/
unlock press from the driver door. See
Vehicle Personalization0123.
If equipped with memory seats, RKE
transmitters 1 and 2 are linked to
seating positions of memory 1 or 2.
See Memory Seats 041.
Keyless Unlocking/Locking from the
Driver Door
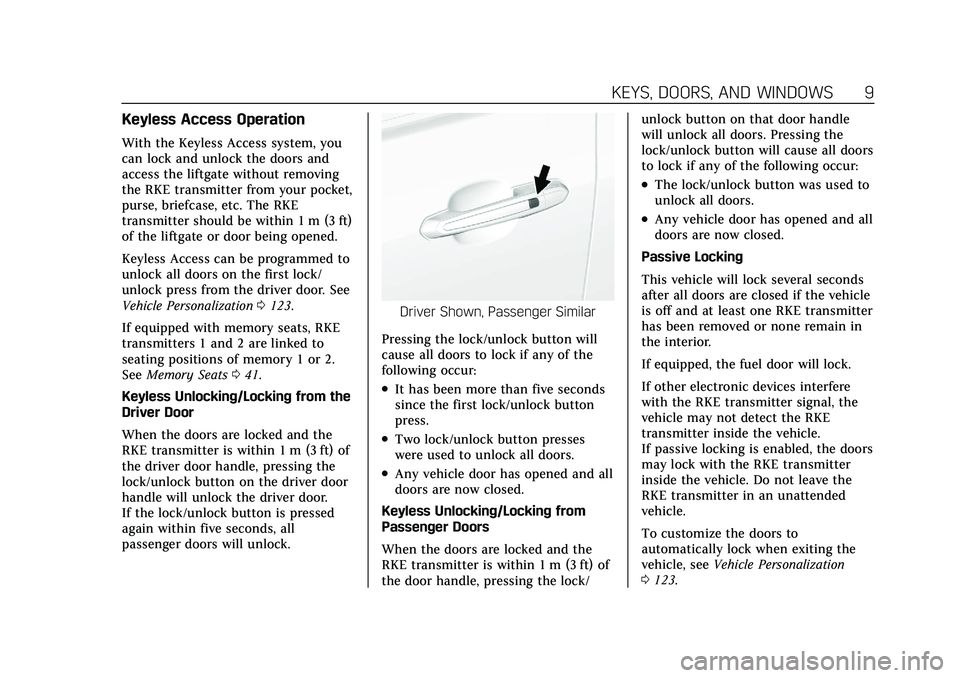
When the doors are locked and the
RKE transmitter is within 1 m (3 ft) of
the driver door handle, pressing the
lock/unlock button on the driver door
handle will unlock the driver door.
If the lock/unlock button is pressed
again within five seconds, all
passenger doors will unlock.
Driver Shown, Passenger Similar
Pressing the lock/unlock button will
cause all doors to lock if any of the
following occur:
.It has been more than five seconds
since the first lock/unlock button
press.
.Two lock/unlock button presses
were used to unlock all doors.
.Any vehicle door has opened and all
doors are now closed.
Keyless Unlocking/Locking from
Passenger Doors
When the doors are locked and the
RKE transmitter is within 1 m (3 ft) of
the door handle, pressing the lock/ unlock button on that door handle
will unlock all doors. Pressing the
lock/unlock button will cause all doors
to lock if any of the following occur:
.The lock/unlock button was used to
unlock all doors.
.Any vehicle door has opened and all
doors are now closed.
Passive Locking
This vehicle will lock several seconds
after all doors are closed if the vehicle
is off and at least one RKE transmitter
has been removed or none remain in
the interior.
If equipped, the fuel door will lock.
If other electronic devices interfere
with the RKE transmitter signal, the
vehicle may not detect the RKE
transmitter inside the vehicle.
If passive locking is enabled, the doors
may lock with the RKE transmitter
inside the vehicle. Do not leave the
RKE transmitter in an unattended
vehicle.
To customize the doors to
automatically lock when exiting the
vehicle, see Vehicle Personalization
0 123.
Page 12 of 426
Cadillac XT5 Owner Manual (GMNA-Localizing-U.S./Canada/Mexico-
14590481) - 2021 - CRC - 10/22/20
KEYS, DOORS, AND WINDOWS 11
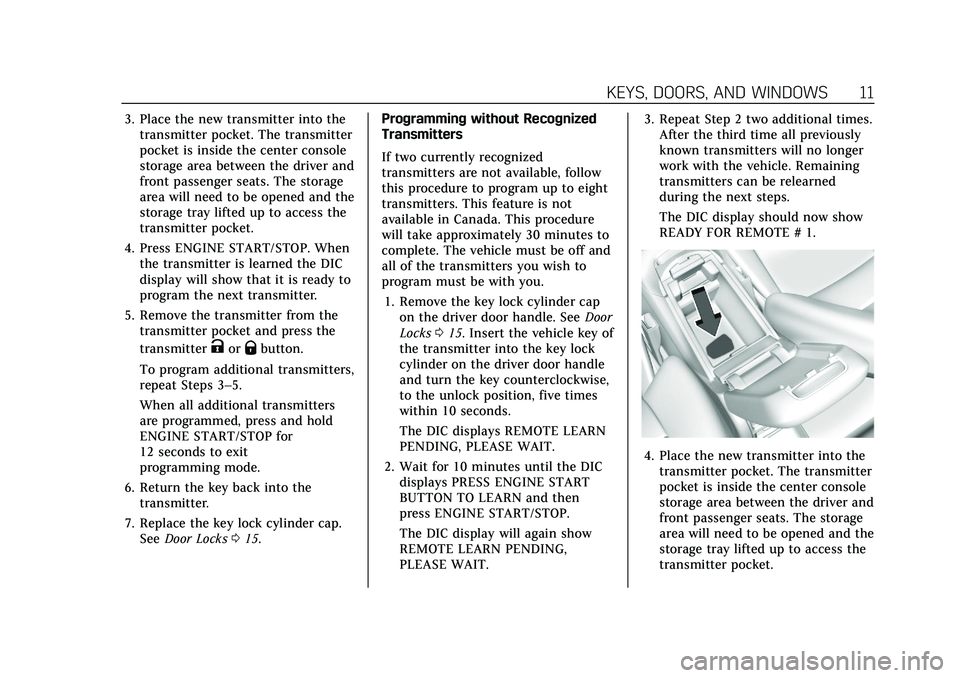
3. Place the new transmitter into thetransmitter pocket. The transmitter
pocket is inside the center console
storage area between the driver and
front passenger seats. The storage
area will need to be opened and the
storage tray lifted up to access the
transmitter pocket.
4. Press ENGINE START/STOP. When the transmitter is learned the DIC
display will show that it is ready to
program the next transmitter.
5. Remove the transmitter from the transmitter pocket and press the
transmitter
KorQbutton.
To program additional transmitters,
repeat Steps 3–5.
When all additional transmitters
are programmed, press and hold
ENGINE START/STOP for
12 seconds to exit
programming mode.
6. Return the key back into the transmitter.
7. Replace the key lock cylinder cap. See Door Locks 015. Programming without Recognized
Transmitters
If two currently recognized
transmitters are not available, follow
this procedure to program up to eight
transmitters. This feature is not
available in Canada. This procedure
will take approximately 30 minutes to
complete. The vehicle must be off and
all of the transmitters you wish to
program must be with you.
1. Remove the key lock cylinder cap on the driver door handle. See Door
Locks 015. Insert the vehicle key of
the transmitter into the key lock
cylinder on the driver door handle
and turn the key counterclockwise,
to the unlock position, five times
within 10 seconds.
The DIC displays REMOTE LEARN
PENDING, PLEASE WAIT.
2. Wait for 10 minutes until the DIC displays PRESS ENGINE START
BUTTON TO LEARN and then
press ENGINE START/STOP.
The DIC display will again show
REMOTE LEARN PENDING,
PLEASE WAIT. 3. Repeat Step 2 two additional times.
After the third time all previously
known transmitters will no longer
work with the vehicle. Remaining
transmitters can be relearned
during the next steps.
The DIC display should now show
READY FOR REMOTE # 1.
4. Place the new transmitter into thetransmitter pocket. The transmitter
pocket is inside the center console
storage area between the driver and
front passenger seats. The storage
area will need to be opened and the
storage tray lifted up to access the
transmitter pocket.
Page 13 of 426
Cadillac XT5 Owner Manual (GMNA-Localizing-U.S./Canada/Mexico-
14590481) - 2021 - CRC - 10/22/20
12 KEYS, DOORS, AND WINDOWS
5. Press ENGINE START/STOP. Whenthe transmitter is learned the DIC
display will show that it is ready to
program the next transmitter.
6. Remove the transmitter from the transmitter pocket and press the
transmitter
KorQbutton.
To program additional transmitters,
repeat Steps 4–6.
When all additional transmitters
are programmed, press and hold
ENGINE START/STOP for
12 seconds to exit
programming mode.
7. Return the key back into the transmitter.
8. Replace the key lock cylinder cap. See Door Locks 015.
Starting the Vehicle with a Low
Transmitter Battery
When the vehicle is started, if the
transmitter battery is weak, the DIC
may display NO REMOTE DETECTED
or NO REMOTE KEY WAS DETECTED
PLACE KEY IN TRANSMITTER POCKET THEN START YOUR
VEHICLE. The DIC may also display
REPLACE BATTERY IN REMOTE KEY.
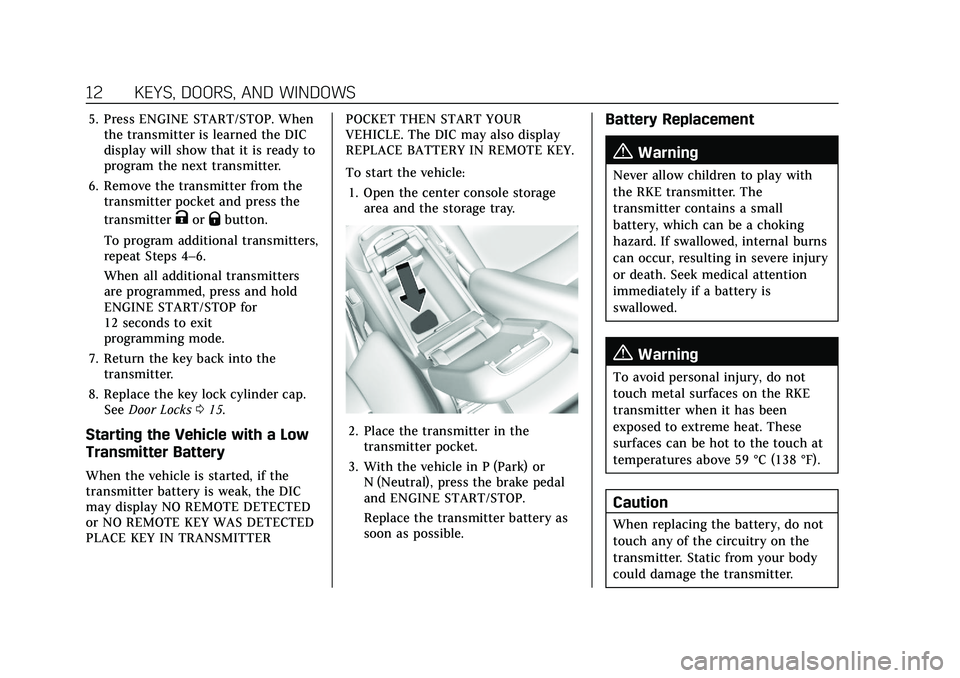
To start the vehicle:
1. Open the center console storage area and the storage tray.
2. Place the transmitter in thetransmitter pocket.
3. With the vehicle in P (Park) or N (Neutral), press the brake pedal
and ENGINE START/STOP.
Replace the transmitter battery as
soon as possible.
Battery Replacement
{Warning
Never allow children to play with
the RKE transmitter. The
transmitter contains a small
battery, which can be a choking
hazard. If swallowed, internal burns
can occur, resulting in severe injury
or death. Seek medical attention
immediately if a battery is
swallowed.
{Warning
To avoid personal injury, do not
touch metal surfaces on the RKE
transmitter when it has been
exposed to extreme heat. These
surfaces can be hot to the touch at
temperatures above 59 °C (138 °F).
Caution
When replacing the battery, do not
touch any of the circuitry on the
transmitter. Static from your body
could damage the transmitter.
Page 24 of 426

Cadillac XT5 Owner Manual (GMNA-Localizing-U.S./Canada/Mexico-
14590481) - 2021 - CRC - 10/22/20
KEYS, DOORS, AND WINDOWS 23
To operate, move your foot in a
forward kicking motion under the left
side of the rear bumper, at the
location of the projected logo, then
pull it back. Then step back. The kick
must come within 14 cm (6 in) of the
rear bumper to activate.
Caution
Splashing water may cause the
liftgate to open. Keep the RKE
transmitter away from the rear
bumper detection area or turn the
liftgate mode to OFF when cleaning
or working near the rear bumper to
avoid accidental opening.
.Do not sweep your foot side to side.
.Do not keep your foot under the
bumper; the liftgate will not
activate.
.Do not touch the liftgate until it has
stopped moving.
.This feature may be temporarily
disabled under some conditions.
If the liftgate does not respond to
the kick, open or close the liftgate
by another method or start the
vehicle. The feature will be
re-enabled.
When closing the liftgate using this
feature, there will be a short delay.
The taillamps will flash and a chime
will sound. Step away from the liftgate
before it starts moving.
Projected Logo
If equipped with this feature, a vehicle
logo will be projected for one minute
onto the ground near the rear bumper
when an RKE transmitter is detected
within approximately 2 m (6 ft). The
projected logo may not be visible
under brighter daytime conditions.
1. 1 m (3 ft) Hands-Free Operation Detection Zone
2. 2 m (6 ft) Projected Logo Detection Zone
The projected logo shows where the
kicking motion is to take place.
The projected logo will only be
available for this RKE transmitter after
it has been out of range for at least
20 seconds.
If an RKE transmitter is again
detected within approximately 2 m
(6 ft) of the liftgate, or another
hands-free operation has been
detected, the one-minute timer will be
reset.
Page 26 of 426
Cadillac XT5 Owner Manual (GMNA-Localizing-U.S./Canada/Mexico-
14590481) - 2021 - CRC - 10/22/20
KEYS, DOORS, AND WINDOWS 25
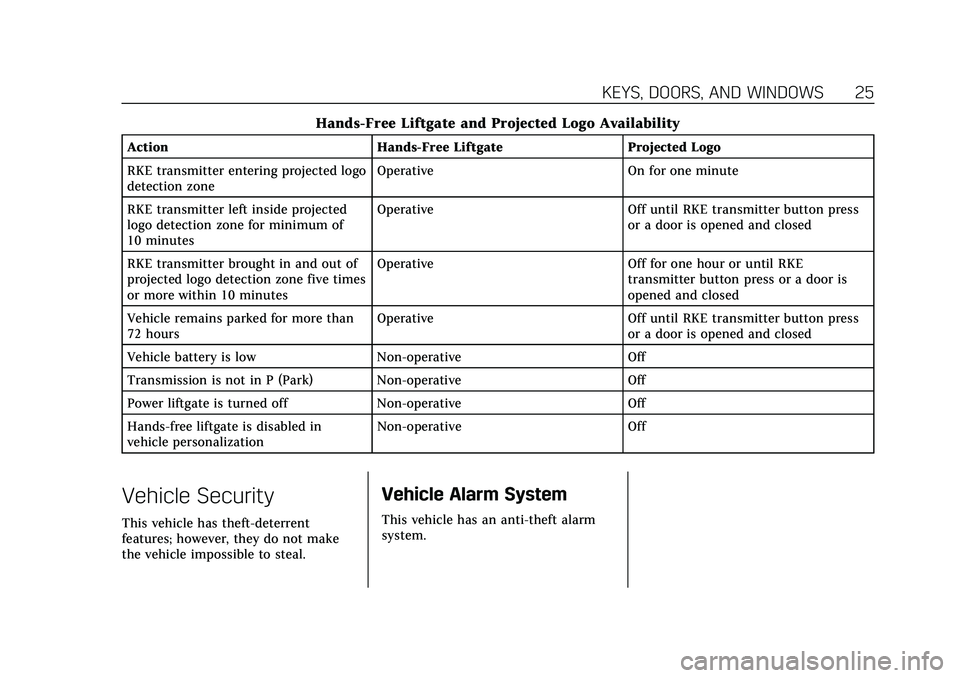
Hands-Free Liftgate and Projected Logo Availability
ActionHands-Free Liftgate Projected Logo
RKE transmitter entering projected logo
detection zone Operative
On for one minute
RKE transmitter left inside projected
logo detection zone for minimum of
10 minutes Operative
Off until RKE transmitter button press
or a door is opened and closed
RKE transmitter brought in and out of
projected logo detection zone five times
or more within 10 minutes Operative
Off for one hour or until RKE
transmitter button press or a door is
opened and closed
Vehicle remains parked for more than
72 hours Operative
Off until RKE transmitter button press
or a door is opened and closed
Vehicle battery is low Non-operative Off
Transmission is not in P (Park) Non-operative Off
Power liftgate is turned off Non-operative Off
Hands-free liftgate is disabled in
vehicle personalization Non-operative
Off
Vehicle Security
This vehicle has theft-deterrent
features; however, they do not make
the vehicle impossible to steal.
Vehicle Alarm System
This vehicle has an anti-theft alarm
system.
Page 28 of 426
Cadillac XT5 Owner Manual (GMNA-Localizing-U.S./Canada/Mexico-
14590481) - 2021 - CRC - 10/22/20
KEYS, DOORS, AND WINDOWS 27
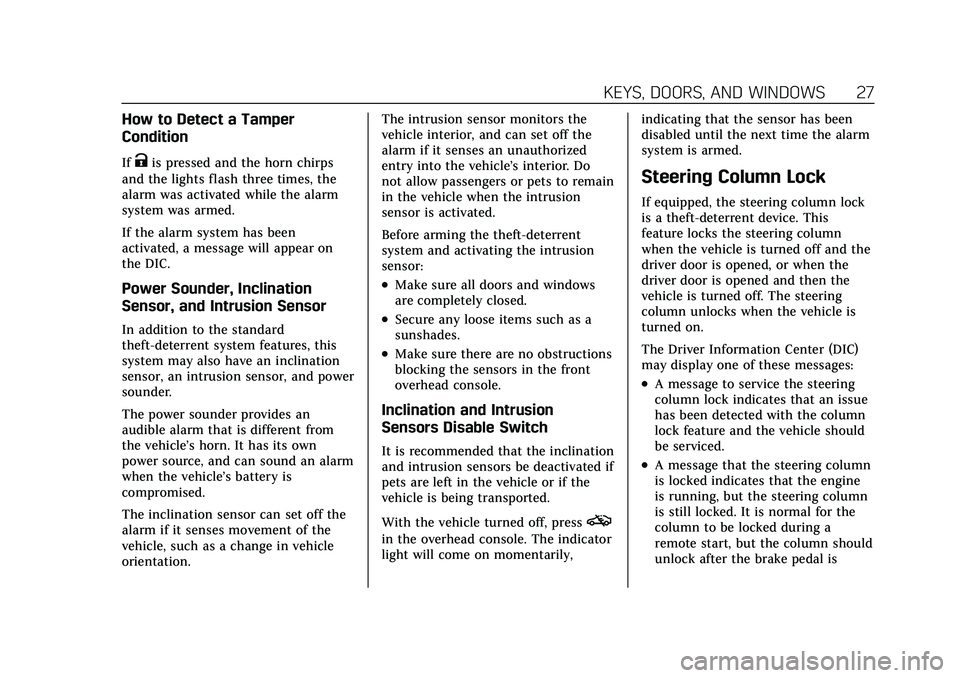
How to Detect a Tamper
Condition
IfKis pressed and the horn chirps
and the lights flash three times, the
alarm was activated while the alarm
system was armed.
If the alarm system has been
activated, a message will appear on
the DIC.
Power Sounder, Inclination
Sensor, and Intrusion Sensor
In addition to the standard
theft-deterrent system features, this
system may also have an inclination
sensor, an intrusion sensor, and power
sounder.
The power sounder provides an
audible alarm that is different from
the vehicle’s horn. It has its own
power source, and can sound an alarm
when the vehicle’s battery is
compromised.
The inclination sensor can set off the
alarm if it senses movement of the
vehicle, such as a change in vehicle
orientation. The intrusion sensor monitors the
vehicle interior, and can set off the
alarm if it senses an unauthorized
entry into the vehicle’s interior. Do
not allow passengers or pets to remain
in the vehicle when the intrusion
sensor is activated.
Before arming the theft-deterrent
system and activating the intrusion
sensor:
.Make sure all doors and windows
are completely closed.
.Secure any loose items such as a
sunshades.
.Make sure there are no obstructions
blocking the sensors in the front
overhead console.
Inclination and Intrusion
Sensors Disable Switch
It is recommended that the inclination
and intrusion sensors be deactivated if
pets are left in the vehicle or if the
vehicle is being transported.
With the vehicle turned off, press
o
in the overhead console. The indicator
light will come on momentarily,
indicating that the sensor has been
disabled until the next time the alarm
system is armed.
Steering Column Lock
If equipped, the steering column lock
is a theft-deterrent device. This
feature locks the steering column
when the vehicle is turned off and the
driver door is opened, or when the
driver door is opened and then the
vehicle is turned off. The steering
column unlocks when the vehicle is
turned on.
The Driver Information Center (DIC)
may display one of these messages:
.A message to service the steering
column lock indicates that an issue
has been detected with the column
lock feature and the vehicle should
be serviced.
.A message that the steering column
is locked indicates that the engine
is running, but the steering column
is still locked. It is normal for the
column to be locked during a
remote start, but the column should
unlock after the brake pedal is
Page 38 of 426
Cadillac XT5 Owner Manual (GMNA-Localizing-U.S./Canada/Mexico-
14590481) - 2021 - CRC - 10/22/20
SEATS AND RESTRAINTS 37
Seats and Restraints
Head Restraints
Head Restraints . . . . . . . . . . . . . . . . . . . . 38
Front Seats
Seat Adjustment . . . . . . . . . . . . . . . . . . . 39
Lumbar Adjustment . . . . . . . . . . . . . . . 40
Reclining Seatbacks . . . . . . . . . . . . . . . 40
Memory Seats . . . . . . . . . . . . . . . . . . . . . . 41
Heated and Ventilated FrontSeats . . . . . . . . . . . . . . . . . . . . . . . . . . . . . . 43
Rear Seats
Rear Seats . . . . . . . . . . . . . . . . . . . . . . . . . . 45
Rear Seat Armrest . . . . . . . . . . . . . . . . . 47
Heated Rear Seats . . . . . . . . . . . . . . . . . 47
Seat Belts
Seat Belts . . . . . . . . . . . . . . . . . . . . . . . . . . . 48
How to Wear Seat BeltsProperly . . . . . . . . . . . . . . . . . . . . . . . . . . . 49
Lap-Shoulder Belt . . . . . . . . . . . . . . . . . . 51
Seat Belt Use During
Pregnancy . . . . . . . . . . . . . . . . . . . . . . . . . 54
Seat Belt Extender . . . . . . . . . . . . . . . . . 54
Safety System Check . . . . . . . . . . . . . . 55 Seat Belt Care . . . . . . . . . . . . . . . . . . . . . . 55
Replacing Seat Belt System Parts
after a Crash . . . . . . . . . . . . . . . . . . . . . . 55
Airbag System
Airbag System . . . . . . . . . . . . . . . . . . . . . 56
Where Are the Airbags? . . . . . . . . . . . 57
When Should an AirbagInflate? . . . . . . . . . . . . . . . . . . . . . . . . . . . 58
What Makes an Airbag Inflate? . . . 59
How Does an Airbag Restrain? . . . 59
What Will You See after an Airbag Inflates? . . . . . . . . . . . . . . . . . . . . . . . . . . 60
Passenger Sensing System . . . . . . . . 61
Servicing the Airbag-Equipped Vehicle . . . . . . . . . . . . . . . . . . . . . . . . . . . . 65
Adding Equipment to the
Airbag-Equipped Vehicle . . . . . . . . 65
Airbag System Check . . . . . . . . . . . . . . 66
Replacing Airbag System Parts after a Crash . . . . . . . . . . . . . . . . . . . . . . 66
Child Restraints
Older Children . . . . . . . . . . . . . . . . . . . . . 67
Infants and Young Children . . . . . . 68
Child Restraint Systems . . . . . . . . . . . 70
Where to Put the Restraint . . . . . . . 72 Lower Anchors and Tethers for
Children (LATCH System) . . . . . . . 74
Replacing LATCH System Parts After a Crash . . . . . . . . . . . . . . . . . . . . . 80
Securing Child Restraints (With
the Seat Belt in the
Rear Seat) . . . . . . . . . . . . . . . . . . . . . . . . 80
Securing Child Restraints (With the Seat Belt in the
Front Seat) . . . . . . . . . . . . . . . . . . . . . . . 82
Page 47 of 426

Cadillac XT5 Owner Manual (GMNA-Localizing-U.S./Canada/Mexico-
14590481) - 2021 - CRC - 10/22/20
46 SEATS AND RESTRAINTS
Reclining the Seatback
To recline the seatback:
1. Pull the reclining seatback handle.
2. Move the seatback to the desiredposition, and then release the
handle to lock the seatback in
place.
3. Push and pull on the seatback to make sure it is locked.
Folding the Seatback
Either side of the seatback can be
folded for more cargo space. Fold a
seatback only when the vehicle is not
moving.
Caution
Folding a rear seat with the seat
belts still fastened may cause
damage to the seat or the seat
belts. Always unbuckle the seat
belts and return them to their
normal stowed position before
folding a rear seat.
To fold the seatback:
1. Pull the handle on top of the seatback to unlock it.
2. Fold the seatback forward. Repeat the steps to fold the other
seatback, if desired.
Driver Side Shown, Passenger Side Similar
The rear seatbacks can also be folded
forward by pulling the levers on either
side of the rear cargo area.
Raising the Seatback
{Warning
If either seatback is not locked, it
could move forward in a sudden
stop or crash. That could cause
injury to the person sitting there.
Always push and pull on the
seatbacks to be sure they are
locked.
Page 49 of 426

Cadillac XT5 Owner Manual (GMNA-Localizing-U.S./Canada/Mexico-
14590481) - 2021 - CRC - 10/22/20
48 SEATS AND RESTRAINTS
heated seat is on. On vehicles with
rear climate controls, an indicator on
the climate control display appears
when this feature is on.
On vehicles without rear climate
controls but equipped with heated
rear seats, press the button again to
turn this feature off. The light on the
button will turn off.
On vehicles with rear climate controls,
this feature turns on at the highest
setting. With each press of the button,
the heated seat changes to the next
lower setting, and then the off setting.
Three lights indicate the highest
setting, and one light indicates the
lowest. If the heated seats are on high,
the level may automatically be
lowered after approximately
30 minutes.
Seat Belts
This section describes how to use seat
belts properly, and some things not
to do.
{Warning
Do not let anyone ride where a seat
belt cannot be worn properly. In a
crash, if you or your passenger(s)
are not wearing seat belts, injuries
can be much worse than if you are
wearing seat belts. You can be
seriously injured or killed by hitting
things inside the vehicle harder or
by being ejected from the vehicle.
In addition, anyone who is not
buckled up can strike other
passengers in the vehicle.
It is extremely dangerous to ride in
a cargo area, inside or outside of a
vehicle. In a collision, passengers
riding in these areas are more likely
to be seriously injured or killed. Do
not allow passengers to ride in any
area of the vehicle that is not
equipped with seats and seat belts.
Always wear a seat belt, and check
that all passenger(s) are restrained
properly too.This vehicle has indicators as a
reminder to buckle the seat belts. See
Seat Belt Reminders
0106.
Why Seat Belts Work
When riding in a vehicle, you travel as
fast as the vehicle does. If the vehicle
stops suddenly, you keep going until
something stops you. It could be the
windshield, the instrument panel,
or the seat belts!
When you wear a seat belt, you and
the vehicle slow down together. There
is more time to stop because you stop
over a longer distance and, when worn
properly, your strongest bones take