clock CADILLAC XT5 2023 Owners Manual
[x] Cancel search | Manufacturer: CADILLAC, Model Year: 2023, Model line: XT5, Model: CADILLAC XT5 2023Pages: 482, PDF Size: 7.1 MB
Page 15 of 482
Cadillac XT5 Owner Manual (GMNA-Localizing-U.S./Canada/Mexico-
16406251) - 2023 - CRC - 3/25/22
14 Keys, Doors, and Windows
Keyless Liftgate Opening
Press the touch pad on the
liftgate handle to open the
liftgate if the remote key is
within 1 m (3 ft).
Key Access
To access a vehicle with a
weak remote key battery, see
Door Locks020.
Programming Remote
Keys to the Vehicle
Only remote keys programmed
to the vehicle will work. If a
remote key is lost or stolen, a
replacement can be purchased
and programmed through your
dealer.
The vehicle can be
reprogrammed so that lost or
stolen remote keys no longer
work. Each vehicle can have
up to eight remote keys
matched to it. Programming with
Recognized Remote Keys
A new remote key can be
programmed to the vehicle
when there are two
recognized remote keys.
To program, the vehicle must
be off and all of the remote
keys, both currently
recognized and new, must be
with you.
1. Place the two recognized remote keys in the
cupholder.
2. Remove the key lock cylinder cap on the driver
door handle. See Door
Locks 020. Insert the
vehicle key of the remote
key into the key lock
cylinder on the driver door
and turn the key
counterclockwise, to the
unlock position, five times
within 10 seconds.
The DIC displays READY
FOR REMOTE #2, 3,
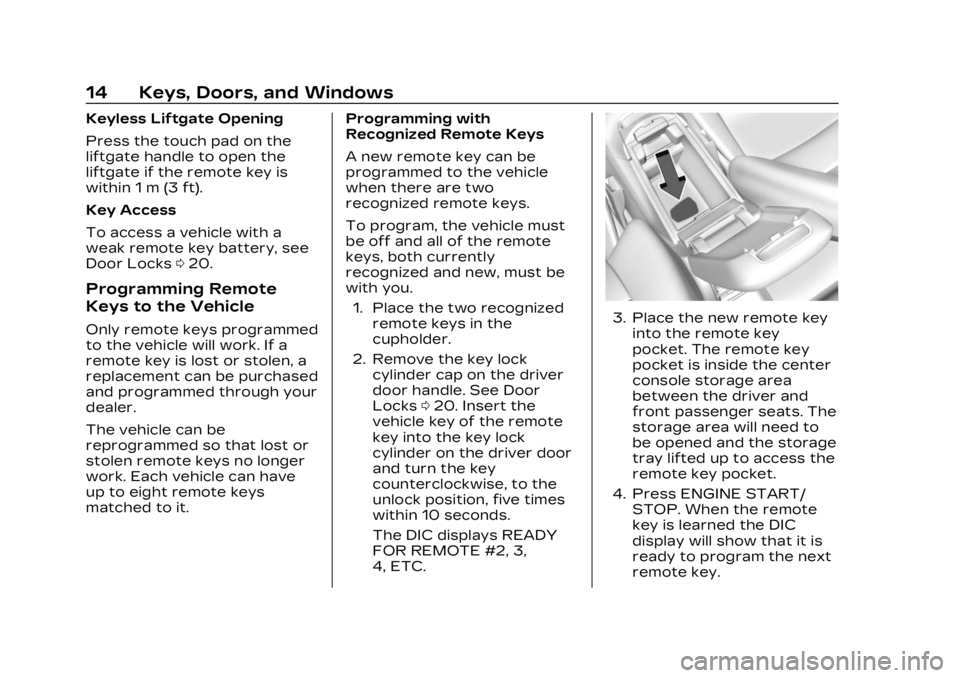
4, ETC.3. Place the new remote key into the remote key
pocket. The remote key
pocket is inside the center
console storage area
between the driver and
front passenger seats. The
storage area will need to
be opened and the storage
tray lifted up to access the
remote key pocket.
4. Press ENGINE START/ STOP. When the remote
key is learned the DIC
display will show that it is
ready to program the next
remote key.
Page 16 of 482
Cadillac XT5 Owner Manual (GMNA-Localizing-U.S./Canada/Mexico-
16406251) - 2023 - CRC - 3/25/22
Keys, Doors, and Windows 15
5. Remove the remote keyfrom the remote key
pocket and press the
remote key
KorQbutton.
To program additional
remote keys, repeat
Steps 3–5.
When all additional remote
keys are programmed,
press and hold ENGINE
START/STOP for
12 seconds to exit
programming mode.
6. Return the key back into the remote key.
7. Replace the key lock cylinder cap. See Door
Locks 020.
Programming without
Recognized Remote Keys
If two currently recognized
remote keys are not available,
follow this procedure to
program up to eight remote
keys. This feature is not
available in Canada. This
procedure will take
approximately 30 minutes to complete. The vehicle must be
off and all of the remote keys
you wish to program must be
with you.
1. Remove the key lock cylinder cap on the driver
door handle. See Door
Locks 020. Insert the
vehicle key of the remote
key into the key lock
cylinder on the driver door
handle and turn the key
counterclockwise, to the
unlock position, five times
within 10 seconds.
The DIC displays REMOTE
LEARN PENDING,
PLEASE WAIT.
2. Wait for 10 minutes until the DIC displays PRESS
ENGINE START BUTTON
TO LEARN and then press
ENGINE START/STOP.
The DIC display will again
show REMOTE LEARN
PENDING, PLEASE WAIT.
3. Repeat Step 2 two additional times. After the
third time all previously known remote keys will no
longer work with the
vehicle. Remaining remote
keys can be relearned
during the next steps.
The DIC display should
now show READY FOR
REMOTE # 1.
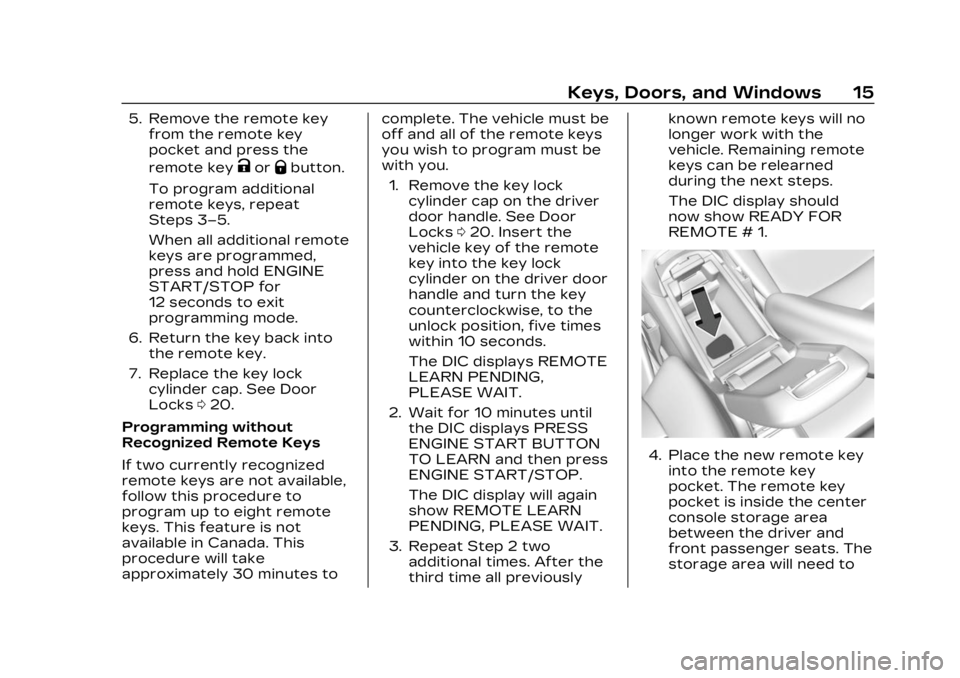
4. Place the new remote key
into the remote key
pocket. The remote key
pocket is inside the center
console storage area
between the driver and
front passenger seats. The
storage area will need to
Page 112 of 482
Cadillac XT5 Owner Manual (GMNA-Localizing-U.S./Canada/Mexico-
16406251) - 2023 - CRC - 3/25/22
Instruments and Controls 111
Instruments and
Controls
Controls
Steering WheelAdjustment . . . . . . . . . . . . . . . . . 112
Heated Steering Wheel . . . 113
Horn . . . . . . . . . . . . . . . . . . . . . . . . . . . . 113
Windshield Wiper/ Washer . . . . . . . . . . . . . . . . . . . . . . 113
Rear Window Wiper/ Washer . . . . . . . . . . . . . . . . . . . . . . 116
Compass . . . . . . . . . . . . . . . . . . . . . . 117
Clock . . . . . . . . . . . . . . . . . . . . . . . . . . . 118
Power Outlets . . . . . . . . . . . . . . . 118
Wireless Charging . . . . . . . . . . 118
Warning Lights, Gauges,
and Indicators
Warning Lights, Gauges, and Indicators . . . . . . . . . . . . . . 121
Instrument Cluster . . . . . . . . 122
Speedometer . . . . . . . . . . . . . . . 125
Odometer . . . . . . . . . . . . . . . . . . . . 125
Trip Odometer . . . . . . . . . . . . . . 125
Tachometer . . . . . . . . . . . . . . . . . . 125
Fuel Gauge . . . . . . . . . . . . . . . . . . . 125
Engine Coolant Temperature Gauge . . . . . 126 Seat Belt Reminders . . . . . . 126
Airbag Readiness
Light . . . . . . . . . . . . . . . . . . . . . . . . . . 127
Passenger Airbag Status Indicator . . . . . . . . . . . . . . . . . . . . . 128
Charging System Light . . . 128
Malfunction Indicator Lamp (Check Engine
Light) . . . . . . . . . . . . . . . . . . . . . . . . . 129
Brake System Warning Light . . . . . . . . . . . . . . . . . . . . . . . . . . 131
Electric Parking Brake Light . . . . . . . . . . . . . . . . . . . . . . . . . . 132
Service Electric Parking Brake Light . . . . . . . . . . . . . . . . . 132
Antilock Brake System (ABS) Warning Light . . . . . 132
Performance Shifting Light . . . . . . . . . . . . . . . . . . . . . . . . . 133
All-Wheel-Drive Light . . . . . 133
Lane Keep Assist (LKA) Light . . . . . . . . . . . . . . . . . . . . . . . . . 133
Vehicle Ahead Indicator . . . . . . . . . . . . . . . . . . . . 134
Pedestrian Ahead Indicator . . . . . . . . . . . . . . . . . . . . 134
Traction Off Light . . . . . . . . . 134
StabiliTrak OFF Light . . . . . 135 Traction Control System
(TCS)/StabiliTrak
Light . . . . . . . . . . . . . . . . . . . . . . . . . 135
Engine Coolant Temperature Warning
Light (Uplevel Only) . . . . . . 135
Driver Mode Control Light . . . . . . . . . . . . . . . . . . . . . . . . . 136
Tire Pressure Light . . . . . . . 136
Engine Oil Pressure Light . . . . . . . . . . . . . . . . . . . . . . . . . . 137
Low Fuel Warning Light . . . . . . . . . . . . . . . . . . . . . . . . . . 137
Security Light . . . . . . . . . . . . . . . 138
High-Beam On Light . . . . . . 138
Lamps On Reminder . . . . . . 138
Cruise Control Light . . . . . . 138
Door Ajar Light . . . . . . . . . . . . . 139
Information Displays
Driver Information Center (DIC) . . . . . . . . . . . . . . . . 139
Head-Up Display (HUD) . . . 142
Vehicle Messages
Vehicle Messages . . . . . . . . . 146
Engine Power Messages . . . . . . . . . . . . . . . . . . . 146
Vehicle Speed
Messages . . . . . . . . . . . . . . . . . . . 147
Page 119 of 482
Cadillac XT5 Owner Manual (GMNA-Localizing-U.S./Canada/Mexico-
16406251) - 2023 - CRC - 3/25/22
118 Instruments and Controls
Clock
Set the time and date using
the infotainment system. See
"Time/Date" under Settings
0205.
Power Outlets
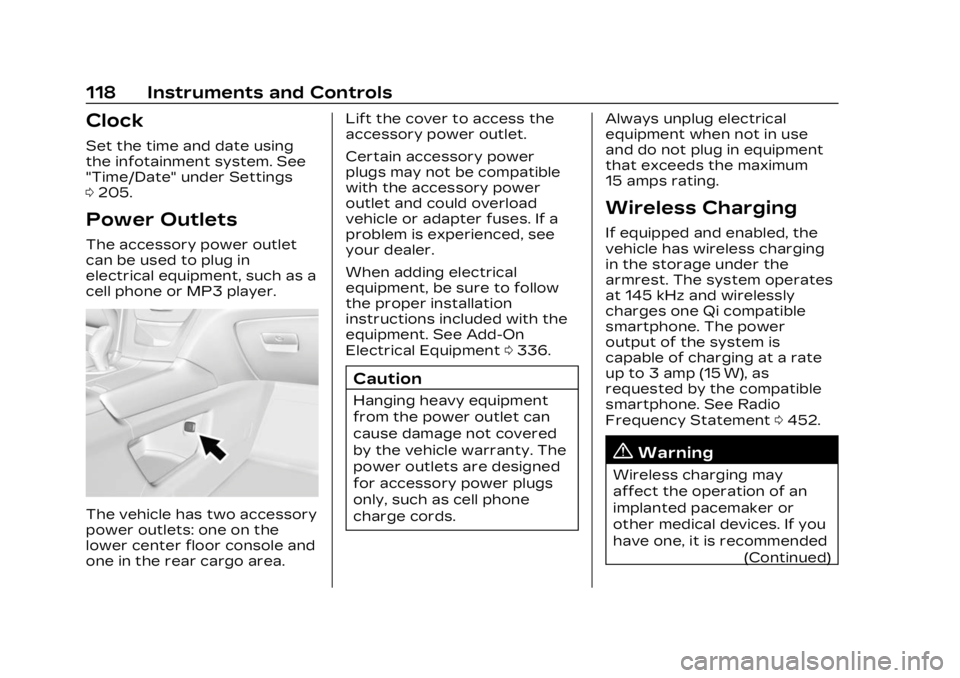
The accessory power outlet
can be used to plug in
electrical equipment, such as a
cell phone or MP3 player.
The vehicle has two accessory
power outlets: one on the
lower center floor console and
one in the rear cargo area. Lift the cover to access the
accessory power outlet.
Certain accessory power
plugs may not be compatible
with the accessory power
outlet and could overload
vehicle or adapter fuses. If a
problem is experienced, see
your dealer.
When adding electrical
equipment, be sure to follow
the proper installation
instructions included with the
equipment. See Add-On
Electrical Equipment
0336.
Caution
Hanging heavy equipment
from the power outlet can
cause damage not covered
by the vehicle warranty. The
power outlets are designed
for accessory power plugs
only, such as cell phone
charge cords. Always unplug electrical
equipment when not in use
and do not plug in equipment
that exceeds the maximum
15 amps rating.
Wireless Charging
If equipped and enabled, the
vehicle has wireless charging
in the storage under the
armrest. The system operates
at 145 kHz and wirelessly
charges one Qi compatible
smartphone. The power
output of the system is
capable of charging at a rate
up to 3 amp (15 W), as
requested by the compatible
smartphone. See Radio
Frequency Statement
0452.
{Warning
Wireless charging may
affect the operation of an
implanted pacemaker or
other medical devices. If you
have one, it is recommended
(Continued)
Page 206 of 482
Cadillac XT5 Owner Manual (GMNA-Localizing-U.S./Canada/Mexico-
16406251) - 2023 - CRC - 3/25/22
Infotainment System 205
apply. For Android Auto
support and to see if your
phone is compatible, see
https://support.google.com/
androidauto. For Apple
CarPlay support and to see if
your phone is compatible, see
www.apple.com/ios/carplay/.
Apple or Google may change
or suspend availability at any
time. Android Auto, Android,
Google, Google Play, and other
marks are trademarks of
Google Inc.; Apple CarPlay is a
trademark of Apple Inc.
Press
{on the center stack to
exit Android Auto or Apple
CarPlay. To enter back into
Android Auto or Apple
CarPlay, press and hold
{on
the center stack.
Apple CarPlay and Android
Auto can be disabled from the
infotainment system. To do
this, touch Home, Settings,
and then touch the Apps tab
along the top of the display. Use the On/Off toggled to
turn off Apple CarPlay or
Android Auto.
Settings
Certain settings can be
managed in the Online
Account sites when an
account is established, and
may be modified if other users
have accessed the vehicle or
created accounts. This may
result in changes to the
security or functionality of the
infotainment system. Some
settings may also be
transferred to a new vehicle,
if equipped. For instructions,
visit your brand website.
Refer to the User Terms and
Privacy Statement for
important details. To view,
touch the Settings icon on the
Home Page of the
infotainment display.
The settings menu may be
organized into four categories.
Select the desired category by
touching System, Apps,
Vehicle, or Personal.
To access the personalization
menus:
1. Touch Settings on the Home Page on the
infotainment display.
2. Touch the desired category to display a list of
available options.
3. Touch to select the desired feature setting.
4. Touch the options on the infotainment display to
disable or enable a feature.
5. Touch
zto go to the top
level of the Settings menu.
System
The menu may contain the
following:
Time / Date
Allows setting of the clock.
Page 355 of 482

Cadillac XT5 Owner Manual (GMNA-Localizing-U.S./Canada/Mexico-
16406251) - 2023 - CRC - 3/28/22
354 Vehicle Care
the cooling system is cool
before this is done. See
Engine Overheating0356.
The coolant surge tank is in
the engine compartment on
the driver side of the vehicle.
See Engine Compartment
Overview 0342.
How to Add Coolant to the
Surge Tank
{Warning
Spilling coolant on hot
engine parts can burn you.
Coolant contains ethylene
glycol and it will burn if the
engine parts are hot enough.
{Warning
Steam and scalding liquids
from a hot cooling system
are under pressure. Turning
the pressure cap, even a
little, can cause them to
come out at high speed and
(Continued)
Warning (Continued)
you could be burned. Never
turn the cap when the
cooling system, including the
pressure cap, is hot. Wait for
the cooling system and
pressure cap to cool.
Caution
Failure to follow the specific
coolant fill procedure could
cause the engine to
overheat and could cause
system damage. If coolant is
not visible in the surge tank,
contact your dealer.
The coolant surge tank
pressure cap can be removed
when the cooling system,
including the surge tank
pressure cap and upper
radiator hose, is no longer hot.
Coolant Fill Instructions
(3.6L Engine Only)
1. Turn the pressure cap slowly counterclockwise.
If a hiss is heard, wait for
that to stop. A hiss means
there is still some
pressure left.
2. Keep turning the pressure cap slowly and remove it.
Page 404 of 482

Cadillac XT5 Owner Manual (GMNA-Localizing-U.S./Canada/Mexico-
16406251) - 2023 - CRC - 3/28/22
Vehicle Care 403
1. Remove the rear tire andreplace it with the spare
tire by performing all steps
in Removing the Flat Tire
and Installing the
Spare Tire.
2. Perform all steps in Removing the Flat Tire and
Installing the Spare Tire
again this time replacing
the flat front tire with the
rear tire.
3. Proceed to Storing a Flat or Spare Tire and Tools.
Removing the Spare Tire
and Tools
To access the spare tire and
tools:
1. Open the liftgate. See Liftgate 025.
2. Remove the cargo management system
divider. See Cargo
Management System
0108.
3. Pull up on the handle to lift
the load floor. Use the
hook to hold the load floor
open. See Rear Storage
0104.4. Turn the wing nut (4)
counterclockwise to
remove the jack (1), wheel
wrench (2), and strap (3).
Place the jack and tools
near the tire being
changed.
Page 405 of 482

Cadillac XT5 Owner Manual (GMNA-Localizing-U.S./Canada/Mexico-
16406251) - 2023 - CRC - 3/28/22
404 Vehicle Care
5. Remove the nut retainingthe spare tire.
6. Remove the spare tire and place it next to the tire
being changed.
Removing the Flat Tire
and Installing the
Spare Tire
1. Do a safety check beforeproceeding. See If a Tire
Goes Flat 0401.
2. Turn the wheel wrench
counterclockwise to loosen
all the wheel nuts, but do
not remove them yet.
{Warning
Getting under a vehicle
when it is lifted on a jack is
dangerous. If the vehicle
slips off the jack, you could
be badly injured or killed.
Never get under a vehicle
when it is supported only by
a jack.
{Warning
Raising the vehicle with the
jack improperly positioned
can damage the vehicle and
even make the vehicle fall.
To help avoid personal injury
and vehicle damage, be sure
to fit the jack lift head into
the proper location before
raising the vehicle.
{Warning
Lifting a vehicle and getting
under it to do maintenance
or repairs is dangerous
without the appropriate
safety equipment and
training. If a jack is provided
with the vehicle, it is
designed only for changing a
flat tire. If it is used for
anything else, you or others
could be badly injured or
killed if the vehicle slips off
(Continued)
Page 406 of 482

Cadillac XT5 Owner Manual (GMNA-Localizing-U.S./Canada/Mexico-
16406251) - 2023 - CRC - 3/28/22
Vehicle Care 405
Warning (Continued)
the jack. If a jack is provided
with the vehicle, only use it
for changing a flat tire.
Caution
Using a jack to raise the
vehicle without positioning it
correctly could damage your
vehicle. When raising your
vehicle on a jack, be sure to
position it correctly under
the frame and avoid contact
with the plastic molding.
3. Attach the wrench to the jack by fitting the hex end
of the wrench over the hex
head of the jack.
4. Place the jack under the vehicle.
Caution
Make sure that the jack lift
head is in the correct
position or you may damage
(Continued)
Caution (Continued)
your vehicle. The repairs
would not be covered by
your warranty.
5. Position the jack lift headat the jack location nearest
the tire being changed.
The jacking location is
indicated by a half circle
notch in the metal flange.
The jack must not be used
in any other position.
6. Turn the wheel wrenchclockwise to raise the jack
until the slot in the jack lift
head fits into the metal
flange located behind the
cut out on the plastic
molding.
7. Raise the vehicle by turning the jack handle
clockwise. Raise the
vehicle far enough off the
ground so there is enough
room for the road tire to
clear the ground.
Page 407 of 482

Cadillac XT5 Owner Manual (GMNA-Localizing-U.S./Canada/Mexico-
16406251) - 2023 - CRC - 3/28/22
406 Vehicle Care
8. Remove all of thewheel nuts.
9. Remove the tire being changed.
{Warning
Rust or dirt on a wheel,
or on the parts to which it
is fastened, can cause
wheel nuts to become
loose over time. The
wheel could come off and
cause a crash. When
changing a wheel, remove
any rust or dirt from
(Continued)
Warning (Continued)
places where the wheel
attaches to the vehicle. In
an emergency, a cloth or
paper towel can be used;
however, use a scraper
or wire brush later to
remove all rust or dirt.
10. Remove any rust or dirt from the wheel bolts,
mounting surfaces, and
spare wheel.
11. Place the spare tire on the wheel-mounting surface.
{Warning
Never use oil or grease on
bolts or nuts because the
nuts might come loose. The
vehicle's wheel could fall off,
causing a crash.
12. Reinstall the wheel nuts. Tighten each nut by hand
until the wheel is held
against the hub.
13. Lower the vehicle by turning the jack handle
counterclockwise.
{Warning
Wheel nuts that are
improperly or incorrectly
tightened can cause the
wheels to become loose or
come off. The wheel nuts
should be tightened with a
torque wrench to the proper
torque specification after
replacing. Follow the torque
specification supplied by the
(Continued)