ignition CADILLAC XT6 2020 User Guide
[x] Cancel search | Manufacturer: CADILLAC, Model Year: 2020, Model line: XT6, Model: CADILLAC XT6 2020Pages: 385, PDF Size: 6.63 MB
Page 45 of 385
Cadillac XT6 Owner Manual (GMNA-Localizing-U.S./Canada-12984300) -
2020 - CRC - 3/19/19
44 SEATS AND RESTRAINTS
Front Seats
Power Seat Adjustment
{Warning
You can lose control of the vehicle
if you try to adjust a driver seat
while the vehicle is moving. Adjust
the driver seat only when the
vehicle is not moving.
{Warning
The power seats will work with the
ignition off. Children could operate
the power seats and be injured.
Never leave children alone in the
vehicle.
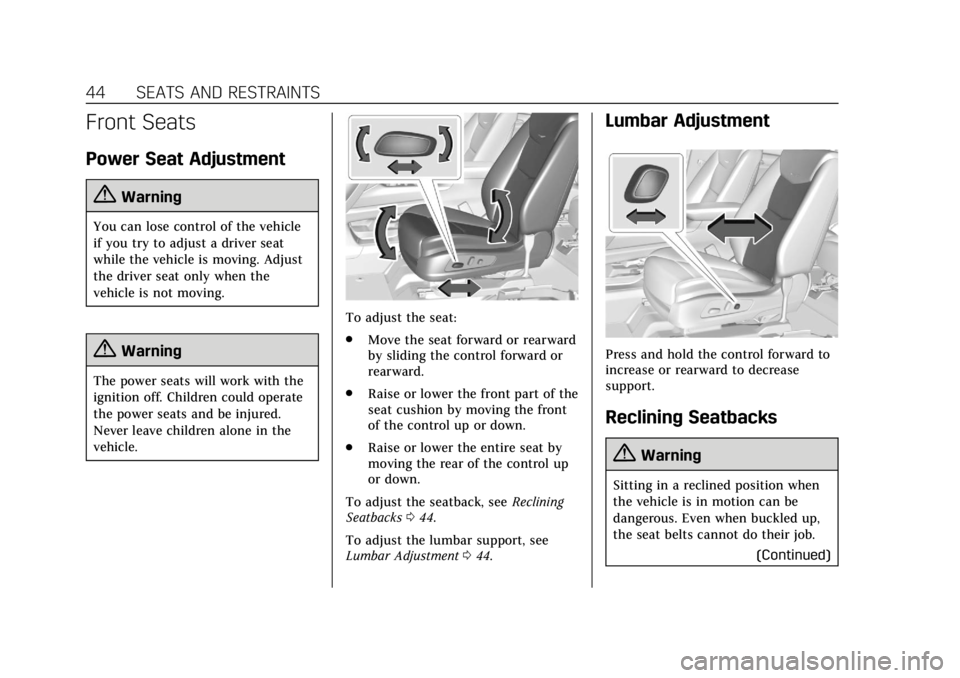
To adjust the seat:
.Move the seat forward or rearward
by sliding the control forward or
rearward.
. Raise or lower the front part of the
seat cushion by moving the front
of the control up or down.
. Raise or lower the entire seat by
moving the rear of the control up
or down.
To adjust the seatback, see Reclining
Seatbacks 044.
To adjust the lumbar support, see
Lumbar Adjustment 044.
Lumbar Adjustment
Press and hold the control forward to
increase or rearward to decrease
support.
Reclining Seatbacks
{Warning
Sitting in a reclined position when
the vehicle is in motion can be
dangerous. Even when buckled up,
the seat belts cannot do their job.
(Continued)
Page 47 of 385
Cadillac XT6 Owner Manual (GMNA-Localizing-U.S./Canada-12984300) -
2020 - CRC - 3/19/19
46 SEATS AND RESTRAINTS
Before saving, adjust all available
memory feature positions. Turn the
vehicle on and then press and release
SET; a beep will sound. Then
immediately press and hold 1, 2,
or
B(Exit) until two beeps sound.
To manually recall these positions,
press and hold 1, 2, or
Buntil the
saved position is reached. Follow the
instructions under “Saving Memory
Positions.”
The vehicle identifies the current
driver’s RKE transmitter number (1–
8). See Remote Keyless Entry (RKE)
System Operation 08. Only RKE
transmitters 1 and 2 can be used for
automatic memory recalls. A Driver
Information Center (DIC) welcome
message indicating the transmitter
number may display for the first few
ignition cycles following a transmitter
change. For Seat Entry Memory to
work properly, save the positions to
the memory button (1 or 2) matching
the RKE transmitter number displayed
in the DIC welcome message. Carry
the linked RKE transmitter when
entering the vehicle. Vehicle Personalization Settings
.
To have the Seat Entry Memory
movement begin when the vehicle
is started, select the Settings
menu, then Vehicle, then Seating
Position, and then Seat Entry
Memory. Select On or Off. See
“Seat Entry Memory” later in this
section.
. To begin Seat Exit Memory
movement when the vehicle is
turned off and the driver door is
opened, or when the vehicle is
turned off with the driver door
already opened, select the Settings
menu, then Vehicle, then Seating
Position, and then Seat Exit
Memory. Select On or Off. See
“Seat Exit Memory” later in this
section.
. See Vehicle Personalization 0135
for additional setting information.
Identifying Driver Number
To identify the driver number: 1. Move your RKE transmitter away from the vehicle. 2. Start the vehicle with another
key or RKE transmitter. The DIC
should display the driver number
for the other RKE transmitter.
Turn the vehicle off and remove
the key or RKE transmitter from
the vehicle.
3. Start the vehicle with the initial key or RKE transmitter. The DIC
should display the driver number
of your RKE transmitter.
Saving Memory Positions
Read these instructions completely
before saving memory positions.
To save preferred driving positions
1 and 2: 1. Turn the vehicle on or to ACC/ ACCESSORY.
A DIC welcome message may
indicate driver number 1 or 2.
2. Adjust all available memory features to the desired driving
position.
3. Press and release SET; a beep will sound.
Page 50 of 385
Cadillac XT6 Owner Manual (GMNA-Localizing-U.S./Canada-12984300) -
2020 - CRC - 3/19/19
SEATS AND RESTRAINTS 49
PressCor{, if equipped, to
ventilate the driver or passenger seat.
A ventilated seat has a fan that pulls
or pushes air through the seat. The air
is not cooled.
When this feature is off, the heated
and ventilated seat symbols on the
buttons are white. When a heated seat
is turned on, the symbol turns red.
When a ventilated seat is turned on,
the symbol turns blue.
Press the button once for the highest
setting. With each press of the button,
the seat will change to the next lower
setting, and then to the off setting.
The indicator lights next to the
buttons indicate three for the highest
setting and one for the lowest. If the
heated seats are on high, the level
may automatically be lowered after
approximately 30 minutes.
The passenger seat may take longer to
heat up. Auto Heated and Ventilated Seats
When the vehicle is on, this feature
will automatically activate the heated
or ventilated seats at the level
required by the vehicle’s interior
temperature.
The active high, medium, low, or off
heated or ventilated seat level will be
indicated by the manual heated or
ventilated seat buttons on the center
stack. Use the manual heated or
ventilated seat buttons on the center
stack to turn auto heated or ventilated
seats off. If the passenger seat is
unoccupied, the auto heated or
ventilated seats feature will not
activate that seat. The auto heated or
ventilated seats feature can be
programmed to always be enabled
when the vehicle is on.
See
Vehicle Personalization 0135.
Remote Start Heated and Ventilated
Seats
During a remote start, the heated or
ventilated seats, if equipped, can be
turned on automatically. When it is
cold outside, the heated seats turn on,
and when it is hot outside the ventilated seats turn on. If the auto
heated or ventilated seats feature,
if equipped, is not turned on, the
heated or ventilated seats will be
canceled when the ignition is turned
on. Press the heated or ventilated seat
button to use the heated or ventilated
seats after the vehicle is started.
The heated or ventilated seat
indicator lights do not turn on during
a remote start.
The temperature performance of an
unoccupied seat may be reduced. This
is normal.
The remote start heated or ventilated
seats may be enabled or disabled in
vehicle personalization. See
Remote
Vehicle Start 015 and
Vehicle Personalization 0135.
Page 69 of 385
Cadillac XT6 Owner Manual (GMNA-Localizing-U.S./Canada-12984300) -
2020 - CRC - 3/19/19
68 SEATS AND RESTRAINTS
How Does an Airbag
Restrain?
In moderate to severe frontal or near
frontal collisions, even belted
occupants can contact the steering
wheel or the instrument panel. In
moderate to severe side collisions,
even belted occupants can contact the
inside of the vehicle.
Airbags supplement the protection
provided by seat belts by distributing
the force of the impact more evenly
over the occupant's body.
Rollover capable roof-rail airbags are
designed to help contain the head and
chest of occupants in the outboard
seating positions in the first, second,
and third rows. The rollover capable
roof-rail airbags are designed to help
reduce the risk of full or partial
ejection in rollover events, although
no system can prevent all such
ejections.
But airbags would not help in many
types of collisions, primarily because
the occupant's motion is not toward
those airbags. SeeWhen Should an
Airbag Inflate? 066. Airbags should never be regarded as
anything more than a supplement to
seat belts.
What Will You See after an
Airbag Inflates?
After frontal, knee, and seat-mounted
side impact airbags inflate, they
quickly deflate, so quickly that some
people may not even realize the
airbags inflated. Roof-rail airbags may
still be at least partially inflated for
some time after they inflate. Some
components of the airbag module may
be hot for several minutes. For
location of the airbags, see
Where Are
the Airbags? 065.
The parts of the airbag that come into
contact with you may be warm, but
not too hot to touch. There may be
some smoke and dust coming from
the vents in the deflated airbags.
Airbag inflation does not prevent the
driver from seeing out of the
windshield or being able to steer the
vehicle, nor does it prevent people
from leaving the vehicle.
{Warning
When an airbag inflates, there may
be dust in the air. This dust could
cause breathing problems for
people with a history of asthma or
other breathing trouble. To avoid
this, everyone in the vehicle should
get out as soon as it is safe to do
so. If you have breathing problems
but cannot get out of the vehicle
after an airbag inflates, then get
fresh air by opening a window or a
door. If you experience breathing
problems following an airbag
deployment, you should seek
medical attention.
The vehicle has a feature that may
automatically unlock the doors, turn
on the interior lamps and hazard
warning flashers, and shut off the fuel
system after the airbags inflate. The
feature may also activate, without
airbag inflation, after an event that
exceeds a predetermined threshold.
After turning the ignition off and then
on again, the fuel system will return
Page 107 of 385
Cadillac XT6 Owner Manual (GMNA-Localizing-U.S./Canada-12984300) -
2020 - CRC - 3/19/19
106 INSTRUMENTS AND CONTROLS
Windshield Wiper/Washer
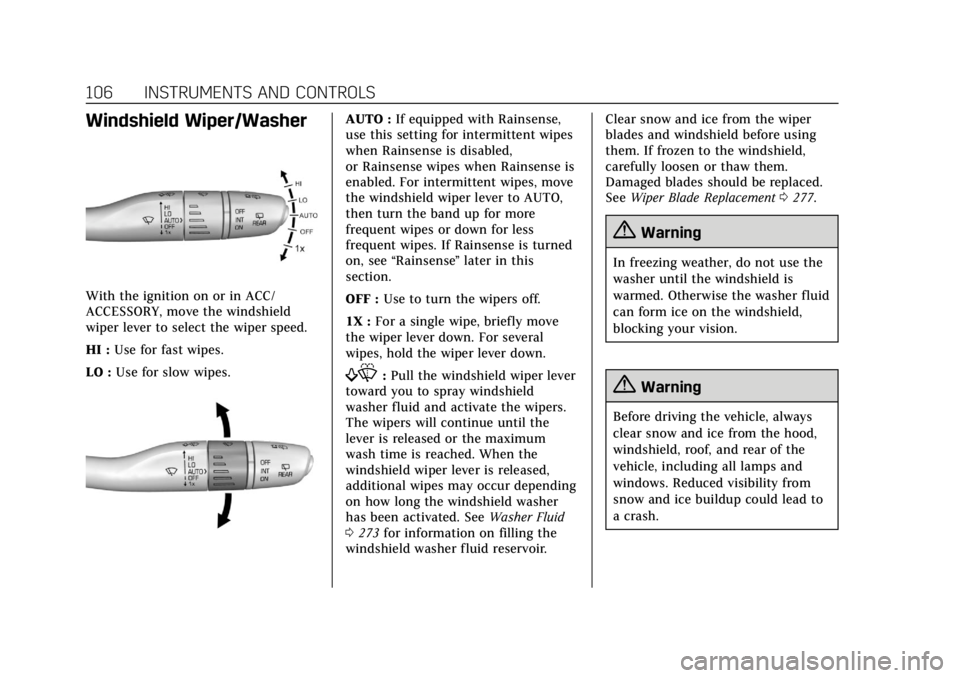
With the ignition on or in ACC/
ACCESSORY, move the windshield
wiper lever to select the wiper speed.
HI :Use for fast wipes.
LO : Use for slow wipes.
AUTO : If equipped with Rainsense,
use this setting for intermittent wipes
when Rainsense is disabled,
or Rainsense wipes when Rainsense is
enabled. For intermittent wipes, move
the windshield wiper lever to AUTO,
then turn the band up for more
frequent wipes or down for less
frequent wipes. If Rainsense is turned
on, see “Rainsense ”later in this
section.
OFF : Use to turn the wipers off.
1X : For a single wipe, briefly move
the wiper lever down. For several
wipes, hold the wiper lever down.
f: Pull the windshield wiper lever
toward you to spray windshield
washer fluid and activate the wipers.
The wipers will continue until the
lever is released or the maximum
wash time is reached. When the
windshield wiper lever is released,
additional wipes may occur depending
on how long the windshield washer
has been activated. See Washer Fluid
0 273 for information on filling the
windshield washer fluid reservoir. Clear snow and ice from the wiper
blades and windshield before using
them. If frozen to the windshield,
carefully loosen or thaw them.
Damaged blades should be replaced.
See
Wiper Blade Replacement 0277.
{Warning
In freezing weather, do not use the
washer until the windshield is
warmed. Otherwise the washer fluid
can form ice on the windshield,
blocking your vision.
{Warning
Before driving the vehicle, always
clear snow and ice from the hood,
windshield, roof, and rear of the
vehicle, including all lamps and
windows. Reduced visibility from
snow and ice buildup could lead to
a crash.
Page 108 of 385
Cadillac XT6 Owner Manual (GMNA-Localizing-U.S./Canada-12984300) -
2020 - CRC - 3/19/19
INSTRUMENTS AND CONTROLS 107
Wiper Parking
If the ignition is turned off while the
wipers are on LO, HI, or AUTO with
Rainsense turned off, they will
immediately stop.
If the windshield wiper lever is then
moved to OFF before the driver door is
opened or within 10 minutes, the
wipers will restart and move to the
base of the windshield.
If the ignition is turned off while the
wipers are performing wipes due to
windshield washing or Rainsense, the
wipers continue to run until they
reach the base of the windshield.
Rainsense
If equipped with Rainsense and the
feature is turned on, a sensor near the
top center of the windshield detects
the amount of water on the
windshield and controls the frequency
of the windshield wiper based on the
current sensitivity setting.
Keep this area of the windshield clear
of debris to allow for best system
performance.AUTO :
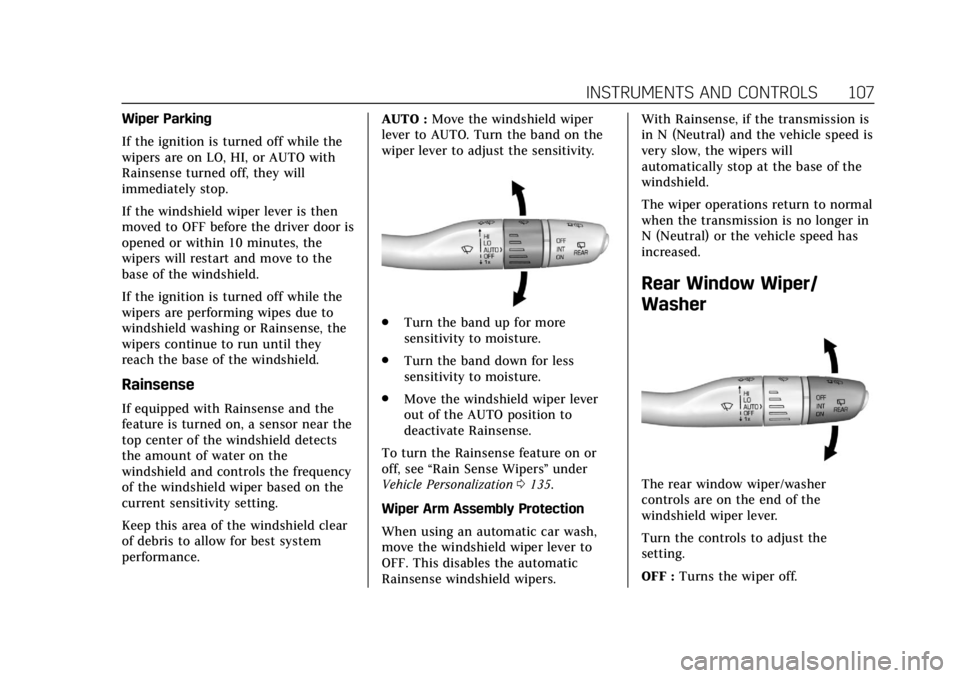
Move the windshield wiper
lever to AUTO. Turn the band on the
wiper lever to adjust the sensitivity.
. Turn the band up for more
sensitivity to moisture.
. Turn the band down for less
sensitivity to moisture.
. Move the windshield wiper lever
out of the AUTO position to
deactivate Rainsense.
To turn the Rainsense feature on or
off, see “Rain Sense Wipers ”under
Vehicle Personalization 0135.
Wiper Arm Assembly Protection
When using an automatic car wash,
move the windshield wiper lever to
OFF. This disables the automatic
Rainsense windshield wipers. With Rainsense, if the transmission is
in N (Neutral) and the vehicle speed is
very slow, the wipers will
automatically stop at the base of the
windshield.
The wiper operations return to normal
when the transmission is no longer in
N (Neutral) or the vehicle speed has
increased.
Rear Window Wiper/
Washer
The rear window wiper/washer
controls are on the end of the
windshield wiper lever.
Turn the controls to adjust the
setting.
OFF :
Turns the wiper off.
Page 110 of 385
Cadillac XT6 Owner Manual (GMNA-Localizing-U.S./Canada-12984300) -
2020 - CRC - 3/19/19
INSTRUMENTS AND CONTROLS 109
antenna, StabiliTrak/Electronic
Stability Control (ESC), and vehicle
speed information.
The compass system is designed to
operate for a certain number of miles
or degrees of turn before needing a
signal from the GPS satellites. When
the compass display shows CAL, drive
the vehicle for a short distance in an
open area where it can receive a GPS
signal. The compass system will
automatically determine when a GPS
signal is restored and provide a
heading again.
Clock
The time and date for the clock can be
set using the infotainment system. See
“Time/Date”in “System ”under
“Settings ”in the infotainment manual.
Power Outlets
Power Outlets 12-Volt Direct Current
The vehicle has two 12-volt outlets
that can be used to plug in electrical
equipment, such as a cell phone or
MP3 player.
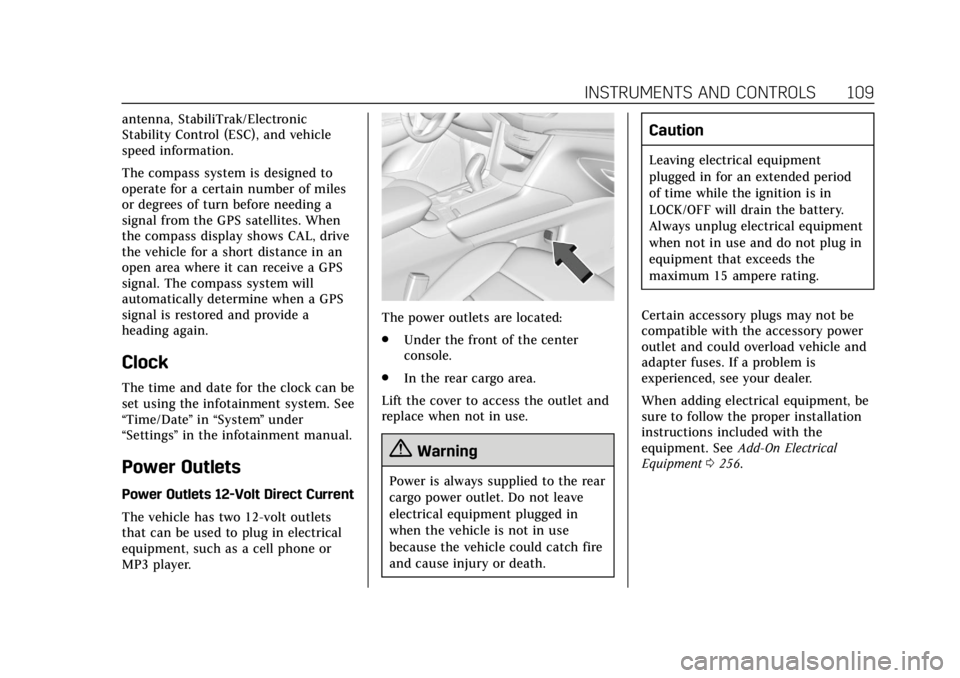
The power outlets are located:
.
Under the front of the center
console.
. In the rear cargo area.
Lift the cover to access the outlet and
replace when not in use.
{Warning
Power is always supplied to the rear
cargo power outlet. Do not leave
electrical equipment plugged in
when the vehicle is not in use
because the vehicle could catch fire
and cause injury or death.
Caution
Leaving electrical equipment
plugged in for an extended period
of time while the ignition is in
LOCK/OFF will drain the battery.
Always unplug electrical equipment
when not in use and do not plug in
equipment that exceeds the
maximum 15 ampere rating.
Certain accessory plugs may not be
compatible with the accessory power
outlet and could overload vehicle and
adapter fuses. If a problem is
experienced, see your dealer.
When adding electrical equipment, be
sure to follow the proper installation
instructions included with the
equipment. See Add-On Electrical
Equipment 0256.
Page 117 of 385
Cadillac XT6 Owner Manual (GMNA-Localizing-U.S./Canada-12984300) -
2020 - CRC - 3/19/19
116 INSTRUMENTS AND CONTROLS
Display :Press the thumbwheel to
enter the Display menu. Select to turn
on or off the speedometer, time, fuel
range, or, if equipped, compass or
speed sign.
Speed Warning : The Speed Warning
display allows the driver to set a
warning at a speed that they do not
want to exceed. To set the Speed
Warning press the thumbwheel when
Speed Warning is displayed. Use the
thumbwheel to adjust the value and
press to set the speed.
Once the speed is set, this feature can
be turned off by pressing the
thumbwheel while viewing this page.
If the selected speed limit is exceeded,
a pop-up warning is displayed with a
chime.
Head-up Display (HUD) (Uplevel) :
If equipped, this feature allows for
adjusting the angle of the HUD image
and changing or turning off the Speed
Limit Sign.
HUD Rotation (Uplevel): Press the
thumbwheel while Adjust Rotation is
highlighted to enter Adjust Mode.
Scroll to adjust the angle of the HUD display. Press the thumbwheel to
confirm and save the setting. This
feature may only be available in
P (Park).
Speed Sign: If equipped, press the
thumbwheel while Speed Sign is
highlighted to turn it on or off.
Software Information :
Displays open
source software information.
Speedometer
The speedometer shows the vehicle's
speed in either kilometers per hour
(km/h) or miles per hour (mph).
Odometer
The odometer shows how far the
vehicle has been driven, in either
kilometers or miles.
Trip Odometer
The trip odometer shows how far the
vehicle has been driven since the trip
odometer was last reset. The trip odometer is accessed and
reset through the Driver Information
Center (DIC). See
Driver Information
Center (DIC) 0128.
Tachometer
The tachometer displays the engine
speed in revolutions per minute (rpm).
For vehicles with the Stop/Start
system, when the ignition is on, the
tachometer indicates the vehicle
status. When pointing to AUTO STOP,
the engine is off but the vehicle is on
and can move. The engine could auto
start at any time. When the indicator
points to OFF, the vehicle is off.
When the engine is on, the
tachometer will indicate the engine’s
revolutions per minute (rpm). The
tachometer may vary by several
hundred rpm’s, during Auto Stop
mode, when the engine is shutting off
and restarting.
Page 118 of 385
Cadillac XT6 Owner Manual (GMNA-Localizing-U.S./Canada-12984300) -
2020 - CRC - 3/19/19
INSTRUMENTS AND CONTROLS 117
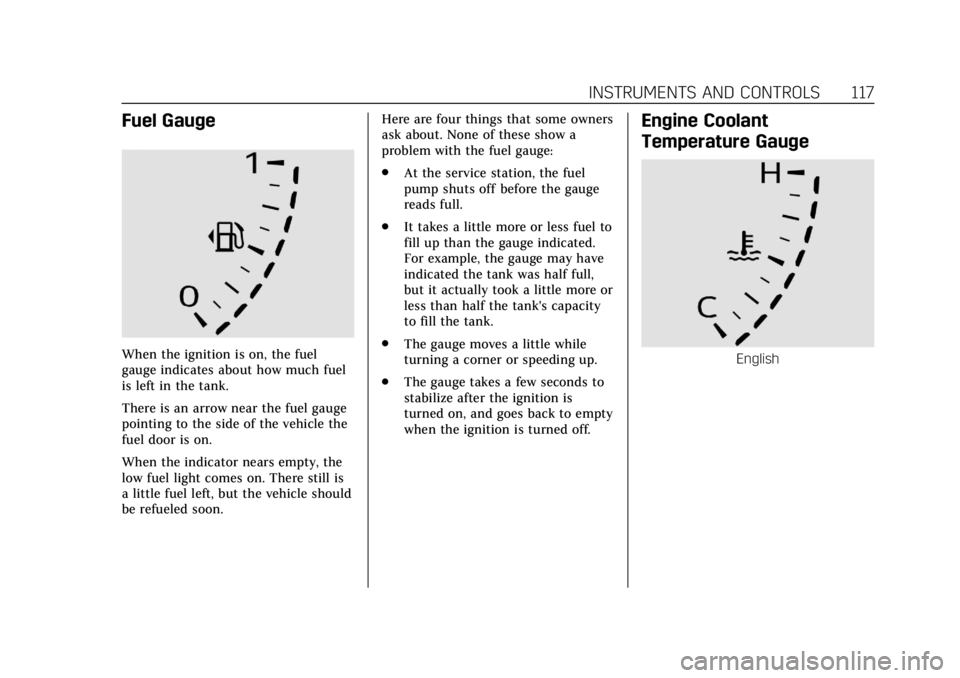
Fuel Gauge
When the ignition is on, the fuel
gauge indicates about how much fuel
is left in the tank.
There is an arrow near the fuel gauge
pointing to the side of the vehicle the
fuel door is on.
When the indicator nears empty, the
low fuel light comes on. There still is
a little fuel left, but the vehicle should
be refueled soon.Here are four things that some owners
ask about. None of these show a
problem with the fuel gauge:
.
At the service station, the fuel
pump shuts off before the gauge
reads full.
. It takes a little more or less fuel to
fill up than the gauge indicated.
For example, the gauge may have
indicated the tank was half full,
but it actually took a little more or
less than half the tank's capacity
to fill the tank.
. The gauge moves a little while
turning a corner or speeding up.
. The gauge takes a few seconds to
stabilize after the ignition is
turned on, and goes back to empty
when the ignition is turned off.
Engine Coolant
Temperature Gauge
English
Page 121 of 385
Cadillac XT6 Owner Manual (GMNA-Localizing-U.S./Canada-12984300) -
2020 - CRC - 3/19/19
120 INSTRUMENTS AND CONTROLS
{Warning
If the airbag readiness light ever
comes on and stays on, it means
that something may be wrong with
the airbag system. To help avoid
injury to yourself or others, have
the vehicle serviced right away. See
Airbag Readiness Light0119 for
more information, including
important safety information.
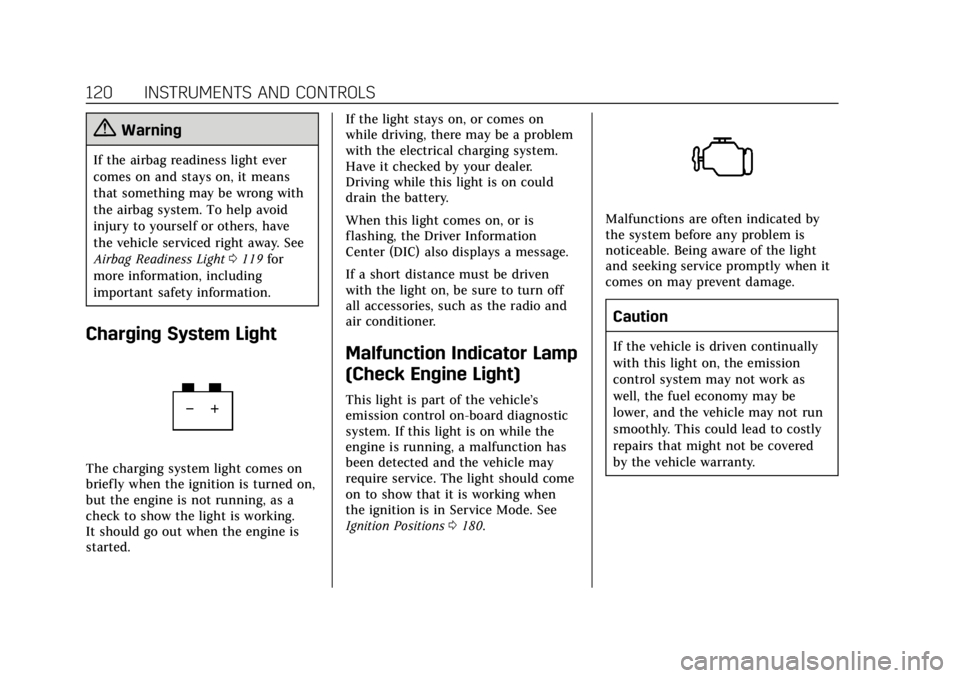
Charging System Light
The charging system light comes on
briefly when the ignition is turned on,
but the engine is not running, as a
check to show the light is working.
It should go out when the engine is
started. If the light stays on, or comes on
while driving, there may be a problem
with the electrical charging system.
Have it checked by your dealer.
Driving while this light is on could
drain the battery.
When this light comes on, or is
flashing, the Driver Information
Center (DIC) also displays a message.
If a short distance must be driven
with the light on, be sure to turn off
all accessories, such as the radio and
air conditioner.
Malfunction Indicator Lamp
(Check Engine Light)
This light is part of the vehicle’s
emission control on-board diagnostic
system. If this light is on while the
engine is running, a malfunction has
been detected and the vehicle may
require service. The light should come
on to show that it is working when
the ignition is in Service Mode. See
Ignition Positions
0180.
Malfunctions are often indicated by
the system before any problem is
noticeable. Being aware of the light
and seeking service promptly when it
comes on may prevent damage.
Caution
If the vehicle is driven continually
with this light on, the emission
control system may not work as
well, the fuel economy may be
lower, and the vehicle may not run
smoothly. This could lead to costly
repairs that might not be covered
by the vehicle warranty.