lock CADILLAC XT6 2020 Repair Manual
[x] Cancel search | Manufacturer: CADILLAC, Model Year: 2020, Model line: XT6, Model: CADILLAC XT6 2020Pages: 385, PDF Size: 6.63 MB
Page 147 of 385
Cadillac XT6 Owner Manual (GMNA-Localizing-U.S./Canada-12984300) -
2020 - CRC - 3/19/19
146 LIGHTING
The automatic high-beam headlamps
may need to be disabled if any of the
above conditions exist.
Adaptive Headlight System
If equipped, this system turns the
vehicle's high-beam headlamps on and
off according to surrounding traffic
conditions.
The Adaptive Headlight System (AHS)
is active with other traffic.
This light
band this light$
come on in the instrument cluster
when the AHS is enabled and all
segments are active. The system is
then in full high beam mode.
Turning On and Enabling the
Adaptive Headlight System
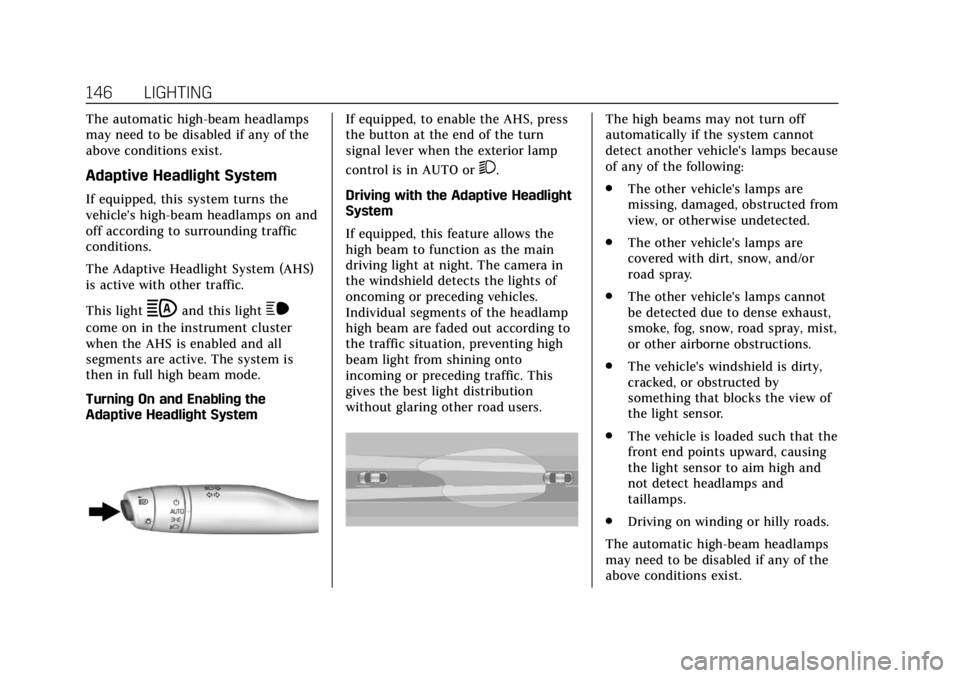
If equipped, to enable the AHS, press
the button at the end of the turn
signal lever when the exterior lamp
control is in AUTO or
2.
Driving with the Adaptive Headlight
System
If equipped, this feature allows the
high beam to function as the main
driving light at night. The camera in
the windshield detects the lights of
oncoming or preceding vehicles.
Individual segments of the headlamp
high beam are faded out according to
the traffic situation, preventing high
beam light from shining onto
incoming or preceding traffic. This
gives the best light distribution
without glaring other road users.
The high beams may not turn off
automatically if the system cannot
detect another vehicle's lamps because
of any of the following:
. The other vehicle's lamps are
missing, damaged, obstructed from
view, or otherwise undetected.
. The other vehicle's lamps are
covered with dirt, snow, and/or
road spray.
. The other vehicle's lamps cannot
be detected due to dense exhaust,
smoke, fog, snow, road spray, mist,
or other airborne obstructions.
. The vehicle's windshield is dirty,
cracked, or obstructed by
something that blocks the view of
the light sensor.
. The vehicle is loaded such that the
front end points upward, causing
the light sensor to aim high and
not detect headlamps and
taillamps.
. Driving on winding or hilly roads.
The automatic high-beam headlamps
may need to be disabled if any of the
above conditions exist.
Page 162 of 385

Cadillac XT6 Owner Manual (GMNA-Localizing-U.S./Canada-12984300) -
2020 - CRC - 3/19/19
CLIMATE CONTROLS 161
Rear Climate Display Controls
1. Rear Temperature Display
2. Fan Control
3. Sync (Synchronized Temperatures)
4. Rear Control Lockout
5. Air Delivery Mode Control
6. Auto (Rear Automatic Operation)
7. On/Off
8. Rear Climate Temperature Control Rear :
Touch this button on the front
climate control display to open the
rear climate control display. The rear
climate control settings can now be
adjusted from the front
passenger area.
On/Off : Touch On/Off on the display
to turn the rear climate control on or
off. If the rear climate control is
turned off using On/Off on the display,
the rear climate control buttons must
be pressed twice to turn the system
back on.
Sync : Touch Sync on the display to
match the rear climate control
settings to the front climate control
driver settings. The Sync button is
highlighted. Press the temperature or
AUTO button twice to unlink the set
driver and rear settings. The Sync
button is no longer highlighted.
Q: Touch to lock or unlock control of
the rear climate control system from
the rear seat passengers. When locked,
the rear climate controls can only be
adjusted from the front seat. Automatic Operation
AUTO :
Press to turn on or off. The
air delivery is controlled
automatically. The AUTO indicator
appears on the display. If the air
delivery mode or fan speed is
manually adjusted, this cancels full
automatic operation.
Manual Operation
]: Press the rear fan control up or
down to increase or decrease the
airf low to the rear panel outlets.
Temperature Controls : Press up or
down to adjust the rear passenger
temperature. The rear passenger
temperature can also be adjusted by
touching
Qfor warmer air orRfor
cooler air on the rear climate display.
Air Delivery Mode Control : Press up
or down to select the desired air
delivery mode. The air delivery mode
can also be changed by touching
[,
\, orYon the rear climate display.
This changes the direction of the
airf low in the rear seating area.
Page 163 of 385

Cadillac XT6 Owner Manual (GMNA-Localizing-U.S./Canada-12984300) -
2020 - CRC - 3/19/19
162 CLIMATE CONTROLS
If the rear floor air delivery mode is
selected, the rear fan speed indicator
will change when adjusted, but the
airf low amount directed to the floor
will not. This is normal operation for
the system.
To activate the rear floor air delivery
mode, touch
[on the rear climate
display.
Air Vents
Use the slider switch on the air outlets
to change the direction of the airf low,
or to open and close off the airf low.
There are also outlets overhead in the
rear passenger area; adjust as needed.
Keep all outlets open whenever
possible for best system performance.
Operation Tips
. Clear away any ice, snow, or leaves
from the air inlets at the base of
the windshield that can block the
flow of air into the vehicle.
. Clear snow off the hood to
improve visibility and help
decrease moisture drawn into the
vehicle. .
Use of non-GM approved hood
deflectors can adversely affect the
performance of the system.
. Keep the path under all seats clear
of objects to help circulate the air
inside the vehicle more effectively.
. If fogging reoccurs while in vent or
bi-level modes with mild
temperature throughout the
vehicle, turn on the air conditioner
to reduce windshield fogging.
Page 165 of 385
Cadillac XT6 Owner Manual (GMNA-Localizing-U.S./Canada-12984300) -
2020 - CRC - 3/19/19
164 DRIVING AND OPERATING
Driving and
Operating
Driving Information
Driving for Better FuelEconomy . . . . . . . . . . . . . . . . . . . . . . . . 165
Distracted Driving . . . . . . . . . . . . . . . . 165
Defensive Driving . . . . . . . . . . . . . . . . 166
Drunk Driving . . . . . . . . . . . . . . . . . . . . 166
Control of a Vehicle . . . . . . . . . . . . . . 166
Braking . . . . . . . . . . . . . . . . . . . . . . . . . . . . 167
Steering . . . . . . . . . . . . . . . . . . . . . . . . . . . 167
Off-Road Recovery . . . . . . . . . . . . . . . . 168
Loss of Control . . . . . . . . . . . . . . . . . . . 168
Off-Road Driving . . . . . . . . . . . . . . . . . 169
Driving on Wet Roads . . . . . . . . . . . 173
Hill and Mountain Roads . . . . . . . . 174
Winter Driving . . . . . . . . . . . . . . . . . . . . 174
If the Vehicle Is Stuck . . . . . . . . . . . 176
Vehicle Load Limits . . . . . . . . . . . . . . 176
Starting and Operating
New Vehicle Break-In . . . . . . . . . . . . 180
Ignition Positions . . . . . . . . . . . . . . . . 180
Starting the Engine . . . . . . . . . . . . . . 181
Stop/Start System . . . . . . . . . . . . . . . . 182
Engine Heater . . . . . . . . . . . . . . . . . . . . 184 Retained Accessory
Power (RAP) . . . . . . . . . . . . . . . . . . . . 186
Shifting Into Park . . . . . . . . . . . . . . . . 186
Shifting out of Park . . . . . . . . . . . . . . 186
Parking over Things That Burn . . . . . . . . . . . . . . . . . . . . . . . 188
Active Fuel Management . . . . . . . . 188
Extended Parking . . . . . . . . . . . . . . . . . 189
Engine Exhaust
Engine Exhaust . . . . . . . . . . . . . . . . . . . 189
Running the Vehicle While Parked . . . . . . . . . . . . . . . . . . . . . . . . . . . 190
Automatic Transmission
Automatic Transmission . . . . . . . . . 190
Manual Mode . . . . . . . . . . . . . . . . . . . . . 195
Drive Systems
All-Wheel Drive . . . . . . . . . . . . . . . . . . 196
Brakes
Electric Brake Boost . . . . . . . . . . . . . . 197
Antilock Brake System (ABS) . . . . 197
Electric Parking Brake . . . . . . . . . . . . 198
Brake Assist . . . . . . . . . . . . . . . . . . . . . . . 199
Hill Start Assist (HSA) . . . . . . . . . . . 199
Ride Control Systems
Traction Control/ElectronicStability Control . . . . . . . . . . . . . . . . 200
Driver Mode Control . . . . . . . . . . . . . 202
Cruise Control
Cruise Control . . . . . . . . . . . . . . . . . . . . 203
Adaptive Cruise Control . . . . . . . . . 205
Driver Assistance Systems
Driver Assistance Systems . . . . . . . 216
Assistance Systems for Parking
or Backing . . . . . . . . . . . . . . . . . . . . . . . 217
Rear Pedestrian Alert . . . . . . . . . . . . 225
Assistance Systems for Driving . . . . . . . . . . . . . . . . . . . . . . . . . . 226
Forward Collision Alert (FCA) System . . . . . . . . . . . . . . . . . . . . . . . . . . 226
Automatic Emergency Braking (AEB) . . . . . . . . . . . . . . . . . . . 229
Front Pedestrian Braking (FPB) System . . . . . . . . . . . . . . . . . . . . . . . . . . 230
Night Vision System . . . . . . . . . . . . . 232
Side Blind Zone Alert (SBZA) . . . . 235
Lane Change Alert (LCA) . . . . . . . . 235
Lane Keep Assist (LKA) . . . . . . . . . . 237
Surround Vision Recorder . . . . . . . 239
Fuel
Top Tier Fuel . . . . . . . . . . . . . . . . . . . . . 241
Recommended Fuel . . . . . . . . . . . . . . 241
Prohibited Fuels . . . . . . . . . . . . . . . . . . 241
Fuels in Foreign Countries . . . . . . . 242
Fuel Additives . . . . . . . . . . . . . . . . . . . . 242
Filling the Tank . . . . . . . . . . . . . . . . . . 242
Page 169 of 385
Cadillac XT6 Owner Manual (GMNA-Localizing-U.S./Canada-12984300) -
2020 - CRC - 3/19/19
168 DRIVING AND OPERATING
If the steering wheel is turned until it
reaches the end of its travel and is
held against that position for an
extended period of time, power
steering assist may be reduced.
Normal use of the power steering
assist should return when the system
cools down.
See your dealer if there is a problem.
Curve Tips
.Take curves at a reasonable speed.
. Reduce speed before entering a
curve.
. Maintain a reasonable steady
speed through the curve.
. Wait until the vehicle is out of the
curve before accelerating gently
into the straightaway.
Steering in Emergencies
.There are some situations when
steering around a problem may be
more effective than braking.
. Holding both sides of the steering
wheel allows you to turn
180 degrees without removing
a hand.
. The Antilock Brake System (ABS)
allows steering while braking.
Off-Road Recovery
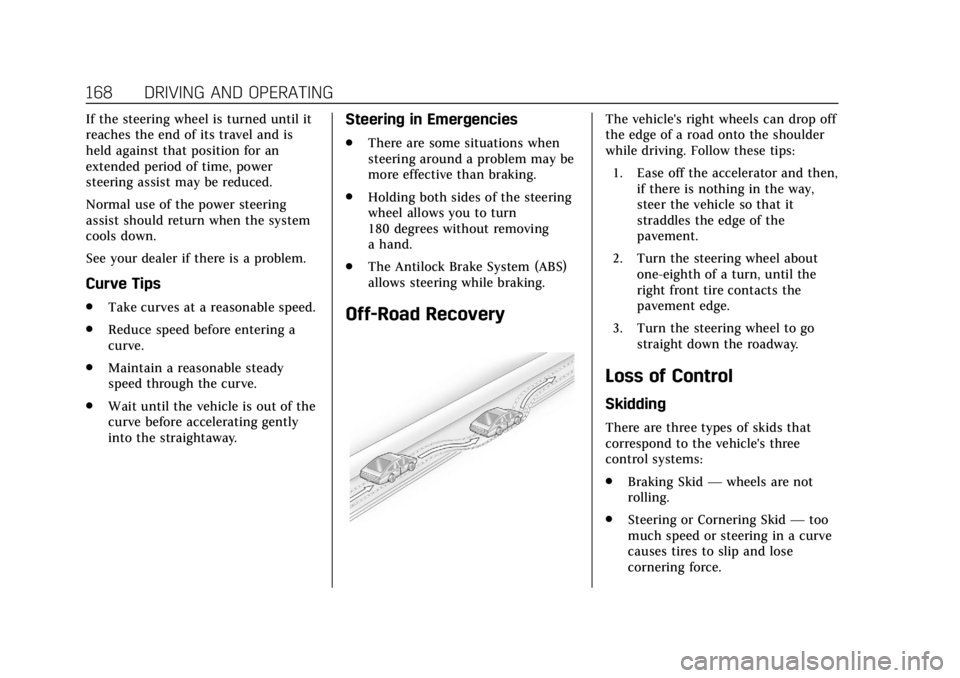
The vehicle's right wheels can drop off
the edge of a road onto the shoulder
while driving. Follow these tips:
1. Ease off the accelerator and then, if there is nothing in the way,
steer the vehicle so that it
straddles the edge of the
pavement.
2. Turn the steering wheel about one-eighth of a turn, until the
right front tire contacts the
pavement edge.
3. Turn the steering wheel to go straight down the roadway.
Loss of Control
Skidding
There are three types of skids that
correspond to the vehicle's three
control systems:
.Braking Skid —wheels are not
rolling.
. Steering or Cornering Skid —too
much speed or steering in a curve
causes tires to slip and lose
cornering force.
Page 170 of 385
Cadillac XT6 Owner Manual (GMNA-Localizing-U.S./Canada-12984300) -
2020 - CRC - 3/19/19
DRIVING AND OPERATING 169
.Acceleration Skid —too much
throttle causes the driving wheels
to spin.
Defensive drivers avoid most skids by
taking reasonable care suited to
existing conditions, and by not
overdriving those conditions. But
skids are always possible.
If the vehicle starts to slide, follow
these suggestions:
. Ease your foot off the accelerator
pedal and steer the way you want
the vehicle to go. The vehicle may
straighten out. Be ready for a
second skid if it occurs.
. Slow down and adjust your driving
according to weather conditions.
Stopping distance can be longer
and vehicle control can be affected
when traction is reduced by water,
snow, ice, gravel, or other material
on the road. Learn to recognize
warning clues —such as enough
water, ice, or packed snow on the
road to make a mirrored surface
— and slow down when you have
any doubt. .
Try to avoid sudden steering,
acceleration, or braking, including
reducing vehicle speed by shifting
to a lower gear. Any sudden
changes could cause the tires to
slide.
Remember: Antilock brakes help avoid
only the braking skid.
Off-Road Driving
All-wheel-drive vehicles can be used
for off-road driving. Vehicles without
all-wheel drive and vehicles not
equipped with All Terrain (AT) or
On-Off Road (OOR) tires must not be
driven off-road except on a level, solid
surface. To contact the tire
manufacturer for more information
about the original equipment tires, see
the Limited Warranty and Owner
Assistance Information manual.
Controlling the vehicle is the key to
successful off-road driving. One of the
best ways to control the vehicle is to
control the speed.
{Warning
When driving off-road, bouncing
and quick changes in direction can
easily throw you out of position.
This could cause you to lose control
and crash. You and your passengers
should always wear seat belts.
Before Driving Off-Road
. Have all necessary maintenance
and service work completed.
. Fuel the vehicle, fill fluid levels,
and check inflation pressure in all
tires, including the spare,
if equipped.
. Read all the information about
all-wheel-drive vehicles in this
manual.
. Make sure all underbody shields,
if equipped, are properly attached.
. Know the local laws that apply to
off-road driving.
Page 176 of 385
Cadillac XT6 Owner Manual (GMNA-Localizing-U.S./Canada-12984300) -
2020 - CRC - 3/19/19
DRIVING AND OPERATING 175
.Turn on Traction Control. See
Traction Control/Electronic Stability
Control 0200.
. Antilock Brake System (ABS)
improves vehicle stability during
hard stops, but the brakes should
be applied sooner than when on
dry pavement. See Antilock Brake
System (ABS) 0197.
. Allow greater following distance
and watch for slippery spots. Icy
patches can occur on otherwise
clear roads in shaded areas. The
surface of a curve or an overpass
can remain icy when the
surrounding roads are clear. Avoid
sudden steering maneuvers and
braking while on ice.
. Turn off cruise control.
. Select All-Wheel Drive (AWD)
mode. See Driver Mode Control
0 202 and
All-Wheel Drive 0196.
Blizzard Conditions
Stop the vehicle in a safe place and
signal for help. Stay with the vehicle
unless there is help nearby. If possible, use Roadside Assistance. See
Roadside
Service 0353. To get help and keep
everyone in the vehicle safe:
. Turn on the hazard warning
flashers.
. Tie a red cloth to an outside
mirror.
{Warning
Snow can trap engine exhaust
under the vehicle. This may cause
exhaust gases to get inside. Engine
exhaust contains carbon monoxide
(CO), which cannot be seen or
smelled. It can cause
unconsciousness and even death.
If the vehicle is stuck in snow:
. Clear snow from the base of
the vehicle, especially any
blocking the exhaust pipe.
. Open a window about 5 cm
(2 in) on the vehicle side that
is away from the wind, to
bring in fresh air.
(Continued)
Warning (Continued)
.Fully open the air outlets on
or under the instrument
panel.
. Adjust the climate control
system to circulate the air
inside the vehicle and set the
fan speed to the highest
setting. See “Climate Control
Systems.”
For more information about CO, see
Engine Exhaust 0189.
To save fuel, run the engine for short
periods to warm the vehicle and then
shut the engine off and partially close
the window. Moving about to keep
warm also helps.
If it takes time for help to arrive,
when running the engine, push the
accelerator pedal slightly so the
engine runs faster than the idle speed.
This keeps the battery charged to
restart the vehicle and to signal for
help with the headlamps. Do this as
little as possible, to save fuel.
Page 185 of 385

Cadillac XT6 Owner Manual (GMNA-Localizing-U.S./Canada-12984300) -
2020 - CRC - 3/19/19
184 DRIVING AND OPERATING
Engine Heater
The engine heater, if available, can
help in cold weather conditions at or
below−18 °C (0 °F) for easier starting
and better fuel economy during
engine warm-up. Plug in the engine
heater at least four hours before
starting the vehicle. An internal
thermostat in the plug end of the cord
will prevent engine heater operation
at temperatures above −18 °C (0 °F).
{Warning
Do not plug in the engine block
heater while the vehicle is parked in
a garage or under a carport.
Property damage or personal injury
may result. Always park the vehicle
in a clear open area away from
buildings or structures.
To Use the Engine Heater
1. Turn off the engine.
2. Remove the engine heater
connector cover by gently prying
with a flat-bladed tool at the
location of the notch along the
top edge of the cover.
3. Check the heater cord fordamage. If it is damaged, do not
use it. See your dealer for a
replacement. Inspect the cord for
damage yearly.
Page 187 of 385
Cadillac XT6 Owner Manual (GMNA-Localizing-U.S./Canada-12984300) -
2020 - CRC - 3/19/19
186 DRIVING AND OPERATING
Retained Accessory
Power (RAP)
Some vehicle accessories may be used
after the ignition is turned off.
The power windows and sunroof,
if equipped, will continue to work for
up to 10 minutes or until any door is
opened.
The infotainment system will continue
to work for 10 minutes, until the
driver door is opened, or until the
ignition is turned on or placed in
ACC/ACCESSORY.
Shifting Into Park
To shift into P (Park):1. Hold the brake pedal down and set the parking brake. See Electric
Parking Brake 0198.
2. Press the button on top of the shift lever to shift into P (Park).
See Automatic Transmission
0 190.
3. The P indicator on the shift lever will turn red when the vehicle is
in P (Park).
Leaving the Vehicle with the
Engine Running
{Warning
It can be dangerous to leave the
vehicle with the engine running.
It could overheat and catch fire.
It is dangerous to get out of the
vehicle if the vehicle is not in
P (Park) with the parking brake set.
The vehicle can roll.
Do not leave the vehicle when the
engine is running. If you have left
the engine running, the vehicle can
move suddenly. You or others could
be injured. To be sure the vehicle
will not move, even when you are
on fairly level ground, always set
the parking brake and shift to
P (Park). See Shifting Into Park 0186
. If you are towing a trailer, see
Driving Characteristics and Towing
Tips 0244. If you have to leave the vehicle with
the engine running, be sure the
vehicle is in P (Park) and the parking
brake is set before you leave it.
If you are towing a trailer and parking
on a hill, see
Driving Characteristics
and Towing Tips 0244.
Shifting out of Park
This vehicle is equipped with an
electronic transmission. The shift lock
release button is designed to prevent
inadvertent shifting out of P (Park)
unless the ignition is on, the brake
pedal is applied, and the shift lock
release button is pressed.
The shift lock control is always
functional except in the case of an
uncharged or low voltage (less than
9-volt) battery.
If the vehicle has an uncharged
battery or a battery with low voltage,
try charging or jump starting the
battery. See Jump Starting - North
America 0318.
Page 188 of 385
Cadillac XT6 Owner Manual (GMNA-Localizing-U.S./Canada-12984300) -
2020 - CRC - 3/19/19
DRIVING AND OPERATING 187
To shift out of P (Park):1. Ensure the engine is running.
2. Apply the brake pedal.
3. Press the shift lock release button.
4. Move the shift lever to the desired position.
5. The P indicator will turn white and the gear indicator on the
shift lever will turn red when the
vehicle is no longer in P (Park).
6. After releasing the shift lever, it will return to the center position.
If the vehicle cannot shift from
P (Park), a Driver Information
Center (DIC) message will be
displayed. See your dealer for service.
Manual Park Release
{Warning
The transmission will be placed in
N (Neutral) when the manual park
release is pulled. The vehicle can (Continued)
Warning (Continued)
roll and you or others could be
injured. Ensure the vehicle is on
level ground.
Caution
The manual park release is not
intended to be used for towing.
Damage may result from using the
manual park release in this way.
The repairs would not be covered
by the vehicle warranty.
This vehicle includes a manual park
release that can be used to shift the
vehicle into N (Neutral) when the
engine is not running.
Pulling the manual park release while
the vehicle is on or turning the
ignition on while the manual park
release is pulled, will cause a DIC
message to display. To place the vehicle in N (Neutral)
using the manual park release:
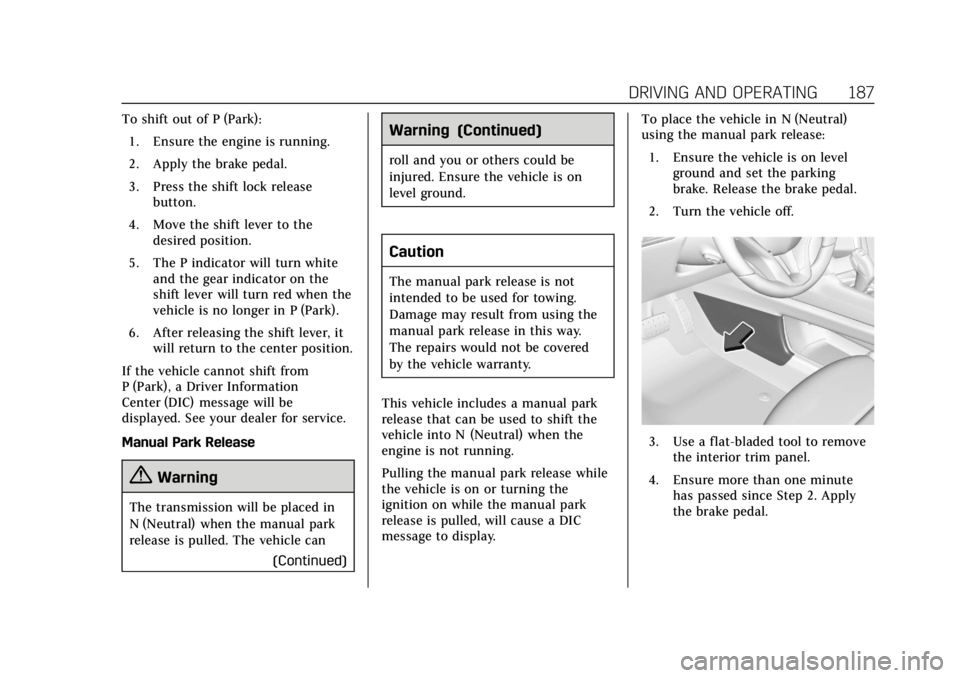
1. Ensure the vehicle is on level ground and set the parking
brake. Release the brake pedal.
2. Turn the vehicle off.
3. Use a flat-bladed tool to remove the interior trim panel.
4. Ensure more than one minute has passed since Step 2. Apply
the brake pedal.