rear CADILLAC XT6 2021 Owner's Manual
[x] Cancel search | Manufacturer: CADILLAC, Model Year: 2021, Model line: XT6, Model: CADILLAC XT6 2021Pages: 431, PDF Size: 8.29 MB
Page 292 of 431
Cadillac XT6 Owner Manual (GMNA-Localizing-U.S./Canada-14574701) -
2021 - CRC - 2/8/21
DRIVING AND OPERATING 291
If equipped with Lane Change Alert
(LCA), the LCA detection zones that
extend back from the side of the
vehicle do not move further back
when a trailer is towed. Use caution
while changing lanes when towing a
trailer.
If equipped with Rear Cross Traffic
Alert (RCTA), use caution while
backing up when towing a trailer, as
the RCTA detection zones that extend
out from the back of the vehicle do
not move further back when a trailer
is towed.
{Warning
To prevent serious injury or death
from carbon monoxide (CO), when
towing a trailer:
.Do not drive with the liftgate,
trunk/hatch, or rear-most
window open.
.Fully open the air outlets on or
under the instrument panel.(Continued)
Warning (Continued)
.Adjust the climate control
system to a setting that brings in
only outside air. See“Climate
Control Systems” in the Index.
For more information about carbon
monoxide, see Engine Exhaust
0 239.
Towing a trailer requires experience.
The combination of the vehicle and
trailer is longer and not as responsive
as the vehicle itself. Get used to the
handling and braking of the
combination by driving on a level road
surface before driving on public roads.
The trailer structure, the tires, and the
brakes must be all be rated to carry
the intended cargo. Inadequate trailer
equipment can cause the combination
to operate in an unexpected or unsafe
manner. Before driving, inspect all
trailer hitch parts and attachments,
safety chains, electrical connectors,
lamps, tires, and mirrors. See Towing
Equipment 0297. If the trailer has
electric brakes, start the combination
moving and then manually apply the trailer brake controller to check the
trailer brakes work. During the trip,
occasionally check that the cargo and
trailer are secure and that the lamps
and any trailer brakes are working.
Towing with a Stability Control
System
When towing, the stability control
system might be heard. The system
reacts to vehicle movement caused by
the trailer, which mainly occurs
during cornering. This is normal when
towing heavier trailers.
Following Distance
Stay at least twice as far behind the
vehicle ahead as you would when
driving without a trailer. This can help
to avoid heavy braking and sudden
turns.
Passing
More passing distance is needed when
towing a trailer. The combination of
the vehicle and trailer will not
accelerate as quickly and is much
longer than the vehicle alone. It is
necessary to go much farther beyond
Page 298 of 431

Cadillac XT6 Owner Manual (GMNA-Localizing-U.S./Canada-14574701) -
2021 - CRC - 2/8/21
DRIVING AND OPERATING 297
Trailer Load Balance
The correct trailer load balance must
be maintained to ensure trailer
stability. Incorrect load balance is a
leading cause of trailer sway.
The trailer tongue weight (1) should
be 10–15% of the loaded trailer
weight (2). Some specific trailer types,
such as boat trailers, fall outside of
this range. Always refer to the trailer
owner’s manual for the recommended
trailer tongue weight for each trailer.
Never exceed the maximum loads for
your vehicle, hitch, and trailer.After loading the trailer, separately
weigh the trailer and then the trailer
tongue and calculate the trailer load
balance percentage to see if the
weights and distribution are
appropriate for your vehicle. If the
trailer weight is too high, it may be
possible to transfer some of the cargo
into your vehicle. If the trailer tongue
weight is too high or too low, it may
be possible to rearrange some of the
cargo inside of the trailer.
Do not exceed the maximum
allowable tongue weight for your
vehicle. Use the shortest hitch
extension available to position the
hitch ball closer to your vehicle. This
will help reduce the effect of the
trailer tongue weight on the trailer
hitch and the rear axle.
If a cargo carrier is used in the trailer
hitch receiver, choose a carrier that
positions the load as close to the
vehicle as possible. Make sure the
total weight, including the carrier, is
no more than half of the maximum
allowable tongue weight for the
vehicle.Ask your dealer for trailering
information or assistance.
Towing Equipment
Hitches
Always use the correct hitch
equipment for your vehicle.
Crosswinds, large trucks going by, and
rough roads can affect the trailer and
the hitch.
Never attach rental hitches or other
bumper-type hitches. Only use
frame-mounted hitches that do not
attach to the bumper.
Hitch Cover
Page 304 of 431
Cadillac XT6 Owner Manual (GMNA-Localizing-U.S./Canada-14574701) -
2021 - CRC - 2/8/21
VEHICLE CARE 303
Vehicle Care
General Information
General Information . . . . . . . . . . . . . 304
California Proposition65 Warning . . . . . . . . . . . . . . . . . . . . . 304
California Perchlorate Materials Requirements . . . . . . . . . . . . . . . . . . . 305
Accessories and Modifications . . . . . . . . . . . . . . . . . . . 305
Vehicle Checks
Doing Your OwnService Work . . . . . . . . . . . . . . . . . . . . 305
Hood . . . . . . . . . . . . . . . . . . . . . . . . . . . . . . 306
Engine Compartment Overview . . . . . . . . . . . . . . . . . . . . . . . . . 308
Engine Oil . . . . . . . . . . . . . . . . . . . . . . . . . 311
Engine Oil Life System . . . . . . . . . . . 313
Automatic Transmission Fluid . . . . . . . . . . . . . . . . . . . . . . . . . . . . . 314
Engine Air Filter Life System . . . . 314
Engine Air Cleaner/Filter . . . . . . . . . 315
Cooling System . . . . . . . . . . . . . . . . . . . 316
Engine Overheating . . . . . . . . . . . . . . 320
Washer Fluid . . . . . . . . . . . . . . . . . . . . . 321
Brakes . . . . . . . . . . . . . . . . . . . . . . . . . . . . . 322
Brake Fluid . . . . . . . . . . . . . . . . . . . . . . . 322 Battery - North America . . . . . . . . . 323
All-Wheel Drive . . . . . . . . . . . . . . . . . . 324
Park Brake and P (Park)
Mechanism Check . . . . . . . . . . . . . . 324
Wiper Blade Replacement . . . . . . . 325
Windshield Replacement . . . . . . . . 326
Gas Strut(s) . . . . . . . . . . . . . . . . . . . . . . . 326
Headlamp Aiming
Front Headlamp Aiming . . . . . . . . . 327
Bulb Replacement
LED Lighting . . . . . . . . . . . . . . . . . . . . . 327
Electrical System
Electrical System Overload . . . . . . 327
Fuses and Circuit Breakers . . . . . . 328
Engine Compartment Fuse
Block . . . . . . . . . . . . . . . . . . . . . . . . . . . . 329
Instrument Panel Fuse Block . . . . 332
Rear Compartment Fuse Block . . . . . . . . . . . . . . . . . . . . . . . . . . . . 335
Wheels and Tires
Tires . . . . . . . . . . . . . . . . . . . . . . . . . . . . . . . 337
All-Season Tires . . . . . . . . . . . . . . . . . . 337
Winter Tires . . . . . . . . . . . . . . . . . . . . . . 338
Summer Tires . . . . . . . . . . . . . . . . . . . . 338
Tire Sidewall Labeling . . . . . . . . . . . 339 Tire Designations . . . . . . . . . . . . . . . . . 340
Tire Terminology and
Definitions . . . . . . . . . . . . . . . . . . . . . . 341
Tire Pressure . . . . . . . . . . . . . . . . . . . . . . 343
Tire Pressure for High-Speed Operation . . . . . . . . . . . . . . . . . . . . . . . . 345
Tire Pressure Monitor System . . . 346
Tire Pressure Monitor Operation . . . . . . . . . . . . . . . . . . . . . . . . 347
Tire Inspection . . . . . . . . . . . . . . . . . . . 350
Tire Rotation . . . . . . . . . . . . . . . . . . . . . 351
When It Is Time for New Tires . . . . . . . . . . . . . . . . . . . . . . . . . . . . . 352
Buying New Tires . . . . . . . . . . . . . . . . 353
Different Size Tires and Wheels . . . . . . . . . . . . . . . . . . . . . . . . . . 354
Uniform Tire Quality Grading . . . 354
Wheel Alignment and Tire Balance . . . . . . . . . . . . . . . . . . . . . . . . . . 356
Wheel Replacement . . . . . . . . . . . . . . 356
Tire Chains . . . . . . . . . . . . . . . . . . . . . . . 356
If a Tire Goes Flat . . . . . . . . . . . . . . . . 357
Tire Changing . . . . . . . . . . . . . . . . . . . . . 358
Compact Spare Tire . . . . . . . . . . . . . . 364
Jump Starting
Jump Starting - North America . . . . . . . . . . . . . . . . . . . . . . . . . 364
Page 326 of 431
Cadillac XT6 Owner Manual (GMNA-Localizing-U.S./Canada-14574701) -
2021 - CRC - 2/8/21
VEHICLE CARE 325
.To check the P (Park) mechanism's
holding ability: With the engine
running, shift to P (Park). Then
release the parking brake followed
by the regular brake.
Contact your dealer if service is
required.
Wiper Blade Replacement
Windshield wiper blades should be
inspected for wear or cracking.
It is a good idea to clean or replace
the wiper blade assembly on a regular
basis or when worn. For proper
windshield wiper blade length and
type, see Maintenance Replacement
Parts 0390.
Caution
Allowing the wiper arm to touch
the windshield when no wiper blade
is installed could damage the
windshield. Any damage that occurs
would not be covered by the vehicle
warranty. Do not allow the wiper
arm to touch the windshield.
Front Wiper Blade Replacement
To replace the wiper blade assembly:
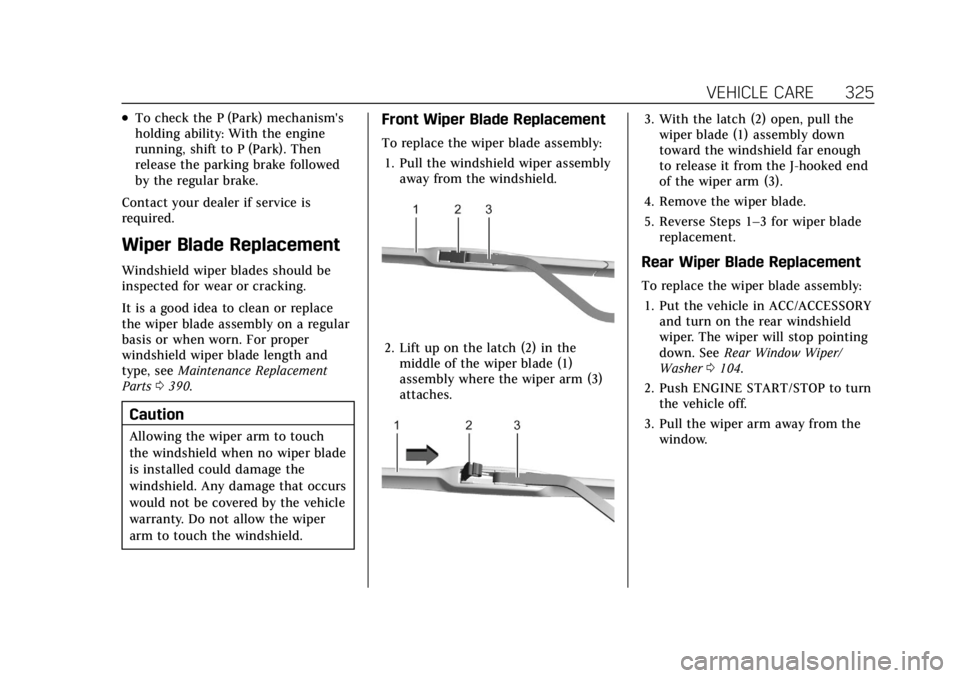
1. Pull the windshield wiper assembly away from the windshield.
2. Lift up on the latch (2) in themiddle of the wiper blade (1)
assembly where the wiper arm (3)
attaches.
3. With the latch (2) open, pull thewiper blade (1) assembly down
toward the windshield far enough
to release it from the J-hooked end
of the wiper arm (3).
4. Remove the wiper blade.
5. Reverse Steps 1–3 for wiper blade replacement.
Rear Wiper Blade Replacement
To replace the wiper blade assembly:
1. Put the vehicle in ACC/ACCESSORY and turn on the rear windshield
wiper. The wiper will stop pointing
down. See Rear Window Wiper/
Washer 0104.
2. Push ENGINE START/STOP to turn the vehicle off.
3. Pull the wiper arm away from the window.
Page 327 of 431
Cadillac XT6 Owner Manual (GMNA-Localizing-U.S./Canada-14574701) -
2021 - CRC - 2/8/21
326 VEHICLE CARE
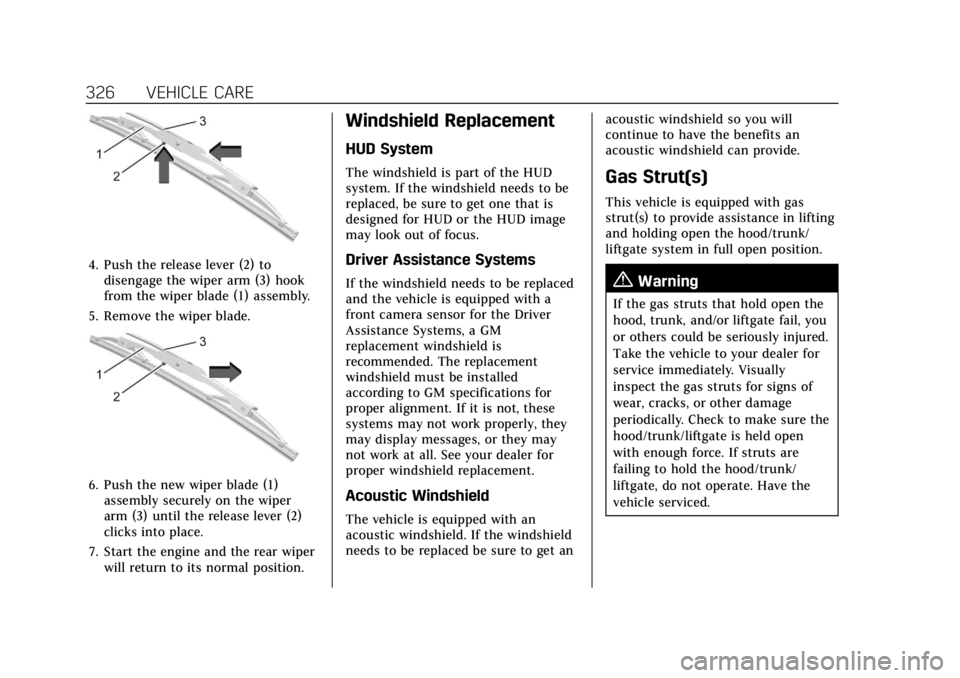
4. Push the release lever (2) todisengage the wiper arm (3) hook
from the wiper blade (1) assembly.
5. Remove the wiper blade.
6. Push the new wiper blade (1) assembly securely on the wiper
arm (3) until the release lever (2)
clicks into place.
7. Start the engine and the rear wiper will return to its normal position.
Windshield Replacement
HUD System
The windshield is part of the HUD
system. If the windshield needs to be
replaced, be sure to get one that is
designed for HUD or the HUD image
may look out of focus.
Driver Assistance Systems
If the windshield needs to be replaced
and the vehicle is equipped with a
front camera sensor for the Driver
Assistance Systems, a GM
replacement windshield is
recommended. The replacement
windshield must be installed
according to GM specifications for
proper alignment. If it is not, these
systems may not work properly, they
may display messages, or they may
not work at all. See your dealer for
proper windshield replacement.
Acoustic Windshield
The vehicle is equipped with an
acoustic windshield. If the windshield
needs to be replaced be sure to get an acoustic windshield so you will
continue to have the benefits an
acoustic windshield can provide.
Gas Strut(s)
This vehicle is equipped with gas
strut(s) to provide assistance in lifting
and holding open the hood/trunk/
liftgate system in full open position.
{Warning
If the gas struts that hold open the
hood, trunk, and/or liftgate fail, you
or others could be seriously injured.
Take the vehicle to your dealer for
service immediately. Visually
inspect the gas struts for signs of
wear, cracks, or other damage
periodically. Check to make sure the
hood/trunk/liftgate is held open
with enough force. If struts are
failing to hold the hood/trunk/
liftgate, do not operate. Have the
vehicle serviced.
Page 331 of 431

Cadillac XT6 Owner Manual (GMNA-Localizing-U.S./Canada-14574701) -
2021 - CRC - 2/8/21
330 VEHICLE CARE
FusesUsage
F1 Antilock Brake System Fuses
Usage
F2 Starter 1
F3 DC DC Transformer 1 Fuses
Usage
F4 –
F5 DC DC Transformer 2
F6 Amplifier 1
F7 Front Blower
F8 Starter 3
F9 –
F10 –
F11 –
F12 Front Wiper
F13 Starter 2
F14 –
F15 Rear Wiper 1
F16 –
F17 –
F18 Automatic Headlamp Leveling Module
F19 –
F20 –
F21 –
Page 332 of 431
Cadillac XT6 Owner Manual (GMNA-Localizing-U.S./Canada-14574701) -
2021 - CRC - 2/8/21
VEHICLE CARE 331
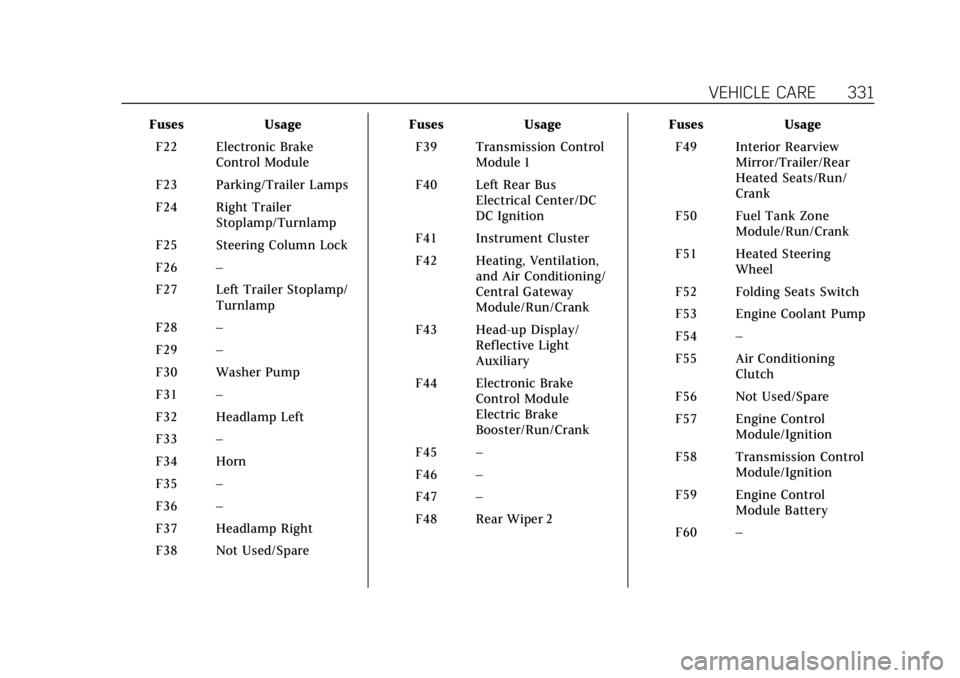
FusesUsage
F22 Electronic Brake Control Module
F23 Parking/Trailer Lamps
F24 Right Trailer Stoplamp/Turnlamp
F25 Steering Column Lock
F26 –
F27 Left Trailer Stoplamp/ Turnlamp
F28 –
F29 –
F30 Washer Pump
F31 –
F32 Headlamp Left
F33 –
F34 Horn
F35 –
F36 –
F37 Headlamp Right
F38 Not Used/Spare Fuses
Usage
F39 Transmission Control Module 1
F40 Left Rear Bus Electrical Center/DC
DC Ignition
F41 Instrument Cluster
F42 Heating, Ventilation, and Air Conditioning/
Central Gateway
Module/Run/Crank
F43 Head-up Display/ Reflective Light
Auxiliary
F44 Electronic Brake Control Module
Electric Brake
Booster/Run/Crank
F45 –
F46 –
F47 –
F48 Rear Wiper 2 Fuses
Usage
F49 Interior Rearview Mirror/Trailer/Rear
Heated Seats/Run/
Crank
F50 Fuel Tank Zone Module/Run/Crank
F51 Heated Steering Wheel
F52 Folding Seats Switch
F53 Engine Coolant Pump
F54 –
F55 Air Conditioning Clutch
F56 Not Used/Spare
F57 Engine Control Module/Ignition
F58 Transmission Control Module/Ignition
F59 Engine Control Module Battery
F60 –
Page 335 of 431
Cadillac XT6 Owner Manual (GMNA-Localizing-U.S./Canada-14574701) -
2021 - CRC - 2/8/21
334 VEHICLE CARE
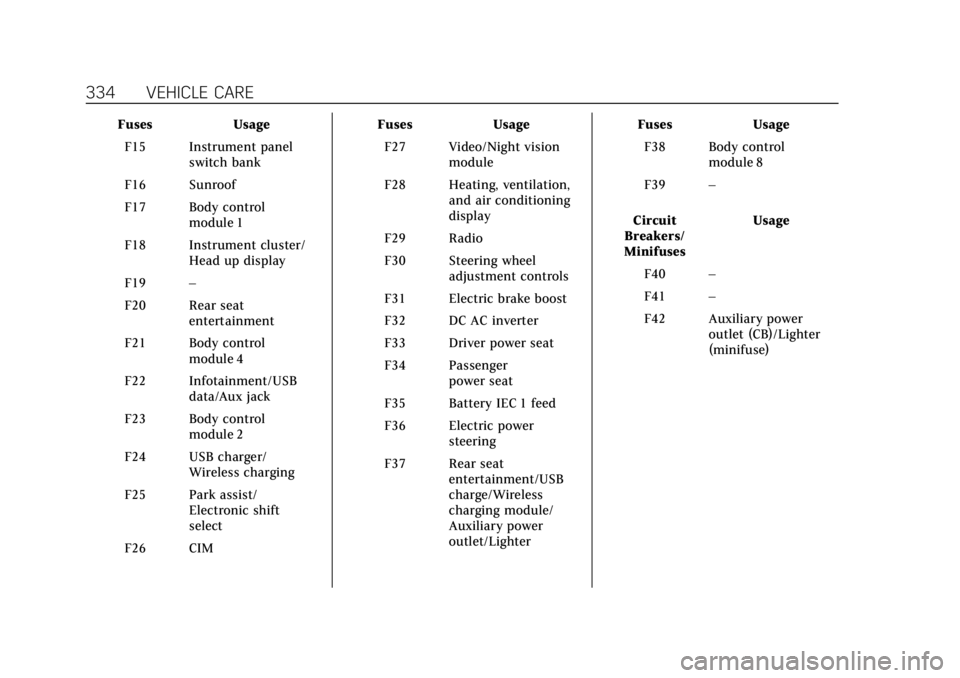
FusesUsage
F15 Instrument panel switch bank
F16 Sunroof
F17 Body control module 1
F18 Instrument cluster/ Head up display
F19 –
F20 Rear seat entertainment
F21 Body control module 4
F22 Infotainment/USB data/Aux jack
F23 Body control module 2
F24 USB charger/ Wireless charging
F25 Park assist/ Electronic shift
select
F26 CIM Fuses
Usage
F27 Video/Night vision module
F28 Heating, ventilation, and air conditioning
display
F29 Radio
F30 Steering wheel adjustment controls
F31 Electric brake boost
F32 DC AC inverter
F33 Driver power seat
F34 Passenger power seat
F35 Battery IEC 1 feed
F36 Electric power steering
F37 Rear seat entertainment/USB
charge/Wireless
charging module/
Auxiliary power
outlet/Lighter Fuses
Usage
F38 Body control module 8
F39 –
Circuit
Breakers/
Minifuses Usage
F40 –
F41 –
F42 Auxiliary power outlet (CB)/Lighter
(minifuse)
Page 336 of 431

Cadillac XT6 Owner Manual (GMNA-Localizing-U.S./Canada-14574701) -
2021 - CRC - 2/8/21
VEHICLE CARE 335
Rear Compartment Fuse
Block
The rear compartment fuse block is in
the cargo area, on the driver side of
the vehicle behind the lower trim
panel. To access the fuses in the Rear
Electrical Center, remove the center
cargo bin, then small side bin. See
Rear Storage093. See your dealer if
additional assistance is needed.
The label for this fuse block is in the
spare tire area, on the foam under the
cargo floor. The vehicle may not be equipped with
all of the fuses, relays, and features
shown.
Fuses
Usage
F1 –
F2 Trailer battery 1
F3 Driver seat belt motor
F4 Rear blower
F5 Rear drive control
F6 Passenger seat belt motor
F7 Right window
F8 Rear defogger
F9 Left window
F10 Folding seats 1
F11 Trailer reverse
F12 –
F13 –
F14 –
F15 –
F16 –
F17 –
F18 Trailer module
Page 337 of 431

Cadillac XT6 Owner Manual (GMNA-Localizing-U.S./Canada-14574701) -
2021 - CRC - 2/8/21
336 VEHICLE CARE
FusesUsage
F19 Ventilated seats/Left front heated seats/
Run/Crank
F20 –
F21 Trailer connector
F22 –
F23 –
F24 Passenger window switch
F25 –
F26 Trailer brake
F27 –
F28 Passive entry/Passive start
F29 –
F30 Canister vent
F31 –
F32 Heated mirror
F33 –
F34 Liftgate module Fuses
Usage
F35 Fuel system control module
F36 –
F37 –
F38 Window module
F39 –
F40 Memory seat module
F41 Automatic occupancy sensor
F42 Trailer battery 2
F43 –
F44 Third row seats
F45 Liftgate motor
F46 Rear heated seats
F47 –
F48 Glass break sensor
F49 –
F50 –
F51 –
F52 Active dampening system module Fuses
Usage
F53 –
F54 External object calculating/Side blind
zone alert
F55 Theft deterrent
F56 Universal garage door opener/Rain sensor
F57 Folding seats 2
Circuit
Breakers Usage
CB1 –
CB2 –
CB3 Rear auxiliary power outlet
Relays Usage
K1 Folding seats 1
K2 –