stop start CADILLAC XT6 2021 Service Manual
[x] Cancel search | Manufacturer: CADILLAC, Model Year: 2021, Model line: XT6, Model: CADILLAC XT6 2021Pages: 431, PDF Size: 8.29 MB
Page 286 of 431

Cadillac XT6 Owner Manual (GMNA-Localizing-U.S./Canada-14574701) -
2021 - CRC - 2/8/21
DRIVING AND OPERATING 285
To Activate :Touch Video Recorder
on the Home Page. Touch the red dot.
The red dot will illuminate when the
video recorder is on. It will remain on
until it has been turned off. Recording
will start after exiting the playback
screen. Advise other drivers and
occupants of the vehicle that video
images are being recorded.
To Deactivate : Touch Video Recorder
on the Home Page. Touch the red dot.
Select from the following when the
vehicle is in P (Park).
Exit : Touch X to exit this application
and return to the previous app.
Video List : Touch to display a list of
the most recent and saved videos.
Touch the delete button next to the
name to delete a saved video. Rewind :
Touch to rewind the video.
Touch again up to three times to
increase speed. Touch a fourth time to
stop rewinding.
Play/Pause : Touch to play or pause a
recorded video.
Fast Forward : Touch to fast forward
the video. Touch again up to three
times to increase speed. Touch a
fourth time to stop fast forward.
Save : Touch to save a video. This
protects the video from being erased.
Once the SD card is full, the oldest
files will be overwritten unless they
have been saved.
Camera Views : When opening the
Video Recorder, the previous file will
show all camera views and can be
played. Icons in the upper right corner
of each view indicate which camera.
Touch one of the views to zoom to
only that camera view. Touch again to
return to all camera views. Press X at
any time to exit the video
recorder app. The latest recorded video file can be
played. In addition:
.The recorded video is stored in
five-minute-long files.
.All files can be viewed on the
playback app or when the SD card
is read by a personal computer (PC).
.Once the SD card is full, the oldest
files will be overwritten.
To Delete Data : Remove the SD card
from the vehicle and insert into a PC
to manually delete the file.
Error messages can occur if:
.No SD card is present.
.An empty SD card is present.
.The video files are the wrong
format.
.The video files are corrupt.
.The SD card is full.
.There is a system error.
Other files should not be stored on
the same SD card as the surround
vision recorder files. Storing other files
on the same card may increase
recording start up and playback time
or result in a loss of data. An error
Page 289 of 431
Cadillac XT6 Owner Manual (GMNA-Localizing-U.S./Canada-14574701) -
2021 - CRC - 2/8/21
288 DRIVING AND OPERATING
Warning (Continued)
.Do not re-enter the vehicle while
pumping fuel.
.Keep children away from the fuel
pump and never let children
pump fuel.
.Before touching the fill nozzle,
touch a metallic object to
discharge static electricity from
your body.
.Fuel can spray out if the fill
nozzle is inserted too quickly.
This spray can happen if the
tank is nearly full, and is more
likely in hot weather. Insert the
fill nozzle slowly and wait for any
hiss noise to stop before
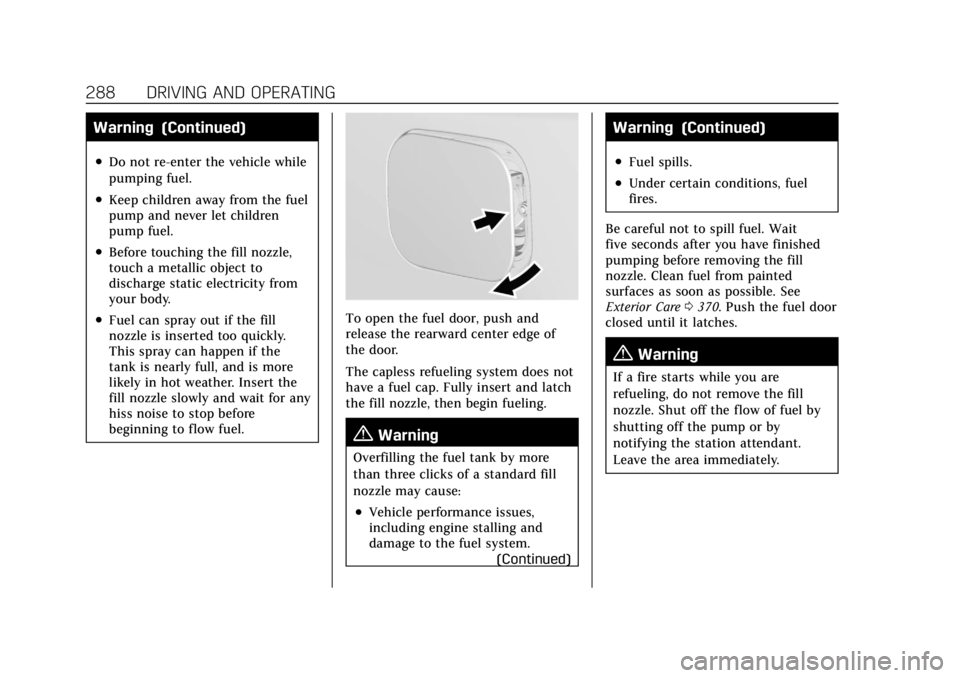
beginning to flow fuel.To open the fuel door, push and
release the rearward center edge of
the door.
The capless refueling system does not
have a fuel cap. Fully insert and latch
the fill nozzle, then begin fueling.
{Warning
Overfilling the fuel tank by more
than three clicks of a standard fill
nozzle may cause:
.Vehicle performance issues,
including engine stalling and
damage to the fuel system.(Continued)
Warning (Continued)
.Fuel spills.
.Under certain conditions, fuel
fires.
Be careful not to spill fuel. Wait
five seconds after you have finished
pumping before removing the fill
nozzle. Clean fuel from painted
surfaces as soon as possible. See
Exterior Care 0370. Push the fuel door
closed until it latches.
{Warning
If a fire starts while you are
refueling, do not remove the fill
nozzle. Shut off the flow of fuel by
shutting off the pump or by
notifying the station attendant.
Leave the area immediately.
Page 291 of 431
Cadillac XT6 Owner Manual (GMNA-Localizing-U.S./Canada-14574701) -
2021 - CRC - 2/8/21
290 DRIVING AND OPERATING
Driving Characteristics and
Towing Tips
{Warning
You can lose control when towing a
trailer if the correct equipment is
not used or the vehicle is not driven
properly. For example, if the trailer
is too heavy or the trailer brakes are
inadequate for the load, the vehicle
may not stop as expected. You and
others could be seriously injured.
The vehicle may also be damaged,
and the repairs would not be
covered by the vehicle warranty.
Pull a trailer only if all the steps in
this section have been followed. Ask
your dealer for advice and
information about towing a trailer
with the vehicle.
Driving with a Trailer
Trailering is different than just driving
the vehicle by itself. Trailering means
changes in handling, acceleration,
braking, durability, and fuel economy.Successful, safe trailering takes correct
equipment, and it has to be used
properly.
The following information has many
time-tested, important trailering tips
and safety rules. Many of these are
important for your safety and that of
your passengers. Read this section
carefully before pulling a trailer.
When towing a trailer:
.Become familiar with and follow all
state and local laws that apply to
trailer towing. These requirements
vary from state to state.
.State laws may require the use of
extended side view mirrors. Even if
not required, you should install
extended side view mirrors if your
visibility is limited or restricted
while towing.
.Do not tow a trailer during the first
800 km (500 mi) of vehicle use to
prevent damage to the engine, axle,
or other parts.
.It is recommended to perform the
first oil change before heavy towing.
.During the first 800 km (500 mi) of
trailer towing, do not drive over
80 km/h (50 mph) and do not make
starts at full throttle.
.Vehicles can tow in D (Drive). If the
transmission downshifts too often, a
lower gear may be selected using
Manual Mode. See
Manual Mode
0 244.
If equipped, the following driver
assistance features should be turned
off when towing a trailer:
.Adaptive Cruise Control (ACC)
.Super Cruise Control
.Lane Keep Assist (LKA)
.Park Assist
.Automatic Parking Assist (APA)
.Reverse Automatic Braking (RAB)
If equipped, the following driver
assistance features should be turned
to alert or off when towing a trailer:
.Automatic Emergency
Braking (AEB)
.Intelligent Brake Assist (IBA)
.Front Pedestrian Braking (FPB)
Page 307 of 431

Cadillac XT6 Owner Manual (GMNA-Localizing-U.S./Canada-14574701) -
2021 - CRC - 2/8/21
306 VEHICLE CARE
If equipped with remote vehicle start,
open the hood before performing any
service work to prevent remote
starting the vehicle accidentally. See
Remote Vehicle Start014.
Keep a record with all parts receipts
and list the mileage and the date of
any service work performed. See
Maintenance Records 0392.
Caution
Even small amounts of
contamination can cause damage to
vehicle systems. Do not allow
contaminants to contact the fluids,
reservoir caps, or dipsticks.
Hood
{Warning
For vehicles with auto engine stop/
start, turn the vehicle off before
opening the hood. If the vehicle is
on, the engine will start when the
hood is opened. You or others could
be injured.
{Warning
Components under the hood can
get hot from running the engine. To
help avoid the risk of burning
unprotected skin, never touch these
components until they have cooled,
and always use a glove or towel to
avoid direct skin contact.
Clear any snow from the hood before
opening.
To open the hood:
1. Pull the hood release lever with the
isymbol. It is on the lower left
side of the instrument panel.
2. Go to the front of the vehicle and locate the secondary release lever
under the front center of the hood.
Push the secondary hood release
lever to the right to release.
3. After you have partially lifted the hood, the gas strut system will
automatically lift the hood and
hold it in the fully open position.
Page 324 of 431

Cadillac XT6 Owner Manual (GMNA-Localizing-U.S./Canada-14574701) -
2021 - CRC - 2/8/21
VEHICLE CARE 323
.A fluid leak in the brake hydraulic
system. Have the brake hydraulic
system fixed. With a leak, the
brakes will not work well.
Always clean the brake fluid reservoir
cap and the area around the cap
before removing it.
Do not top off the brake fluid. Adding
fluid does not correct a leak. If fluid is
added when the linings are worn,
there will be too much fluid when
new brake linings are installed. Add or
remove fluid, as necessary, only when
work is done on the brake hydraulic
system.
{Warning
If too much brake fluid is added, it
can spill on the engine and burn,
if the engine is hot enough. You or
others could be burned, and the
vehicle could be damaged. Add
brake fluid only when work is done
on the brake hydraulic system.
When the brake fluid falls to a low
level, the brake warning light comes
on. See Brake System Warning Light
0 117. Brake fluid absorbs water over time
which degrades the effectiveness of
the brake fluid. Replace brake fluid at
the specified intervals to prevent
increased stopping distance. See
Maintenance Schedule
0380.
What to Add
Use only GM approved DOT 3 brake
fluid from a clean, sealed container.
See Recommended Fluids and
Lubricants 0389.
{Warning
The wrong or contaminated brake
fluid could result in damage to the
brake system. This could result in
the loss of braking leading to a
possible injury. Always use the
proper GM approved brake fluid.
Caution
If brake fluid is spilled on the
vehicle's painted surfaces, the paint
finish can be damaged. Immediately
wash off any painted surface.
Battery - North America
The original equipment battery is
maintenance free. Do not remove the
cap and do not add fluid.
Refer to the replacement number on
the original battery label when a new
battery is needed. For replacement of
the battery, see your dealer.
The vehicle has an Absorbed Glass
Mat (AGM) 12-volt battery.
Installation of a standard 12-volt
battery will result in reduced 12-volt
battery life.
When using a 12-volt battery charger
on the 12-volt AGM battery, some
chargers have an AGM battery setting
on the charger. If available, use the
AGM setting on the charger, to limit
charge voltage to 14.8 volts.
Stop/Start System
This vehicle has a Stop/Start system
to shut off the engine to help
conserve fuel. See Stop/Start System
0 234.
Page 326 of 431
Cadillac XT6 Owner Manual (GMNA-Localizing-U.S./Canada-14574701) -
2021 - CRC - 2/8/21
VEHICLE CARE 325
.To check the P (Park) mechanism's
holding ability: With the engine
running, shift to P (Park). Then
release the parking brake followed
by the regular brake.
Contact your dealer if service is
required.
Wiper Blade Replacement
Windshield wiper blades should be
inspected for wear or cracking.
It is a good idea to clean or replace
the wiper blade assembly on a regular
basis or when worn. For proper
windshield wiper blade length and
type, see Maintenance Replacement
Parts 0390.
Caution
Allowing the wiper arm to touch
the windshield when no wiper blade
is installed could damage the
windshield. Any damage that occurs
would not be covered by the vehicle
warranty. Do not allow the wiper
arm to touch the windshield.
Front Wiper Blade Replacement
To replace the wiper blade assembly:
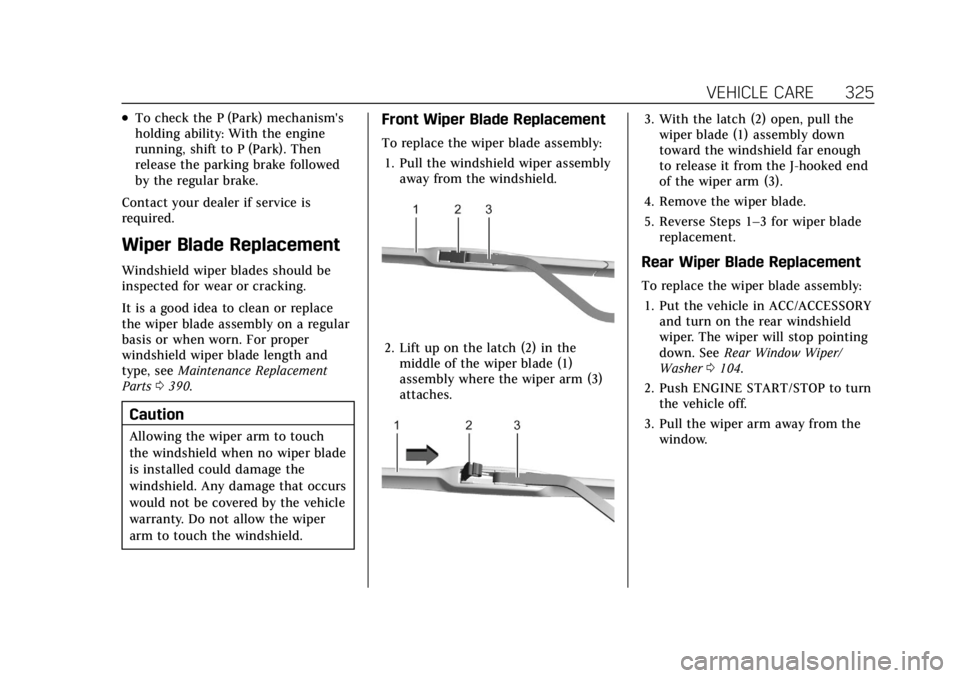
1. Pull the windshield wiper assembly away from the windshield.
2. Lift up on the latch (2) in themiddle of the wiper blade (1)
assembly where the wiper arm (3)
attaches.
3. With the latch (2) open, pull thewiper blade (1) assembly down
toward the windshield far enough
to release it from the J-hooked end
of the wiper arm (3).
4. Remove the wiper blade.
5. Reverse Steps 1–3 for wiper blade replacement.
Rear Wiper Blade Replacement
To replace the wiper blade assembly:
1. Put the vehicle in ACC/ACCESSORY and turn on the rear windshield
wiper. The wiper will stop pointing
down. See Rear Window Wiper/
Washer 0104.
2. Push ENGINE START/STOP to turn the vehicle off.
3. Pull the wiper arm away from the window.
Page 329 of 431
Cadillac XT6 Owner Manual (GMNA-Localizing-U.S./Canada-14574701) -
2021 - CRC - 2/8/21
328 VEHICLE CARE
problem is fixed. This greatly reduces
the chance of circuit overload and fire
caused by electrical problems.
Fuses and circuit breakers protect
power devices in the vehicle.
Replace a bad fuse with a new one of
the identical size and rating.
If there is a problem on the road and
a fuse needs to be replaced, the
same amperage fuse can be borrowed.
Choose some feature of the vehicle
that is not needed to use and replace
it as soon as possible.
Headlamp Wiring
An electrical overload may cause the
lamps to go on and off, or in some
cases to remain off. Have the
headlamp wiring checked right away if
the lamps go on and off or remain off.
Windshield Wipers
If the wiper motor overheats due to
heavy snow or ice, the windshield
wipers will stop until the motor cools
and will then restart.Although the circuit is protected from
electrical overload, overload due to
heavy snow or ice may cause wiper
linkage damage. Always clear ice and
heavy snow from the windshield
before using the windshield wipers.
If the overload is caused by an
electrical problem and not snow or
ice, be sure to get it fixed.
Fuses and Circuit Breakers
The wiring circuits in the vehicle are
protected from short circuits by a
combination of fuses and circuit
breakers. This greatly reduces the
chance of damage caused by electrical
problems.
{Danger
Fuses and circuit breakers are
marked with their ampere rating.
Do not exceed the
specified amperage rating when
replacing fuses and circuit breakers.
Use of an oversized fuse or circuit
breaker can result in a vehicle fire.
You and others could be seriously
injured or killed.
{Warning
Installation or use of fuses that do
not meet GM’s original fuse
specifications is dangerous. The
fuses could fail, and result in a fire.
You or others could be injured or
killed, and the vehicle could be
damaged.
See Accessories and Modifications
0 305 and
General Information 0304.
To check a fuse, look at the
silver-colored band inside the fuse.
If the band is broken or melted,
replace the fuse. Be sure to replace a
bad fuse with a new one of the
identical size and rating.
Fuses of the same amperage can be
temporarily borrowed from another
fuse location, if a fuse goes out.
Replace the fuse as soon as possible.
Page 348 of 431

Cadillac XT6 Owner Manual (GMNA-Localizing-U.S./Canada-14574701) -
2021 - CRC - 2/8/21
VEHICLE CARE 347
remain continuously illuminated. This
sequence will continue upon
subsequent vehicle start-ups as long
as the malfunction exists.
When the malfunction indicator is
illuminated, the system may not be
able to detect or signal low tire
pressure as intended. TPMS
malfunctions may occur for a variety
of reasons, including the installation
of replacement or alternate tires or
wheels on the vehicle that prevent the
TPMS from functioning properly.
Always check the TPMS malfunction
telltale after replacing one or more
tires or wheels on your vehicle to
ensure that the replacement or
alternate tires and wheels allow the
TPMS to continue to function
properly.
SeeTire Pressure Monitor Operation
0 347.
See Radio Frequency Statement 0406.Tire Pressure Monitor
Operation
This vehicle may have a Tire Pressure
Monitor System (TPMS). The TPMS is
designed to warn the driver when a
low tire pressure condition exists.
TPMS sensors are mounted onto each
tire and wheel assembly, excluding the
spare tire and wheel assembly. The
TPMS sensors monitor the air
pressure in the tires and transmit the
tire pressure readings to a receiver
located in the vehicle.
When a low tire pressure condition is
detected, the TPMS illuminates the
low tire pressure warning light on the
instrument cluster. If the warning
light comes on, stop as soon as
possible and inflate the tires to the
recommended pressure shown on the
Tire and Loading Information label.
See Vehicle Load Limits 0228. A message to check the pressure in a
specific tire displays in the Driver
Information Center (DIC). The low tire
pressure warning light and the DIC
warning message come on at each
ignition cycle until the tires are
inflated to the correct inflation
pressure. Using the DIC, tire pressure
levels can be viewed. For additional
information and details about the DIC
operation and displays see
Driver
Information Center (DIC) 0124.
The low tire pressure warning light
may come on in cool weather when
the vehicle is first started, and then
turn off as the vehicle is driven. This
could be an early indicator that the air
pressure is getting low and needs to
be inflated to the proper pressure.
A Tire and Loading Information label,
attached to your vehicle, shows the
size of the original equipment tires
and the correct inflation pressure for
the tires when they are cold. See
Vehicle Load Limits 0228, for an
example of the Tire and Loading
Information label and its location.
Also see Tire Pressure 0343.
Page 350 of 431
Cadillac XT6 Owner Manual (GMNA-Localizing-U.S./Canada-14574701) -
2021 - CRC - 2/8/21
VEHICLE CARE 349
When the low tire pressure warning
light comes on:1. Park the vehicle in a safe, level place.
2. Set the parking brake firmly.
3. Place the vehicle in P (Park).
4. Add air to the tire that is underinflated. The turn signal lamp
will flash.
When the recommended pressure
is reached, the horn sounds once
and the turn signal lamp will stop
flashing and briefly turn solid.
Repeat these steps for all
underinflated tires that have
illuminated the low tire pressure
warning light.
{Warning
Overinflating a tire could cause the
tire to rupture and you or others
could be injured. Do not exceed the
maximum pressure listed on the
tire sidewall. See Tire Sidewall
Labeling 0339 and
Vehicle Load Limits 0228. If the tire is overinflated by more than
35 kPa (5 psi), the horn will sound
multiple times and the turn signal
lamp will continue to flash for several
seconds after filling stops. To release
and correct the pressure, while the
turn signal lamp is still flashing,
briefly press the center of the valve
stem. When the recommended
pressure is reached, the horn
sounds once.
If the turn signal lamp does not flash
within 15 seconds after starting to
inflate the tire, the tire fill alert has
not been activated or is not working.
If the hazard warning flashers are on,
the tire fill alert visual feedback will
not work properly.
The TPMS will not activate the tire fill
alert properly under the following
conditions:
.There is interference from an
external device or transmitter.
.The air pressure from the inflation
device is not sufficient to inflate
the tire.
.There is a malfunction in the TPMS.
.There is a malfunction in the horn
or turn signal lamps.
.The identification code of the TPMS
sensor is not registered to the
system.
.The battery of the TPMS sensor
is low.
If the tire fill alert does not operate
due to TPMS interference, move the
vehicle about 1 m (3 ft) back or
forward and try again. If the tire fill
alert feature is not working, use a tire
pressure gauge.
TPMS Sensor Matching Process
Each TPMS sensor has a unique
identification code. The identification
code needs to be matched to a new
tire/wheel position after rotating the
vehicle’s tires or replacing one or more
of the TPMS sensors. The TPMS
sensor matching process should also
be performed after replacing a spare
tire with a road tire containing the
TPMS sensor. The malfunction light
and the DIC message should go off at
the next ignition cycle. The sensors
are matched to the tire/wheel
positions, using a TPMS relearn tool,
Page 351 of 431

Cadillac XT6 Owner Manual (GMNA-Localizing-U.S./Canada-14574701) -
2021 - CRC - 2/8/21
350 VEHICLE CARE
in the following order: driver side
front tire, passenger side front tire,
passenger side rear tire, and driver
side rear. See your dealer for service or
to purchase a relearn tool. A TPMS
relearn tool can also be purchased.
See Tire Pressure Monitor Sensor
Activation Tool at
www.gmtoolsandequipment.com or
call 1-800-GM TOOLS
(1-800-468-6657).
There are two minutes to match the
first tire/wheel position, and
five minutes overall to match all four
tire/wheel positions. If it takes longer,
the matching process stops and must
be restarted.
The TPMS sensor matching process is:1. Set the parking brake.
2. Place the vehicle in Service Mode. See Ignition Positions 0232.
3. Make sure the Tire Pressure info display option is turned on. The
info displays on the DIC can be
turned on and off through the
Options menu. See Driver
Information Center (DIC) 0124. 4. Use the five-way DIC control on the
right side of the steering wheel to
scroll to the Tire Pressure screen
under the DIC info page. See Driver
Information Center (DIC) 0124.
5. Press and hold the thumbwheel in the center of the five-way DIC
control.
The horn sounds twice to signal
the receiver is in relearn mode and
the TIRE LEARNING ACTIVE
message displays on the DIC
screen.
6. Start with the driver side front tire.
7. Place the relearn tool against the tire sidewall, near the valve stem.
Then press the button to activate
the TPMS sensor. A horn chirp
confirms that the sensor
identification code has been
matched to this tire and wheel
position.
8. Proceed to the passenger side front tire, and repeat Step 7.
9. Proceed to the passenger side rear tire, and repeat Step 7. 10. Proceed to the driver side rear tire,
and repeat Step 7. The horn sounds
two times to indicate the sensor
identification code has been
matched to the driver side rear tire,
and the TPMS sensor matching
process is no longer active. The
TIRE LEARNING ACTIVE message
on the DIC display screen goes off.
11. Turn the vehicle off.
12. Set all four tires to the recommended air pressure level as
indicated on the Tire and Loading
Information label.
Tire Inspection
We recommend that the tires,
including the spare tire, if the
vehicle has one, be inspected for
signs of wear or damage at least
once a month.
Replace the tire if:
.The indicators at three or more
places around the tire can
be seen.
.There is cord or fabric showing
through the tire's rubber.