display CADILLAC XTS 2017 1.G Owners Manual
[x] Cancel search | Manufacturer: CADILLAC, Model Year: 2017, Model line: XTS, Model: CADILLAC XTS 2017 1.GPages: 314, PDF Size: 3.71 MB
Page 8 of 314

Cadillac XTS Owner Manual (GMNA-Localizing-MidEast-10292881) - 2017 -
crc - 7/1/16
IN BRIEF 7
1.Air Vents 0165.
2. Electric Parking Brake 0186.
Instrument Panel Illumination
Control 0155.
Head-Up Display (HUD) 0131 (If
Equipped).
3. Exterior Lamp Controls 0151.
Turn Signal Lever. See Turn and
Lane-Change Signals 0154.
4. Instrument Cluster 0112.
Driver Information Center (DIC)
Display. See Driver Information
Center (DIC) 0128.
5. Windshield Wiper/Washer 0105.
6. Hazard Warning Flashers 0154.
Lane Departure Warning
(LDW) 0211.
Traction Control/Electronic
Stability Control 0188.
7. Infotainment 0158.
8. Glove Box Button. See Glove
Box 0100.
Parking Assist Button. See
Assistance Systems for Parking or
Backing 0202. 9.
Dual Automatic Climate Control
System 0159.
Heated and Ventilated Front Seats
0 58 (If Equipped).
10. Instrument Panel Storage 099 (If
Equipped).
Wireless Charging Pad (If
Equipped) (Out of View). See
Wireless Charging 0108.
11. Shift Lever. See Automatic
Transmission 0183.
12. ENGINE START/STOP Button. SeeIgnition Positions 0177.
13. Steering Wheel Controls 0104.
14. Horn 0104.
15. Steering Wheel Adjustment 0104.
16. Cruise Control 0191.
Adaptive Cruise Control 0194 (If
Equipped).
Forward Collision Alert (FCA)
System 0206 (If Equipped).
Phone Button. See “Steering
Wheel Controls ”in the
infotainment manual. Heated Steering Wheel
0104 (If
Equipped).
17. Data Link Connector (DLC) (Out of View). See Malfunction
Indicator Lamp (Check Engine
Light) 0120.
18. Hood Release. See Hood0223.
19. Instrument Panel Storage 099.
Page 11 of 314
Cadillac XTS Owner Manual (GMNA-Localizing-MidEast-10292881) - 2017 -
crc - 7/1/16
10 IN BRIEF
The power window switches on the
driver door control all the windows.
Each passenger door has a switch that
controls only that window.
Press the switch to lower the window.
Pull the switch up to raise it.
SeePower Windows 043.
Seat Adjustment
Uplevel Seat Adjustment
If equipped, the ignition must be on
to use all uplevel seat features.
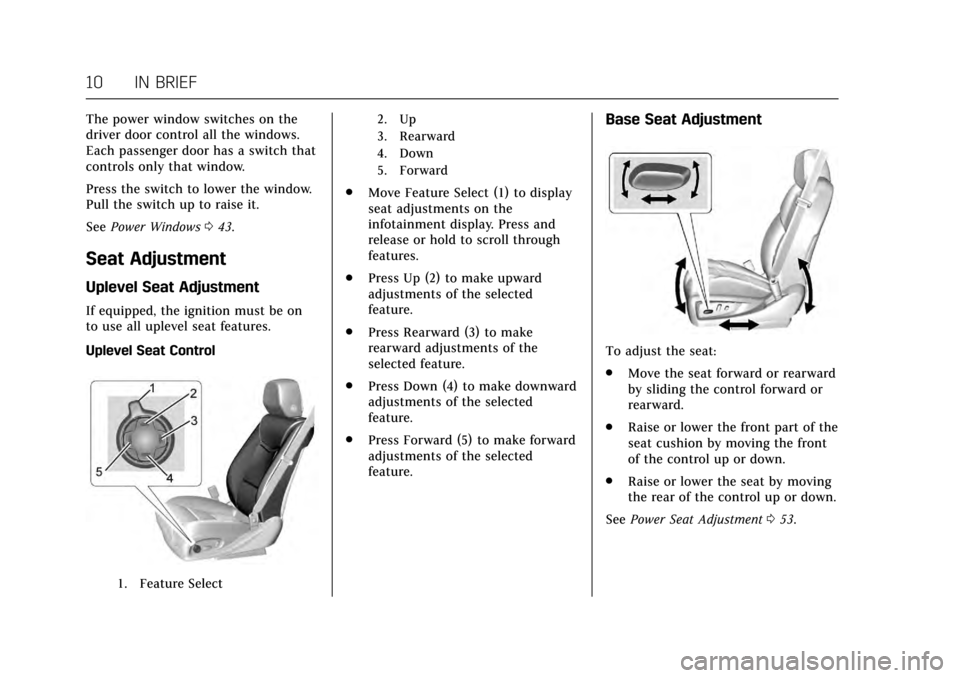
Uplevel Seat Control
1. Feature Select 2. Up
3. Rearward
4. Down
5. Forward
.
Move Feature Select (1) to display
seat adjustments on the
infotainment display. Press and
release or hold to scroll through
features.
. Press Up (2) to make upward
adjustments of the selected
feature.
. Press Rearward (3) to make
rearward adjustments of the
selected feature.
. Press Down (4) to make downward
adjustments of the selected
feature.
. Press Forward (5) to make forward
adjustments of the selected
feature.
Base Seat Adjustment
To adjust the seat:
.
Move the seat forward or rearward
by sliding the control forward or
rearward.
. Raise or lower the front part of the
seat cushion by moving the front
of the control up or down.
. Raise or lower the seat by moving
the rear of the control up or down.
See Power Seat Adjustment 053.
Page 12 of 314
Cadillac XTS Owner Manual (GMNA-Localizing-MidEast-10292881) - 2017 -
crc - 7/1/16
IN BRIEF 11
Lumbar and Bolster Support
Uplevel Seat Adjustment
If equipped, the ignition must be on
to use all uplevel seat features.
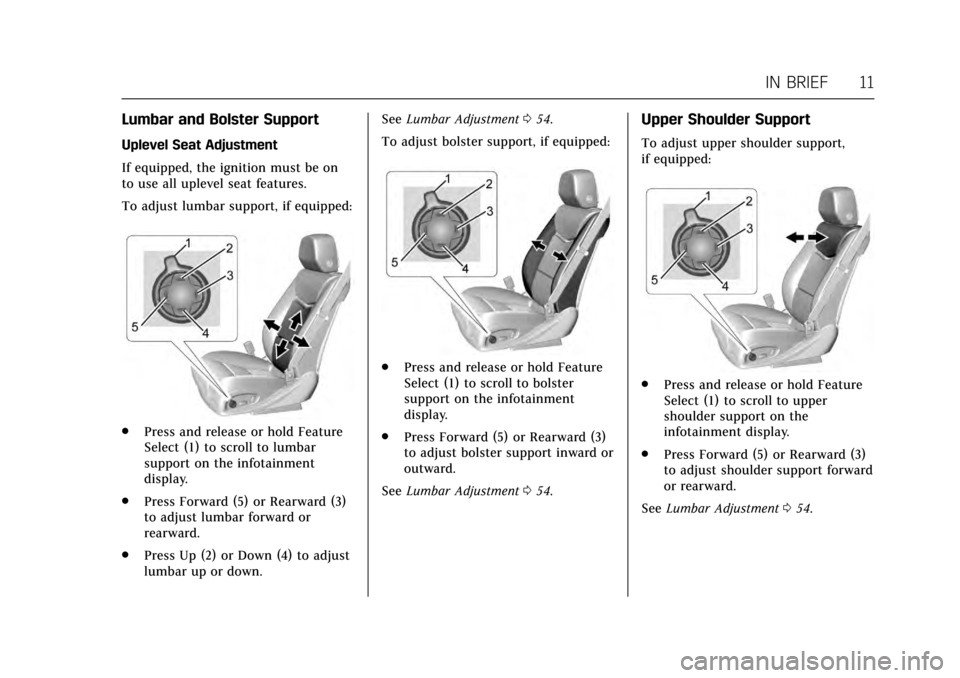
To adjust lumbar support, if equipped:
.Press and release or hold Feature
Select (1) to scroll to lumbar
support on the infotainment
display.
. Press Forward (5) or Rearward (3)
to adjust lumbar forward or
rearward.
. Press Up (2) or Down (4) to adjust
lumbar up or down. See
Lumbar Adjustment 054.
To adjust bolster support, if equipped:
. Press and release or hold Feature
Select (1) to scroll to bolster
support on the infotainment
display.
. Press Forward (5) or Rearward (3)
to adjust bolster support inward or
outward.
See Lumbar Adjustment 054.
Upper Shoulder Support
To adjust upper shoulder support,
if equipped:
.
Press and release or hold Feature
Select (1) to scroll to upper
shoulder support on the
infotainment display.
. Press Forward (5) or Rearward (3)
to adjust shoulder support forward
or rearward.
See Lumbar Adjustment 054.
Page 13 of 314
Cadillac XTS Owner Manual (GMNA-Localizing-MidEast-10292881) - 2017 -
crc - 7/1/16
12 IN BRIEF
Reclining Seatbacks
Base Shown, Uplevel Similar
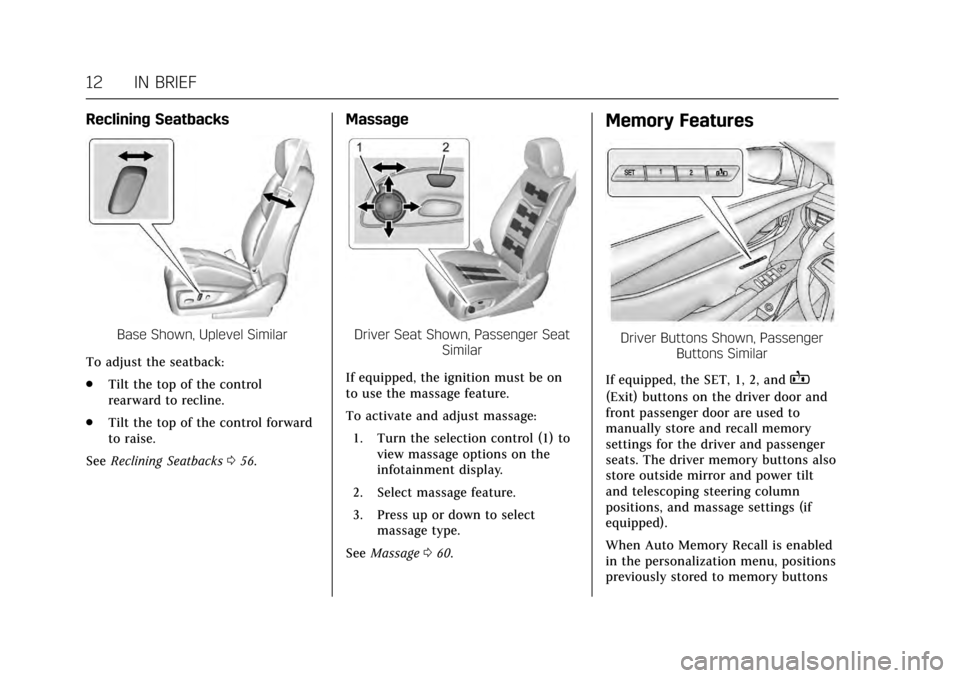
To adjust the seatback:
. Tilt the top of the control
rearward to recline.
. Tilt the top of the control forward
to raise.
See Reclining Seatbacks 056.
Massage
Driver Seat Shown, Passenger Seat
Similar
If equipped, the ignition must be on
to use the massage feature.
To activate and adjust massage: 1. Turn the selection control (1) to view massage options on the
infotainment display.
2. Select massage feature.
3. Press up or down to select massage type.
See Massage 060.
Memory Features
Driver Buttons Shown, Passenger
Buttons Similar
If equipped, the SET, 1, 2, and
B
(Exit) buttons on the driver door and
front passenger door are used to
manually store and recall memory
settings for the driver and passenger
seats. The driver memory buttons also
store outside mirror and power tilt
and telescoping steering column
positions, and massage settings (if
equipped).
When Auto Memory Recall is enabled
in the personalization menu, positions
previously stored to memory buttons
Page 19 of 314
Cadillac XTS Owner Manual (GMNA-Localizing-MidEast-10292881) - 2017 -
crc - 7/1/16
18 IN BRIEF
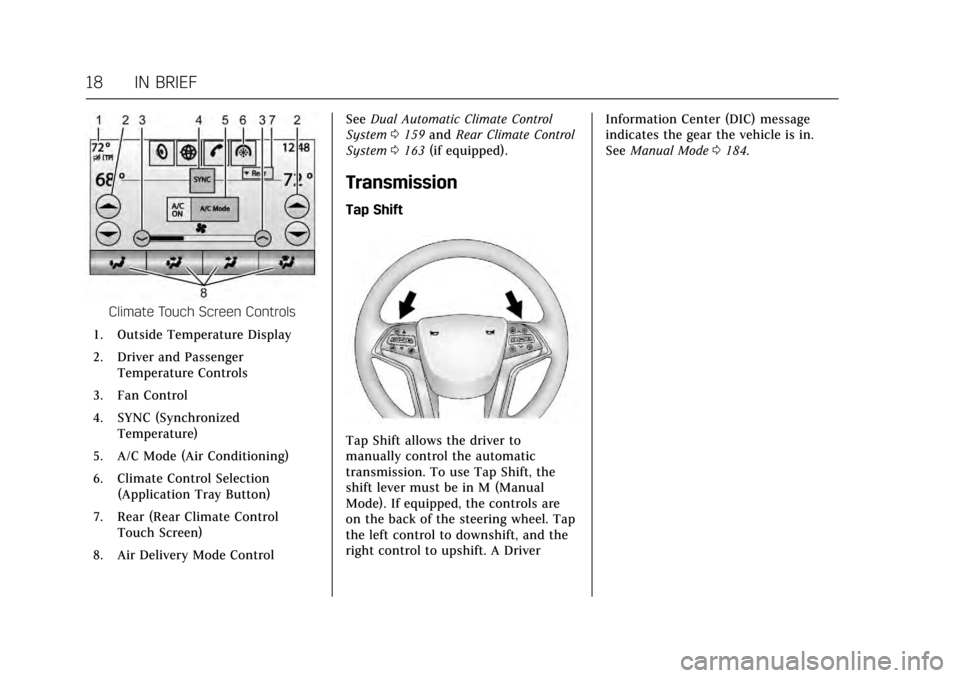
Climate Touch Screen Controls
1. Outside Temperature Display
2. Driver and Passenger Temperature Controls
3. Fan Control
4. SYNC (Synchronized Temperature)
5. A/C Mode (Air Conditioning)
6. Climate Control Selection (Application Tray Button)
7. Rear (Rear Climate Control Touch Screen)
8. Air Delivery Mode Control See
Dual Automatic Climate Control
System 0159 and Rear Climate Control
System 0163 (if equipped).
Transmission
Tap Shift
Tap Shift allows the driver to
manually control the automatic
transmission. To use Tap Shift, the
shift lever must be in M (Manual
Mode). If equipped, the controls are
on the back of the steering wheel. Tap
the left control to downshift, and the
right control to upshift. A Driver Information Center (DIC) message
indicates the gear the vehicle is in.
See
Manual Mode 0184.
Page 21 of 314
Cadillac XTS Owner Manual (GMNA-Localizing-MidEast-10292881) - 2017 -
crc - 7/1/16
20 IN BRIEF
Driver Information
Center (DIC)
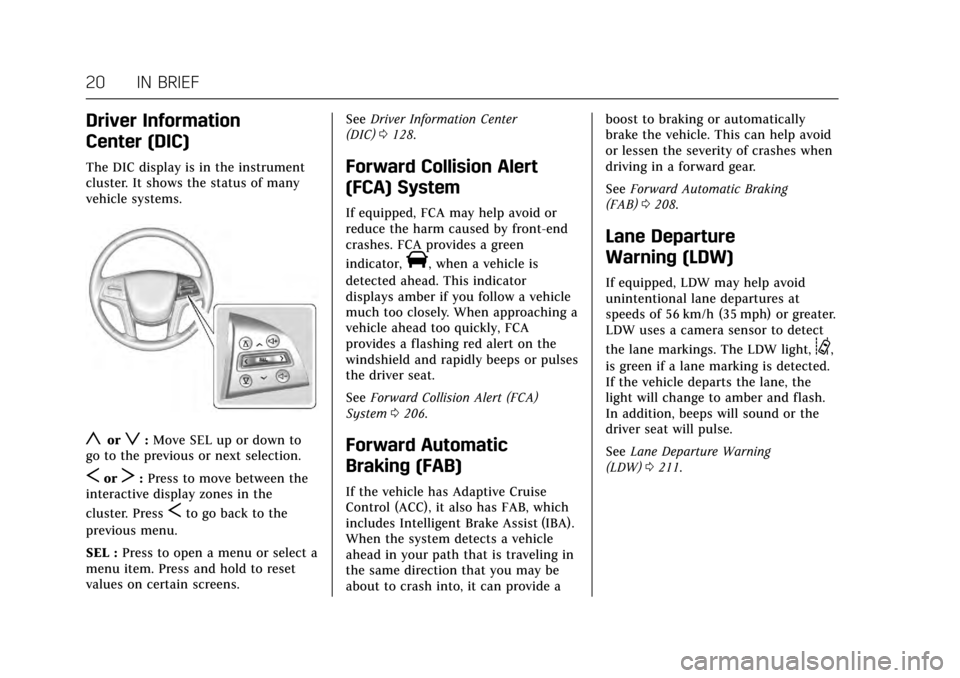
The DIC display is in the instrument
cluster. It shows the status of many
vehicle systems.
yorz:Move SEL up or down to
go to the previous or next selection.
SorT: Press to move between the
interactive display zones in the
cluster. Press
Sto go back to the
previous menu.
SEL : Press to open a menu or select a
menu item. Press and hold to reset
values on certain screens. See
Driver Information Center
(DIC) 0128.
Forward Collision Alert
(FCA) System
If equipped, FCA may help avoid or
reduce the harm caused by front-end
crashes. FCA provides a green
indicator,
V, when a vehicle is
detected ahead. This indicator
displays amber if you follow a vehicle
much too closely. When approaching a
vehicle ahead too quickly, FCA
provides a flashing red alert on the
windshield and rapidly beeps or pulses
the driver seat.
See Forward Collision Alert (FCA)
System 0206.
Forward Automatic
Braking (FAB)
If the vehicle has Adaptive Cruise
Control (ACC), it also has FAB, which
includes Intelligent Brake Assist (IBA).
When the system detects a vehicle
ahead in your path that is traveling in
the same direction that you may be
about to crash into, it can provide a boost to braking or automatically
brake the vehicle. This can help avoid
or lessen the severity of crashes when
driving in a forward gear.
See
Forward Automatic Braking
(FAB) 0208.
Lane Departure
Warning (LDW)
If equipped, LDW may help avoid
unintentional lane departures at
speeds of 56 km/h (35 mph) or greater.
LDW uses a camera sensor to detect
the lane markings. The LDW light,
@,
is green if a lane marking is detected.
If the vehicle departs the lane, the
light will change to amber and flash.
In addition, beeps will sound or the
driver seat will pulse.
See Lane Departure Warning
(LDW) 0211.
Page 22 of 314
Cadillac XTS Owner Manual (GMNA-Localizing-MidEast-10292881) - 2017 -
crc - 7/1/16
IN BRIEF 21
Side Blind Zone
Alert (SBZA)
If equipped, SBZA will detect moving
vehicles in the next lane over in the
vehicle's side blind zone area. When
this happens, the SBZA display will
light up in the corresponding outside
side mirror and will flash if the turn
signal is on.
SeeSide Blind Zone Alert (SBZA) 0210.
Surround Vision
If equipped, views around the vehicle
display in the infotainment display to
aid with parking and low-speed
maneuvers.
See “Surround Vision ”under
Assistance Systems for Parking or
Backing 0202.
Front Vision Camera
If equipped, a view of the area in front
of the vehicle displays on the
infotainment display to aid with
parking and low-speed maneuvers.
See “Front Vision Camera ”under
Assistance Systems for Parking or
Backing 0202.
Rear Vision Camera (RVC)
If equipped, RVC displays a view of
the area behind the vehicle on the
infotainment display when the vehicle
is shifted into R (Reverse) to aid with
parking and low-speed backing
maneuvers.
See Assistance Systems for Parking or
Backing 0202.
Rear Cross Traffic Alert
(RCTA) System
If equipped, the RCTA system uses a
triangle with an arrow displayed on
the infotainment display to warn of
traffic behind your vehicle that may
cross your vehicle's path while in
R (Reverse). In addition, beeps will
sound, or the driver seat will pulse.
See Assistance Systems for Parking or
Backing 0202.
Parking Assist
If equipped, Rear Parking Assist (RPA)
uses sensors on the rear bumper to
assist with parking and avoiding
objects while in R (Reverse). It operates at speeds less than 8 km/h
(5 mph). RPA may display a warning
triangle on the Rear Vision Camera
screen and a graphic on the
instrument cluster to provide the
object distance. In addition, multiple
beeps or seat pulses may occur if very
close to an object.
The vehicle may also have the Front
Parking Assist system.
See
Assistance Systems for Parking or
Backing 0202.
Reverse Automatic
Braking (RAB)
If the vehicle has Adaptive Cruise
Control (ACC) it also has the RAB
system, which is designed to help
avoid or reduce the harm caused by
backing crashes when the vehicle is
shifted into R (Reverse). If the system
detects the vehicle is backing too fast
to avoid a crash with a detected object
behind your vehicle in your path, it
may automatically brake hard to
a stop.
See Assistance Systems for Parking or
Backing 0202.
Page 24 of 314
Cadillac XTS Owner Manual (GMNA-Localizing-MidEast-10292881) - 2017 -
crc - 7/1/16
IN BRIEF 23
Performance and
Maintenance
Traction Control/Electronic
Stability Control
The Traction Control System (TCS)
limits wheel spin. The system turns
on automatically every time the
vehicle is started.
The StabiliTrak system assists with
directional control of the vehicle in
difficult driving conditions. The
system also turns on automatically
every time the vehicle is started.
.To turn off traction control, press
and release
gon the center
stack.
icomes on in the
instrument cluster and the
appropriate DIC message is
displayed. See Ride Control System
Messages 0141.
. To turn off both traction control
and StabiliTrak, press and hold
g
on the center stack, untili
andgcome on in the instrument cluster and the appropriate DIC
message is displayed. See
Ride
Control System Messages 0141.
. Press and release
gagain to turn
on both systems.
See Traction Control/Electronic Stability
Control 0188.
Tire Pressure Monitor
This vehicle may have a Tire Pressure
Monitor System (TPMS).
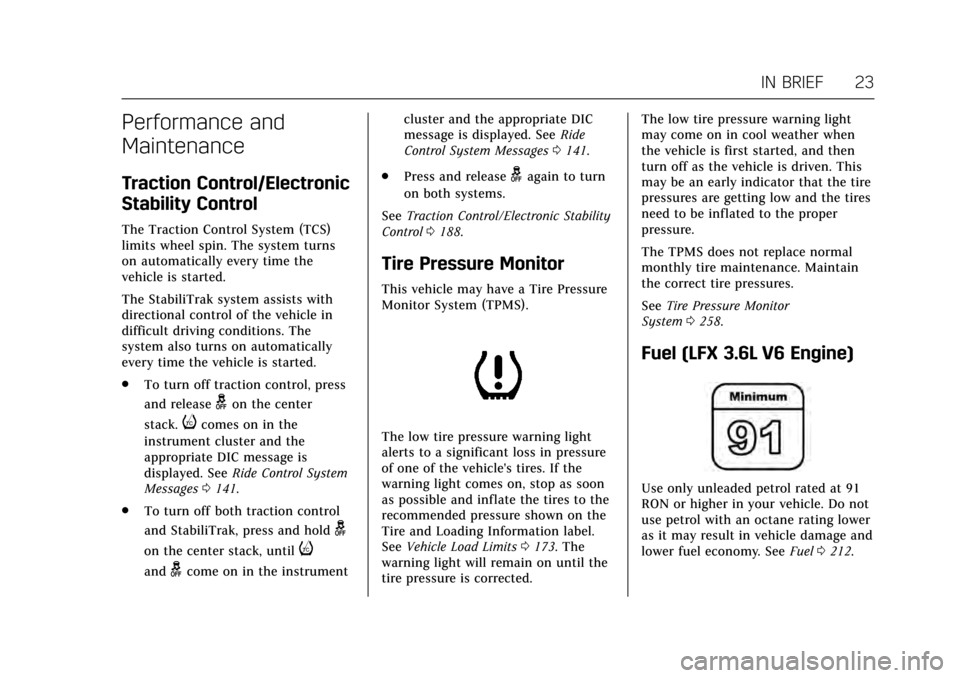
The low tire pressure warning light
alerts to a significant loss in pressure
of one of the vehicle's tires. If the
warning light comes on, stop as soon
as possible and inflate the tires to the
recommended pressure shown on the
Tire and Loading Information label.
See Vehicle Load Limits 0173. The
warning light will remain on until the
tire pressure is corrected. The low tire pressure warning light
may come on in cool weather when
the vehicle is first started, and then
turn off as the vehicle is driven. This
may be an early indicator that the tire
pressures are getting low and the tires
need to be inflated to the proper
pressure.
The TPMS does not replace normal
monthly tire maintenance. Maintain
the correct tire pressures.
See
Tire Pressure Monitor
System 0258.
Fuel (LFX 3.6L V6 Engine)
Use only unleaded petrol rated at 91
RON or higher in your vehicle. Do not
use petrol with an octane rating lower
as it may result in vehicle damage and
lower fuel economy. See Fuel0212.
Page 25 of 314
Cadillac XTS Owner Manual (GMNA-Localizing-MidEast-10292881) - 2017 -
crc - 7/1/16
24 IN BRIEF
Fuel (LF3 3.6L V6 Twin
Turbo Engine)
Premium Required Fuel
Use 95 RON or higher octane
unleaded gasoline in your vehicle. Do
not use petrol with an octane rating
lower as it may result in vehicle
damage and lower fuel economy. See
Fuel0212.
Engine Oil Life System
The engine oil life system calculates
engine oil life based on vehicle use
and displays the CHANGE ENGINE
OIL SOON message when it is time to
change the engine oil and filter. The
oil life system should be reset to 100%
only following an oil change. Resetting the Oil Life System
1. Using the DIC controls on the right side of the steering wheel,
display REMAINING OIL LIFE on
the DIC. See Driver Information
Center (DIC) 0128. When
remaining oil life is low, the
CHANGE ENGINE OIL SOON
message will appear on the
display. See Engine Oil
Messages 0137.
2. Press and hold SEL to clear the CHANGE ENGINE OIL SOON
message and reset the oil life
at 100%.
Be careful not to reset the oil life
display accidentally at any time
other than after the oil is
changed. It cannot be reset
accurately until the next oil
change.
The oil life system can also be reset as
follows: 1. Turn the ignition on with the engine off.
2. Fully press and release the accelerator pedal three times
within five seconds. If the CHANGE ENGINE OIL
SOON message is not on, the
system is reset.
See Engine Oil Life System 0230.
Driving for Better Fuel
Economy
Driving habits can affect fuel mileage.
Here are some driving tips to get the
best fuel economy possible.
.
Avoid fast starts and accelerate
smoothly.
. Brake gradually and avoid abrupt
stops.
. Avoid idling the engine for long
periods of time.
. When road and weather
conditions are appropriate, use
cruise control.
. Always follow posted speed limits
or drive more slowly when
conditions require.
. Keep vehicle tires properly
inflated.
. Combine several trips into a
single trip.
Page 31 of 314
Cadillac XTS Owner Manual (GMNA-Localizing-MidEast-10292881) - 2017 -
crc - 7/1/16
30 KEYS, DOORS, AND WINDOWS
Temporary Disable of Passive
Locking Feature
Temporarily disable the passive
locking by pressing and holding
Kon
the interior door switch with a door
open for at least four seconds, or until
three chimes are heard. Passive
locking will then remain disabled
until
Qon the interior door is
pressed, or until the vehicle is
turned on.
Remote Left In Vehicle Alert
When the vehicle is turned off and a
remote is left in the vehicle, the horn
will chirp three times after all doors
are closed. To turn on or off see
Vehicle Personalization 0144.
Keyless Trunk Opening
Press the touch pad on the rear of the
trunk above the license plate to open
the trunk when the RKE transmitter is
in range.
Keyed Access
For accessing a vehicle with a dead
transmitter battery, see Door
Locks 033.
Programming Transmitters to
the Vehicle
Only RKE transmitters programmed to
the vehicle will work. If a transmitter
is lost or stolen, a replacement can be
purchased and programmed through
your dealer. When the replacement
transmitter is programmed to this
vehicle, all remaining transmitters
must also be reprogrammed. Any lost
or stolen transmitters will no longer
work once the new transmitter is
programmed. Each vehicle can have
up to eight transmitters programmed
to it. See your dealer to program
transmitters to the vehicle.
Starting the Vehicle with a Low
Transmitter Battery
If the transmitter battery is weak, or if
there is interference with the signal,
the DIC may display NO REMOTE
DETECTED or NO REMOTE KEY WAS
DETECTED PLACE KEY IN
TRANSMITTER POCKET THEN
START YOUR VEHICLE when you try
to start the vehicle. See Key and Lock
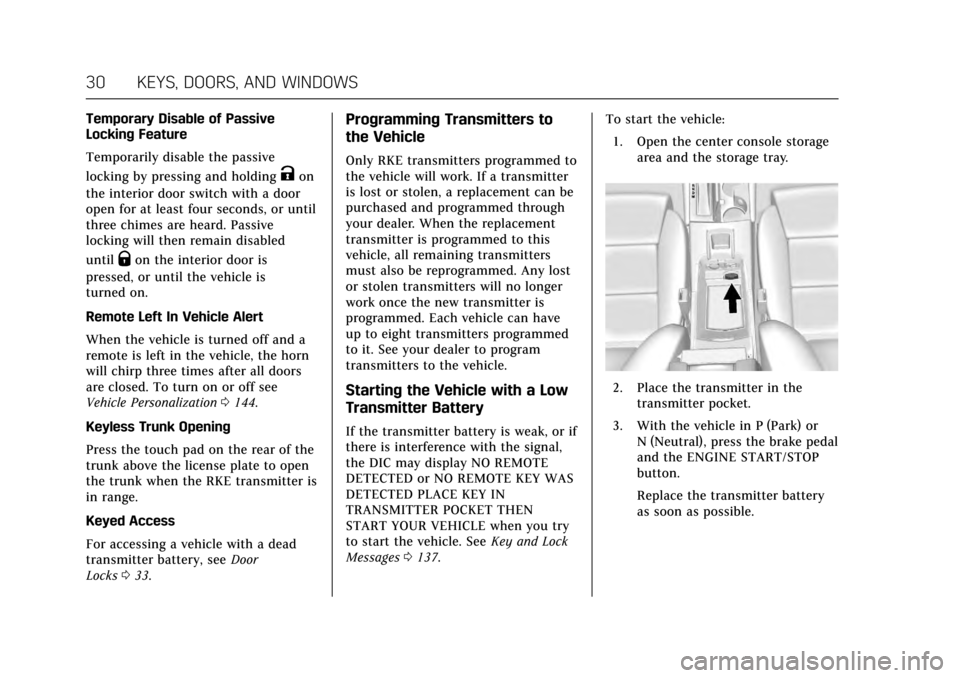
Messages 0137. To start the vehicle:
1. Open the center console storage area and the storage tray.
2. Place the transmitter in thetransmitter pocket.
3. With the vehicle in P (Park) or N (Neutral), press the brake pedal
and the ENGINE START/STOP
button.
Replace the transmitter battery
as soon as possible.