tow CADILLAC XTS 2017 1.G Owners Manual
[x] Cancel search | Manufacturer: CADILLAC, Model Year: 2017, Model line: XTS, Model: CADILLAC XTS 2017 1.GPages: 314, PDF Size: 3.71 MB
Page 18 of 314
Cadillac XTS Owner Manual (GMNA-Localizing-MidEast-10292881) - 2017 -
crc - 7/1/16
IN BRIEF 17
If equipped with Rainsense and the
feature is enabled in vehicle
personalization, move the windshield
wiper lever to INT and turn the
x
INT band to adjust the sensitivity to
moisture.
.Turn the band up for more
sensitivity to moisture.
. Turn the band down for less
sensitivity to moisture.
. Move the windshield wiper lever
out of the INT position to
deactivate Rainsense.
To turn the Rainsense feature on or
off, see “Rain Sense Wipers ”under
Vehicle Personalization 0144.
OFF : Use to turn the wipers off.
1X : For a single wipe, briefly move
the lever down. For several wipes, hold
the lever down.
n L: Pull the lever toward you to
spray windshield washer fluid and
activate the wipers.
See Windshield Wiper/Washer 0105.
Climate Controls
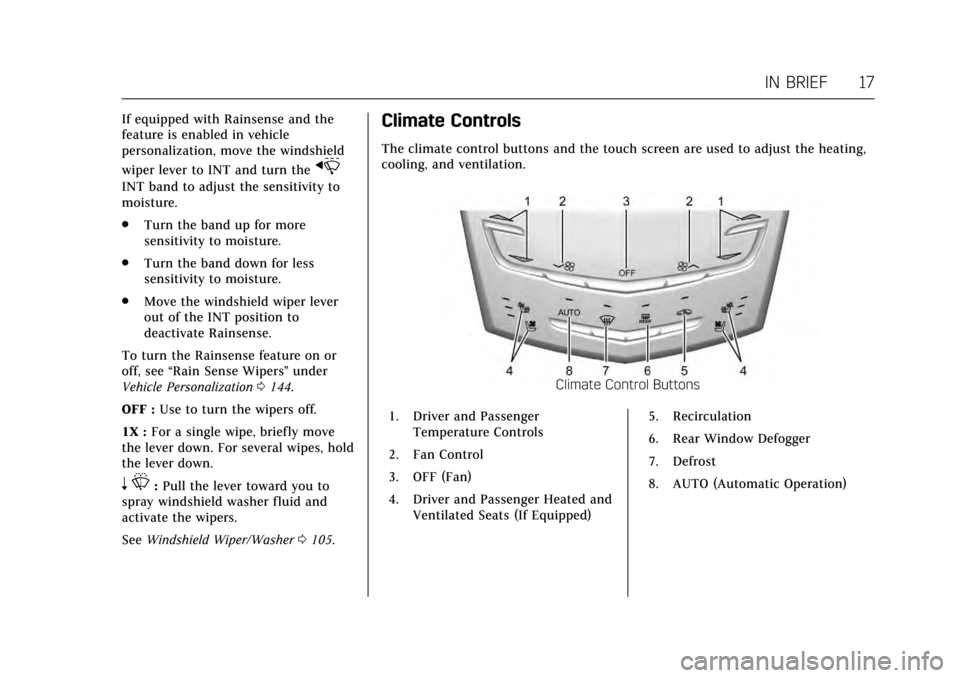
The climate control buttons and the touch screen are used to adjust the heating,
cooling, and ventilation.
Climate Control Buttons
1. Driver and Passenger Temperature Controls
2. Fan Control
3. OFF (Fan)
4. Driver and Passenger Heated and Ventilated Seats (If Equipped) 5. Recirculation
6. Rear Window Defogger
7. Defrost
8. AUTO (Automatic Operation)
Page 43 of 314
Cadillac XTS Owner Manual (GMNA-Localizing-MidEast-10292881) - 2017 -
crc - 7/1/16
42 KEYS, DOORS, AND WINDOWS
Memory Mirrors
The vehicle may have memory
mirrors. SeeMemory Seats 057.
Side Blind Zone Alert (SBZA)
The vehicle may have SBZA. See Side
Blind Zone Alert (SBZA) 0210.
Turn Signal Indicator
The vehicle has a turn signal indicator
on the mirror housings. The indicator
will flash when a turn signal or the
hazard warning flashers are used.
Folding Mirrors
Manual Folding Mirrors
The mirrors can be folded inward
toward the vehicle to prevent damage
when going through an automatic car
wash. Push the mirror outward to
return it to the original position.
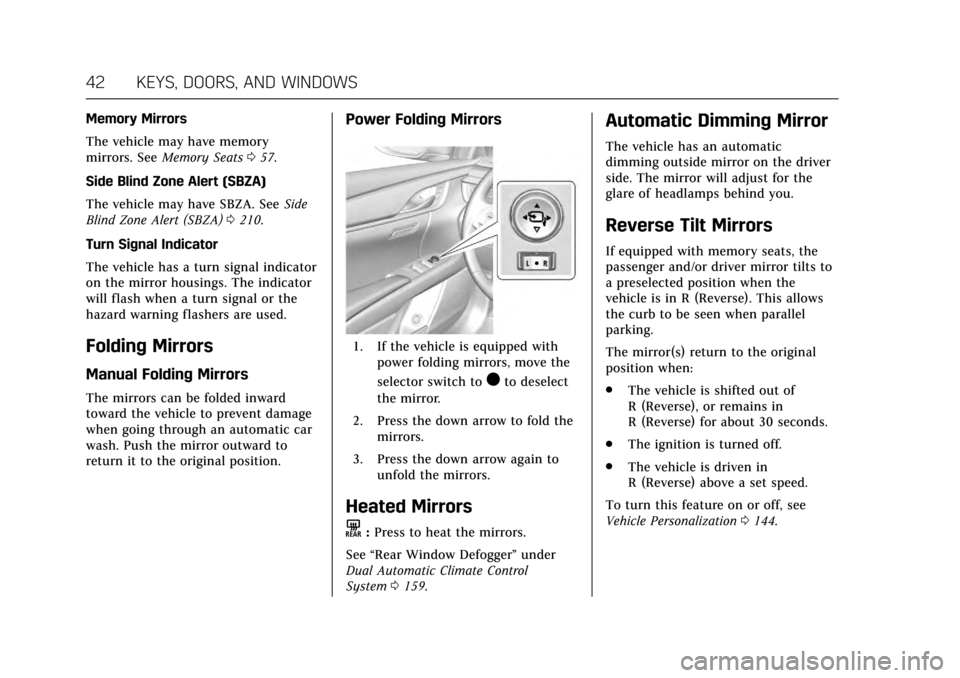
Power Folding Mirrors
1. If the vehicle is equipped with power folding mirrors, move the
selector switch to
)to deselect
the mirror.
2. Press the down arrow to fold the mirrors.
3. Press the down arrow again to unfold the mirrors.
Heated Mirrors
K
:Press to heat the mirrors.
See “Rear Window Defogger” under
Dual Automatic Climate Control
System 0159.
Automatic Dimming Mirror
The vehicle has an automatic
dimming outside mirror on the driver
side. The mirror will adjust for the
glare of headlamps behind you.
Reverse Tilt Mirrors
If equipped with memory seats, the
passenger and/or driver mirror tilts to
a preselected position when the
vehicle is in R (Reverse). This allows
the curb to be seen when parallel
parking.
The mirror(s) return to the original
position when:
.
The vehicle is shifted out of
R (Reverse), or remains in
R (Reverse) for about 30 seconds.
. The ignition is turned off.
. The vehicle is driven in
R (Reverse) above a set speed.
To turn this feature on or off, see
Vehicle Personalization 0144.
Page 44 of 314
Cadillac XTS Owner Manual (GMNA-Localizing-MidEast-10292881) - 2017 -
crc - 7/1/16
KEYS, DOORS, AND WINDOWS 43
Interior Mirrors
Interior Rearview Mirrors
Adjust the rearview mirror for a clear
view of the area behind the vehicle.
Do not spray glass cleaner directly on
the mirror. Use a soft towel dampened
with water.
Automatic Dimming
Rearview Mirror
The vehicle has an automatic
dimming rearview mirror. The mirror
will automatically reduce the glare
from the headlamps from behind. The
dimming feature comes on when the
vehicle is started.
Windows
{Warning
Never leave a child, a helpless adult,
or a pet alone in a vehicle,
especially with the windows closed
in warm or hot weather. They can
be overcome by the extreme heat
and suffer permanent injuries or
even death from heat stroke.
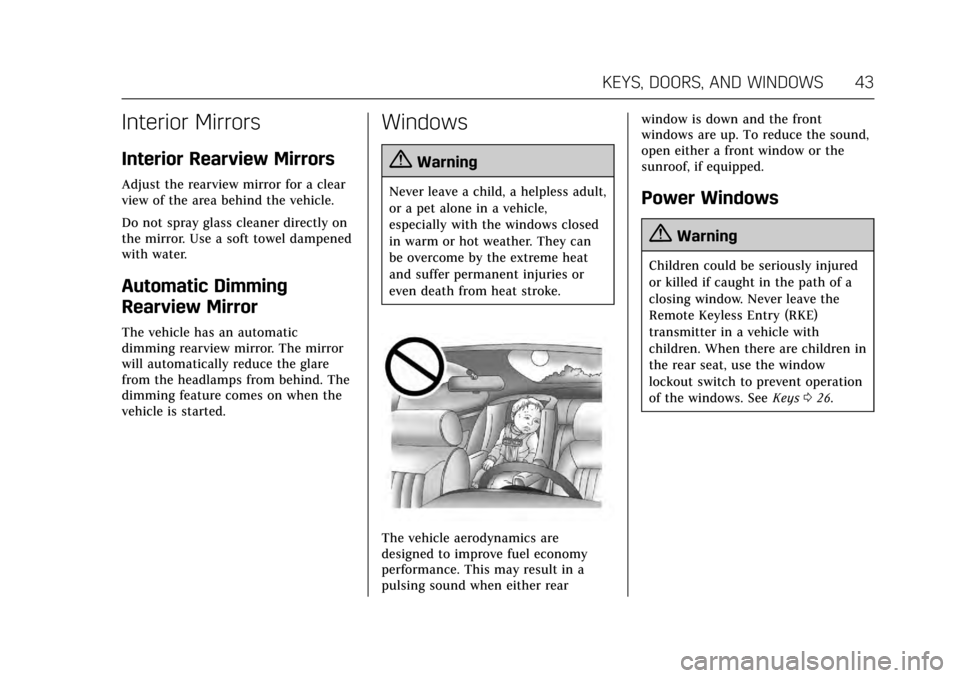
The vehicle aerodynamics are
designed to improve fuel economy
performance. This may result in a
pulsing sound when either rearwindow is down and the front
windows are up. To reduce the sound,
open either a front window or the
sunroof, if equipped.
Power Windows
{Warning
Children could be seriously injured
or killed if caught in the path of a
closing window. Never leave the
Remote Keyless Entry (RKE)
transmitter in a vehicle with
children. When there are children in
the rear seat, use the window
lockout switch to prevent operation
of the windows. See
Keys026.
Page 61 of 314
Cadillac XTS Owner Manual (GMNA-Localizing-MidEast-10292881) - 2017 -
crc - 7/1/16
60 SEATS AND RESTRAINTS
The heated or ventilated seats may be
enabled or disabled in the vehicle
personalization menu. SeeRemote
Vehicle Start 031 and Vehicle
Personalization 0144.
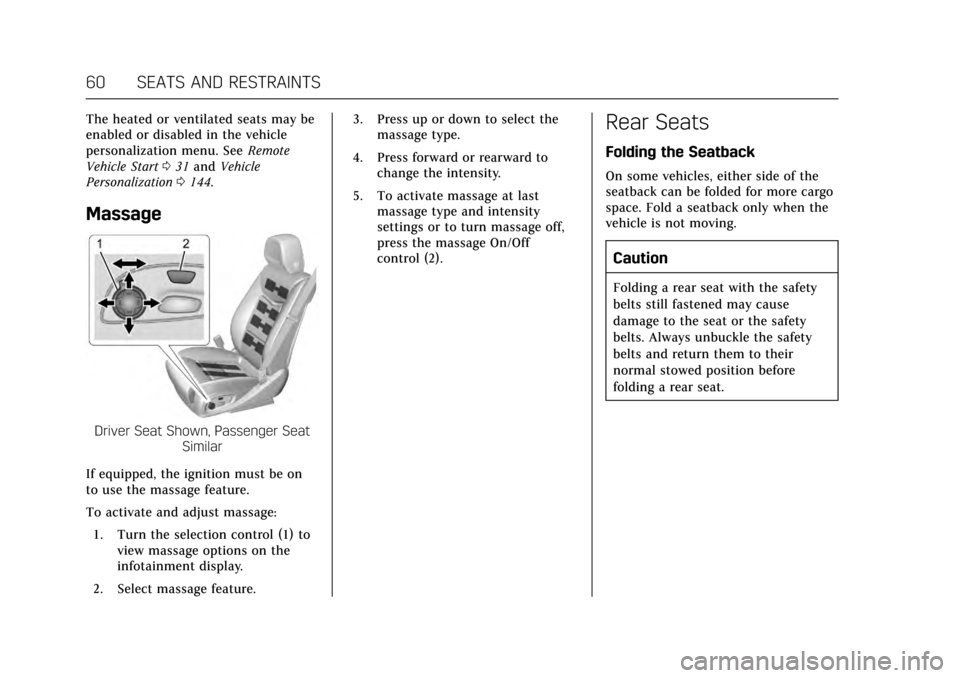
Massage
Driver Seat Shown, Passenger Seat
Similar
If equipped, the ignition must be on
to use the massage feature.
To activate and adjust massage: 1. Turn the selection control (1) to view massage options on the
infotainment display.
2. Select massage feature. 3. Press up or down to select the
massage type.
4. Press forward or rearward to change the intensity.
5. To activate massage at last massage type and intensity
settings or to turn massage off,
press the massage On/Off
control (2).
Rear Seats
Folding the Seatback
On some vehicles, either side of the
seatback can be folded for more cargo
space. Fold a seatback only when the
vehicle is not moving.
Caution
Folding a rear seat with the safety
belts still fastened may cause
damage to the seat or the safety
belts. Always unbuckle the safety
belts and return them to their
normal stowed position before
folding a rear seat.
Page 63 of 314
Cadillac XTS Owner Manual (GMNA-Localizing-MidEast-10292881) - 2017 -
crc - 7/1/16
62 SEATS AND RESTRAINTS
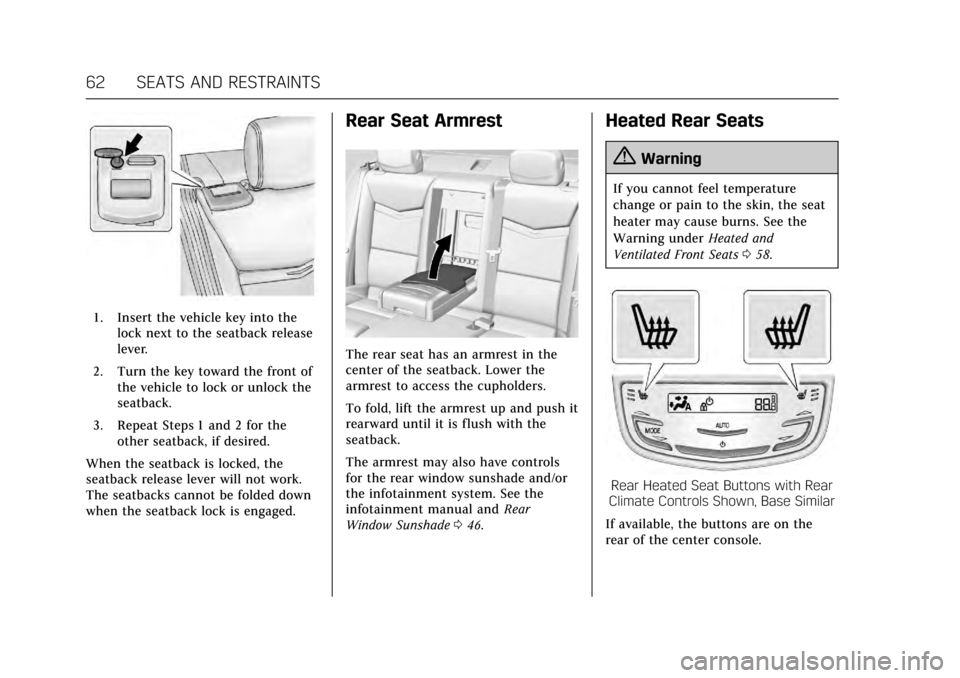
1. Insert the vehicle key into thelock next to the seatback release
lever.
2. Turn the key toward the front of the vehicle to lock or unlock the
seatback.
3. Repeat Steps 1 and 2 for the other seatback, if desired.
When the seatback is locked, the
seatback release lever will not work.
The seatbacks cannot be folded down
when the seatback lock is engaged.
Rear Seat Armrest
The rear seat has an armrest in the
center of the seatback. Lower the
armrest to access the cupholders.
To fold, lift the armrest up and push it
rearward until it is flush with the
seatback.
The armrest may also have controls
for the rear window sunshade and/or
the infotainment system. See the
infotainment manual and Rear
Window Sunshade 046.
Heated Rear Seats
{Warning
If you cannot feel temperature
change or pain to the skin, the seat
heater may cause burns. See the
Warning under Heated and
Ventilated Front Seats 058.
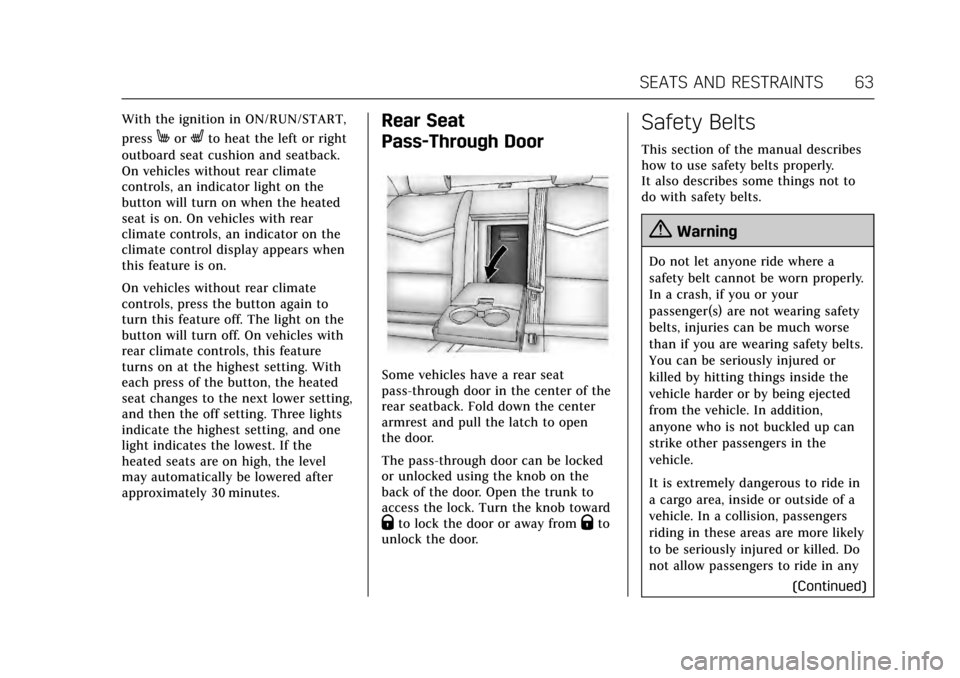
Rear Heated Seat Buttons with Rear
Climate Controls Shown, Base Similar
If available, the buttons are on the
rear of the center console.
Page 64 of 314
Cadillac XTS Owner Manual (GMNA-Localizing-MidEast-10292881) - 2017 -
crc - 7/1/16
SEATS AND RESTRAINTS 63
With the ignition in ON/RUN/START,
press
MorLto heat the left or right
outboard seat cushion and seatback.
On vehicles without rear climate
controls, an indicator light on the
button will turn on when the heated
seat is on. On vehicles with rear
climate controls, an indicator on the
climate control display appears when
this feature is on.
On vehicles without rear climate
controls, press the button again to
turn this feature off. The light on the
button will turn off. On vehicles with
rear climate controls, this feature
turns on at the highest setting. With
each press of the button, the heated
seat changes to the next lower setting,
and then the off setting. Three lights
indicate the highest setting, and one
light indicates the lowest. If the
heated seats are on high, the level
may automatically be lowered after
approximately 30 minutes.Rear Seat
Pass-Through Door
Some vehicles have a rear seat
pass-through door in the center of the
rear seatback. Fold down the center
armrest and pull the latch to open
the door.
The pass-through door can be locked
or unlocked using the knob on the
back of the door. Open the trunk to
access the lock. Turn the knob toward
Qto lock the door or away fromQto
unlock the door.
Safety Belts
This section of the manual describes
how to use safety belts properly.
It also describes some things not to
do with safety belts.
{Warning
Do not let anyone ride where a
safety belt cannot be worn properly.
In a crash, if you or your
passenger(s) are not wearing safety
belts, injuries can be much worse
than if you are wearing safety belts.
You can be seriously injured or
killed by hitting things inside the
vehicle harder or by being ejected
from the vehicle. In addition,
anyone who is not buckled up can
strike other passengers in the
vehicle.
It is extremely dangerous to ride in
a cargo area, inside or outside of a
vehicle. In a collision, passengers
riding in these areas are more likely
to be seriously injured or killed. Do
not allow passengers to ride in any
(Continued)
Page 68 of 314
Cadillac XTS Owner Manual (GMNA-Localizing-MidEast-10292881) - 2017 -
crc - 7/1/16
SEATS AND RESTRAINTS 67
To unlatch the belt, push the button
on the buckle. The belt should return
to its stowed position.
Always stow the safety belt slowly.
If the safety belt webbing returns
quickly to the stowed position, the
retractor may lock and cannot be
pulled out. If this happens, pull the
safety belt straight out firmly to
unlock the webbing, and then release
it. If the webbing is still locked in the
retractor, see your dealer.
Before a door is closed, be sure the
safety belt is out of the way. If a door
is slammed against a safety belt,
damage can occur to both the safety
belt and the vehicle.
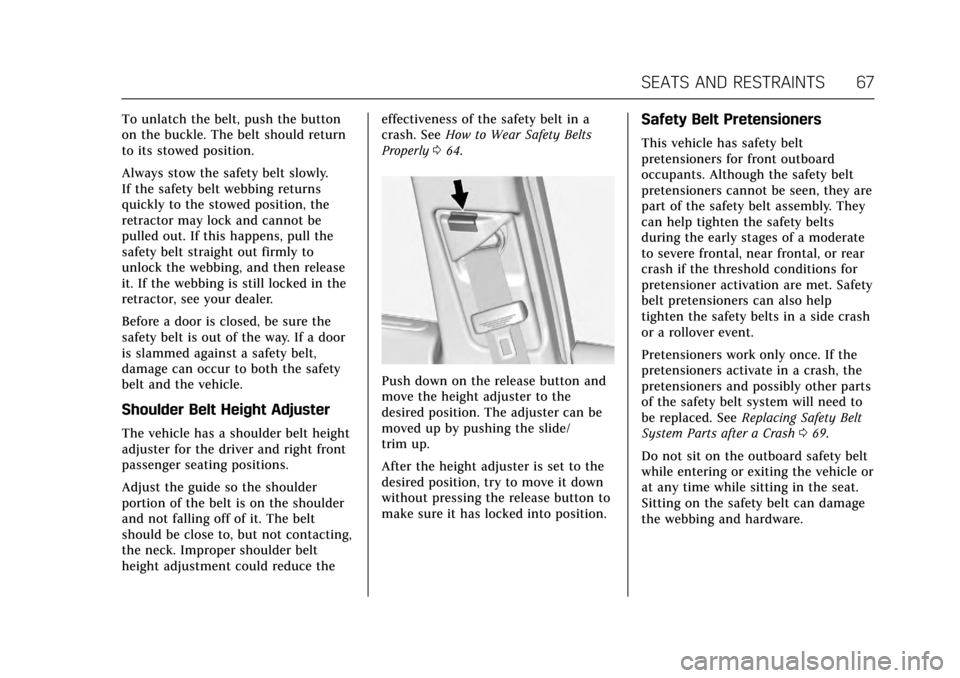
Shoulder Belt Height Adjuster
The vehicle has a shoulder belt height
adjuster for the driver and right front
passenger seating positions.
Adjust the guide so the shoulder
portion of the belt is on the shoulder
and not falling off of it. The belt
should be close to, but not contacting,
the neck. Improper shoulder belt
height adjustment could reduce theeffectiveness of the safety belt in a
crash. See
How to Wear Safety Belts
Properly 064.
Push down on the release button and
move the height adjuster to the
desired position. The adjuster can be
moved up by pushing the slide/
trim up.
After the height adjuster is set to the
desired position, try to move it down
without pressing the release button to
make sure it has locked into position.
Safety Belt Pretensioners
This vehicle has safety belt
pretensioners for front outboard
occupants. Although the safety belt
pretensioners cannot be seen, they are
part of the safety belt assembly. They
can help tighten the safety belts
during the early stages of a moderate
to severe frontal, near frontal, or rear
crash if the threshold conditions for
pretensioner activation are met. Safety
belt pretensioners can also help
tighten the safety belts in a side crash
or a rollover event.
Pretensioners work only once. If the
pretensioners activate in a crash, the
pretensioners and possibly other parts
of the safety belt system will need to
be replaced. See Replacing Safety Belt
System Parts after a Crash 069.
Do not sit on the outboard safety belt
while entering or exiting the vehicle or
at any time while sitting in the seat.
Sitting on the safety belt can damage
the webbing and hardware.
Page 75 of 314
Cadillac XTS Owner Manual (GMNA-Localizing-MidEast-10292881) - 2017 -
crc - 7/1/16
74 SEATS AND RESTRAINTS
How Does an Airbag
Restrain?
In moderate to severe frontal or near
frontal collisions, even belted
occupants can contact the steering
wheel or the instrument panel. In
moderate to severe side collisions,
even belted occupants can contact the
inside of the vehicle.
Airbags supplement the protection
provided by safety belts by
distributing the force of the impact
more evenly over the occupant's body.
Rollover capable roof-rail airbags are
designed to help contain the head and
chest of occupants in the outboard
seating positions in the first and
second rows. The rollover capable
roof-rail airbags are designed to help
reduce the risk of full or partial
ejection in rollover events, although
no system can prevent all such
ejections.
But airbags would not help in many
types of collisions, primarily because
the occupant's motion is not toward
those airbags. SeeWhen Should an
Airbag Inflate? 072. Airbags should never be regarded as
anything more than a supplement to
safety belts.
What Will You See after an
Airbag Inflates?
After the frontal airbags and
seat-mounted side impact airbags
inflate, they quickly deflate, so quickly
that some people may not even realize
an airbag inflated. Roof-rail airbags
may still be at least partially inflated
for some time after they inflate. Some
components of the airbag module may
be hot for several minutes. For
location of the airbags, see
Where Are
the Airbags? 071.
The parts of the airbag that come into
contact with you may be warm, but
not too hot to touch. There may be
some smoke and dust coming from
the vents in the deflated airbags.
Airbag inflation does not prevent the
driver from seeing out of the
windshield or being able to steer the
vehicle, nor does it prevent people
from leaving the vehicle.
{Warning
When an airbag inflates, there may
be dust in the air. This dust could
cause breathing problems for
people with a history of asthma or
other breathing trouble. To avoid
this, everyone in the vehicle should
get out as soon as it is safe to do
so. If you have breathing problems
but cannot get out of the vehicle
after an airbag inflates, then get
fresh air by opening a window or a
door. If you experience breathing
problems following an airbag
deployment, you should seek
medical attention.
The vehicle has a feature that may
automatically unlock the doors, turn
on the interior lamps and hazard
warning flashers, and shut off the fuel
system after the airbags inflate. The
feature may also activate, without
airbag inflation, after an event that
exceeds a predetermined threshold.
You can lock the doors, turn off the
Page 80 of 314
Cadillac XTS Owner Manual (GMNA-Localizing-MidEast-10292881) - 2017 -
crc - 7/1/16
SEATS AND RESTRAINTS 79
If the passenger frontal airbag and
passenger knee airbag are turned
on, the on indicator will be lit.
If the passenger seat gets wet, dry the
seat immediately. If the airbag
readiness light is lit, do not install a
child restraint or allow anyone to
occupy the seat. See Airbag Readiness
Light 0119 for important safety
information.
The on indicator may be lit if an
object, such as a briefcase, handbag,
grocery bag, laptop, or other electronic
device, is put on an unoccupied seat.
If this is not desired, remove the
object from the seat.
{Warning
Stowing of articles under the
passenger seat or between the
passenger seat cushion and
seatback may interfere with the
proper operation of the passenger
sensing system.
Servicing the
Airbag-Equipped Vehicle
Airbags affect how the vehicle should
be serviced. There are parts of the
airbag system in several places around
the vehicle. Your dealer and the
service manual have information
about servicing the vehicle and the
airbag system.
{Warning
For up to 10 seconds after the
vehicle is turned off and the battery
is disconnected, an airbag can still
inflate during improper service. You
can be injured if you are close to an
airbag when it inflates. Avoid
yellow connectors. They are
probably part of the airbag system.
Be sure to follow proper service
procedures, and make sure the
person performing work for you is
qualified to do so.
Adding Equipment to the
Airbag-Equipped Vehicle
Adding accessories that change the
vehicle's frame, bumper system,
height, front end, or side sheet metal,
may keep the airbag system from
working properly. The operation of the
airbag system can also be affected by
changing or moving any parts of the
front seats, safety belts, the airbag
sensing and diagnostic module,
steering wheel, instrument panel, any
airbag module, ceiling or pillar garnish
trim, overhead console, front sensors,
side impact sensors, or airbag wiring.
Your dealer and the service manual
have information about the location of
the airbag sensors, sensing and
diagnostic module, and airbag wiring.
In addition, the vehicle has a
passenger sensing system for the front
outboard passenger position, which
includes sensors that are part of the
passenger seat. The passenger sensing
system may not operate properly if
the original seat trim is replaced with
non-GM covers, upholstery, or trim; or
with GM covers, upholstery, or trim
designed for a different vehicle. Any
Page 92 of 314
Cadillac XTS Owner Manual (GMNA-Localizing-MidEast-10292881) - 2017 -
crc - 7/1/16
SEATS AND RESTRAINTS 91
Warning (Continued)
tightened around a child’s neck, the
only way to loosen the belt is to
cut it.
Buckle any unused safety belts
behind the child restraint so
children cannot reach them. Pull
the shoulder belt all the way out of
the retractor to set the lock, and
tighten the belt behind the child
restraint after the child restraint
has been installed.
Caution
Do not let the LATCH attachments
rub against the vehicle’s safety
belts. This may damage these parts.
If necessary, move buckled safety
belts to avoid rubbing the LATCH
attachments.
Do not fold the rear seatback when
the seat is occupied. Do not fold the
empty rear seat with a safety belt(Continued)
Caution (Continued)
buckled. This could damage the
safety belt or the seat. Unbuckle
and return the safety belt to its
stowed position, before folding
the seat.
If you need to secure more than one
child restraint in the rear seat, see
Where to Put the Restraint 086.
You cannot secure three child
restraints using the LATCH anchors in
the rear seat at the same time, but
you can install two of them. If you
want to do this, install one LATCH
child restraint in the right rear seating
position, and install the other one
either in the left rear seating position
or in the center seating position.
If you need to install child restraints
in both the center and left rear seating
positions, the one in the center
seating position will need to be
secured using the vehicle safety belts
instead of the LATCH anchors.
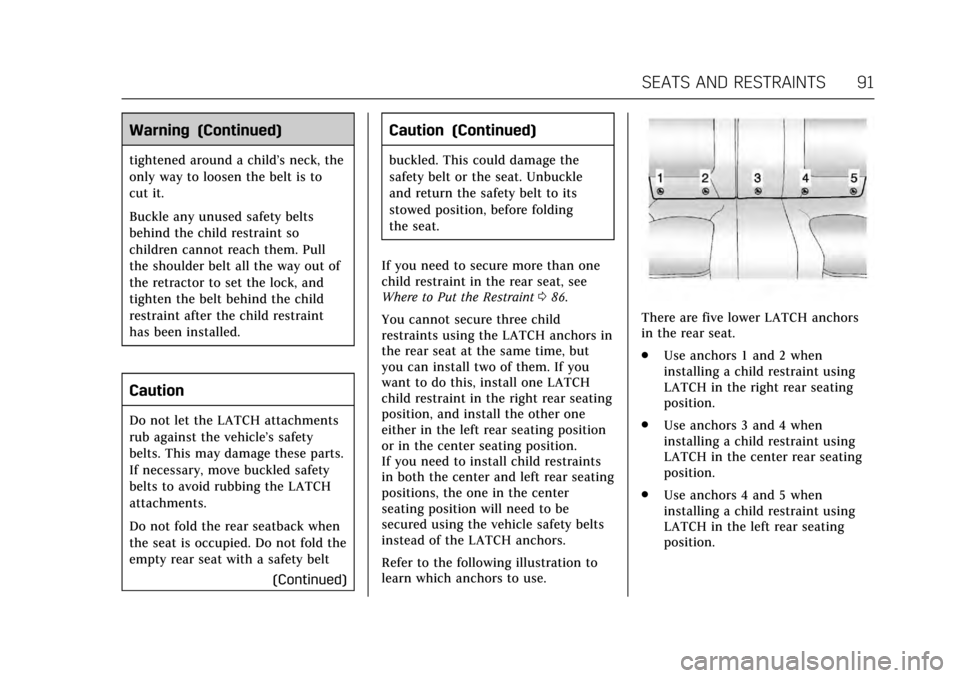
Refer to the following illustration to
learn which anchors to use.
There are five lower LATCH anchors
in the rear seat.
. Use anchors 1 and 2 when
installing a child restraint using
LATCH in the right rear seating
position.
. Use anchors 3 and 4 when
installing a child restraint using
LATCH in the center rear seating
position.
. Use anchors 4 and 5 when
installing a child restraint using
LATCH in the left rear seating
position.