light CADILLAC XTS 2019 Workshop Manual
[x] Cancel search | Manufacturer: CADILLAC, Model Year: 2019, Model line: XTS, Model: CADILLAC XTS 2019Pages: 376, PDF Size: 6.71 MB
Page 138 of 376
Cadillac XTS Owner Manual (GMNA-Localizing-U.S./Canada-12032610) -
2019 - crc - 8/22/18
INSTRUMENTS AND CONTROLS 137
Caution (Continued)
and it may not be covered by the
vehicle warranty. SeeEngine
Overheating 0253.
The engine coolant temperature
warning light comes on when the
engine has overheated.
If this happens pull over and turn off
the engine as soon as possible. See
Engine Overheating 0253.
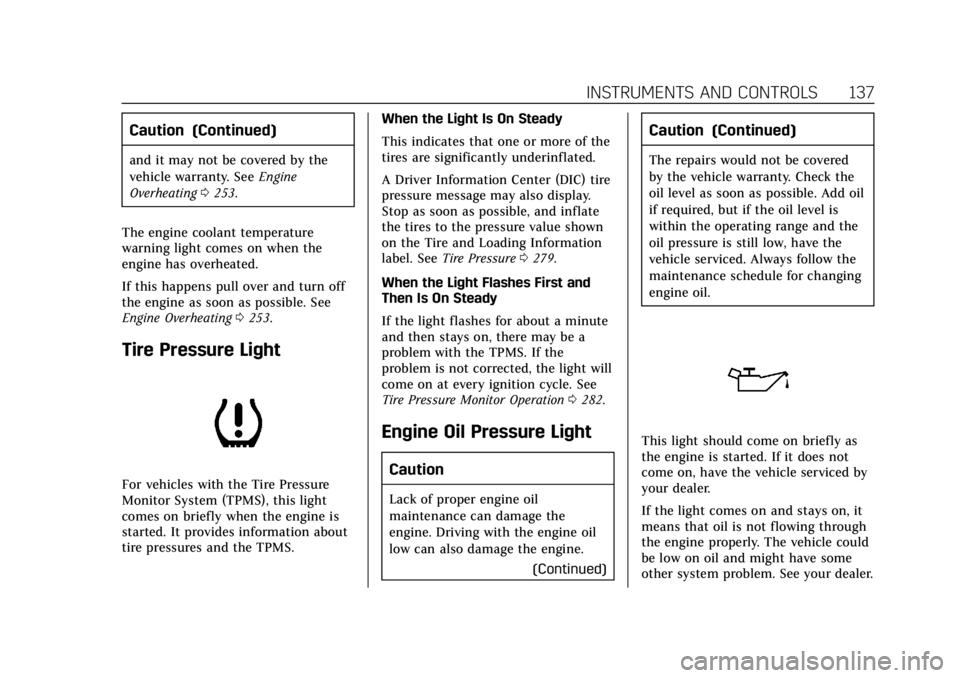
Tire Pressure Light
For vehicles with the Tire Pressure
Monitor System (TPMS), this light
comes on briefly when the engine is
started. It provides information about
tire pressures and the TPMS. When the Light Is On Steady
This indicates that one or more of the
tires are significantly underinflated.
A Driver Information Center (DIC) tire
pressure message may also display.
Stop as soon as possible, and inflate
the tires to the pressure value shown
on the Tire and Loading Information
label. See
Tire Pressure 0279.
When the Light Flashes First and
Then Is On Steady
If the light flashes for about a minute
and then stays on, there may be a
problem with the TPMS. If the
problem is not corrected, the light will
come on at every ignition cycle. See
Tire Pressure Monitor Operation 0282.
Engine Oil Pressure Light
Caution
Lack of proper engine oil
maintenance can damage the
engine. Driving with the engine oil
low can also damage the engine.
(Continued)
Caution (Continued)
The repairs would not be covered
by the vehicle warranty. Check the
oil level as soon as possible. Add oil
if required, but if the oil level is
within the operating range and the
oil pressure is still low, have the
vehicle serviced. Always follow the
maintenance schedule for changing
engine oil.
This light should come on briefly as
the engine is started. If it does not
come on, have the vehicle serviced by
your dealer.
If the light comes on and stays on, it
means that oil is not flowing through
the engine properly. The vehicle could
be low on oil and might have some
other system problem. See your dealer.
Page 139 of 376
Cadillac XTS Owner Manual (GMNA-Localizing-U.S./Canada-12032610) -
2019 - crc - 8/22/18
138 INSTRUMENTS AND CONTROLS
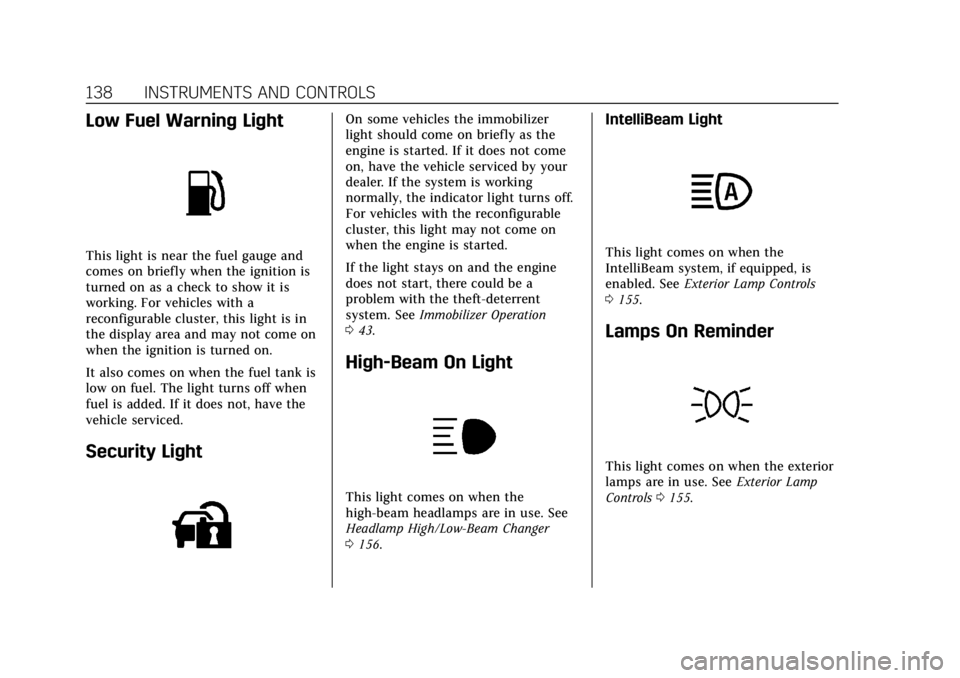
Low Fuel Warning Light
This light is near the fuel gauge and
comes on briefly when the ignition is
turned on as a check to show it is
working. For vehicles with a
reconfigurable cluster, this light is in
the display area and may not come on
when the ignition is turned on.
It also comes on when the fuel tank is
low on fuel. The light turns off when
fuel is added. If it does not, have the
vehicle serviced.
Security Light
On some vehicles the immobilizer
light should come on briefly as the
engine is started. If it does not come
on, have the vehicle serviced by your
dealer. If the system is working
normally, the indicator light turns off.
For vehicles with the reconfigurable
cluster, this light may not come on
when the engine is started.
If the light stays on and the engine
does not start, there could be a
problem with the theft-deterrent
system. SeeImmobilizer Operation
0 43.
High-Beam On Light
This light comes on when the
high-beam headlamps are in use. See
Headlamp High/Low-Beam Changer
0156.
IntelliBeam Light
This light comes on when the
IntelliBeam system, if equipped, is
enabled. See Exterior Lamp Controls
0 155.
Lamps On Reminder
This light comes on when the exterior
lamps are in use. See Exterior Lamp
Controls 0155.
Page 140 of 376

Cadillac XTS Owner Manual (GMNA-Localizing-U.S./Canada-12032610) -
2019 - crc - 8/22/18
INSTRUMENTS AND CONTROLS 139
Cruise Control Light
The cruise control light is white when
the cruise control is on and ready, and
turns green when the cruise control is
set and active.
SeeCruise Control 0199.
Adaptive Cruise Control Light
This light is white when the Adaptive
Cruise Control (ACC, if equipped) is on
and ready, and turns green when the
ACC is set and active. See Adaptive
Cruise Control 0202.
Door Ajar Light
For vehicles equipped with this light,
it comes on when a door is open or
not securely latched. Before driving,
check that all doors are properly
closed.
Information Displays
Driver Information
Center (DIC)
The DIC is displayed in the
instrument cluster. It shows the status
of many vehicle systems.
yorz:Move SEL up or down to
go to the previous or next selection.
SorT: Press to move between the
interactive display zones in the
cluster. Press
Sto go back to the
previous menu.
Page 141 of 376
Cadillac XTS Owner Manual (GMNA-Localizing-U.S./Canada-12032610) -
2019 - crc - 8/22/18
140 INSTRUMENTS AND CONTROLS
SEL :Press to open a menu or select a
menu item. Press and hold to reset
values on certain screens.
DIC Information Display Options
The info displays on the DIC can be
turned on or off through the
Options menu.
1. Press SEL while viewing the Options page in one of the
interactive display zones on the
cluster.
2. Scroll to Info Pages and press SEL.
3. Press
yorzto move through
the list of possible info displays.
4. Press SEL while an item is highlighted to select or deselect
that item. When an item is
selected, a checkmark will appear
next to it.
DIC Information Displays
The following is the list of all possible
DIC information displays. Some of the
information displays may not be
available for your particular vehicle. Speed (Base Cluster) :
Shows the
vehicle speed in either kilometers per
hour (km/h) or miles per hour (mph).
Trip 1 or Trip 2 (Base Cluster) / Trip
1 or Trip 2 and Average Fuel
Economy (Uplevel Cluster) : The Trip
display shows the current distance
traveled, in either kilometers (km) or
miles (mi), since the trip odometer
was last reset. The trip odometer can
be reset by pressing and holding SEL
while this display is active.
The Average Fuel Economy display
shows the approximate average liters
per 100 kilometers (L/100 km) or
miles per gallon (mpg). This number
is calculated based on the number of
L/100 km (mpg) recorded since the
last time this menu item was reset.
This number reflects only the
approximate average fuel economy
that the vehicle has right now, and
will change as driving conditions
change. The Average Fuel Economy
can be reset along with the trip
odometer by pressing and holding SEL
while this display is active. Fuel Range :
Shows the approximate
distance the vehicle can be driven
without refueling. LOW will be
displayed when the vehicle is low on
fuel. The fuel range estimate is based
on an average of the vehicle's fuel
economy over recent driving history
and the amount of fuel remaining in
the fuel tank.
Average Fuel Economy (Base
Cluster) : Shows the approximate
average liters per 100 kilometers (L/
100 km) or miles per gallon (mpg).
This number is calculated based on
the number of L/100 km (mpg)
recorded since the last time this menu
item was reset. This number reflects
only the approximate average fuel
economy that the vehicle has right
now, and will change as driving
conditions change. The Average Fuel
Economy can be reset by pressing and
holding SEL while this display is
active.
Instantaneous Fuel Economy : Shows
the current fuel economy in either
liters per 100 kilometers (L/100 km) or
miles per gallon (mpg). This number
reflects only the approximate fuel
Page 144 of 376
Cadillac XTS Owner Manual (GMNA-Localizing-U.S./Canada-12032610) -
2019 - crc - 8/22/18
INSTRUMENTS AND CONTROLS 143
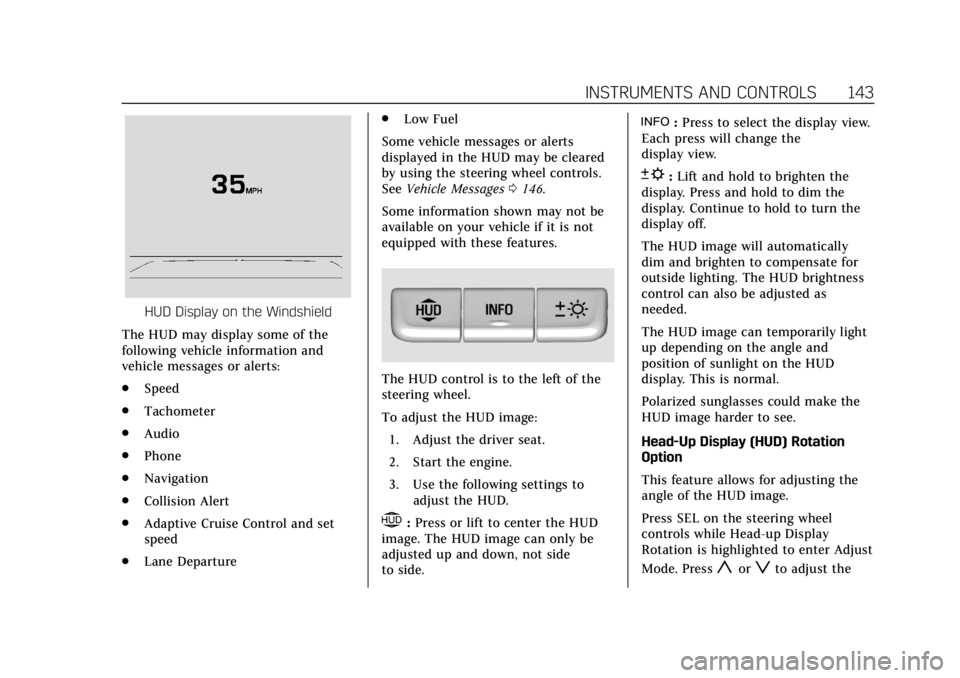
HUD Display on the Windshield
The HUD may display some of the
following vehicle information and
vehicle messages or alerts:
. Speed
. Tachometer
. Audio
. Phone
. Navigation
. Collision Alert
. Adaptive Cruise Control and set
speed
. Lane Departure .
Low Fuel
Some vehicle messages or alerts
displayed in the HUD may be cleared
by using the steering wheel controls.
See Vehicle Messages 0146.
Some information shown may not be
available on your vehicle if it is not
equipped with these features.
The HUD control is to the left of the
steering wheel.
To adjust the HUD image: 1. Adjust the driver seat.
2. Start the engine.
3. Use the following settings to adjust the HUD.
$:Press or lift to center the HUD
image. The HUD image can only be
adjusted up and down, not side
to side.
!: Press to select the display view.
Each press will change the
display view.
D: Lift and hold to brighten the
display. Press and hold to dim the
display. Continue to hold to turn the
display off.
The HUD image will automatically
dim and brighten to compensate for
outside lighting. The HUD brightness
control can also be adjusted as
needed.
The HUD image can temporarily light
up depending on the angle and
position of sunlight on the HUD
display. This is normal.
Polarized sunglasses could make the
HUD image harder to see.
Head-Up Display (HUD) Rotation
Option
This feature allows for adjusting the
angle of the HUD image.
Press SEL on the steering wheel
controls while Head-up Display
Rotation is highlighted to enter Adjust
Mode. Press
yorzto adjust the
Page 145 of 376
Cadillac XTS Owner Manual (GMNA-Localizing-U.S./Canada-12032610) -
2019 - crc - 8/22/18
144 INSTRUMENTS AND CONTROLS
angle of the HUD display. PressSor
Tto highlight OK, then press SEL to
save the setting. CANCEL can also be
selected to cancel the setting. The
vehicle must be in P (Park). See
Instrument Cluster 0121.
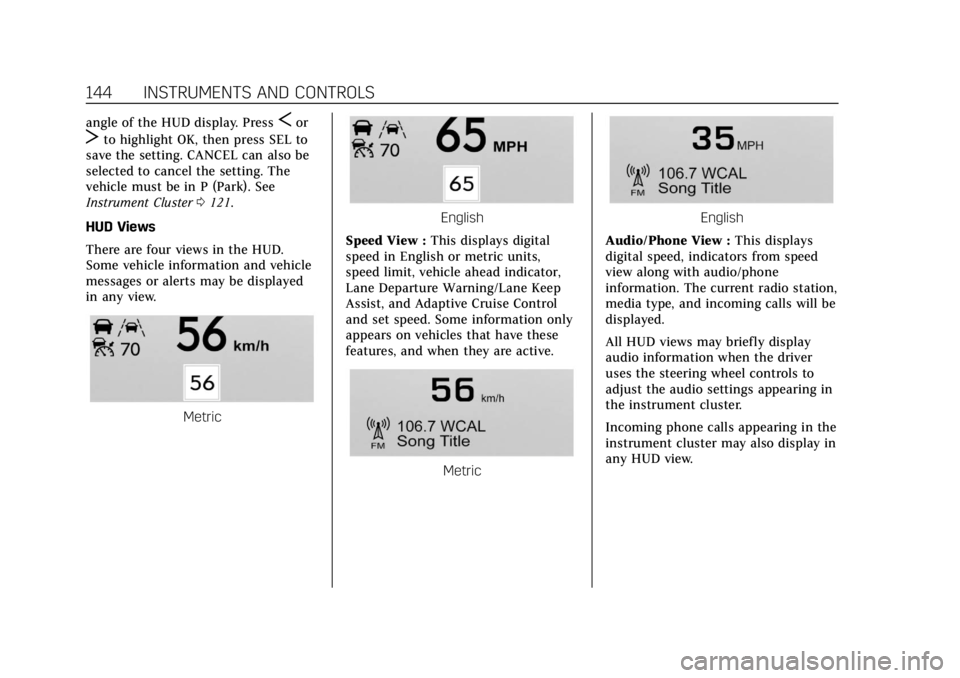
HUD Views
There are four views in the HUD.
Some vehicle information and vehicle
messages or alerts may be displayed
in any view.
Metric
English
Speed View : This displays digital
speed in English or metric units,
speed limit, vehicle ahead indicator,
Lane Departure Warning/Lane Keep
Assist, and Adaptive Cruise Control
and set speed. Some information only
appears on vehicles that have these
features, and when they are active.
Metric
English
Audio/Phone View : This displays
digital speed, indicators from speed
view along with audio/phone
information. The current radio station,
media type, and incoming calls will be
displayed.
All HUD views may briefly display
audio information when the driver
uses the steering wheel controls to
adjust the audio settings appearing in
the instrument cluster.
Incoming phone calls appearing in the
instrument cluster may also display in
any HUD view.
Page 147 of 376
Cadillac XTS Owner Manual (GMNA-Localizing-U.S./Canada-12032610) -
2019 - crc - 8/22/18
146 INSTRUMENTS AND CONTROLS
Vehicle Messages
Messages displayed on the DIC
indicate the status of the vehicle or
some action that may be needed to
correct a condition. Multiple messages
may appear one after another.
The messages that do not require
immediate action can be
acknowledged and cleared by pressing
V. The messages that require
immediate action cannot be cleared
until that action is performed.
All messages should be taken
seriously; clearing the message does
not correct the problem.
If a SERVICE message appears, see
your dealer.
Follow the instructions given in the
messages. The system displays
messages regarding the following
topics:
. Service Messages
. Fluid Levels
. Vehicle Security
. Brakes .
Steering
. Ride Control Systems
. Driver Assistance Systems
. Cruise Control
. Lighting and Bulb Replacement
. Wiper/Washer Systems
. Doors and Windows
. Seat Belts
. Airbag Systems
. Engine and Transmission
. Tire Pressure
. Battery
Engine Power Messages
ENGINE POWER IS REDUCED
This message displays when the
vehicle's propulsion power is reduced.
A reduction in propulsion power can
affect the vehicle's ability to
accelerate. If this message is on, but
there is no observed reduction in
performance, proceed to your
destination. The performance may be
reduced the next time the vehicle is driven. The vehicle may be driven
while this message is on, but
maximum acceleration and speed may
be reduced. Anytime this message
stays on, or displays repeatedly, the
vehicle should be taken to your dealer
for service as soon as possible.
Vehicle Speed Messages
SPEED LIMITED TO
XXX KM/H (MPH)
This message shows that the vehicle
speed has been limited to the speed
displayed. The limited speed is a
protection for various propulsion and
vehicle systems, such as lubrication,
thermal, suspension, Teen Driver if
equipped, or tires.
Page 150 of 376
Cadillac XTS Owner Manual (GMNA-Localizing-U.S./Canada-12032610) -
2019 - crc - 8/22/18
INSTRUMENTS AND CONTROLS 149
Reverse Tilt Mirror
When on, both the driver and
passenger, driver, or passenger outside
mirrors will tilt downward when the
vehicle is shifted to R (Reverse) to
improve visibility of the ground near
the rear wheels. They will return to
their previous driving position when
the vehicle is shifted out of
R (Reverse) or the engine is turned off.
SeeReverse Tilt Mirrors 045.
Touch Off, On - Driver and Passenger,
On - Driver, or On - Passenger.
Remote Mirror Folding
When on, the outside mirrors will
automatically fold or unfold when the
Remote Keyless Entry (RKE)
transmitter
QorKbutton is pressed
and held. See Folding Mirrors 044.
Touch Off or On.
Rain Sense Wipers
This setting automatically turns on
the wipers when moisture is detected
and the wiper switch is in
intermittent mode.
Touch Disabled or Enabled.
Lighting
Touch and the following may display:
. Vehicle Locator Lights
. Exit Lighting
Vehicle Locator Lights
This setting flashes the vehicle’s
headlamps when
Kis pressed on the
Remote Keyless Entry (RKE)
transmitter.
Touch Off or On.
Exit Lighting
This setting specifies how long the
headlamps stay on after the vehicle is
turned off and exited.
Touch Off, 30 Seconds, 60 Seconds,
or 120 Seconds.
Power Door Locks
Touch and the following may display:
. Open Door Anti Lock Out
. Auto Door Unlock
. Delayed Door Lock Open Door Anti Lock Out
This setting prevents the driver door
from locking when the door is open.
If this setting is on, the Delayed Door
Lock menu will not be available.
Touch Off or On.
Auto Door Unlock
This setting allows selection of which
doors will automatically unlock when
the vehicle is shifted into P (Park).
Touch Off, All Doors, or Driver Door.
Delayed Door Lock
This setting delays the locking of the
vehicle’s doors.
Touch Off or On.
Remote Lock, Unlock, Start
Touch and the following may display:
.
Remote Unlock Light Feedback
. Remote Lock Feedback
. Remote Door Unlock
. Remote Start Auto Cool Seats
. Remote Start Auto Heat Seats
. Remote Window Operation
Page 151 of 376
Cadillac XTS Owner Manual (GMNA-Localizing-U.S./Canada-12032610) -
2019 - crc - 8/22/18
150 INSTRUMENTS AND CONTROLS
.Passive Door Unlock
. Passive Door Lock
. Remote Left in Vehicle Alert
Remote Unlock Light Feedback
This setting flashes the exterior lamps
when the vehicle is unlocked with the
RKE transmitter.
Touch Off or Flash Lights.
Remote Lock Feedback
This setting specifies how the vehicle
responds when the vehicle is locked
with the RKE transmitter.
Touch Off, Lights and Horn, Lights
Only, or Horn Only.
Remote Door Unlock
This setting specifies whether all
doors, or just the driver door, unlock
when pressing
Kon the RKE
transmitter.
Touch All Doors or Driver Door. Remote Start Auto Cool Seats
This setting automatically turns on
the ventilated seats when using the
remote start function on warm days.
See
Heated and Ventilated Front Seats
0 63 and Remote Vehicle Start 034.
Touch Off or On.
Remote Start Auto Heat Seats
This setting automatically turns on
the heated seats when using the
remote start function on cold days.
See Heated and Ventilated Front Seats
0 63 and Remote Vehicle Start 034.
If equipped with Auto Heated Steering
Wheel, this feature will turn on when
the Remote Start Auto Heated Seats
turn on.
Touch Off or On.
Remote Window Operation
This setting allows the vehicle’s
windows to open remotely by pressing
and holding
Kon the RKE
transmitter. See Remote Keyless Entry
(RKE) System Operation 027.
Touch Off or On. Passive Door Unlock
This setting specifies which doors
unlock when using the button on the
driver door handle to unlock the
vehicle.
Touch All Doors or Driver Door Only.
Passive Door Lock
This setting specifies if the vehicle will
automatically lock, or lock and
provide an alert after all the doors are
closed, and you walk away from the
vehicle with the RKE transmitter. See
Remote Keyless Entry (RKE) System
Operation
027.
Touch Off, On with Horn Chirp, or On.
Remote Left in Vehicle Alert
This feature sounds an alert when the
RKE transmitter is left in the vehicle.
This menu also enables Remote No
Longer in Vehicle Alert.
Touch Off or On.Seating Position
Touch and the following may display:
. Seat Entry Memory
Page 153 of 376
Cadillac XTS Owner Manual (GMNA-Localizing-U.S./Canada-12032610) -
2019 - crc - 8/22/18
152 INSTRUMENTS AND CONTROLS
instructions refer to a garage door
opener, but can be used for other
devices.
Do not use the Universal Remote
system with any garage door opener
that does not have the stop and
reverse feature. This includes any
garage door opener model
manufactured before April 1, 1982.
Read these instructions completely
before programming the Universal
Remote system. It may help to have
another person assist with the
programming process.
Keep the original hand-held
transmitter for use in other vehicles
as well as for future programming.
Erase the programming when vehicle
ownership is terminated. See“Erasing
Universal Remote System Buttons”
later in this section.
To program a garage door opener,
park outside directly in line with and
facing the garage door opener receiver.
Clear all people and objects near the
garage door. Make sure the hand-held transmitter
has a new battery for quick and
accurate transmission of the
radio-frequency signal.
Programming the Universal
Remote System
For questions or programming help,
see www.homelink.com/gm or call
1-800-355-3515. For calls placed
outside the U.S., Canada, or Puerto
Rico, international rates will apply and
may differ based on landline or mobile
phone.
Programming involves time-sensitive
actions, and may time out causing the
procedure to be repeated.
To program up to three devices:
1. Hold the end of the hand-held transmitter about 3 to 8 cm (1 to
3 in) away from the Universal
Remote system buttons with the
indicator light in view. The
hand-held transmitter was
supplied by the manufacturer of
the garage door opener receiver. 2. At the same time, press and hold
both the hand-held transmitter
button and one of the three
Universal Remote system
buttons to be used to operate the
garage door. Do not release either
button until the indicator light
changes from a slow to a rapid
flash. Then release both buttons.
Some garage door openers may
require substitution of Step 2
with the procedure under “Radio
Signals for Canada and Some
Gate Operators” later in this
section.
3. Press and hold the newly programmed Universal Remote
system button for five seconds
while watching the indicator
light and garage door activation.
.If the indicator light stays on
continuously or the garage
door moves when the button
is pressed, then programming
is complete. There is no need
to complete Steps 4–6.