fuel CHERY TIGGO 2009 Service User Guide
[x] Cancel search | Manufacturer: CHERY, Model Year: 2009, Model line: TIGGO, Model: CHERY TIGGO 2009Pages: 1903, PDF Size: 33.38 MB
Page 73 of 1903
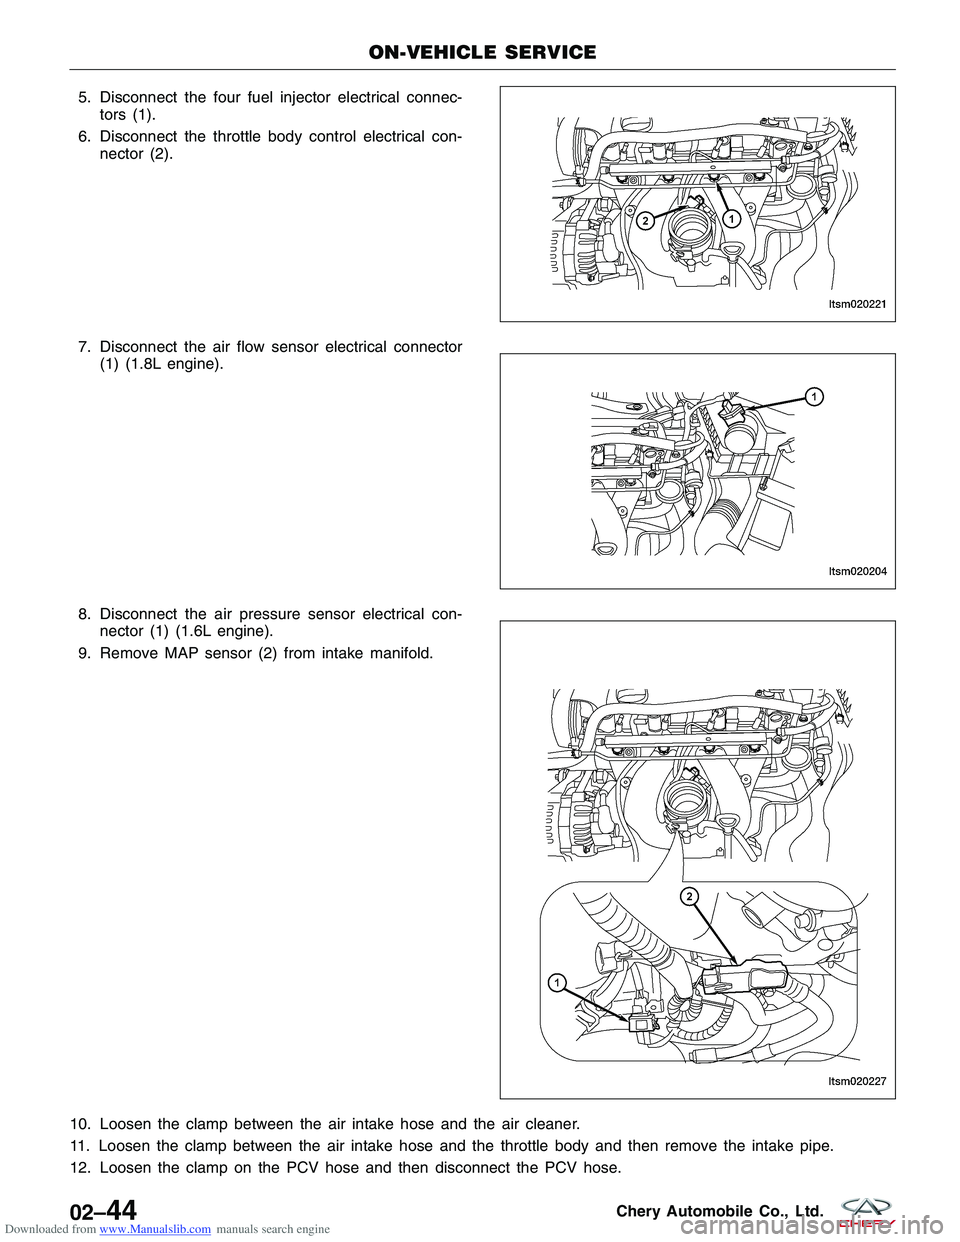
Downloaded from www.Manualslib.com manuals search engine 5. Disconnect the four fuel injector electrical connec-tors (1).
6. Disconnect the throttle body control electrical con- nector (2).
7. Disconnect the air flow sensor electrical connector (1) (1.8L engine).
8. Disconnect the air pressure sensor electrical con- nector (1) (1.6L engine).
9. Remove MAP sensor (2) from intake manifold.
10. Loosen the clamp between the air intake hose and the air cleaner.
11. Loosen the clamp between the air intake hose and the throttle body and then remove the intake pipe.
12. Loosen the clamp on the PCV hose and then disconnect the PCV hose.
ON-VEHICLE SERVICE
LTSM020221
LTSM020204
LTSM020227
02–44Chery Automobile Co., Ltd.
Page 74 of 1903
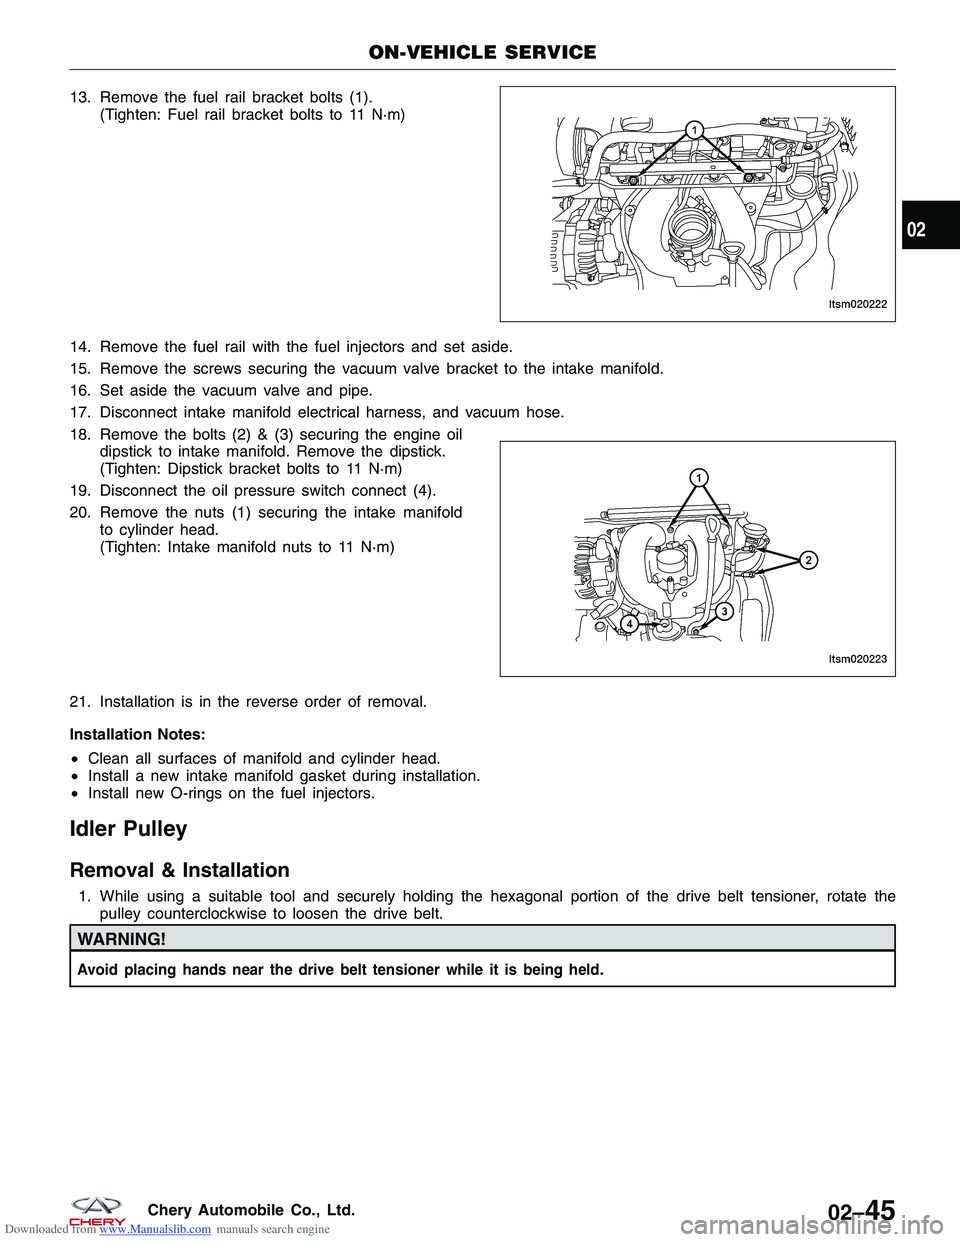
Downloaded from www.Manualslib.com manuals search engine 13. Remove the fuel rail bracket bolts (1).(Tighten: Fuel rail bracket bolts to 11 N·m)
14. Remove the fuel rail with the fuel injectors and set aside.
15. Remove the screws securing the vacuum valve bracket to the intake manifold.
16. Set aside the vacuum valve and pipe.
17. Disconnect intake manifold electrical harness, and vacuum hose.
18. Remove the bolts (2) & (3) securing the engine oil dipstick to intake manifold. Remove the dipstick.
(Tighten: Dipstick bracket bolts to 11 N·m)
19. Disconnect the oil pressure switch connect (4).
20. Remove the nuts (1) securing the intake manifold to cylinder head.
(Tighten: Intake manifold nuts to 11 N·m)
21. Installation is in the reverse order of removal.
Installation Notes:
• Clean all surfaces of manifold and cylinder head.
• Install a new intake manifold gasket during installation.
• Install new O-rings on the fuel injectors.
Idler Pulley
Removal & Installation
1. While using a suitable tool and securely holding the hexagonal portion of the drive belt tensioner, rotate the
pulley counterclockwise to loosen the drive belt.
WARNING!
Avoid placing hands near the drive belt tensioner while it is being held.
ON-VEHICLE SERVICE
LTSM020222
LTSM020223
02
02–45Chery Automobile Co., Ltd.
Page 109 of 1903
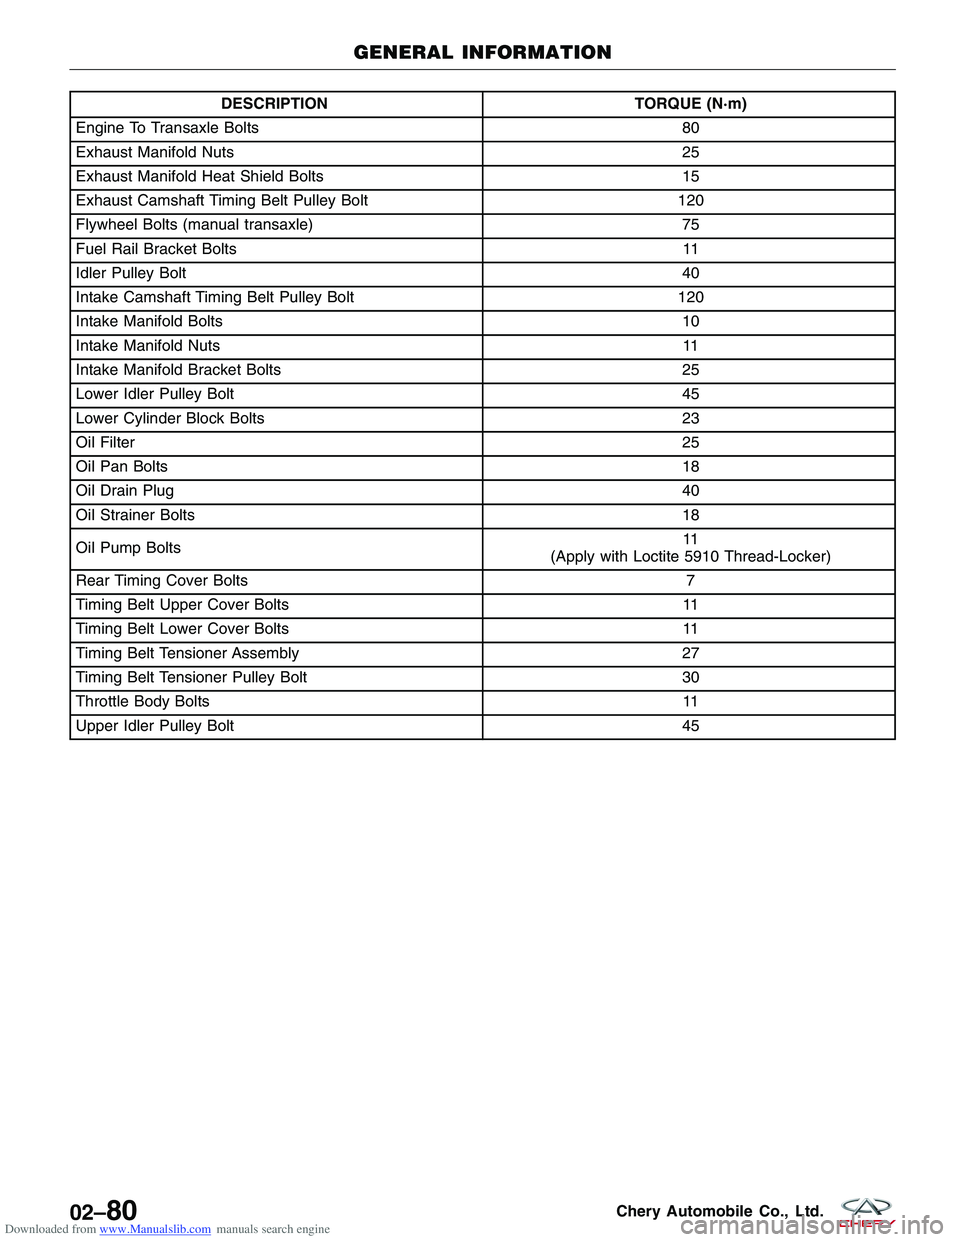
Downloaded from www.Manualslib.com manuals search engine DESCRIPTIONTORQUE (N·m)
Engine To Transaxle Bolts 80
Exhaust Manifold Nuts 25
Exhaust Manifold Heat Shield Bolts 15
Exhaust Camshaft Timing Belt Pulley Bolt 120
Flywheel Bolts (manual transaxle) 75
Fuel Rail Bracket Bolts 11
Idler Pulley Bolt 40
Intake Camshaft Timing Belt Pulley Bolt 120
Intake Manifold Bolts 10
Intake Manifold Nuts 11
Intake Manifold Bracket Bolts 25
Lower Idler Pulley Bolt 45
Lower Cylinder Block Bolts 23
Oil Filter 25
Oil Pan Bolts 18
Oil Drain Plug 40
Oil Strainer Bolts 18
Oil Pump Bolts 11
(Apply with Loctite 5910 Thread-Locker)
Rear Timing Cover Bolts 7
Timing Belt Upper Cover Bolts 11
Timing Belt Lower Cover Bolts 11
Timing Belt Tensioner Assembly 27
Timing Belt Tensioner Pulley Bolt 30
Throttle Body Bolts 11
Upper Idler Pulley Bolt 45
GENERAL INFORMATION
02–80Chery Automobile Co., Ltd.
Page 116 of 1903
Downloaded from www.Manualslib.com manuals search engine DIAGNOSIS & TESTING
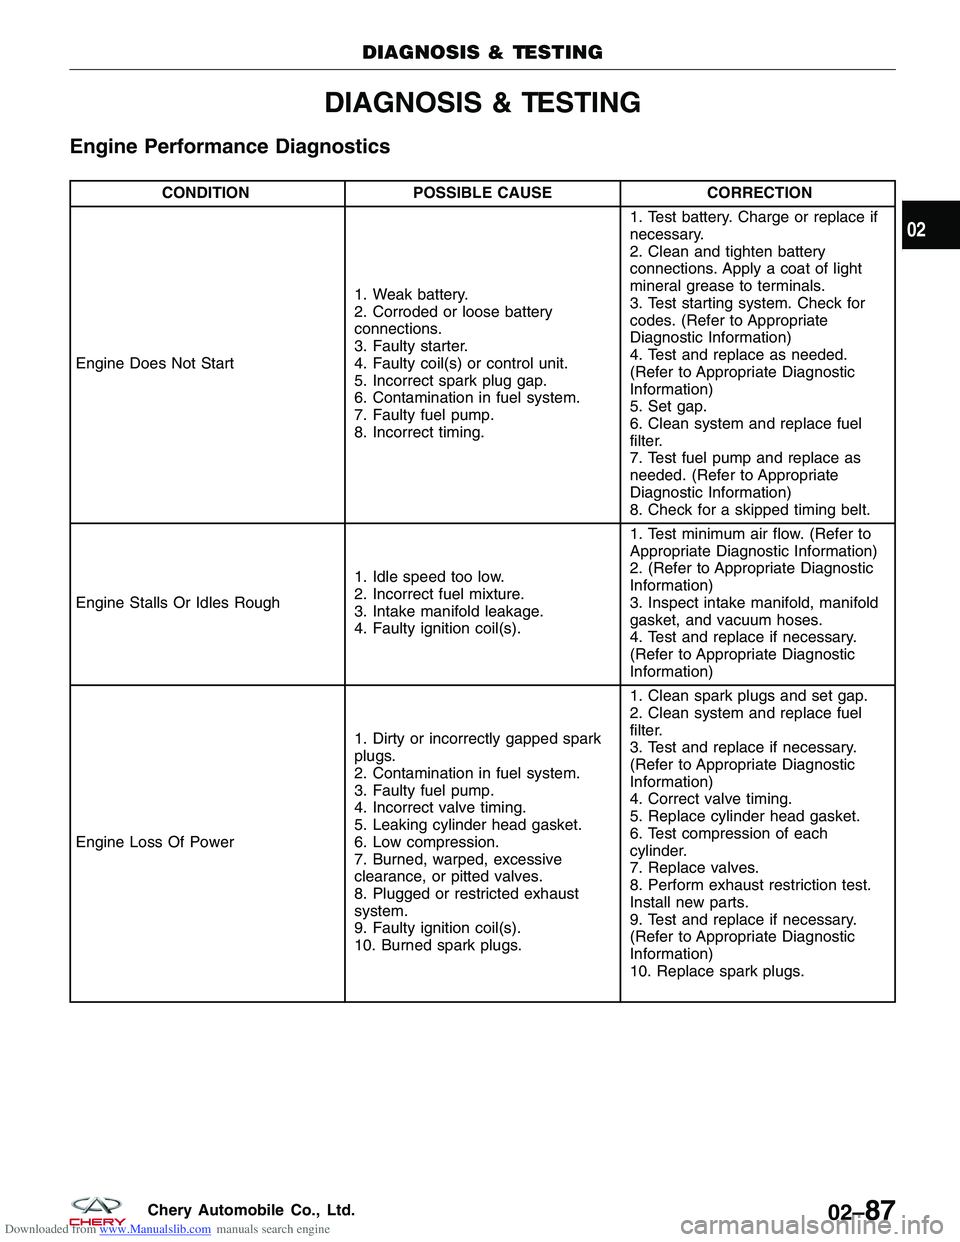
Engine Performance Diagnostics
CONDITIONPOSSIBLE CAUSE CORRECTION
Engine Does Not Start 1. Weak battery.
2. Corroded or loose battery
connections.
3. Faulty starter.
4. Faulty coil(s) or control unit.
5. Incorrect spark plug gap.
6. Contamination in fuel system.
7. Faulty fuel pump.
8. Incorrect timing.1. Test battery. Charge or replace if
necessary.
2. Clean and tighten battery
connections. Apply a coat of light
mineral grease to terminals.
3. Test starting system. Check for
codes. (Refer to Appropriate
Diagnostic Information)
4. Test and replace as needed.
(Refer to Appropriate Diagnostic
Information)
5. Set gap.
6. Clean system and replace fuel
filter.
7. Test fuel pump and replace as
needed. (Refer to Appropriate
Diagnostic Information)
8. Check for a skipped timing belt.
Engine Stalls Or Idles Rough 1. Idle speed too low.
2. Incorrect fuel mixture.
3. Intake manifold leakage.
4. Faulty ignition coil(s).1. Test minimum air flow. (Refer to
Appropriate Diagnostic Information)
2. (Refer to Appropriate Diagnostic
Information)
3. Inspect intake manifold, manifold
gasket, and vacuum hoses.
4. Test and replace if necessary.
(Refer to Appropriate Diagnostic
Information)
Engine Loss Of Power 1. Dirty or incorrectly gapped spark
plugs.
2. Contamination in fuel system.
3. Faulty fuel pump.
4. Incorrect valve timing.
5. Leaking cylinder head gasket.
6. Low compression.
7. Burned, warped, excessive
clearance, or pitted valves.
8. Plugged or restricted exhaust
system.
9. Faulty ignition coil(s).
10. Burned spark plugs.1. Clean spark plugs and set gap.
2. Clean system and replace fuel
filter.
3. Test and replace if necessary.
(Refer to Appropriate Diagnostic
Information)
4. Correct valve timing.
5. Replace cylinder head gasket.
6. Test compression of each
cylinder.
7. Replace valves.
8. Perform exhaust restriction test.
Install new parts.
9. Test and replace if necessary.
(Refer to Appropriate Diagnostic
Information)
10. Replace spark plugs.
DIAGNOSIS & TESTING
02
02–87Chery Automobile Co., Ltd.
Page 117 of 1903
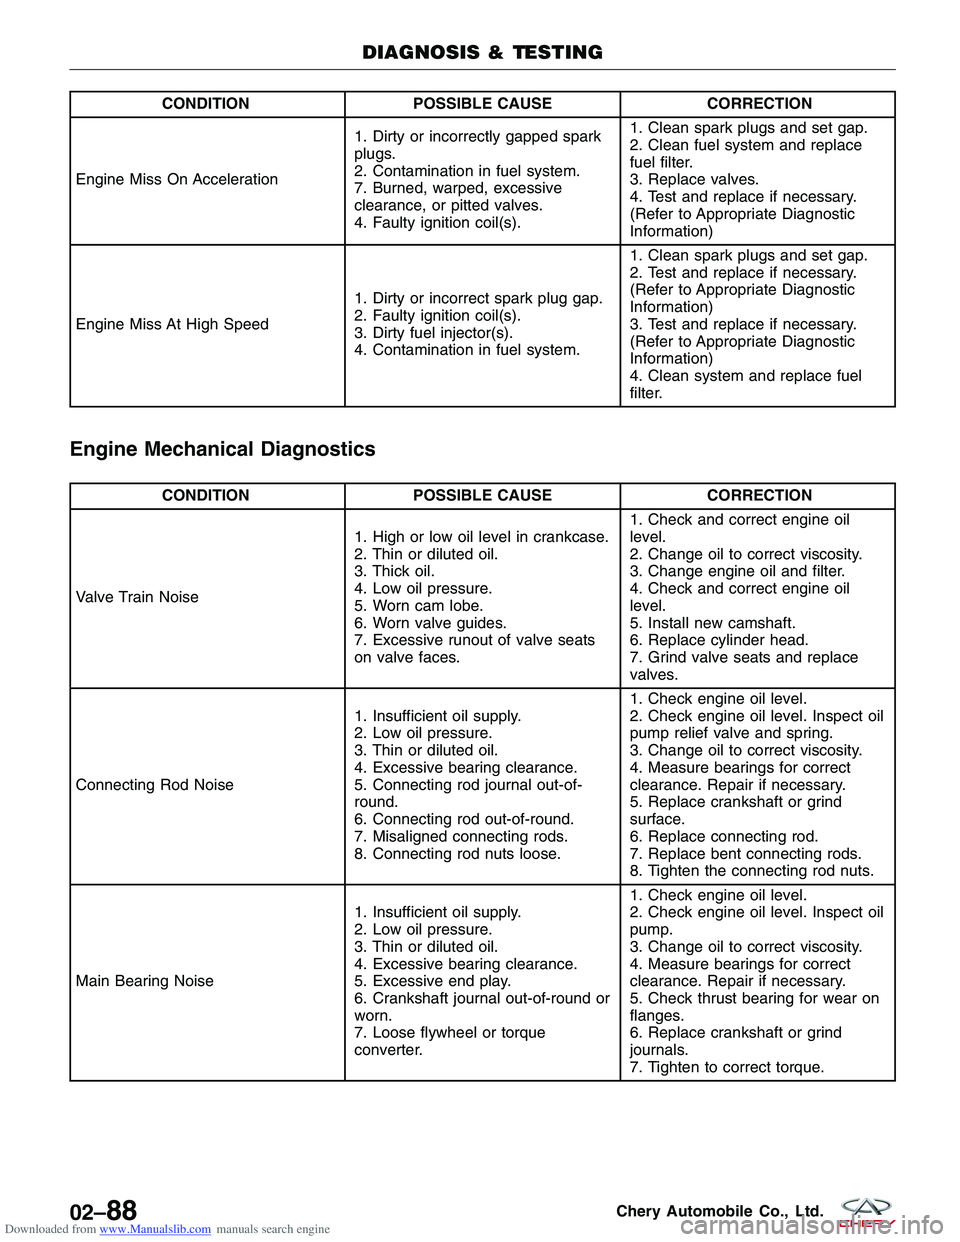
Downloaded from www.Manualslib.com manuals search engine CONDITIONPOSSIBLE CAUSE CORRECTION
Engine Miss On Acceleration 1. Dirty or incorrectly gapped spark
plugs.
2. Contamination in fuel system.
7. Burned, warped, excessive
clearance, or pitted valves.
4. Faulty ignition coil(s).1. Clean spark plugs and set gap.
2. Clean fuel system and replace
fuel filter.
3. Replace valves.
4. Test and replace if necessary.
(Refer to Appropriate Diagnostic
Information)
Engine Miss At High Speed 1. Dirty or incorrect spark plug gap.
2. Faulty ignition coil(s).
3. Dirty fuel injector(s).
4. Contamination in fuel system.1. Clean spark plugs and set gap.
2. Test and replace if necessary.
(Refer to Appropriate Diagnostic
Information)
3. Test and replace if necessary.
(Refer to Appropriate Diagnostic
Information)
4. Clean system and replace fuel
filter.
Engine Mechanical Diagnostics
CONDITION
POSSIBLE CAUSE CORRECTION
Valve Train Noise 1. High or low oil level in crankcase.
2. Thin or diluted oil.
3. Thick oil.
4. Low oil pressure.
5. Worn cam lobe.
6. Worn valve guides.
7. Excessive runout of valve seats
on valve faces.1. Check and correct engine oil
level.
2. Change oil to correct viscosity.
3. Change engine oil and filter.
4. Check and correct engine oil
level.
5. Install new camshaft.
6. Replace cylinder head.
7. Grind valve seats and replace
valves.
Connecting Rod Noise 1. Insufficient oil supply.
2. Low oil pressure.
3. Thin or diluted oil.
4. Excessive bearing clearance.
5. Connecting rod journal out-of-
round.
6. Connecting rod out-of-round.
7. Misaligned connecting rods.
8. Connecting rod nuts loose.1. Check engine oil level.
2. Check engine oil level. Inspect oil
pump relief valve and spring.
3. Change oil to correct viscosity.
4. Measure bearings for correct
clearance. Repair if necessary.
5. Replace crankshaft or grind
surface.
6. Replace connecting rod.
7. Replace bent connecting rods.
8. Tighten the connecting rod nuts.
Main Bearing Noise 1. Insufficient oil supply.
2. Low oil pressure.
3. Thin or diluted oil.
4. Excessive bearing clearance.
5. Excessive end play.
6. Crankshaft journal out-of-round or
worn.
7. Loose flywheel or torque
converter.1. Check engine oil level.
2. Check engine oil level. Inspect oil
pump.
3. Change oil to correct viscosity.
4. Measure bearings for correct
clearance. Repair if necessary.
5. Check thrust bearing for wear on
flanges.
6. Replace crankshaft or grind
journals.
7. Tighten to correct torque.
DIAGNOSIS & TESTING
02–88Chery Automobile Co., Ltd.
Page 119 of 1903
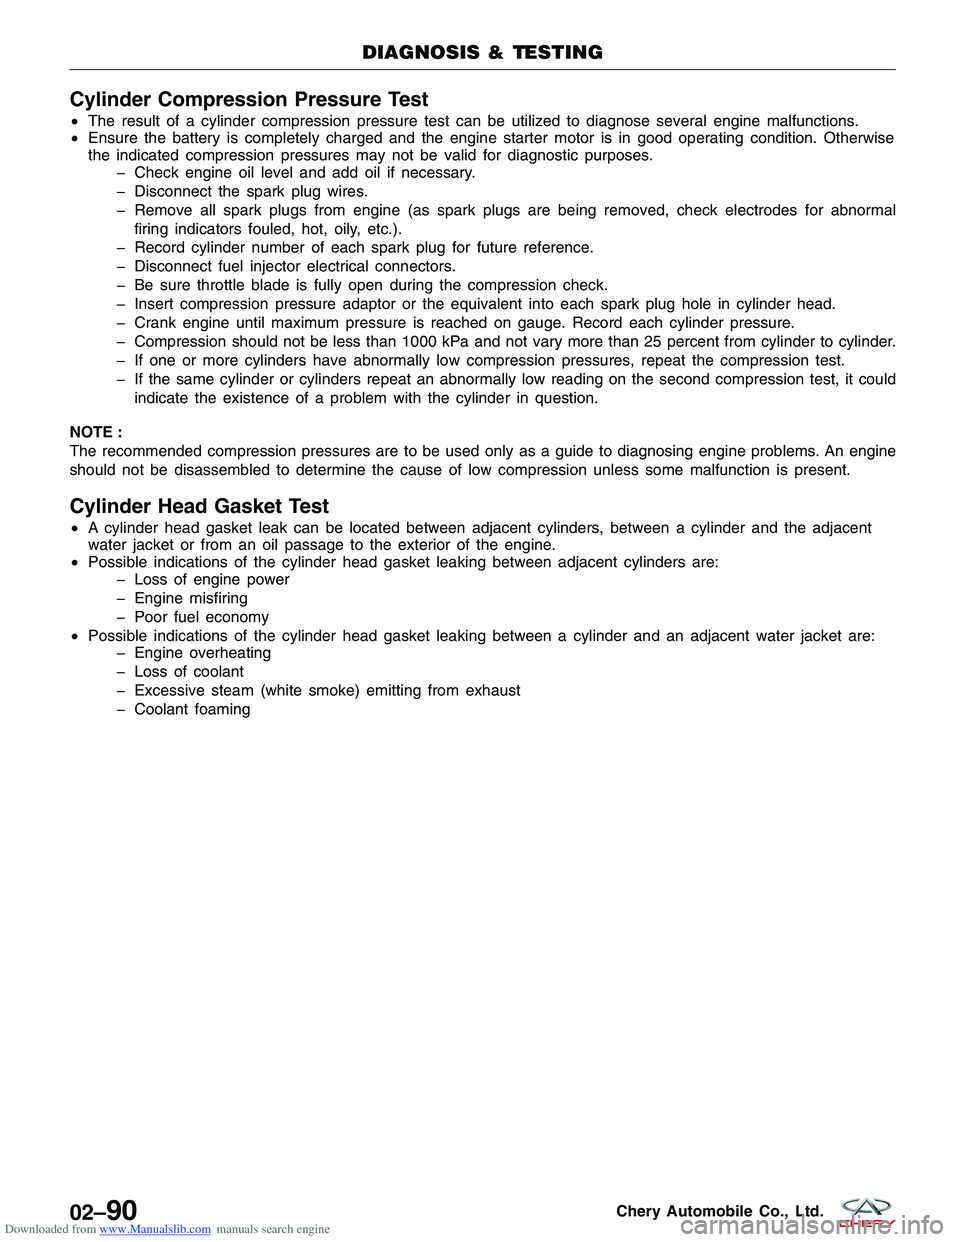
Downloaded from www.Manualslib.com manuals search engine Cylinder Compression Pressure Test
•The result of a cylinder compression pressure test can be utilized to diagnose several engine malfunctions.
• Ensure the battery is completely charged and the engine starter motor is in good operating condition. Otherwise
the indicated compression pressures may not be valid for diagnostic purposes.
Check engine oil level and add oil if necessary.
Disconnect the spark plug wires.
Remove all spark plugs from engine (as spark plugs are being removed, check electrodes for abnormal
firing indicators fouled, hot, oily, etc.).
Record cylinder number of each spark plug for future reference.
Disconnect fuel injector electrical connectors.
Be sure throttle blade is fully open during the compression check.
Insert compression pressure adaptor or the equivalent into each spark plug hole in cylinder head.
Crank engine until maximum pressure is reached on gauge. Record each cylinder pressure.
Compression should not be less than 1000 kPa and not vary more than 25 percent from cylinder to cylinder.
If one or more cylinders have abnormally low compression pressures, repeat the compression test.
If the same cylinder or cylinders repeat an abnormally low reading on the second compression test, it could indicate the existence of a problem with the cylinder in question.
NOTE :
The recommended compression pressures are to be used only as a guide to diagnosing engine problems. An engine
should not be disassembled to determine the cause of low compression unless some malfunction is present.
Cylinder Head Gasket Test
• A cylinder head gasket leak can be located between adjacent cylinders, between a cylinder and the adjacent
water jacket or from an oil passage to the exterior of the engine.
• Possible indications of the cylinder head gasket leaking between adjacent cylinders are:
Loss of engine power
Engine misfiring
Poor fuel economy
• Possible indications of the cylinder head gasket leaking between a cylinder and an adjacent water jacket are:
Engine overheating
Loss of coolant
Excessive steam (white smoke) emitting from exhaust
Coolant foaming
DIAGNOSIS & TESTING
02–90Chery Automobile Co., Ltd.
Page 135 of 1903
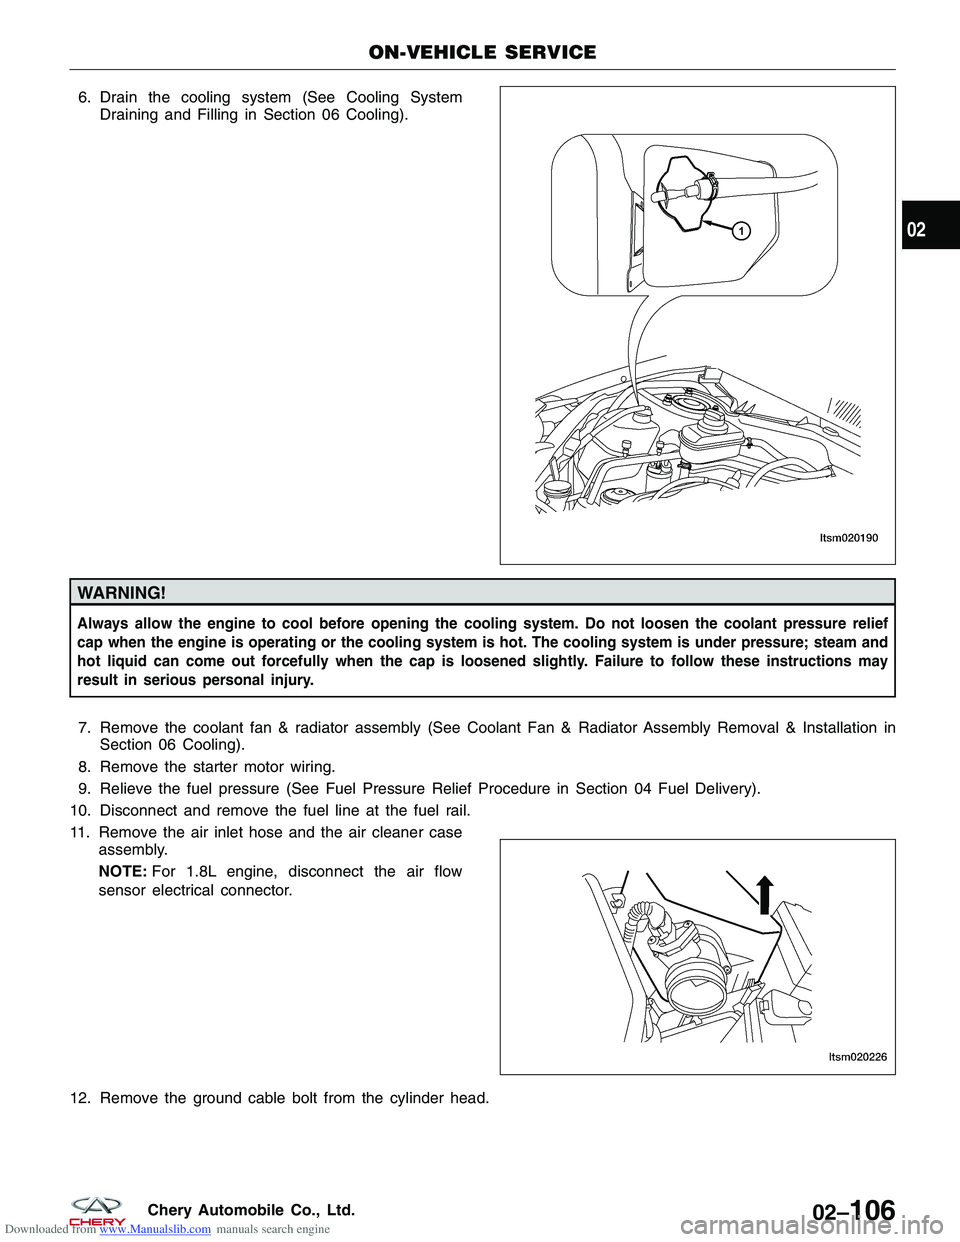
Downloaded from www.Manualslib.com manuals search engine 6. Drain the cooling system (See Cooling SystemDraining and Filling in Section 06 Cooling).
WARNING!
Always allow the engine to cool before opening the cooling system. Do not loosen the coolant pressure relief
cap when the engine is operating or the cooling system is hot. The cooling system is under pressure; steam and
hot liquid can come out forcefully when the cap is loosened slightly. Failure to follow these instructions may
result in serious personal injury.
7. Remove the coolant fan & radiator assembly (See Coolant Fan & Radiator Assembly Removal & Installation inSection 06 Cooling).
8. Remove the starter motor wiring.
9. Relieve the fuel pressure (See Fuel Pressure Relief Procedure in Section 04 Fuel Delivery).
10. Disconnect and remove the fuel line at the fuel rail.
11. Remove the air inlet hose and the air cleaner case assembly.
NOTE: For 1.8L engine, disconnect the air flow
sensor electrical connector.
12. Remove the ground cable bolt from the cylinder head.
ON-VEHICLE SERVICE
LTSM020190
LTSM020226
02
02–106Chery Automobile Co., Ltd.
Page 136 of 1903
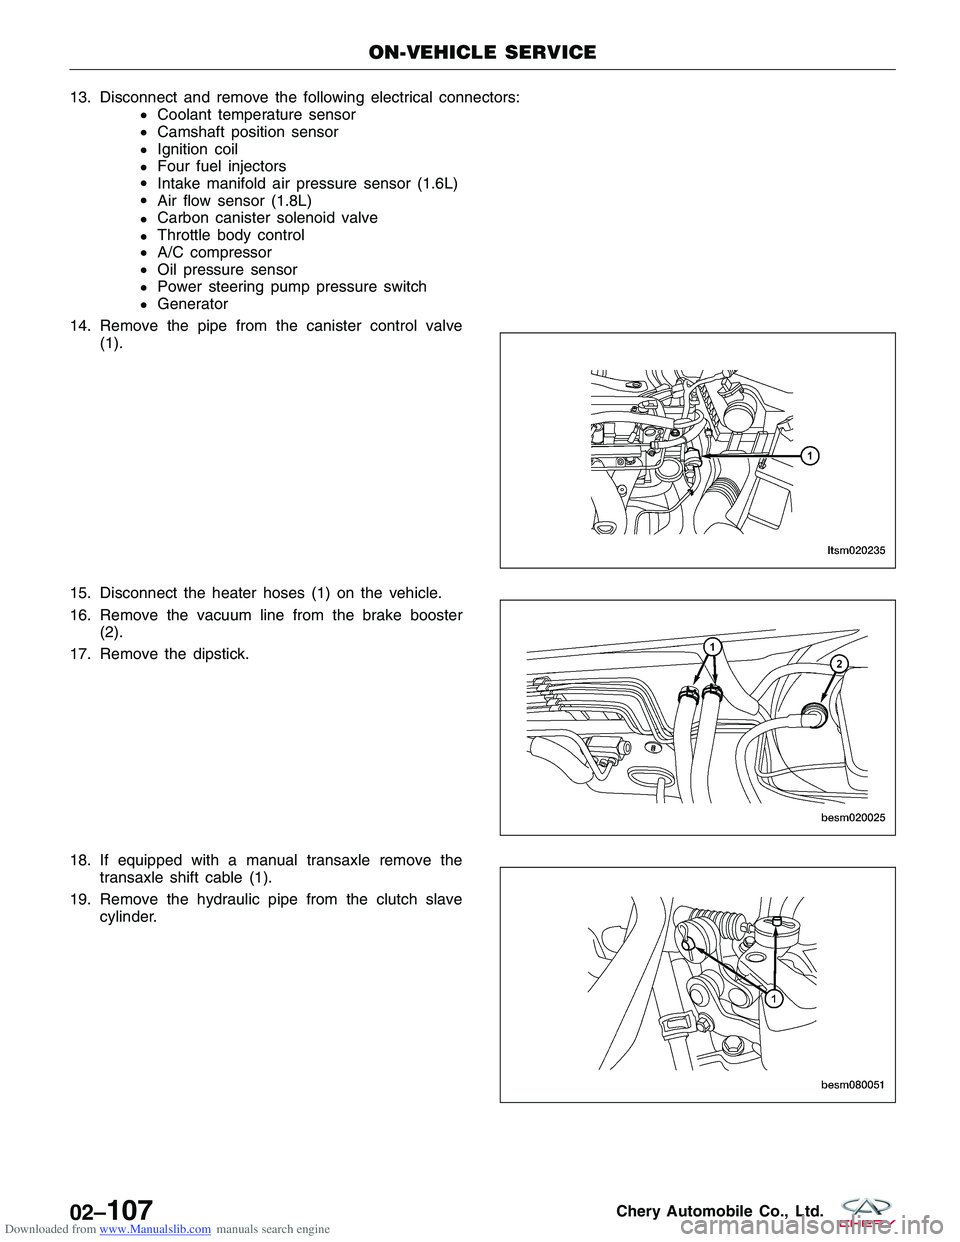
Downloaded from www.Manualslib.com manuals search engine 13.Disconnectandremovethefollowingelectricalconnectors:
€Coolanttemperaturesensor
€Camshaftpositionsensor
€Ignitioncoil
€Fourfuelinjectors
€Intakemanifoldairpressuresensor(1.6L)
€Airflowsensor(1.8L)
€Carboncanistersolenoidvalve
€Throttlebodycontrol
€A/Ccompressor
€Oilpressuresensor
€Powersteeringpumppressureswitch
€Generator
14.Removethepipefromthecanistercontrolvalve
(1).
15.Disconnecttheheaterhoses(1)onthevehicle.
16.Removethevacuumlinefromthebrakebooster
(2).
17.Removethedipstick.
18.Ifequippedwithamanualtransaxleremovethe
transaxleshiftcable(1).
19.Removethehydraulicpipefromtheclutchslave
cylinder.
ON-VEHICLESERVICE
LTSM020235
BESM020025
BESM080051
02–107CheryAutomobileCo.,Ltd.
Page 146 of 1903
Downloaded from www.Manualslib.com manuals search engine Installation Notes:
•Clean all surfaces of manifold and cylinder head.
• Install a new exhaust manifold gasket during installation.
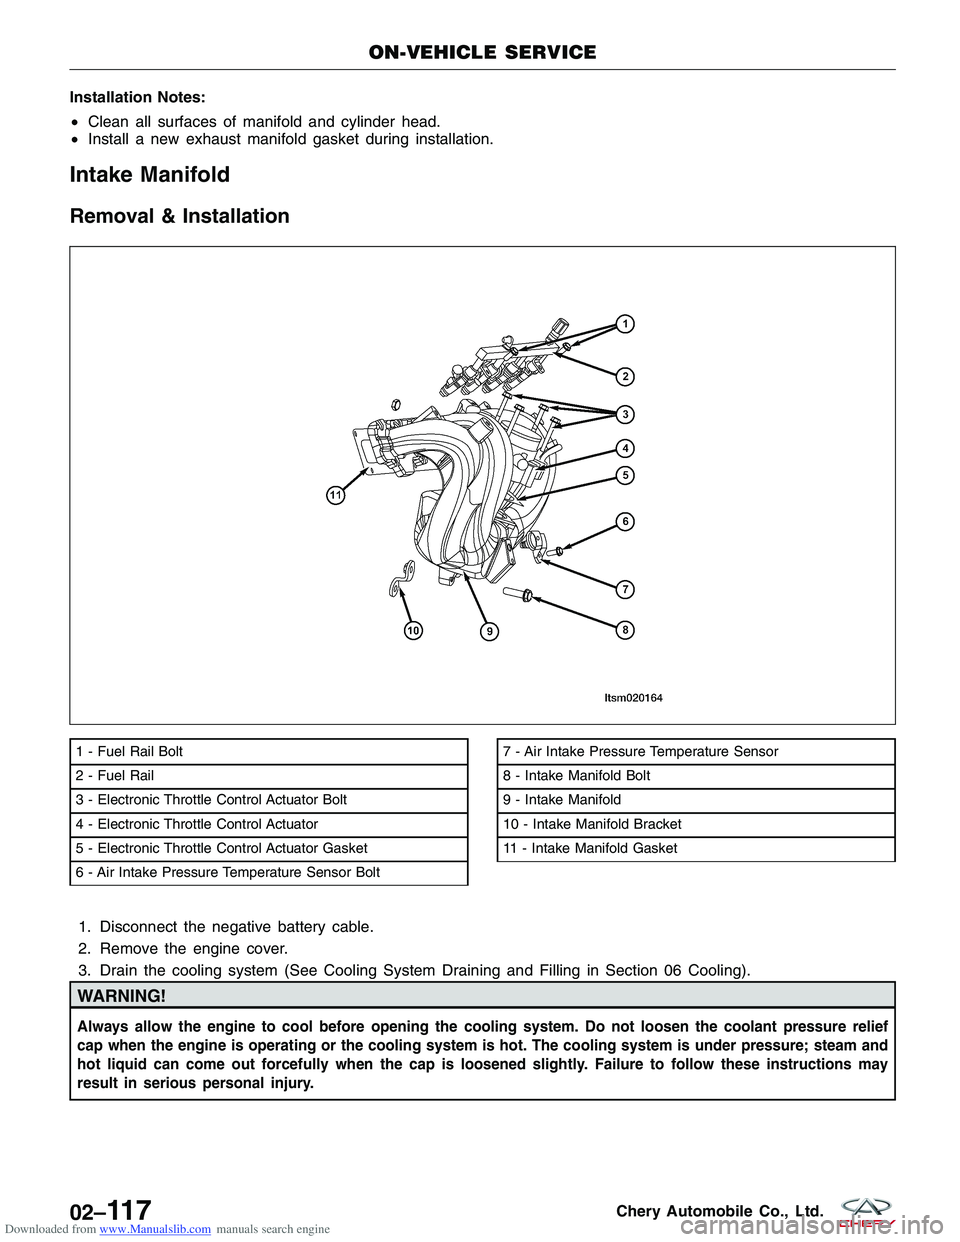
Intake Manifold
Removal & Installation
1. Disconnect the negative battery cable.
2. Remove the engine cover.
3. Drain the cooling system (See Cooling System Draining and Filling in Section 06 Cooling).
WARNING!
Always allow the engine to cool before opening the cooling system. Do not loosen the coolant pressure relief
cap when the engine is operating or the cooling system is hot. The cooling system is under pressure; steam and
hot liquid can come out forcefully when the cap is loosened slightly. Failure to follow these instructions may
result in serious personal injury.
1 - Fuel Rail Bolt
2 - Fuel Rail
3 - Electronic Throttle Control Actuator Bolt
4 - Electronic Throttle Control Actuator
5 - Electronic Throttle Control Actuator Gasket
6 - Air Intake Pressure Temperature Sensor Bolt7 - Air Intake Pressure Temperature Sensor
8 - Intake Manifold Bolt
9 - Intake Manifold
10 - Intake Manifold Bracket
11 - Intake Manifold Gasket
ON-VEHICLE SERVICE
LTSM020164
02–11 7Chery Automobile Co., Ltd.
Page 147 of 1903
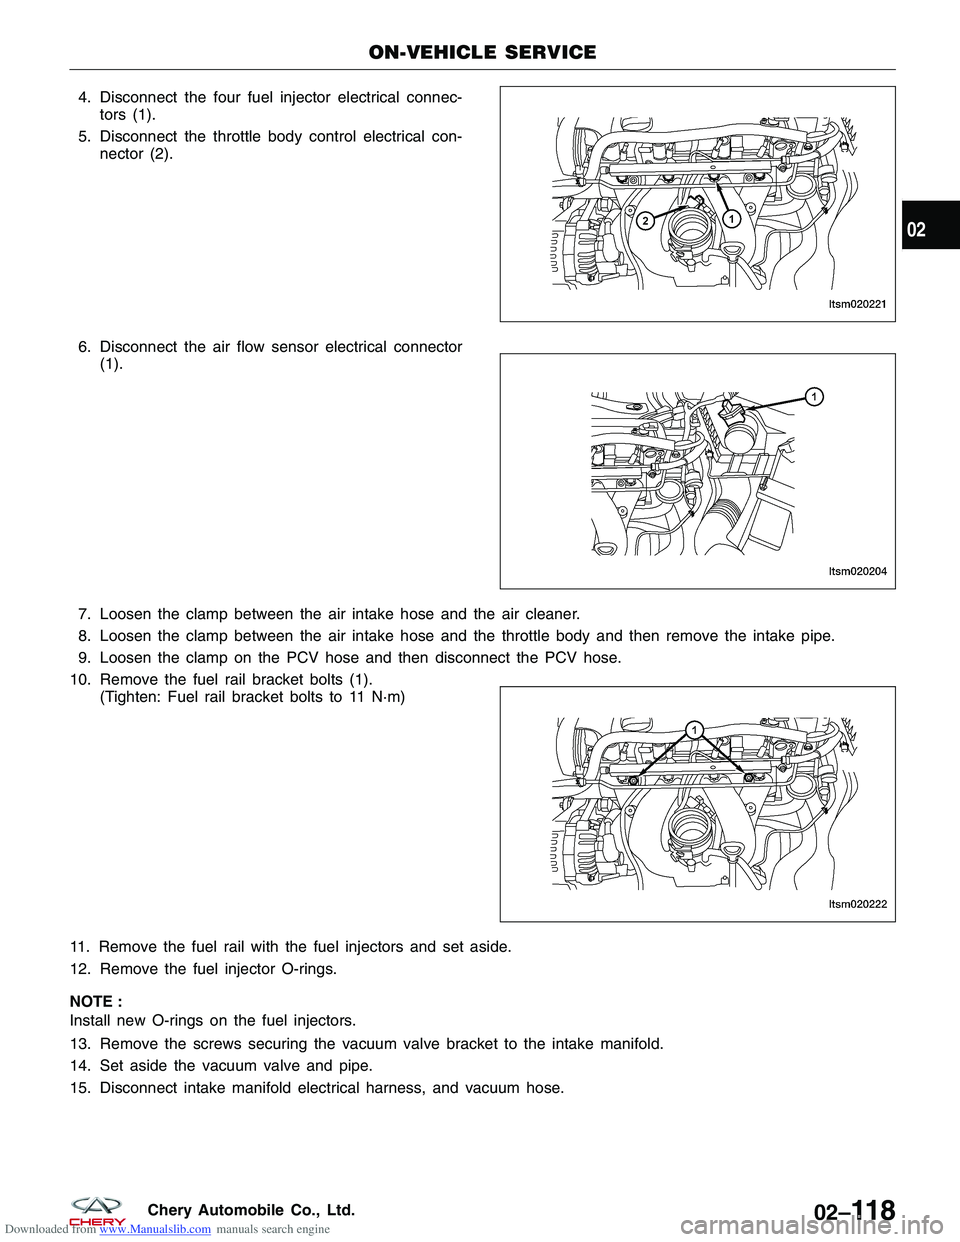
Downloaded from www.Manualslib.com manuals search engine 4. Disconnect the four fuel injector electrical connec-tors (1).
5. Disconnect the throttle body control electrical con- nector (2).
6. Disconnect the air flow sensor electrical connector (1).
7. Loosen the clamp between the air intake hose and the air cleaner.
8. Loosen the clamp between the air intake hose and the throttle body and then remove the intake pipe.
9. Loosen the clamp on the PCV hose and then disconnect the PCV hose.
10. Remove the fuel rail bracket bolts (1). (Tighten: Fuel rail bracket bolts to 11 N·m)
11. Remove the fuel rail with the fuel injectors and set aside.
12. Remove the fuel injector O-rings.
NOTE :
Install new O-rings on the fuel injectors.
13. Remove the screws securing the vacuum valve bracket to the intake manifold.
14. Set aside the vacuum valve and pipe.
15. Disconnect intake manifold electrical harness, and vacuum hose.
ON-VEHICLE SERVICE
LTSM020221
LTSM020204
LTSM020222
02
02–11 8Chery Automobile Co., Ltd.