audio CHERY TIGGO 2009 Service Repair Manual
[x] Cancel search | Manufacturer: CHERY, Model Year: 2009, Model line: TIGGO, Model: CHERY TIGGO 2009Pages: 1903, PDF Size: 33.38 MB
Page 5 of 1903
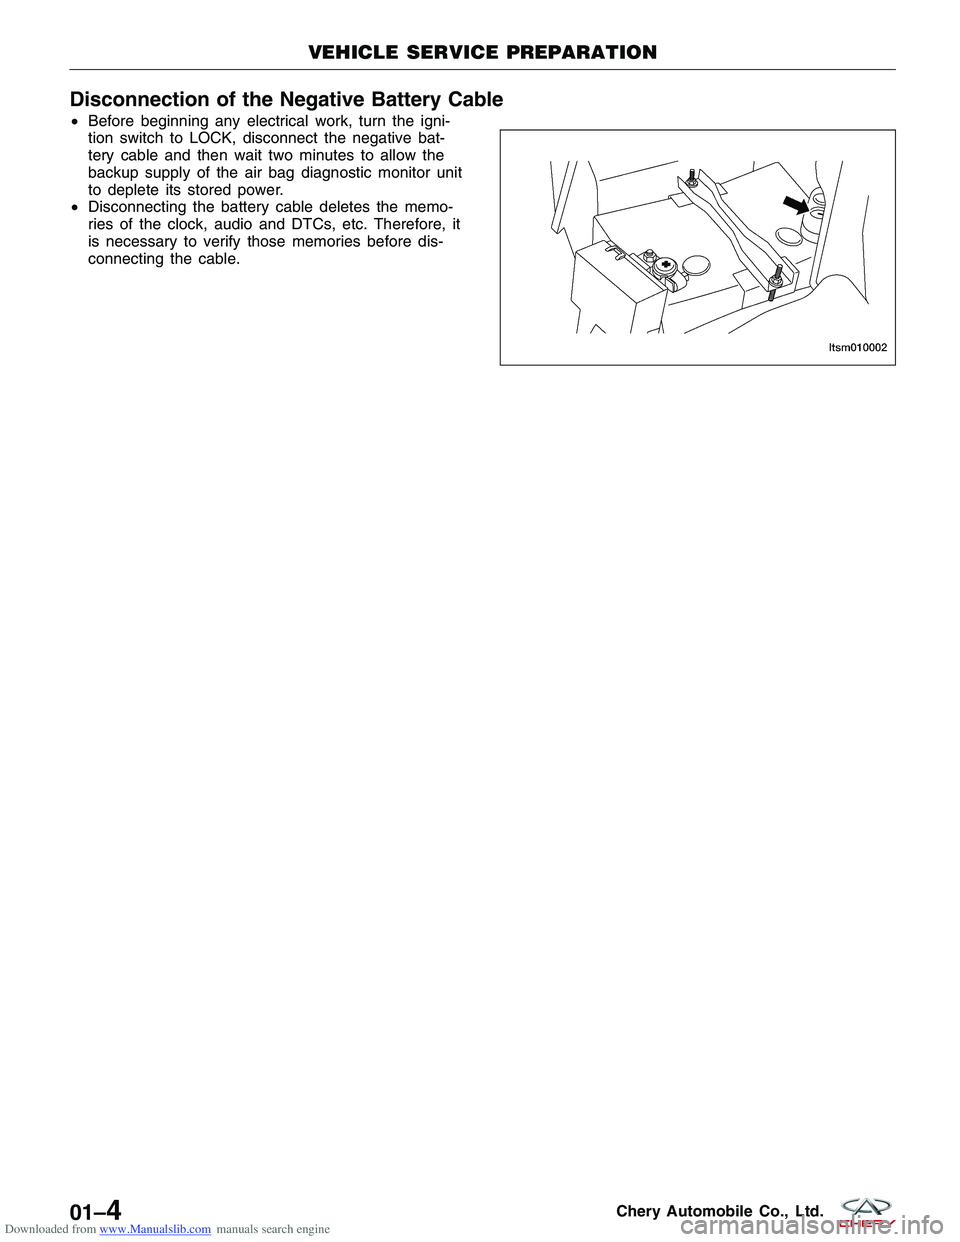
Downloaded from www.Manualslib.com manuals search engine Disconnection of the Negative Battery Cable
•Before beginning any electrical work, turn the igni-
tion switch to LOCK, disconnect the negative bat-
tery cable and then wait two minutes to allow the
backup supply of the air bag diagnostic monitor unit
to deplete its stored power.
• Disconnecting the battery cable deletes the memo-
ries of the clock, audio and DTCs, etc. Therefore, it
is necessary to verify those memories before dis-
connecting the cable.
VEHICLE SERVICE PREPARATION
LTSM010002
01–4Chery Automobile Co., Ltd.
Page 889 of 1903
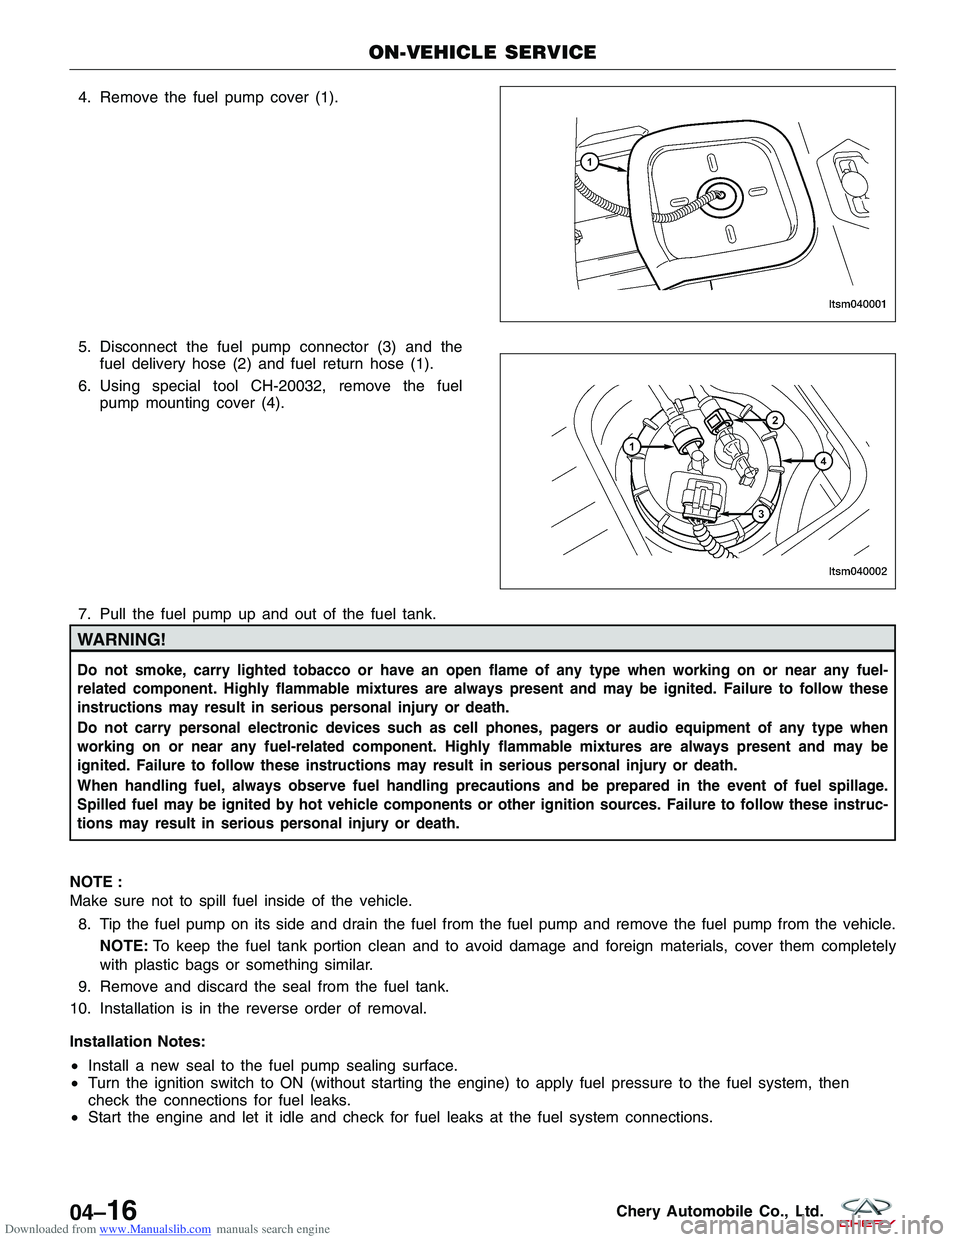
Downloaded from www.Manualslib.com manuals search engine 4. Remove the fuel pump cover (1).
5. Disconnect the fuel pump connector (3) and thefuel delivery hose (2) and fuel return hose (1).
6. Using special tool CH-20032, remove the fuel pump mounting cover (4).
7. Pull the fuel pump up and out of the fuel tank.
WARNING!
Do not smoke, carry lighted tobacco or have an open flame of any type when working on or near any fuel-
related component. Highly flammable mixtures are always present and may be ignited. Failure to follow these
instructions may result in serious personal injury or death.
Do not carry personal electronic devices such as cell phones, pagers or audio equipment of any type when
working on or near any fuel-related component. Highly flammable mixtures are always present and may be
ignited. Failure to follow these instructions may result in serious personal injury or death.
When handling fuel, always observe fuel handling precautions and be prepared in the event of fuel spillage.
Spilled fuel may be ignited by hot vehicle components or other ignition sources. Failure to follow these instruc-
tions may result in serious personal injury or death.
NOTE :
Make sure not to spill fuel inside of the vehicle. 8. Tip the fuel pump on its side and drain the fuel from the fuel pump and remove the fuel pump from the vehicle. NOTE: To keep the fuel tank portion clean and to avoid damage and foreign materials, cover them completely
with plastic bags or something similar.
9. Remove and discard the seal from the fuel tank.
10. Installation is in the reverse order of removal.
Installation Notes:
• Install a new seal to the fuel pump sealing surface.
• Turn the ignition switch to ON (without starting the engine) to apply fuel pressure to the fuel system, then
check the connections for fuel leaks.
• Start the engine and let it idle and check for fuel leaks at the fuel system connections.
ON-VEHICLE SERVICE
LTSM040001
LTSM040002
04–16Chery Automobile Co., Ltd.
Page 1585 of 1903
Downloaded from www.Manualslib.com manuals search engine BODY & ACCESSORIES
15
CONTENTSpage
Body Interior ........................................................................\
15-1
Body Exterior ...................................................................... 15-145
BODY INTERIOR
AUDIO SYSTEM15-4
Description 15-4
Operation 15-4
Electrical Schematics 15-5
Radio 15-8
Removal & Installation 15-8
6 CD Changer 15-9
Removal & Installation 15-9
Antenna 15-10
Removal & Installation 15-10
BODY INTERIOR TRIM15-11
A-Pillar Trim Panel 15-11
Removal & Installation 15-11
B-Pillar Lower Trim Panel 15-11
Removal & Installation 15-11
B-Pillar Upper Trim Panel 15-12
Removal & Installation 15-12
C-Pillar Lower Trim Panel 15-12
Removal & Installation 15-12
C-Pillar Upper Trim Panel 15-13
Removal & Installation 15-13
Assist Handle 15-13
Removal & Installation 15-13
Scuff Plate 15-14
Removal & Installation 15-14
Pedal Pad 15-14
Removal & Installation 15-14
Sun Visor 15-14
Removal & Installation 15-14
Headliner 15-15
Removal & Installation 15-15
CAN VEHICLE COMMUNICATIONS15-16
Description 15-16
Operation 15-16
Electrical Schematics 15-17
CHIME15-19
Description 15-19
Operation 15-19
Electrical Schematics 15-20
DOOR LOCKS15-29
Description 15-29
Operation 15-29
Electrical Schematics 15-30
Door Lock Switch 15-35
Removal & Installation 15-35
Door Lock Assembly 15-35
Removal & Installation 15-35
Door Lock Assembly Inspection 15-37
BODY CONTROL MODULE - BCM15-38
Description 15-38
Operation 15-38
Electrical Schematics 15-39
ON-VEHICLE SERVICE15-44
Body Control Module (BCM) 15-44
Removal & Installation 15-44
INSTRUMENT PANEL15-45
Removal & Installation 15-45
Lower Console 15-50
Removal & Installation 15-50
15
15–1Chery Automobile Co., Ltd.
Page 1588 of 1903
Downloaded from www.Manualslib.com manuals search engine AUDIO SYSTEM
Description
The audio system consists of the following components:
•Audio Unit
• Front Speakers
• Front Tweeters
• Rear Speakers
• Window Antenna (audio)
The audio system is standard factory-installed equipment. The system uses an ignition switched source of battery
current so that the system will operate when the ignition switch is in the LOCK/ACC/ON positions. The system will
also operate in the OFF position for one hour.
Operation
With the audio system on, radio signals are received by the window antenna, the audio unit then sends audio signals
to front speakers and rear speakers.
15–4Chery Automobile Co., Ltd.
Page 1589 of 1903
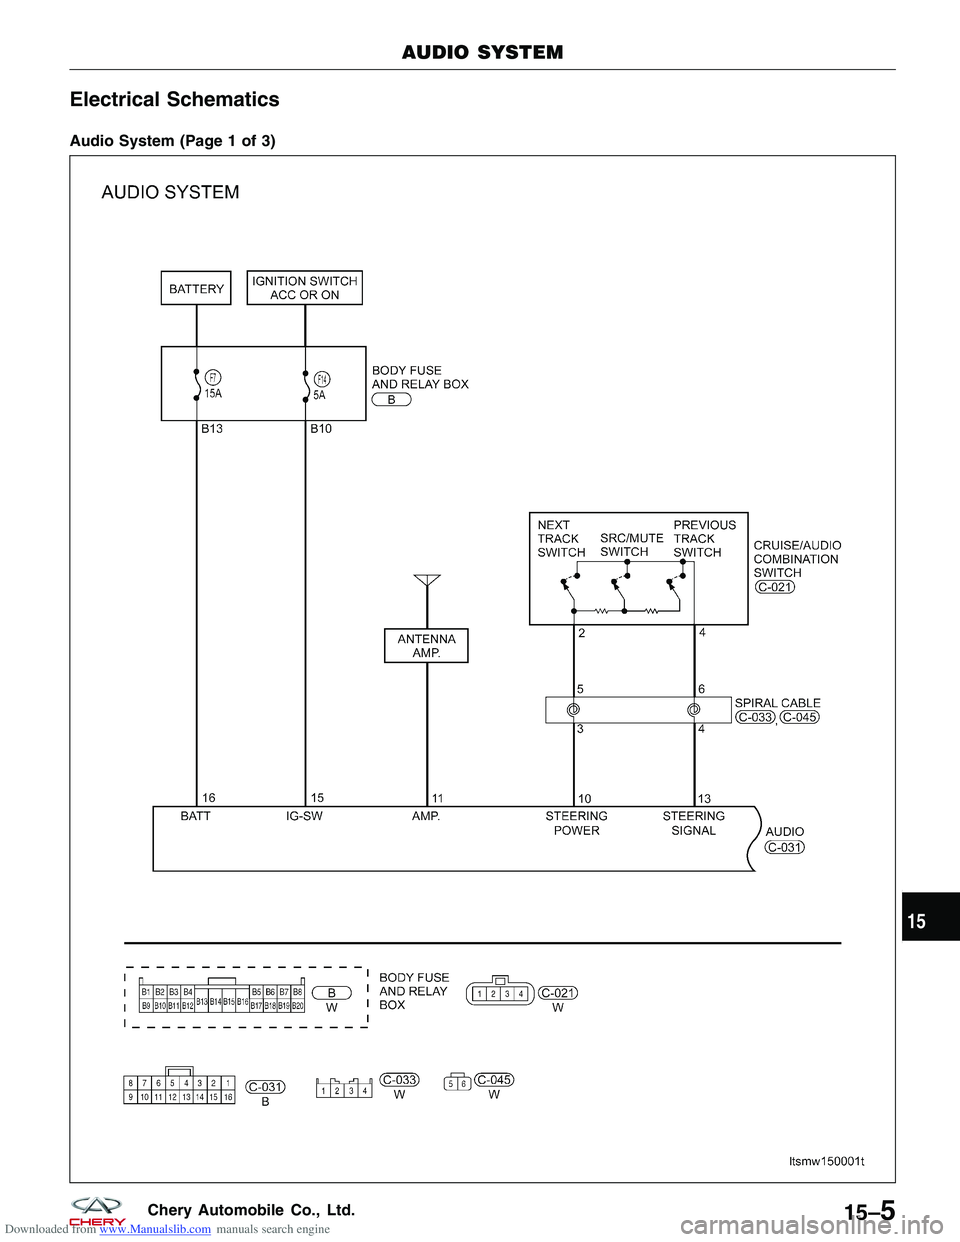
Downloaded from www.Manualslib.com manuals search engine Electrical Schematics
Audio System (Page 1 of 3)
AUDIO SYSTEM
LTSMW150001T
15
15–5Chery Automobile Co., Ltd.
Page 1590 of 1903
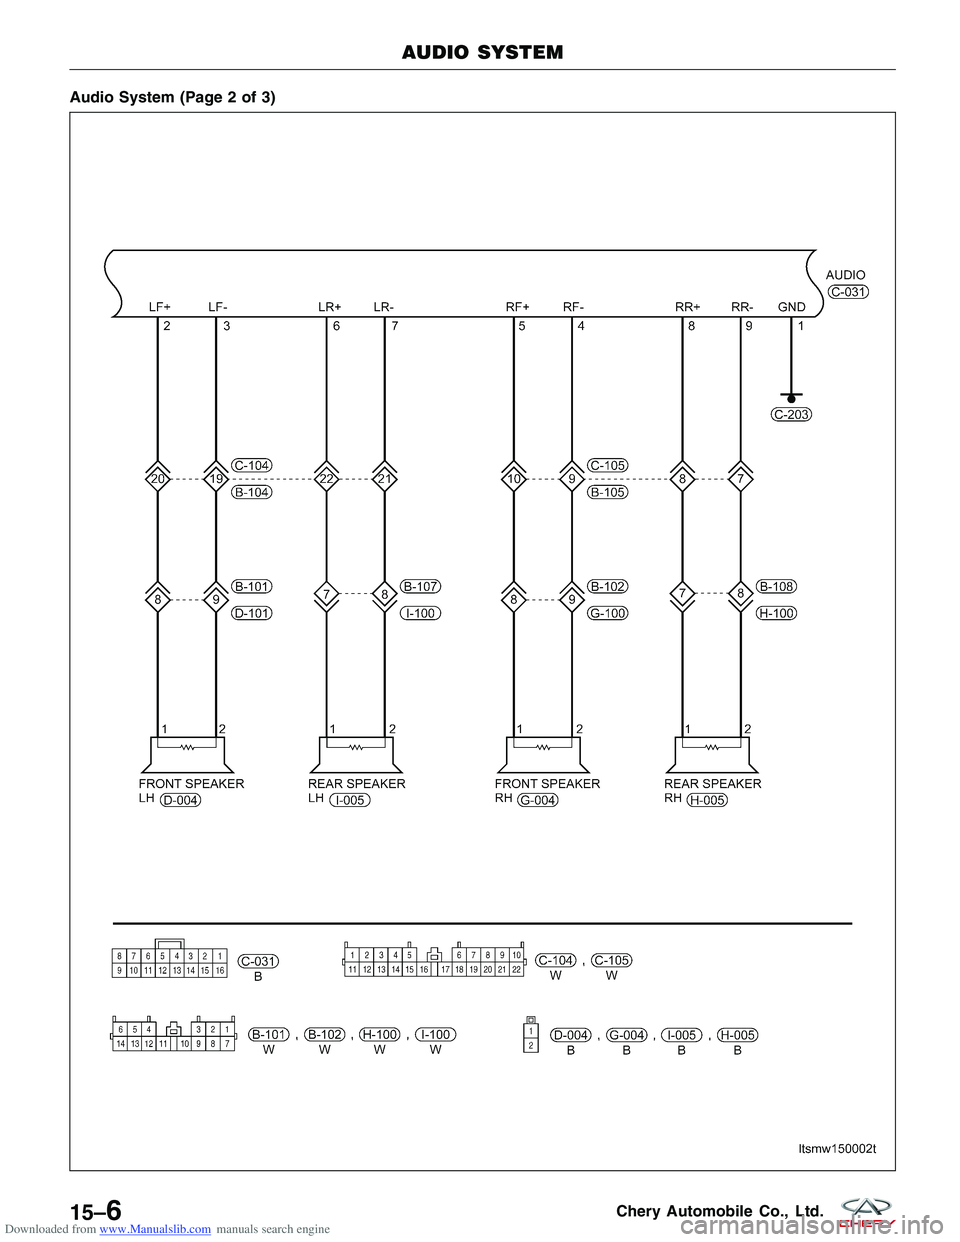
Downloaded from www.Manualslib.com manuals search engine Audio System (Page 2 of 3)
AUDIO SYSTEM
LTSMW150002T
15–6Chery Automobile Co., Ltd.
Page 1591 of 1903
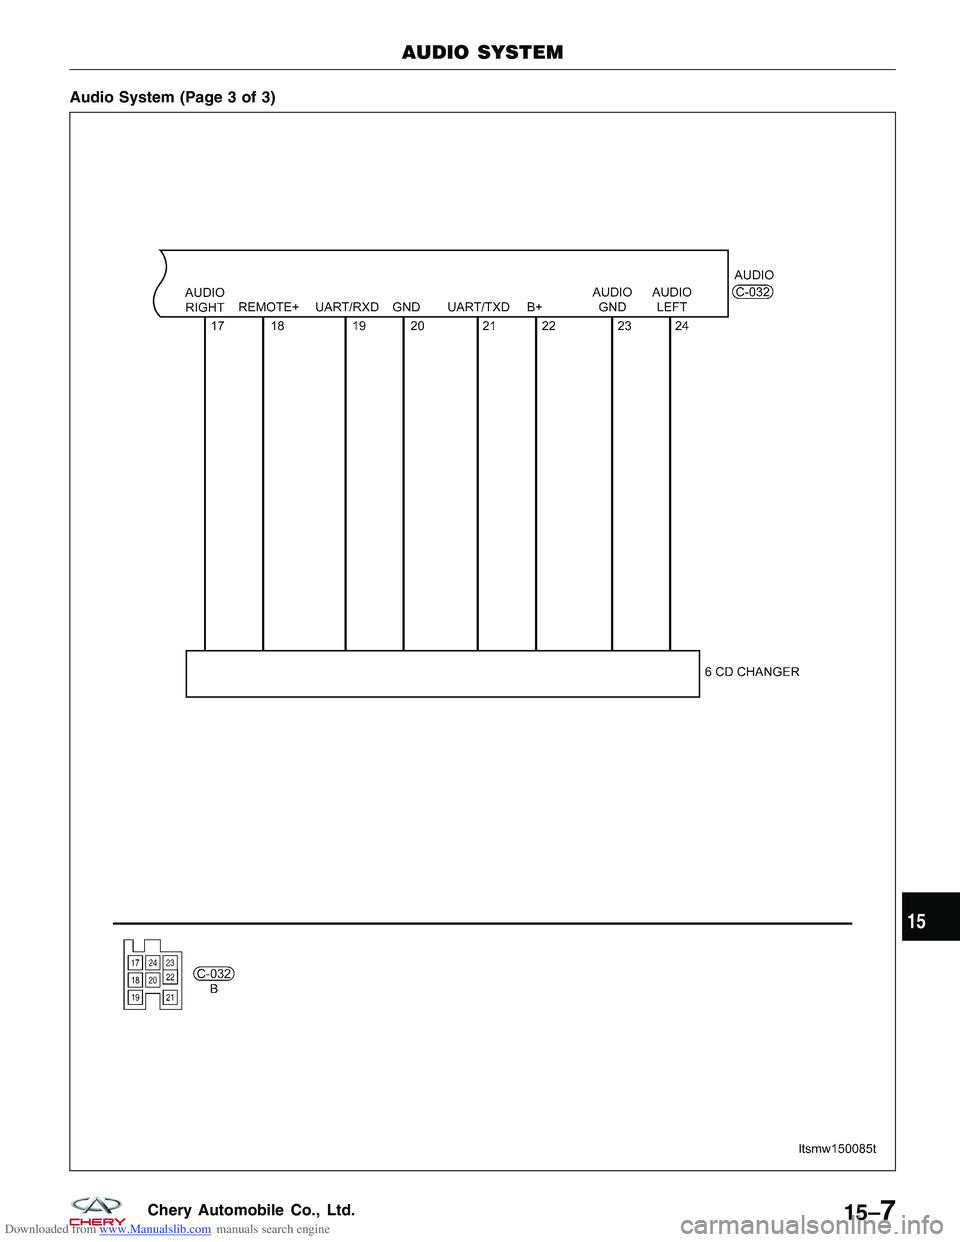
Downloaded from www.Manualslib.com manuals search engine Audio System (Page 3 of 3)
AUDIO SYSTEM
LTSMW150085T
15
15–7Chery Automobile Co., Ltd.
Page 1592 of 1903
Downloaded from www.Manualslib.com manuals search engine Radio
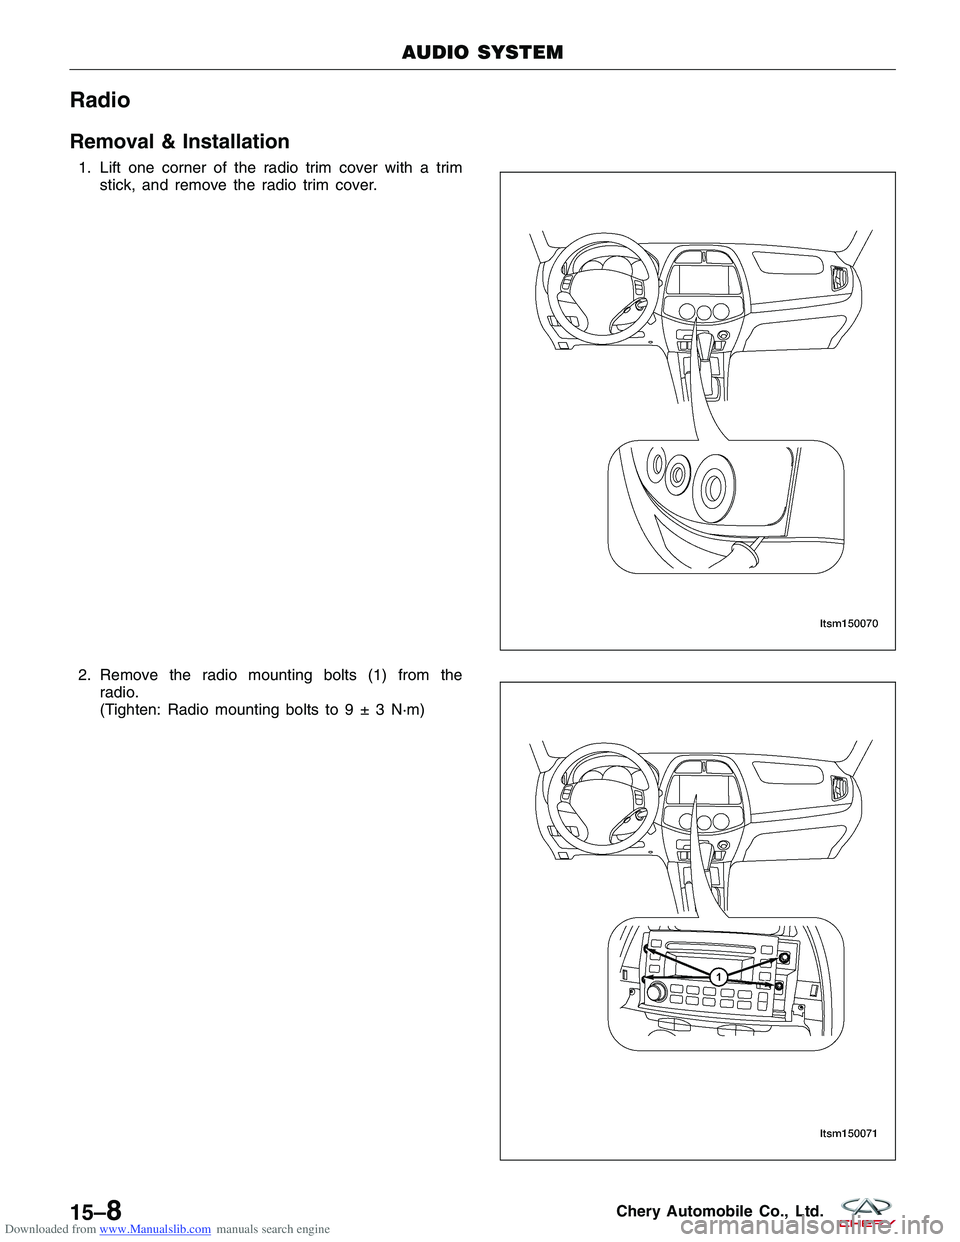
Removal & Installation
1. Lift one corner of the radio trim cover with a trimstick, and remove the radio trim cover.
2. Remove the radio mounting bolts (1) from the radio.
(Tighten: Radio mounting bolts to9±3N·m)
AUDIO SYSTEM
LTSM150070
LTSM150071
15–8Chery Automobile Co., Ltd.
Page 1593 of 1903
Downloaded from www.Manualslib.com manuals search engine 3. Disconnect the electrical connectors.
4. Remove the radio.
5. Installation is in the reverse order of removal.
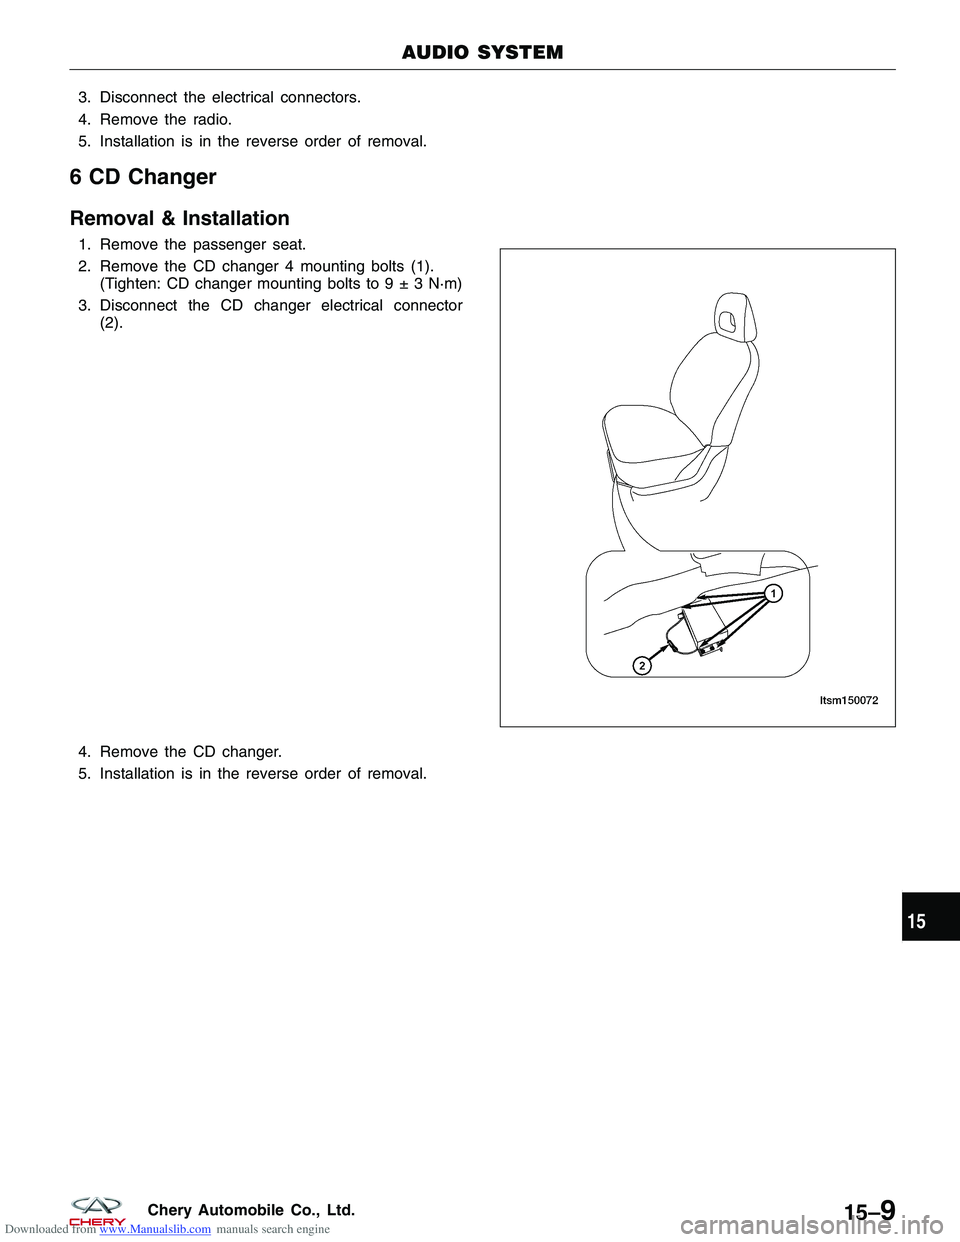
6 CD Changer
Removal & Installation
1. Remove the passenger seat.
2. Remove the CD changer 4 mounting bolts (1).(Tighten: CD changer mounting bolts to9±3N·m)
3. Disconnect the CD changer electrical connector (2).
4. Remove the CD changer.
5. Installation is in the reverse order of removal.
AUDIO SYSTEM
LTSM150072
15
15–9Chery Automobile Co., Ltd.
Page 1594 of 1903
Downloaded from www.Manualslib.com manuals search engine Antenna
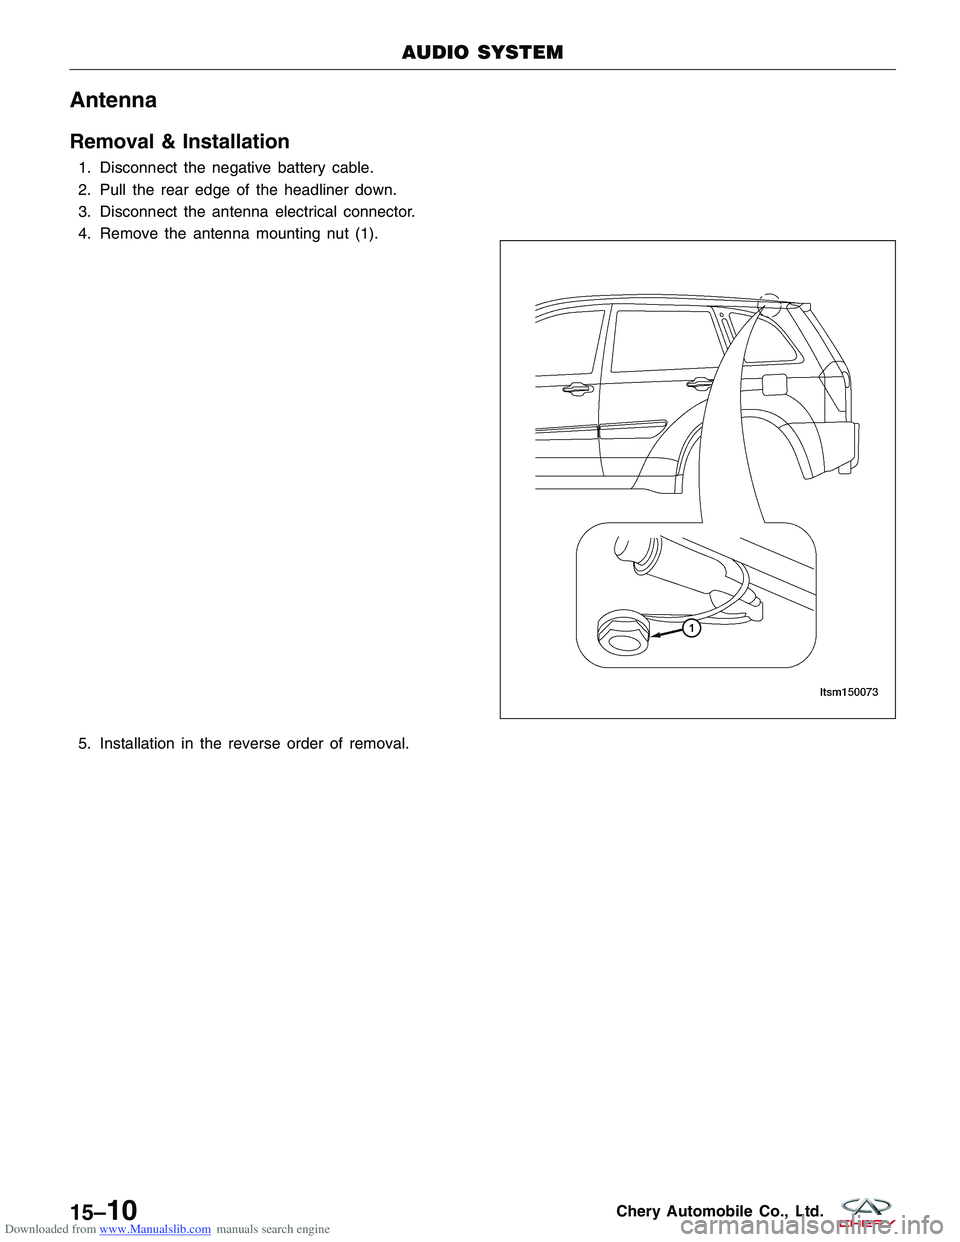
Removal & Installation
1. Disconnect the negative battery cable.
2. Pull the rear edge of the headliner down.
3. Disconnect the antenna electrical connector.
4. Remove the antenna mounting nut (1).
5. Installation in the reverse order of removal.
AUDIO SYSTEM
LTSM150073
15–10Chery Automobile Co., Ltd.