spark plugs replace CHERY TIGGO 2009 Service Repair Manual
[x] Cancel search | Manufacturer: CHERY, Model Year: 2009, Model line: TIGGO, Model: CHERY TIGGO 2009Pages: 1903, PDF Size: 33.38 MB
Page 42 of 1903
Downloaded from www.Manualslib.com manuals search engine DIAGNOSIS & TESTING
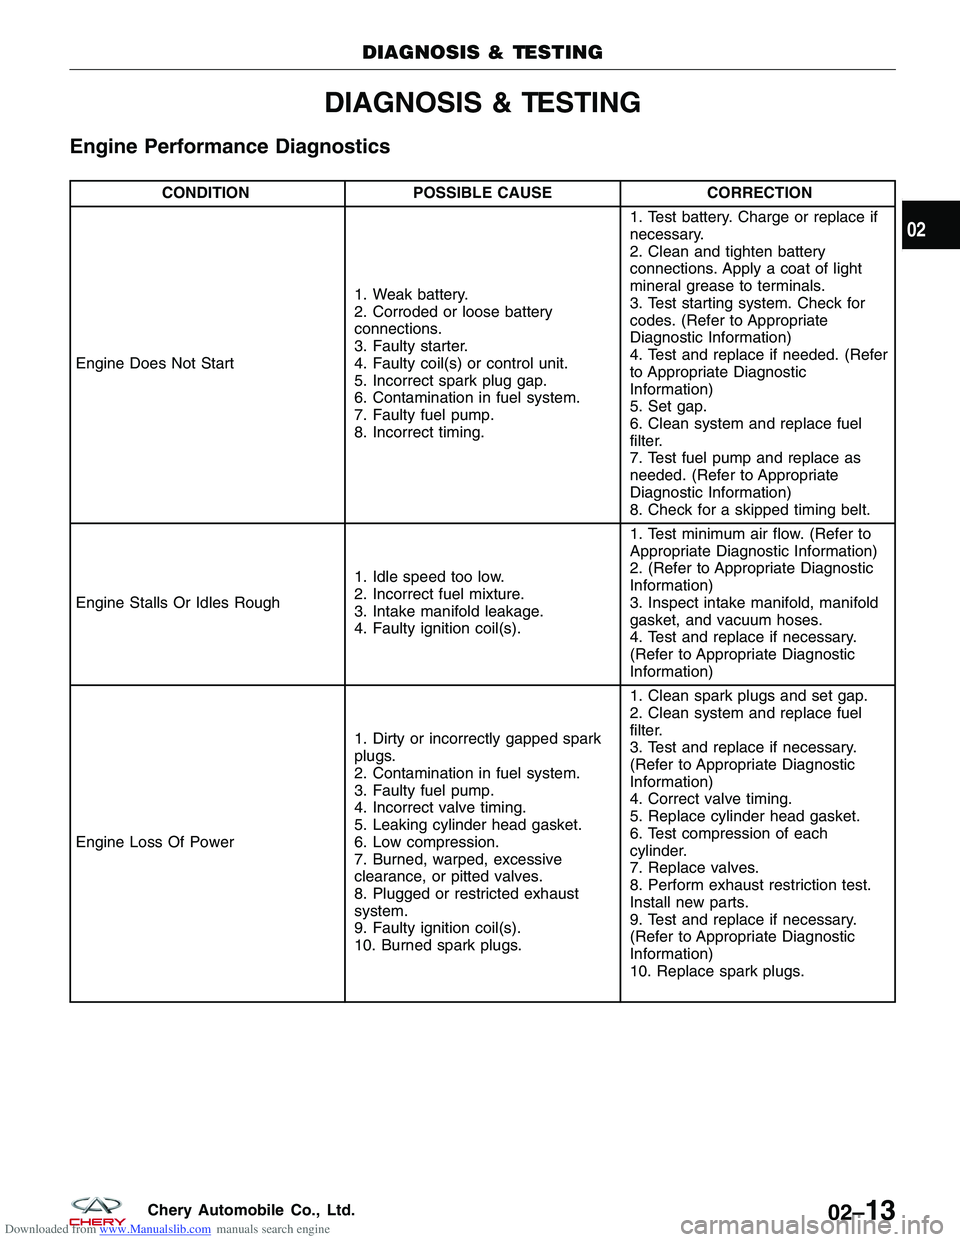
Engine Performance Diagnostics
CONDITIONPOSSIBLE CAUSE CORRECTION
Engine Does Not Start 1. Weak battery.
2. Corroded or loose battery
connections.
3. Faulty starter.
4. Faulty coil(s) or control unit.
5. Incorrect spark plug gap.
6. Contamination in fuel system.
7. Faulty fuel pump.
8. Incorrect timing.1. Test battery. Charge or replace if
necessary.
2. Clean and tighten battery
connections. Apply a coat of light
mineral grease to terminals.
3. Test starting system. Check for
codes. (Refer to Appropriate
Diagnostic Information)
4. Test and replace if needed. (Refer
to Appropriate Diagnostic
Information)
5. Set gap.
6. Clean system and replace fuel
filter.
7. Test fuel pump and replace as
needed. (Refer to Appropriate
Diagnostic Information)
8. Check for a skipped timing belt.
Engine Stalls Or Idles Rough 1. Idle speed too low.
2. Incorrect fuel mixture.
3. Intake manifold leakage.
4. Faulty ignition coil(s).1. Test minimum air flow. (Refer to
Appropriate Diagnostic Information)
2. (Refer to Appropriate Diagnostic
Information)
3. Inspect intake manifold, manifold
gasket, and vacuum hoses.
4. Test and replace if necessary.
(Refer to Appropriate Diagnostic
Information)
Engine Loss Of Power 1. Dirty or incorrectly gapped spark
plugs.
2. Contamination in fuel system.
3. Faulty fuel pump.
4. Incorrect valve timing.
5. Leaking cylinder head gasket.
6. Low compression.
7. Burned, warped, excessive
clearance, or pitted valves.
8. Plugged or restricted exhaust
system.
9. Faulty ignition coil(s).
10. Burned spark plugs.1. Clean spark plugs and set gap.
2. Clean system and replace fuel
filter.
3. Test and replace if necessary.
(Refer to Appropriate Diagnostic
Information)
4. Correct valve timing.
5. Replace cylinder head gasket.
6. Test compression of each
cylinder.
7. Replace valves.
8. Perform exhaust restriction test.
Install new parts.
9. Test and replace if necessary.
(Refer to Appropriate Diagnostic
Information)
10. Replace spark plugs.
DIAGNOSIS & TESTING
02
02–13Chery Automobile Co., Ltd.
Page 43 of 1903
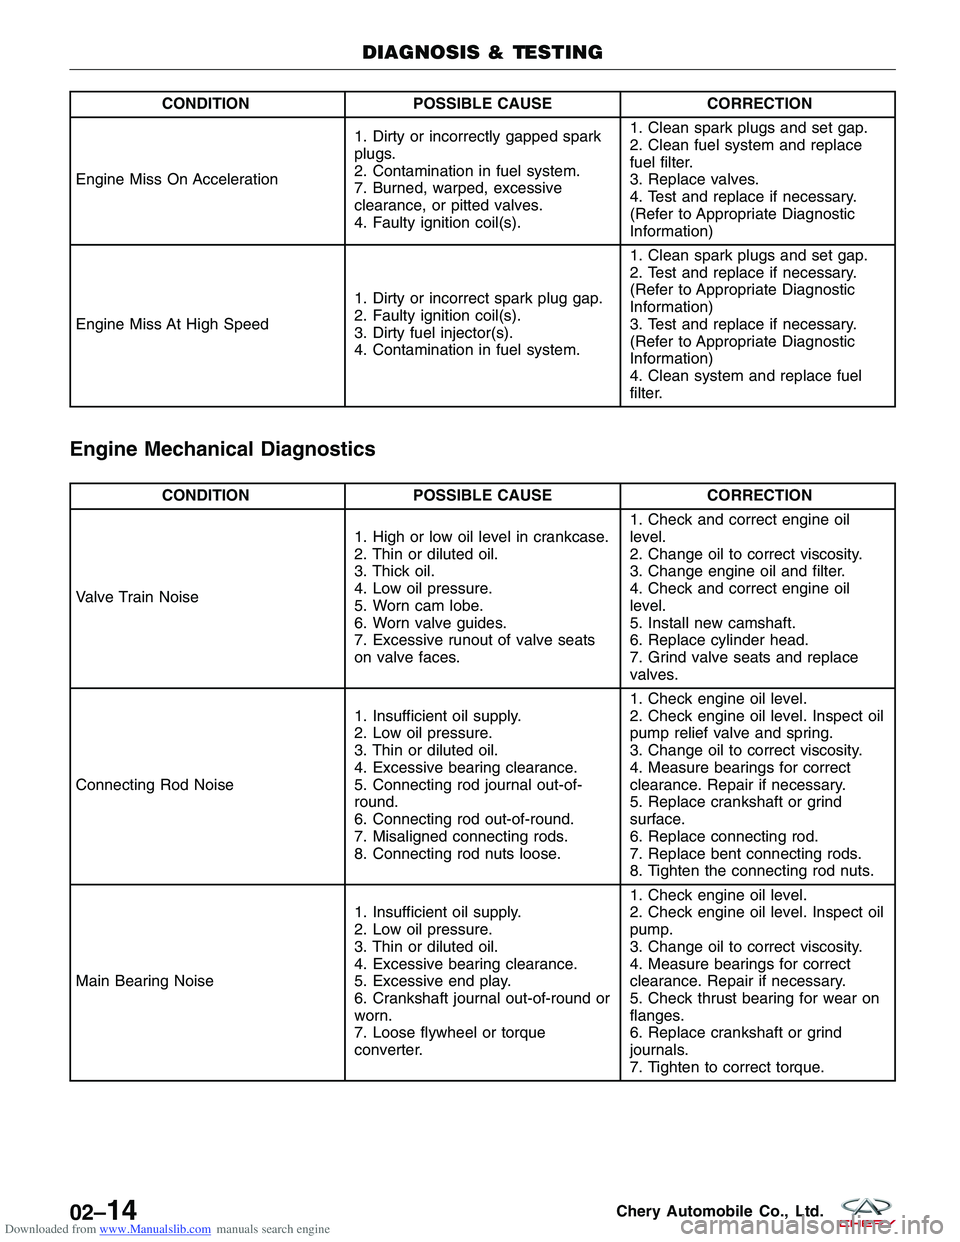
Downloaded from www.Manualslib.com manuals search engine CONDITIONPOSSIBLE CAUSE CORRECTION
Engine Miss On Acceleration 1. Dirty or incorrectly gapped spark
plugs.
2. Contamination in fuel system.
7. Burned, warped, excessive
clearance, or pitted valves.
4. Faulty ignition coil(s).1. Clean spark plugs and set gap.
2. Clean fuel system and replace
fuel filter.
3. Replace valves.
4. Test and replace if necessary.
(Refer to Appropriate Diagnostic
Information)
Engine Miss At High Speed 1. Dirty or incorrect spark plug gap.
2. Faulty ignition coil(s).
3. Dirty fuel injector(s).
4. Contamination in fuel system.1. Clean spark plugs and set gap.
2. Test and replace if necessary.
(Refer to Appropriate Diagnostic
Information)
3. Test and replace if necessary.
(Refer to Appropriate Diagnostic
Information)
4. Clean system and replace fuel
filter.
Engine Mechanical Diagnostics
CONDITION
POSSIBLE CAUSE CORRECTION
Valve Train Noise 1. High or low oil level in crankcase.
2. Thin or diluted oil.
3. Thick oil.
4. Low oil pressure.
5. Worn cam lobe.
6. Worn valve guides.
7. Excessive runout of valve seats
on valve faces.1. Check and correct engine oil
level.
2. Change oil to correct viscosity.
3. Change engine oil and filter.
4. Check and correct engine oil
level.
5. Install new camshaft.
6. Replace cylinder head.
7. Grind valve seats and replace
valves.
Connecting Rod Noise 1. Insufficient oil supply.
2. Low oil pressure.
3. Thin or diluted oil.
4. Excessive bearing clearance.
5. Connecting rod journal out-of-
round.
6. Connecting rod out-of-round.
7. Misaligned connecting rods.
8. Connecting rod nuts loose.1. Check engine oil level.
2. Check engine oil level. Inspect oil
pump relief valve and spring.
3. Change oil to correct viscosity.
4. Measure bearings for correct
clearance. Repair if necessary.
5. Replace crankshaft or grind
surface.
6. Replace connecting rod.
7. Replace bent connecting rods.
8. Tighten the connecting rod nuts.
Main Bearing Noise 1. Insufficient oil supply.
2. Low oil pressure.
3. Thin or diluted oil.
4. Excessive bearing clearance.
5. Excessive end play.
6. Crankshaft journal out-of-round or
worn.
7. Loose flywheel or torque
converter.1. Check engine oil level.
2. Check engine oil level. Inspect oil
pump.
3. Change oil to correct viscosity.
4. Measure bearings for correct
clearance. Repair if necessary.
5. Check thrust bearing for wear on
flanges.
6. Replace crankshaft or grind
journals.
7. Tighten to correct torque.
DIAGNOSIS & TESTING
02–14Chery Automobile Co., Ltd.
Page 44 of 1903
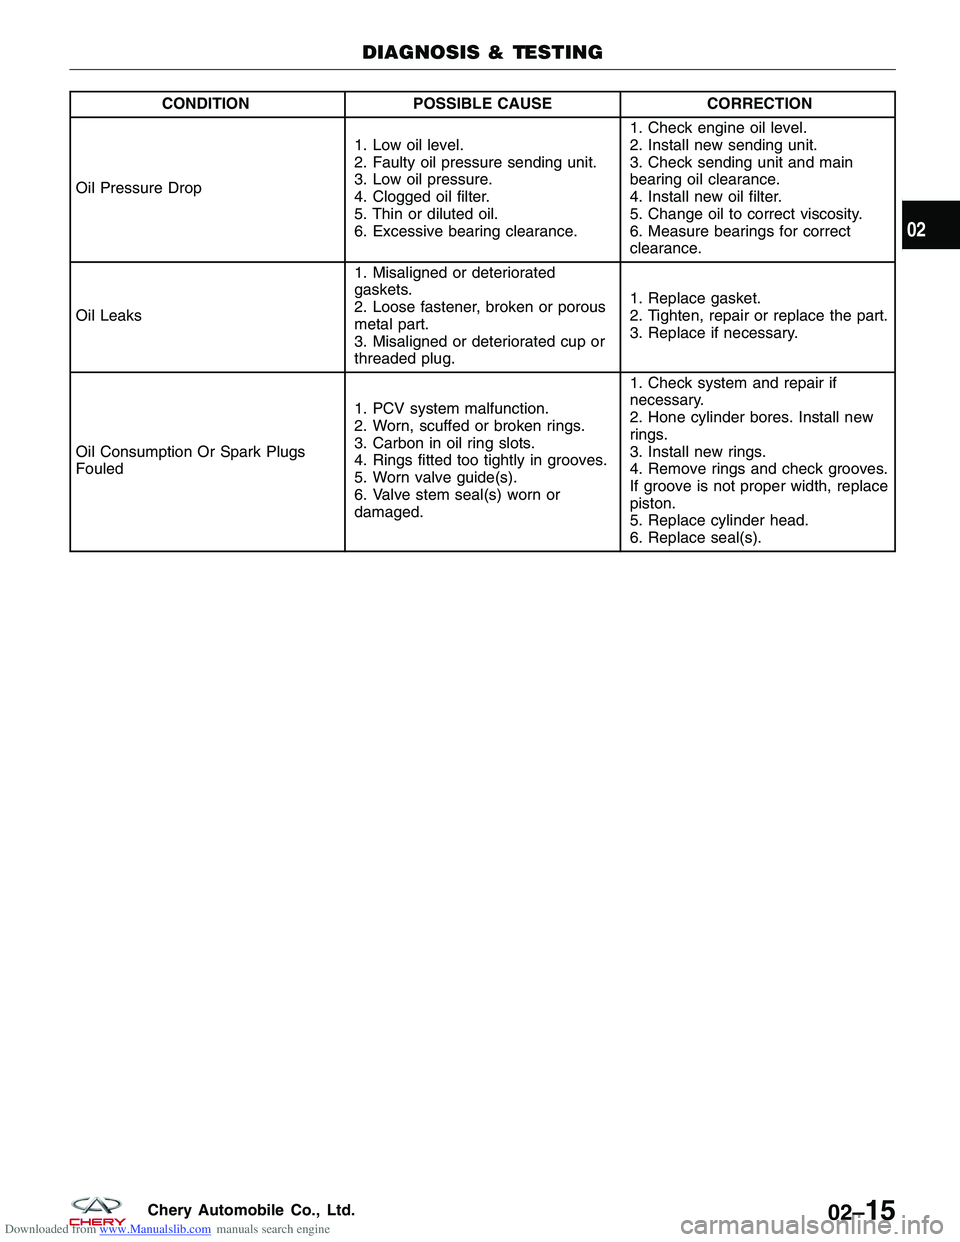
Downloaded from www.Manualslib.com manuals search engine CONDITIONPOSSIBLE CAUSE CORRECTION
Oil Pressure Drop 1. Low oil level.
2. Faulty oil pressure sending unit.
3. Low oil pressure.
4. Clogged oil filter.
5. Thin or diluted oil.
6. Excessive bearing clearance.1. Check engine oil level.
2. Install new sending unit.
3. Check sending unit and main
bearing oil clearance.
4. Install new oil filter.
5. Change oil to correct viscosity.
6. Measure bearings for correct
clearance.
Oil Leaks 1. Misaligned or deteriorated
gaskets.
2. Loose fastener, broken or porous
metal part.
3. Misaligned or deteriorated cup or
threaded plug.1. Replace gasket.
2. Tighten, repair or replace the part.
3. Replace if necessary.
Oil Consumption Or Spark Plugs
Fouled 1. PCV system malfunction.
2. Worn, scuffed or broken rings.
3. Carbon in oil ring slots.
4. Rings fitted too tightly in grooves.
5. Worn valve guide(s).
6. Valve stem seal(s) worn or
damaged.1. Check system and repair if
necessary.
2. Hone cylinder bores. Install new
rings.
3. Install new rings.
4. Remove rings and check grooves.
If groove is not proper width, replace
piston.
5. Replace cylinder head.
6. Replace seal(s).
DIAGNOSIS & TESTING
02
02–15Chery Automobile Co., Ltd.
Page 116 of 1903
Downloaded from www.Manualslib.com manuals search engine DIAGNOSIS & TESTING
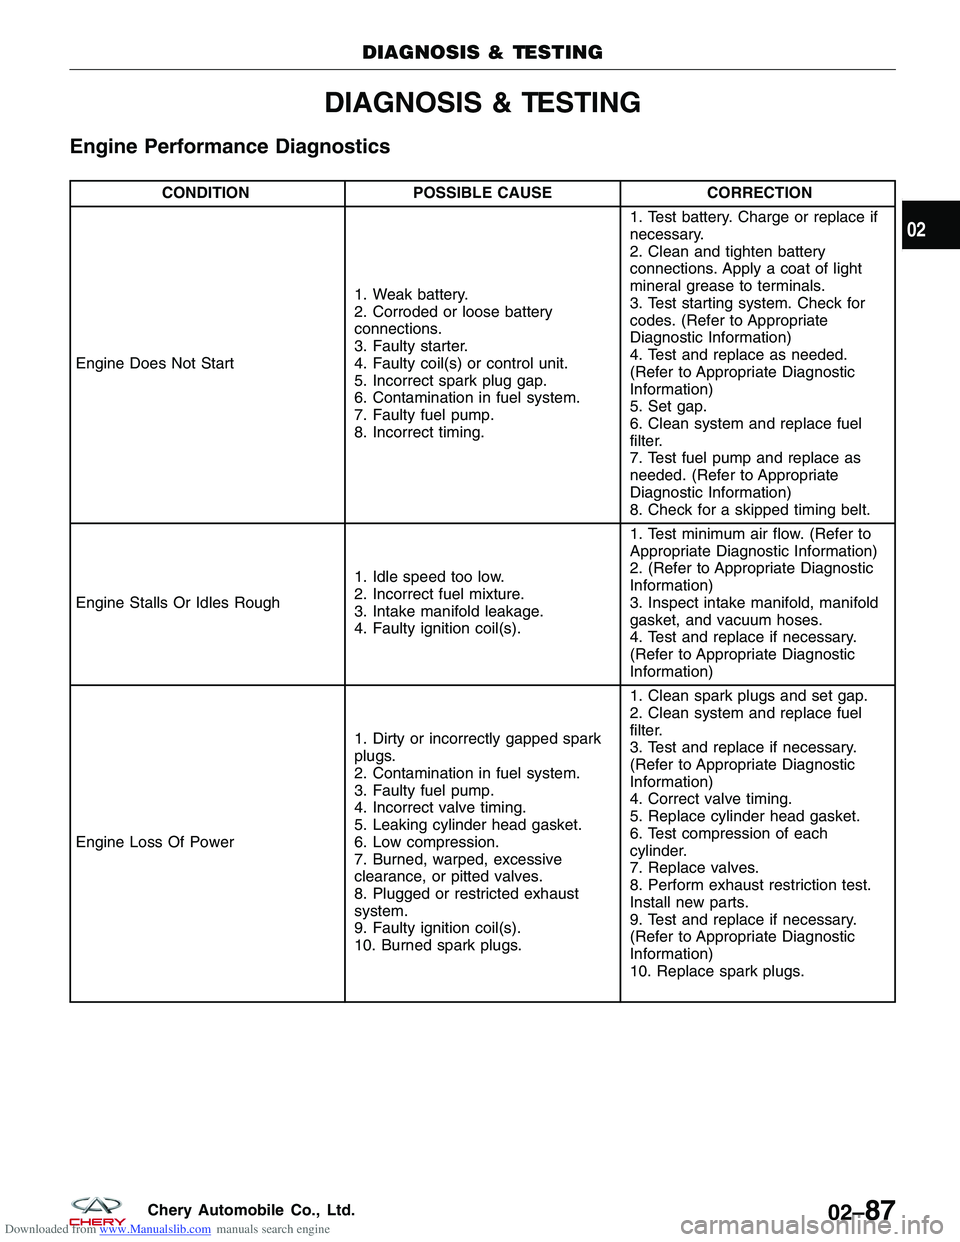
Engine Performance Diagnostics
CONDITIONPOSSIBLE CAUSE CORRECTION
Engine Does Not Start 1. Weak battery.
2. Corroded or loose battery
connections.
3. Faulty starter.
4. Faulty coil(s) or control unit.
5. Incorrect spark plug gap.
6. Contamination in fuel system.
7. Faulty fuel pump.
8. Incorrect timing.1. Test battery. Charge or replace if
necessary.
2. Clean and tighten battery
connections. Apply a coat of light
mineral grease to terminals.
3. Test starting system. Check for
codes. (Refer to Appropriate
Diagnostic Information)
4. Test and replace as needed.
(Refer to Appropriate Diagnostic
Information)
5. Set gap.
6. Clean system and replace fuel
filter.
7. Test fuel pump and replace as
needed. (Refer to Appropriate
Diagnostic Information)
8. Check for a skipped timing belt.
Engine Stalls Or Idles Rough 1. Idle speed too low.
2. Incorrect fuel mixture.
3. Intake manifold leakage.
4. Faulty ignition coil(s).1. Test minimum air flow. (Refer to
Appropriate Diagnostic Information)
2. (Refer to Appropriate Diagnostic
Information)
3. Inspect intake manifold, manifold
gasket, and vacuum hoses.
4. Test and replace if necessary.
(Refer to Appropriate Diagnostic
Information)
Engine Loss Of Power 1. Dirty or incorrectly gapped spark
plugs.
2. Contamination in fuel system.
3. Faulty fuel pump.
4. Incorrect valve timing.
5. Leaking cylinder head gasket.
6. Low compression.
7. Burned, warped, excessive
clearance, or pitted valves.
8. Plugged or restricted exhaust
system.
9. Faulty ignition coil(s).
10. Burned spark plugs.1. Clean spark plugs and set gap.
2. Clean system and replace fuel
filter.
3. Test and replace if necessary.
(Refer to Appropriate Diagnostic
Information)
4. Correct valve timing.
5. Replace cylinder head gasket.
6. Test compression of each
cylinder.
7. Replace valves.
8. Perform exhaust restriction test.
Install new parts.
9. Test and replace if necessary.
(Refer to Appropriate Diagnostic
Information)
10. Replace spark plugs.
DIAGNOSIS & TESTING
02
02–87Chery Automobile Co., Ltd.
Page 117 of 1903
Downloaded from www.Manualslib.com manuals search engine CONDITIONPOSSIBLE CAUSE CORRECTION
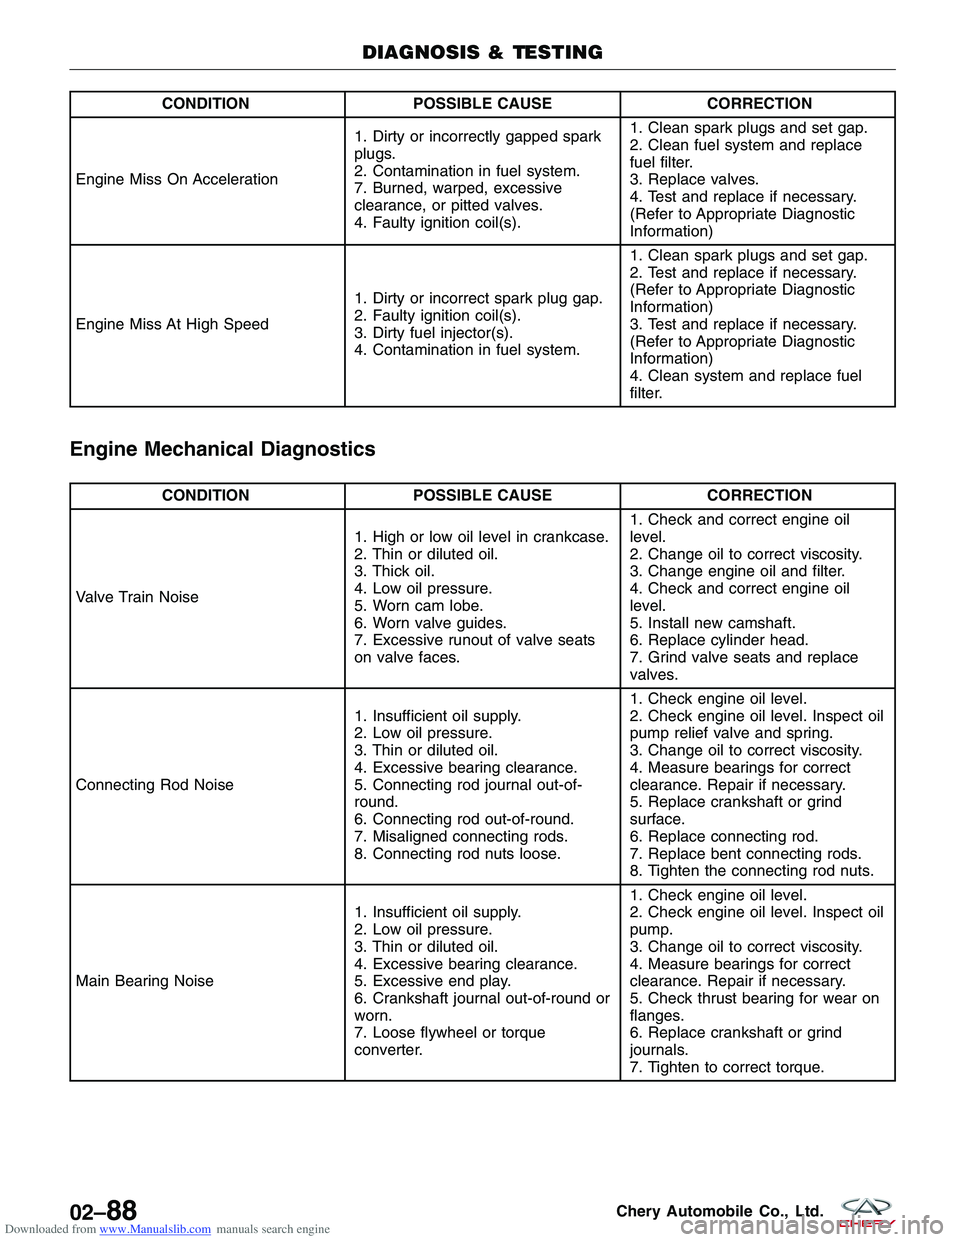
Engine Miss On Acceleration 1. Dirty or incorrectly gapped spark
plugs.
2. Contamination in fuel system.
7. Burned, warped, excessive
clearance, or pitted valves.
4. Faulty ignition coil(s).1. Clean spark plugs and set gap.
2. Clean fuel system and replace
fuel filter.
3. Replace valves.
4. Test and replace if necessary.
(Refer to Appropriate Diagnostic
Information)
Engine Miss At High Speed 1. Dirty or incorrect spark plug gap.
2. Faulty ignition coil(s).
3. Dirty fuel injector(s).
4. Contamination in fuel system.1. Clean spark plugs and set gap.
2. Test and replace if necessary.
(Refer to Appropriate Diagnostic
Information)
3. Test and replace if necessary.
(Refer to Appropriate Diagnostic
Information)
4. Clean system and replace fuel
filter.
Engine Mechanical Diagnostics
CONDITION
POSSIBLE CAUSE CORRECTION
Valve Train Noise 1. High or low oil level in crankcase.
2. Thin or diluted oil.
3. Thick oil.
4. Low oil pressure.
5. Worn cam lobe.
6. Worn valve guides.
7. Excessive runout of valve seats
on valve faces.1. Check and correct engine oil
level.
2. Change oil to correct viscosity.
3. Change engine oil and filter.
4. Check and correct engine oil
level.
5. Install new camshaft.
6. Replace cylinder head.
7. Grind valve seats and replace
valves.
Connecting Rod Noise 1. Insufficient oil supply.
2. Low oil pressure.
3. Thin or diluted oil.
4. Excessive bearing clearance.
5. Connecting rod journal out-of-
round.
6. Connecting rod out-of-round.
7. Misaligned connecting rods.
8. Connecting rod nuts loose.1. Check engine oil level.
2. Check engine oil level. Inspect oil
pump relief valve and spring.
3. Change oil to correct viscosity.
4. Measure bearings for correct
clearance. Repair if necessary.
5. Replace crankshaft or grind
surface.
6. Replace connecting rod.
7. Replace bent connecting rods.
8. Tighten the connecting rod nuts.
Main Bearing Noise 1. Insufficient oil supply.
2. Low oil pressure.
3. Thin or diluted oil.
4. Excessive bearing clearance.
5. Excessive end play.
6. Crankshaft journal out-of-round or
worn.
7. Loose flywheel or torque
converter.1. Check engine oil level.
2. Check engine oil level. Inspect oil
pump.
3. Change oil to correct viscosity.
4. Measure bearings for correct
clearance. Repair if necessary.
5. Check thrust bearing for wear on
flanges.
6. Replace crankshaft or grind
journals.
7. Tighten to correct torque.
DIAGNOSIS & TESTING
02–88Chery Automobile Co., Ltd.
Page 118 of 1903
Downloaded from www.Manualslib.com manuals search engine CONDITIONPOSSIBLE CAUSE CORRECTION
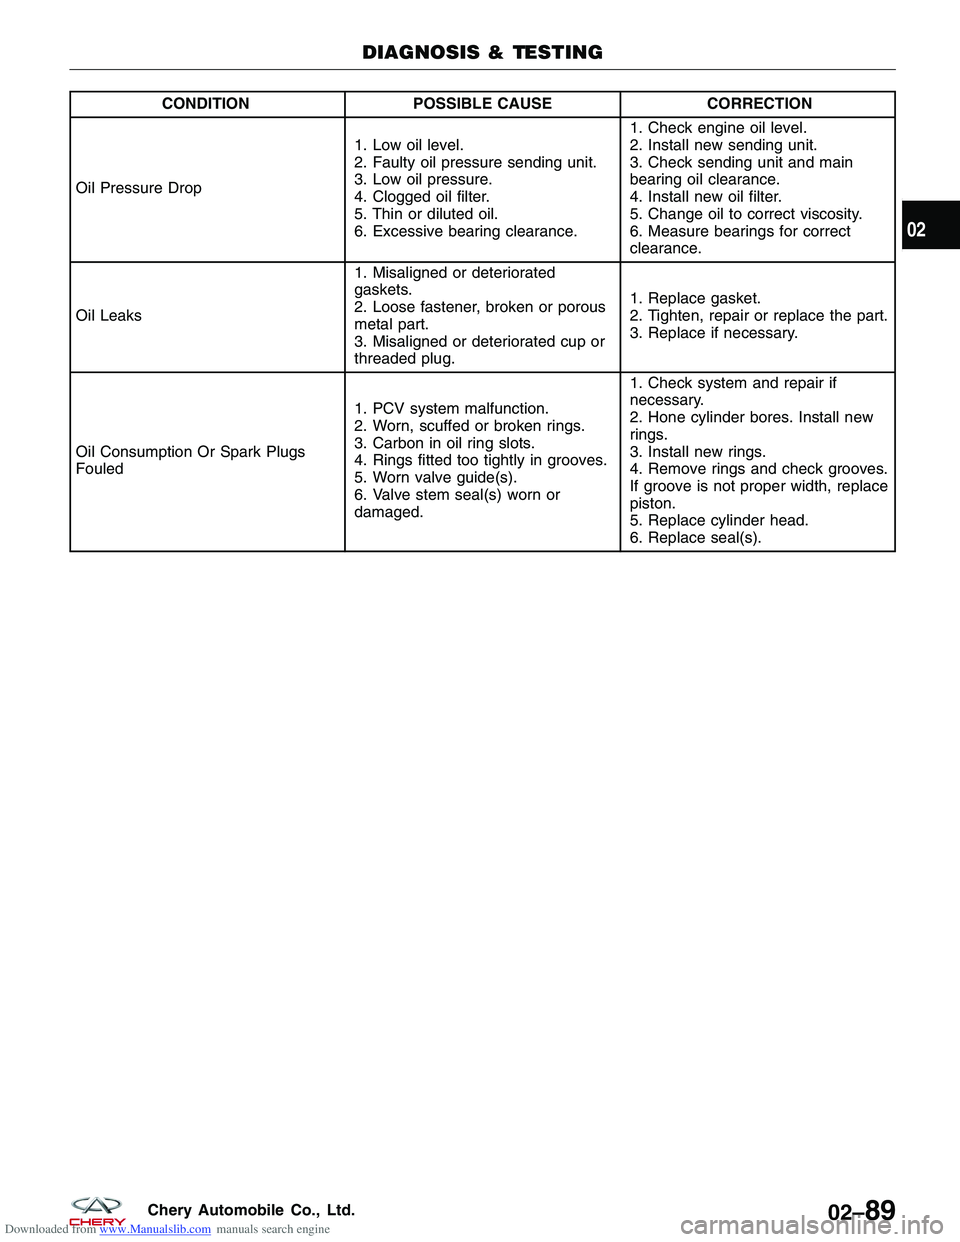
Oil Pressure Drop 1. Low oil level.
2. Faulty oil pressure sending unit.
3. Low oil pressure.
4. Clogged oil filter.
5. Thin or diluted oil.
6. Excessive bearing clearance.1. Check engine oil level.
2. Install new sending unit.
3. Check sending unit and main
bearing oil clearance.
4. Install new oil filter.
5. Change oil to correct viscosity.
6. Measure bearings for correct
clearance.
Oil Leaks 1. Misaligned or deteriorated
gaskets.
2. Loose fastener, broken or porous
metal part.
3. Misaligned or deteriorated cup or
threaded plug.1. Replace gasket.
2. Tighten, repair or replace the part.
3. Replace if necessary.
Oil Consumption Or Spark Plugs
Fouled 1. PCV system malfunction.
2. Worn, scuffed or broken rings.
3. Carbon in oil ring slots.
4. Rings fitted too tightly in grooves.
5. Worn valve guide(s).
6. Valve stem seal(s) worn or
damaged.1. Check system and repair if
necessary.
2. Hone cylinder bores. Install new
rings.
3. Install new rings.
4. Remove rings and check grooves.
If groove is not proper width, replace
piston.
5. Replace cylinder head.
6. Replace seal(s).
DIAGNOSIS & TESTING
02
02–89Chery Automobile Co., Ltd.
Page 192 of 1903
Downloaded from www.Manualslib.com manuals search engine DIAGNOSIS & TESTING
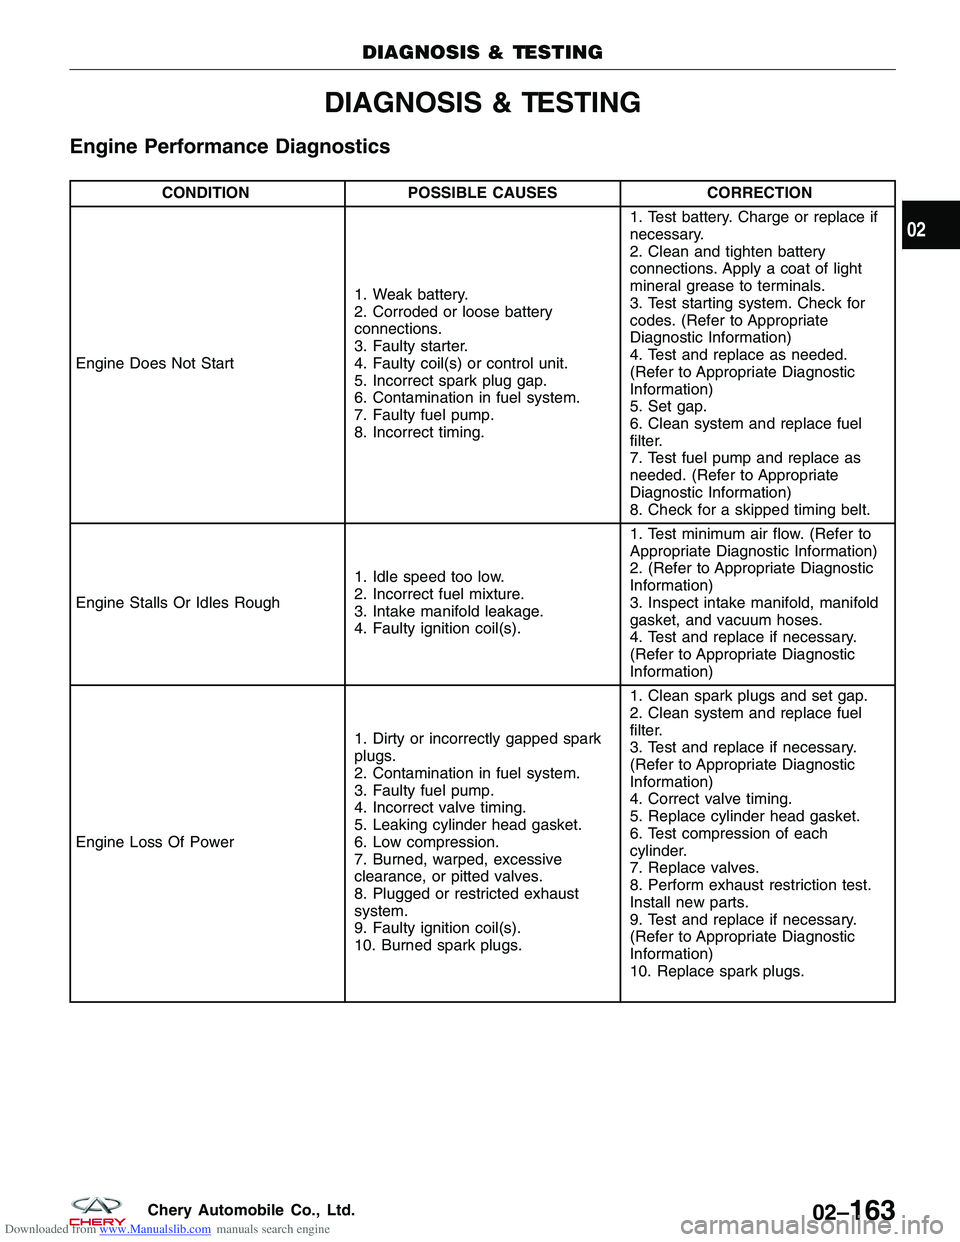
Engine Performance Diagnostics
CONDITIONPOSSIBLE CAUSES CORRECTION
Engine Does Not Start 1. Weak battery.
2. Corroded or loose battery
connections.
3. Faulty starter.
4. Faulty coil(s) or control unit.
5. Incorrect spark plug gap.
6. Contamination in fuel system.
7. Faulty fuel pump.
8. Incorrect timing.1. Test battery. Charge or replace if
necessary.
2. Clean and tighten battery
connections. Apply a coat of light
mineral grease to terminals.
3. Test starting system. Check for
codes. (Refer to Appropriate
Diagnostic Information)
4. Test and replace as needed.
(Refer to Appropriate Diagnostic
Information)
5. Set gap.
6. Clean system and replace fuel
filter.
7. Test fuel pump and replace as
needed. (Refer to Appropriate
Diagnostic Information)
8. Check for a skipped timing belt.
Engine Stalls Or Idles Rough 1. Idle speed too low.
2. Incorrect fuel mixture.
3. Intake manifold leakage.
4. Faulty ignition coil(s).1. Test minimum air flow. (Refer to
Appropriate Diagnostic Information)
2. (Refer to Appropriate Diagnostic
Information)
3. Inspect intake manifold, manifold
gasket, and vacuum hoses.
4. Test and replace if necessary.
(Refer to Appropriate Diagnostic
Information)
Engine Loss Of Power 1. Dirty or incorrectly gapped spark
plugs.
2. Contamination in fuel system.
3. Faulty fuel pump.
4. Incorrect valve timing.
5. Leaking cylinder head gasket.
6. Low compression.
7. Burned, warped, excessive
clearance, or pitted valves.
8. Plugged or restricted exhaust
system.
9. Faulty ignition coil(s).
10. Burned spark plugs.1. Clean spark plugs and set gap.
2. Clean system and replace fuel
filter.
3. Test and replace if necessary.
(Refer to Appropriate Diagnostic
Information)
4. Correct valve timing.
5. Replace cylinder head gasket.
6. Test compression of each
cylinder.
7. Replace valves.
8. Perform exhaust restriction test.
Install new parts.
9. Test and replace if necessary.
(Refer to Appropriate Diagnostic
Information)
10. Replace spark plugs.
DIAGNOSIS & TESTING
02
02–163Chery Automobile Co., Ltd.
Page 193 of 1903
Downloaded from www.Manualslib.com manuals search engine CONDITIONPOSSIBLE CAUSES CORRECTION
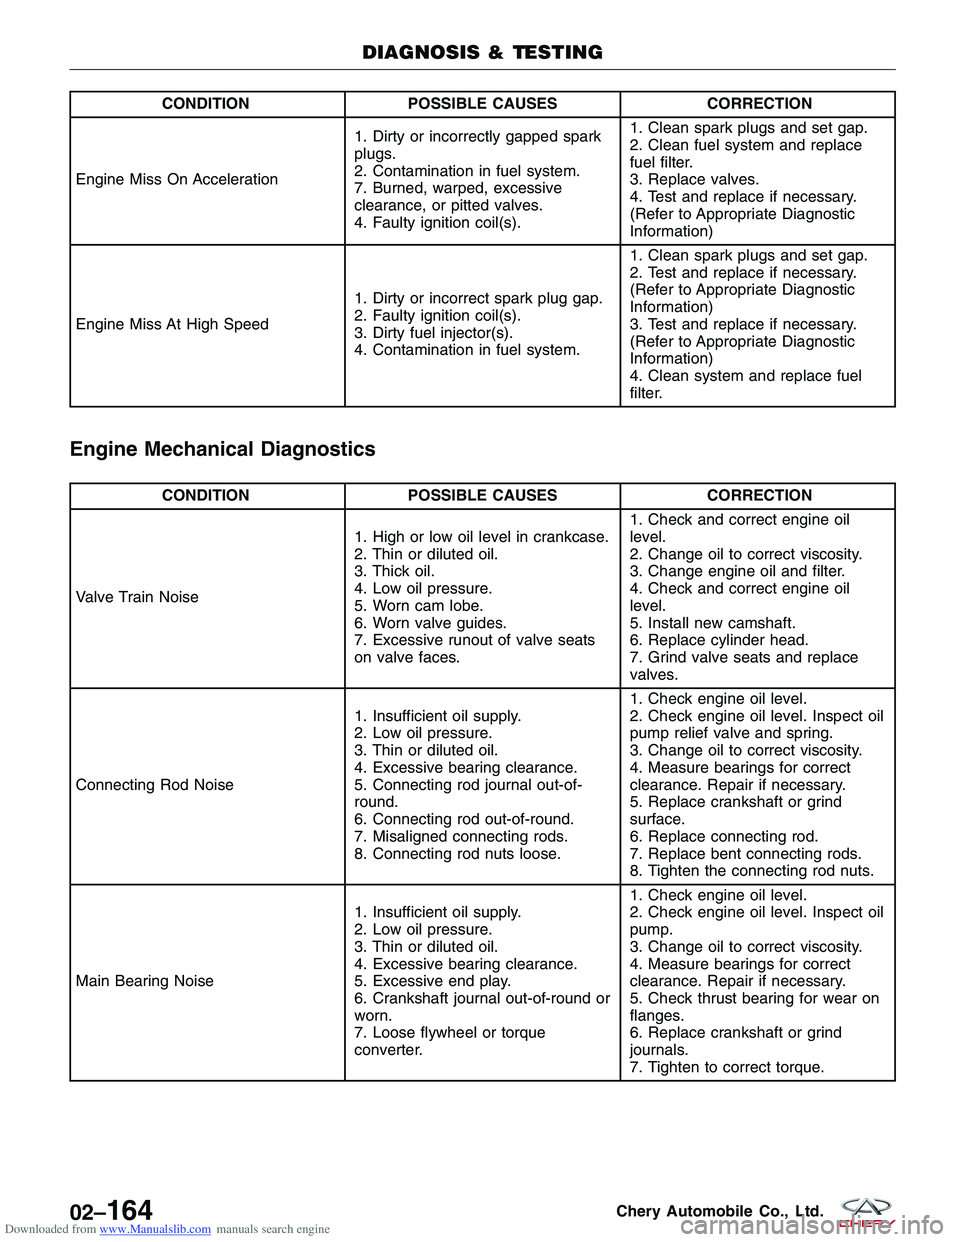
Engine Miss On Acceleration 1. Dirty or incorrectly gapped spark
plugs.
2. Contamination in fuel system.
7. Burned, warped, excessive
clearance, or pitted valves.
4. Faulty ignition coil(s).1. Clean spark plugs and set gap.
2. Clean fuel system and replace
fuel filter.
3. Replace valves.
4. Test and replace if necessary.
(Refer to Appropriate Diagnostic
Information)
Engine Miss At High Speed 1. Dirty or incorrect spark plug gap.
2. Faulty ignition coil(s).
3. Dirty fuel injector(s).
4. Contamination in fuel system.1. Clean spark plugs and set gap.
2. Test and replace if necessary.
(Refer to Appropriate Diagnostic
Information)
3. Test and replace if necessary.
(Refer to Appropriate Diagnostic
Information)
4. Clean system and replace fuel
filter.
Engine Mechanical Diagnostics
CONDITION
POSSIBLE CAUSES CORRECTION
Valve Train Noise 1. High or low oil level in crankcase.
2. Thin or diluted oil.
3. Thick oil.
4. Low oil pressure.
5. Worn cam lobe.
6. Worn valve guides.
7. Excessive runout of valve seats
on valve faces.1. Check and correct engine oil
level.
2. Change oil to correct viscosity.
3. Change engine oil and filter.
4. Check and correct engine oil
level.
5. Install new camshaft.
6. Replace cylinder head.
7. Grind valve seats and replace
valves.
Connecting Rod Noise 1. Insufficient oil supply.
2. Low oil pressure.
3. Thin or diluted oil.
4. Excessive bearing clearance.
5. Connecting rod journal out-of-
round.
6. Connecting rod out-of-round.
7. Misaligned connecting rods.
8. Connecting rod nuts loose.1. Check engine oil level.
2. Check engine oil level. Inspect oil
pump relief valve and spring.
3. Change oil to correct viscosity.
4. Measure bearings for correct
clearance. Repair if necessary.
5. Replace crankshaft or grind
surface.
6. Replace connecting rod.
7. Replace bent connecting rods.
8. Tighten the connecting rod nuts.
Main Bearing Noise 1. Insufficient oil supply.
2. Low oil pressure.
3. Thin or diluted oil.
4. Excessive bearing clearance.
5. Excessive end play.
6. Crankshaft journal out-of-round or
worn.
7. Loose flywheel or torque
converter.1. Check engine oil level.
2. Check engine oil level. Inspect oil
pump.
3. Change oil to correct viscosity.
4. Measure bearings for correct
clearance. Repair if necessary.
5. Check thrust bearing for wear on
flanges.
6. Replace crankshaft or grind
journals.
7. Tighten to correct torque.
DIAGNOSIS & TESTING
02–164Chery Automobile Co., Ltd.
Page 194 of 1903
Downloaded from www.Manualslib.com manuals search engine CONDITIONPOSSIBLE CAUSES CORRECTION
Oil Pressure Drop 1. Low oil level.
2. Faulty oil pressure sending unit.
3. Low oil pressure.
4. Clogged oil filter.
5. Thin or diluted oil.
6. Excessive bearing clearance.1. Check engine oil level.
2. Install new sending unit.
3. Check sending unit and main
bearing oil clearance.
4. Install new oil filter.
5. Change oil to correct viscosity.
6. Measure bearings for correct
clearance.
Oil Leaks 1. Misaligned or deteriorated
gaskets.
2. Loose fastener, broken or porous
metal part.
3. Misaligned or deteriorated cup or
threaded plug.1. Replace gasket.
2. Tighten, repair or replace the part.
3. Replace if necessary.
Oil Consumption Or Spark Plugs
Fouled 1. PCV system malfunction.
2. Worn, scuffed or broken rings.
3. Carbon in oil ring slots.
4. Rings fitted too tightly in grooves.
5. Worn valve guide(s).
6. Valve stem seal(s) worn or
damaged.1. Check system and repair if
necessary.
2. Hone cylinder bores. Install new
rings.
3. Install new rings.
4. Remove rings and check grooves.
If groove is not proper width, replace
piston.
5. Replace cylinder head.
6. Replace seal(s).
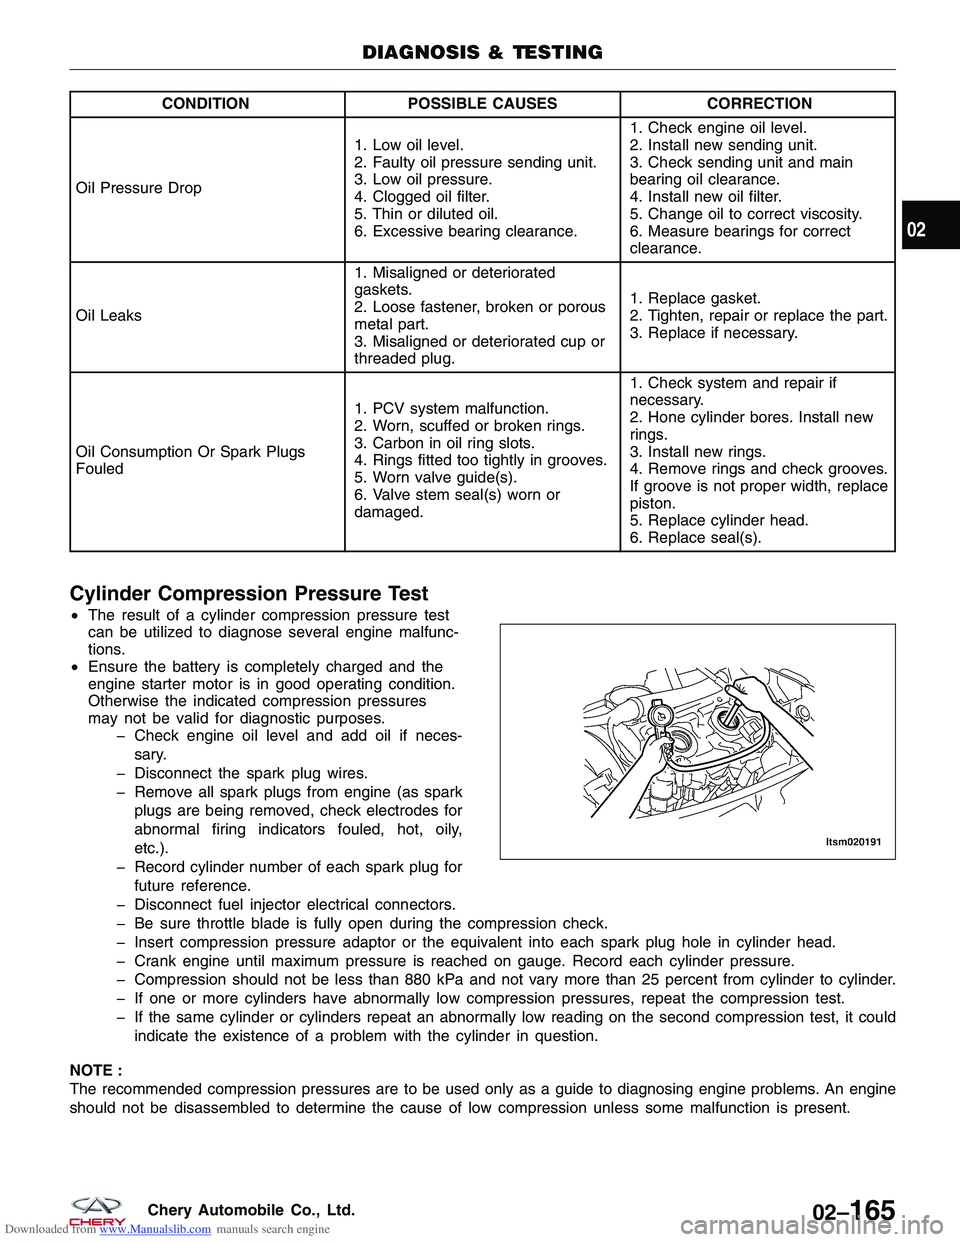
Cylinder Compression Pressure Test
•
The result of a cylinder compression pressure test
can be utilized to diagnose several engine malfunc-
tions.
• Ensure the battery is completely charged and the
engine starter motor is in good operating condition.
Otherwise the indicated compression pressures
may not be valid for diagnostic purposes.
� Check engine oil level and add oil if neces-
sary.
� Disconnect the spark plug wires.
� Remove all spark plugs from engine (as spark plugs are being removed, check electrodes for
abnormal firing indicators fouled, hot, oily,
etc.).
� Record cylinder number of each spark plug for future reference.
� Disconnect fuel injector electrical connectors.
� Be sure throttle blade is fully open during the compression check.
� Insert compression pressure adaptor or the equivalent into each spark plug hole in cylinder head.
� Crank engine until maximum pressure is reached on gauge. Record each cylinder pressure.
� Compression should not be less than 880 kPa and not vary more than 25 percent from cylinder to cylinder.
� If one or more cylinders have abnormally low compression pressures, repeat the compression test.
� If the same cylinder or cylinders repeat an abnormally low reading on the second compression test, it could indicate the existence of a problem with the cylinder in question.
NOTE :
The recommended compression pressures are to be used only as a guide to diagnosing engine problems. An engine
should not be disassembled to determine the cause of low compression unless some malfunction is present.
DIAGNOSIS & TESTING
LTSM020191
02
02–165Chery Automobile Co., Ltd.
Page 838 of 1903

Downloaded from www.Manualslib.com manuals search engine 4.CHECK SECONDARY IGNITION SYSTEM
• Perform the following to test the secondary ignition system:
� Disconnect the injector fuse.
� Remove any of the 4 spark plugs.
� Connect the spark plug to spark plug wire.
� Ground the spark plug on the cylinder block.
� Crank the engine to test the secondary ignition system with the spark plugs removed.
Is a strong blue spark visible at each spark plug while cranking the engine?
Ye s>>Go to the next step.
No
>>Check Camshaft Position (CMP) sensor signal at ECM.
If CMP sensor is OK, check the following:
� Crankshaft Position (CKP) sensor malfunction
� Spark plug wires
� Spark plugs
5.CHECK INTAKE AIR SYSTEM
• Check for MAP/MAF sensor.
Is there any contamination?
Ye s>>Clean or replace the sensor.
No
>>Go to the next step.
6.CHECK EXHAUST SYSTEM
• Check the exhaust system for restrictions.
Is there a restriction in the exhaust system?
Ye s>>Repair as necessary.
No
>>Go to the next step.
7.CHECK BASE ENGINE CONCERNS
• Check for base engine concerns (such as improper compression, worn camshaft/valve train, gasket leaks).
Is a fault indicated?
Ye s>>Repair as necessary.
No
>>Go to the next step.
8.CHECK AUTOMATIC/MANUAL TRANSAXLE OPERATION
• Check the operation of the transaxle.
Is the transaxle operation normal?
Ye s>>Go to the next step.
No
>>Repair as necessary.
ELECTRONIC ENGINE CONTROLS - 2.4L ENGINE SYMPTOM DIAGNOSIS
03–554Chery Automobile Co., Ltd.