wheel torque CHEVROLET ASTRO 1996 Owners Manual
[x] Cancel search | Manufacturer: CHEVROLET, Model Year: 1996, Model line: ASTRO, Model: CHEVROLET ASTRO 1996Pages: 372, PDF Size: 21.51 MB
Page 80 of 372
DRIVE (D): This position is for normal driving. If you
need more power for passing, and you’re:
Going less than about 35 mph (56 km/h), push your
accelerator pedal about halfway down.
Going about 35 mph (56 km/h) or more, push the
accelerator pedal all the way down. You’ll shift
down to
the next gear and have more power.
DRIVE
(D) should be used for normal trailer towing.
THIRD
(3): This position is also used for normal
driving, however it offers more power and lower
fuel
economy than DRIVE (D). You should use THIRD (3)
when carrying a heavy load or driving on steep hills.
SECOND
(2): This position gives you more power but
lower fuel economy.
You can use SECOND (2) on hills.
It can help control your speed
as you go down steep
mountain roads, but
then you would also want to use
your brakes off and on.
If you manually select SECOND
(2)’ the transmission
will drive
in second gear. You may use this feature
for reducing torque to
the rear wheels when you are
trying to start your vehicle from a stop on slippery
road surfaces. FIRST
(1): This
position gives you even more power
(but lower
fuel economy) than SECOND (2). You can .
use it on very steep hills, or in deep snow or mud. If the
selector lever is put
in FIRST (1)’ the transmission
won’t shift
into first gear until the vehicle is going
slowly enough.
NOTICE:
If your rear wheels can’t rotate, don’t try to
drive. This might happen if you were stuck in
very deep sand or mud or were up against
a solid
object. You could damage your transmission or
transfer case or both.
Also, if you stop when going uphill, don’t hold
your vehicle there with only the accelerator
pedal. This could overheat and damage the
transmission. Use your brakes or shift into
PARK
(P) to hold your vehicle in position on
a hill.
2-20
Page 225 of 372
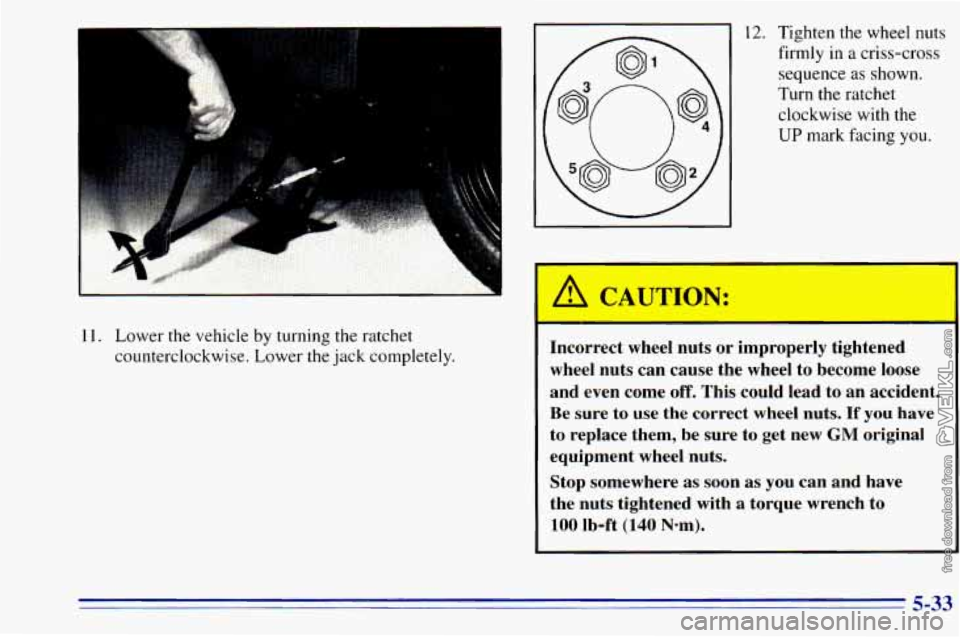
11. Lower the vehicle by turning the ratchet
counterclockwise. Lower
the jack completely.
12. Tighten the wheel nuts
firmly in a criss-cross
sequence as shown.
Turn the ratchet
clockwise with the
UP mark facing you.
A
11 CAUTION:
Incorrect wheel nuts or improperly tightened
wheel nuts can cause the wheel to become loose
and even come
off. This could lead to an accident.
Be sure to use the correct
wheel nuts. If you have
to replace them, be sure to get new
GM original
equipment wheel nuts.
Stop somewhere
as soon as you can and have
the nuts tightened with
a torque wrench to
100 Ib-ft (140 Nom).
I
5-33
Page 226 of 372
NOTICE:
Improperly tightened wheel nuts can lead to
brake pulsation and rotor damage.
To avoid
expensive brake repairs, evenly tighten the wheel
nuts in the proper sequence and to the proper
torque specification.
13. Remove the wheel blocks.
I NOTICE:
Wheel covers won't fit on your compact spare. If
you try to put a wheel cover on your compact
spare, you could damage the cover or the spare. Storing
a jack, a tire or other equipment in the
passenger compartment
of the vehicle could
cause injury. In a sudden stop or collision, loose
equipment could strike someone. Store all these
in the proper place.
5-34
Page 264 of 372
Using the wrong fluid can badly damage
brake system parts. For example, just
a few
drops of mineral-based oil, such as engine
oil, in your brake system can damage brake
system parts
so badly that they’ll have to be
replaced. Don’t let someone put in the
wrong kind of fluid.
If you spill brake fluid on your vehicle’s
painted surfaces, the paint finish can be
damaged. Be careful not to spill brake fluid
on your vehicle.
If you do, wash it off
immediately. See “Appearance Care” in
the Index.
I A CAUTION:
The brake wear warning sound means that
sooner or later your brakes won’t work well.
That could lead to an accident. When you hear
the brake wear warning sound, have your vehicle serviced.
NOTICE:
Continuing to drive with worn-out brake pads
could result
in costly brake repair.
Brake Wear
Your vehicle has front disc brakes and rear drum brakes.
Disc brake pads have built-in wear indicators that make
a high-pitched warning sound when the brake pads are
worn and new pads are needed.
The sound may come and
go or be heard all the time your vehicle
is moving (except
when you are pushing
on the brake pedal firmly). Some driving conditions or climates may cause a brake
squeal when the brakes are first applied or lightly applied.
This does not mean something
is wrong with your brakes.
Free movement
of brake calipers and properly torqued
wheel nuts are necessary to help prevent brake
pulsation. When tires are rotated, inspect brake calipers
for movement, brake pads for wear, and evenly torque
wheel nuts
in the proper sequence to GM specifications.
6-34
Page 274 of 372
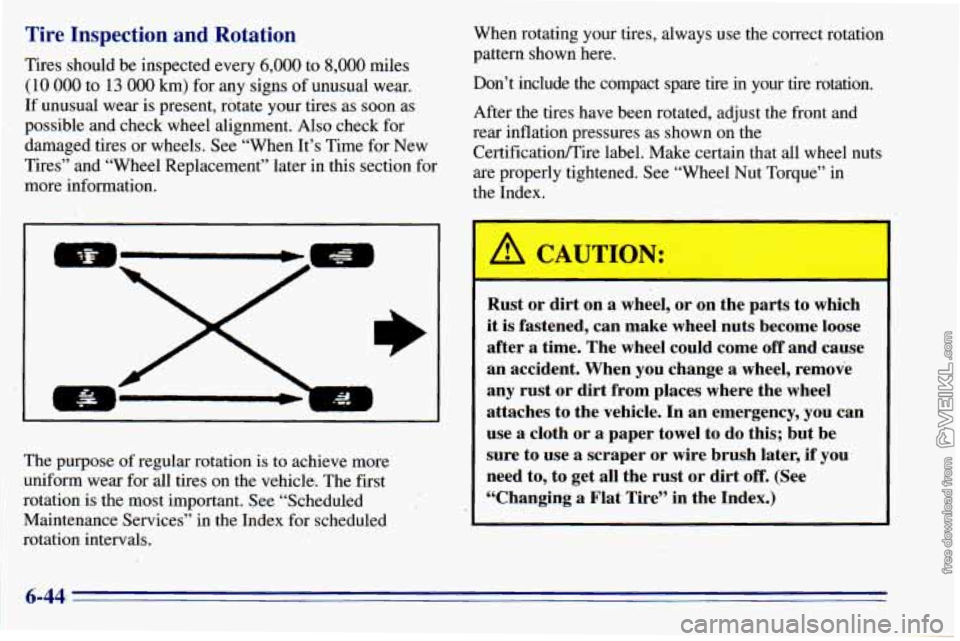
Tire Inspection and Rotation
Tires should be inspected every 6,000 to 8,000 miles
(10 000 to 13 000 km) for any signs of unusual wear.
If unusual wear is present, rotate your tires as soon as
possible and check wheel alignment. Also check for
damaged tires or wheels. See “When It’s Time for New
Tires” and “Wheel Replacement” later in this section for
more information.
The purpose of regular rotation
is to achieve more
uniform wear for all tires on the vehicle. The first
rotation is the most important. See “Scheduled
Maintenance Services” in the Index for scheduled
rotation intervals. When
rotating your tires, always use the correct rotation
pattern shown here.
Don’t include the compact spare tire in your tire rotation. \
After the tires have been rotated, adjust the front and
rear inflation pressures as shown on the
CertificatiodTire label. Make certain that all wheel nuts
are properly tightened. See “Wheel
Nut Torque” in
the Index.
’ A CAUTIO1
Rust or dirt on a wheel, or on the parts to which
it
is fastened, can make wheel nuts become loose
after a time. The wheel could come
off and cause
an accident. When you change a wheel, remove
any rust or dirt from places where the wheel
attaches to the vehicle. In an emergency, you can
use a cloth or a paper towel to do this; but be
sure to use a scraper or wire brush later,
if you
need to, to get all the rust or dirt
off. (See
“Changing
a Flat Tire” in the Index.)
Page 297 of 372
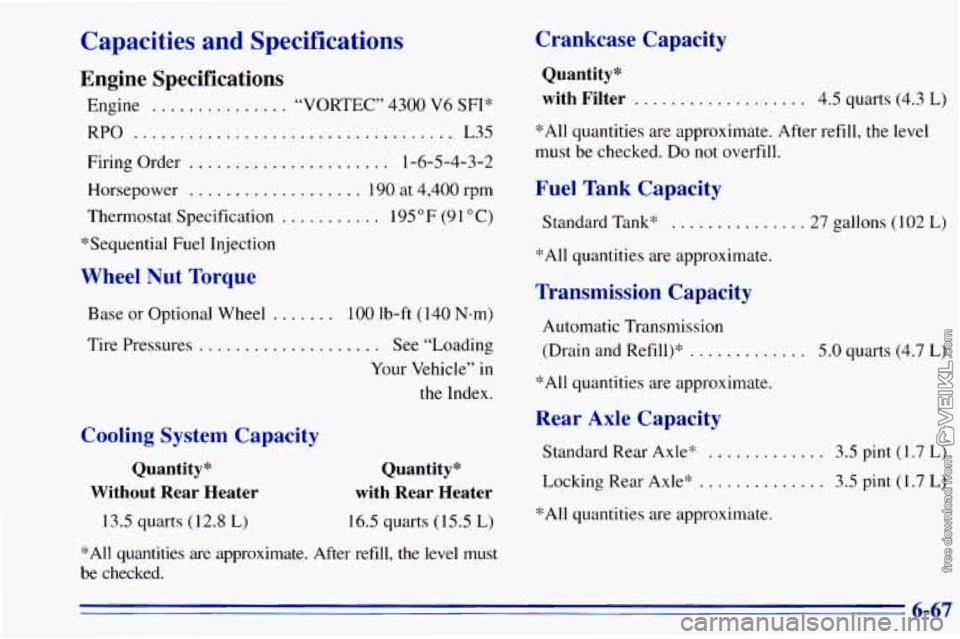
Capacities and Specifications
Engine Specifications
Engine ............... “VORTEC” 4300 V6 SFI‘k
RPO ................................... L35
Firing Order
...................... 1-6-5-4-3-2
Horsepower
................... 190 at 4,400 rpm
Thermostat Specification
......... 195 “F (9 1 O C)
“Sequential Fuel Injection
Wheel Nut Torque
Base or Optional Wheel ....... 100 lb-ft (140 Nem)
Tire Pressures ......... .... See “Loading
Your Vehicle” in
the Index.
Cooling System Capacity
Quantity*
Without Rear Heater
13.5 quarts (12.8 L)
Quantity*
with Rear Heater
16.5 quarts (15.5 L)
*All quantities are approximate. After refill, the level must
be checked.
Crankcase Capacity
Quantity*
with Filter
................... 4.5 quarts (4.3 L)
*All quantities are approximate. After refill, the level
must be checked. Do not overfill.
Fuel Tank Capacity
Standard Tank* ...........
*All quantities are approximate,
Transmission Capacity
Automatic Transmission
(Drain and Refill)“
.........
*All quantities are approximate.
Rear Axle Capacity
Standard Rear Axle* . .
Locking Rear Axle” ..........
*All quantities are approximate.
. . 27 gallons (102 L)
. . 5.0 quarts (4.7 L)
. . 3.5 pint (1.7 L)
3.5 pint (1.7 L)
6-67
Page 369 of 372
Tire Loading ............................... 4-26
Alignment and Balance
........................ 6-47
Buying New
................................. 6-45
Chains
..................................... 6-49
Changing a Flat
.............................. 5-23
Cleaning
.................................... 6-56
Compact Spare
............................... 5-36
Inflation
.................................... 6-43
Inflation Check
............................... 7-41
Inspection and Rotation
........................ 6-44
Loading
.................................... 4-26
Pressure
.................................... 6-43
Temperature
................................. 6-47
Traction
.................................... 6-47
Treadwear
................................... 6-46
Uniform Quality Grading
....................... 6-46
Wear Indicators
.............................. 6-45
When It's Time for New
....................... 6-45
TopStrap
..................................... 1-42
TorqueLock
................................... 2-24
Tire-Loading
Information Label
................... 4-26
Tires
......................................... 6-42
Wheel Replacement
........................... 6-47
Torque. Wheel
Nut ......................... 5-33. 6-67
Towing
a Trailer ................................ 4-29
Towing Your Vehicle
............................. 5-6
Driving on Grades ............................ 4-35
Trailer
Brakes
..................................... 4-33
Drivingwith
................................. 4-33
Hitches
..................................... 4-32
Maintenance When Towing
..................... 4-36
Parking
on Hills .............................. 4-36 Safety
Chains
................................ 4-32
Tongueweight
............................... 4-31
Total Weight on Tires
.......................... 4-32
Towing
..................................... 4-29
Turnsignals
................................. 4-35
Weight
..................................... 4-30
Wiring Harness
............................... 4-37
Transmission Fluid. Automatic
.................... 6-20
Transmitters. Keyless Entry
........................ 2-7
Transportation. Courtesy
.......................... 8-6
Trip Odometer
................................. 2-53
TTY Users
..................................... 8-3
Turn Signal and Lane Change Signals
............... 2-30
Turn Signal/Multifunction Lever
................... 2-29
Turn Signals When Towing
a Trailer ................ 4-35
Two-way Manual Seat
........................... 1-2
Underbody 'Maintenance ....... ........... 6-56
Underhood Electrical Center
...................... 6-64
Vehicle Control
...................................... 4-5
Damage Warnings
.............................. iv
Dimensions ................................. 6-69
Identification Number
......................... 6-59
Loading .................................... 4-26
Storage
..................................... 6-36
Ventilation System
............................... 3-6
Visor Vanity Mirrors
............................ 2-49
Visors. Sun
.................................... 2-49
Voltmeter
................................. 2-55
9-9
Page 370 of 372
warning Devices ........................... 5-1
Warning Lights. Gages and Indicators ............... 2-53
Washer Fluid. Windshield
........................ 6-3 1
Washing Your Vehicle ........................... 6-54
Weatherstrips
.................................. 6-54
Wheel Alignment
.................................. 6-47
Nut Torque
............................. 5-33. 6-67
Replacement
................................. 6-47
Wrench
..................................... 5-25
Windows
..................................... 2-27
Express-Down
............................... 2-28
Power
...................................... 2-27
Swing-Out
.................................. 2-28 Windshield Washer
............................. 2-31
Fluid
....................................... 6-31
Fluid Level Check
............. .............. 7-41
Rear
....................................... 2-32
Windshield Wipers
.............................. 2-31
Blade Replacement
........................... 6-42
Fuses
...................................... 6-60
Rear ....................................... 2-32
Winter Driving
................................. 4-22
Wiring. Headlamp
.............................. 6-60
WreckerTowing
................................. 5-6
Wrench. Wheel
................................. 5-25
9-10