horn CHEVROLET ASTRO 2003 Owners Manual
[x] Cancel search | Manufacturer: CHEVROLET, Model Year: 2003, Model line: ASTRO, Model: CHEVROLET ASTRO 2003Pages: 386, PDF Size: 17.31 MB
Page 84 of 386
Remote Keyless Entry System
Operation
If your vehicle has this feature, you can lock and unlock
your doors from about
3 feet (4 m) up to 30 feet (9 m)
away using the remote keyless entry transmitter supplied
with your vehicle.
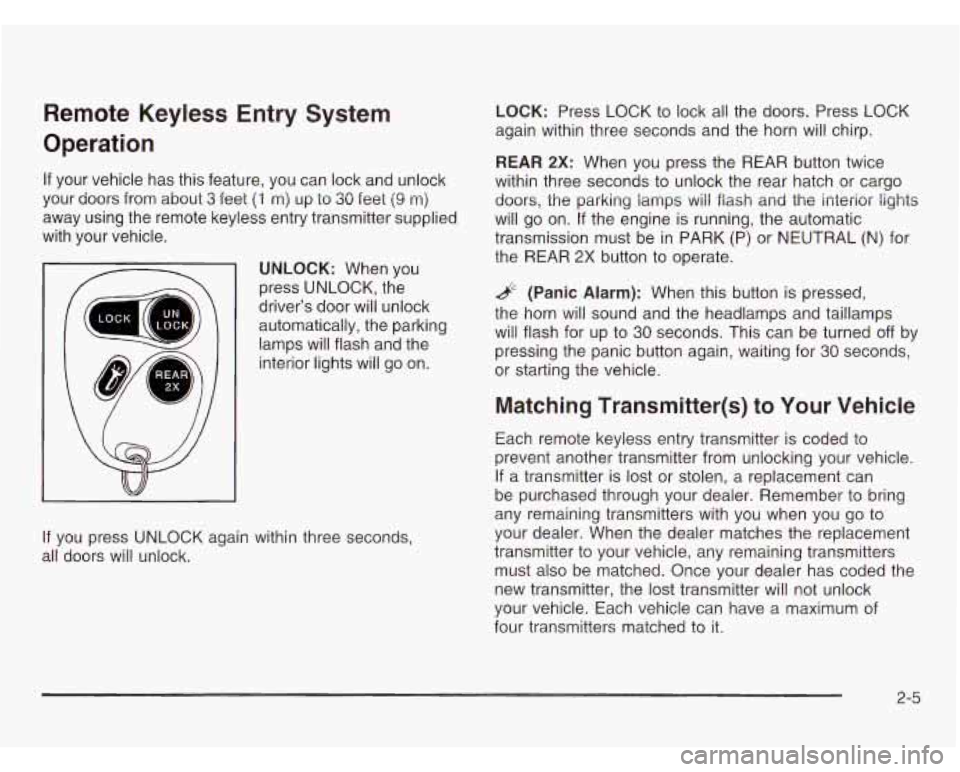
UNLOCK: When you
press UNLOCK, the
driver’s door will unlock
automatically, the parking
lamps will flash and the
interior lights will go on.
If you press UNLOCK again within three seconds,
all doors will unlock.
LOCK: Press LOCK to lock all the doors. Press LOCK
again within three seconds and the horn will chirp.
REAR 2X: When you press the REAR button twice
within three seconds to unlock the rear hatch or cargo
doors, the parking lamps
will flash and the interior lights
will go on. If the engine is running, the automatic
transmission must be in PARK (P) or NEUTRAL (N) for
the REAR
2X button to operate.
& (Panic Alarm): When this button is pressed,
the horn will sound and the headlamps and taillamps
will flash for up to
30 seconds. This can be turned off by
pressing the panic button again, waiting for
30 seconds,
or starting the vehicle.
Matching Transmitter(s) to Your Vehicle
Each remote keyless entry transmitter is coded to
prevent another transmitter from unlocking your vehicle.
If a transmitter is lost or stolen, a replacement can
be purchased through your dealer. Remember to bring
any remaining transmitters with you when you go to
your dealer. When the dealer matches the replacement
transmitter to your vehicle, any remaining transmitters
must also be matched. Once your dealer has coded the
new transmitter, the lost transmitter will not unlock
your vehicle. Each vehicle can have a maximum of
four transmitters matched to
it.
2-5
Page 116 of 386
Continue to press and hold the HomeLink@ button while
you press and release every two seconds (cycle) your
hand-held transmitter until the frequency signal has been
successfully accepted by HomeLink@. The indicator
light will flash slowly at first and then rapidly. Proceed
with Step
4 under “Programming HomeLink@“ to
complete.
Using HomeLink@
Press and hold the appropriate HomeLink@ button for
at least half of a second. The indicator light will come on
while the signal is being transmitted.
Erasing HomeLinP Buttons
To erase programming from the three buttons do the
following:
1. Press and hold down the two outside buttons until
the indicator light begins to flash, after
20 seconds.
2. Release both buttons. Do not hold for longer than
30 seconds.
HomeLink@ is now in the train (learning) mode and can
be programmed at any time beginning with Step
2
under “Programming HomeLink@.”
Individual buttons can not be erased, but they can be
reprogrammed. See “Reprogramming a Single
HomeLink@ Button” next.
Reprogramming a Single HomeLink*
Button
To program a device to HomeLink@ using a HomeLink@
button previously trained, follow these steps:
1. Press and hold the desired HomeLink@ button.
Do not release the button.
2. The indicator light will begin to flash after
20 seconds. While still holding the HomeLink@
button, proceed with Step
2 under “Programming
HomeLink@.”
Resetting Defaults
To reset HomeLink@ to default settings do the following:
1. Hold down the two outside buttons for about
20 seconds until the indicator light begins to flash.
2. Continue to hold both buttons until the HomeLink@
indicator light turns
off.
3. Release both buttons.
For questions or comments, contact HorneLink@
at 1-800-355-3515, or on the internet at
www.homelink.com.
2-37
Page 126 of 386
Section 3 Instrument Panel
Instrument Panel Overview ............................... 3.2
Hazard Warning Flashers
................................ 3-4
Other Warning Devices
................................... 3-5
Horn
............................................................. 3-5
Tilt Wheel
..................................................... 3-5
Turn SignaVMultifunction Lever
......................... 3.6
Exterior Lamps
.......................................... 3.12
Interior Lamps
................................ ....... 3.15
Accessory Power Outlets
............................... 3.16
Ashtrays and Cigarette Lighter
........................ 3.17
Climate Controls ............................................ 3.18
Climate Control System
................................. 3.18
Rear Heating System
................................... -3-1 9
Rear Air Conditioning System ......................... 3.20
Rear Climate Control System
......................... 3.21
Warning Lights, Gages and Indicators ............. 3.23
Instrument Panel Cluster
................................ 3.24
Speedometer and Odometer
........................... 3.25
Safety Belt Reminder Light
............................. 3.26
Air Bag Readiness Light
................................ 3-26
Charging System Light
.................................. 3.27
Voltmeter Gage
........................................... -3-28
Brake System Warning Light
.......................... 3.28 Anti-Lock
Brake System Warning Light
............. 3.29
Engine Coolant Temperature Gage
= = =. ~ = = ~ ~ ~ = i. 3-39
Malfunction Indicator Lamp
............................. 3.30
Oil Pressure Gage
........................................ 3.34
Security Light
.............................................. -3-35
Service All-Wheel Drive Light
......................... 3.35
Tow/Haul Mode Light
......... ................... 3.36
Fuel Gage
................................................... 3.36
Low Fuel Warning Light
................................. 3.37
Audio System@) ............................................. 3.38
Setting the Time for Radios with
the Set Button
.......................................... 3-38
Setting the Time for Radios with
HR and MN Buttons .................................. 3-38
AM-FM Radio
............................................... 3.39
Radio with CD
.............................................. 3-41
Theft-Deterrent Feature
........... ................ 3.47
Understanding Radio Reception
................... 3.50
Care of Your CDs
......................................... 3-50
Care of Your CD Player
................................ 3-50
Fixed Mast Antenna
...................................... 3.50
Check Gages Warning
Light
........................... 3-36
Rear Seat Audio (RSA)
. . .... ............ 3.46
3-
1
Page 130 of 386
Other Warning Devices
If you carry reflective triangles, you can use them to
warn others. Set one up at the side of the road about
300 feet (100 m) behind your vehicle.
Horn
Press the horn symbol in the middle of the steering
wheel to sound the horn.
Tilt Wheel
A tilt steering wheel allows you to adjust the steering
wheel before you drive.
You can also raise it to the
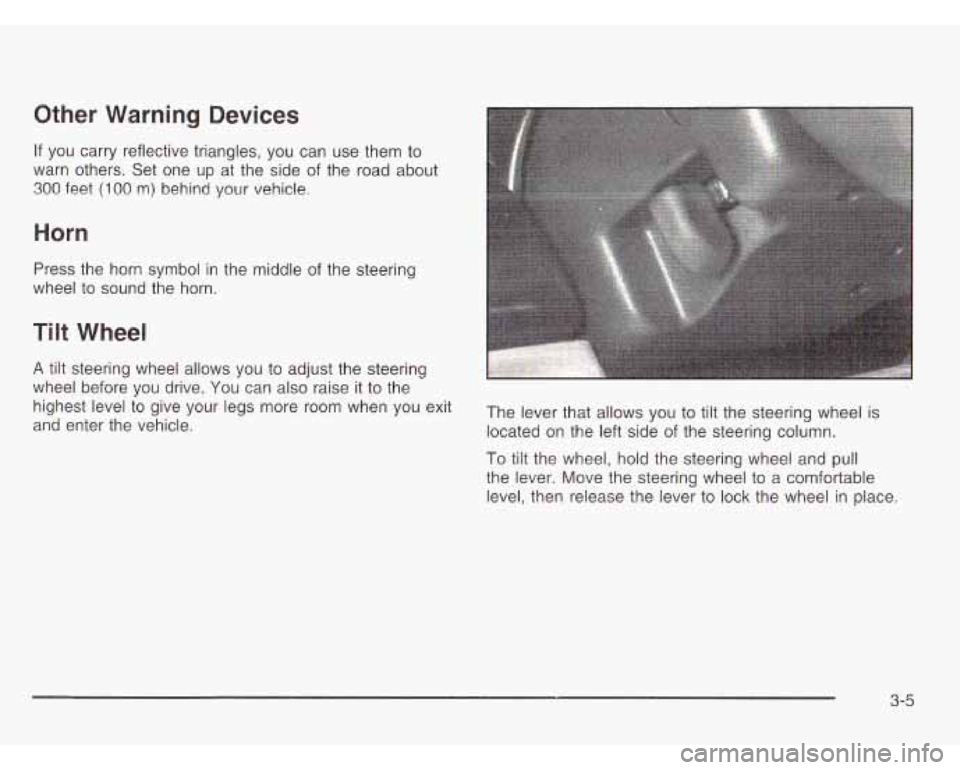
and enter the vehicle. located on the left side of the steering column.
highest
level to give your legs more room when You exit The lever that allows you to tilt the steering wheel is
To tilt the wheel, hold the steering wheel and pull
the lever. Move the steering wheel to a comfortable
level, then release the lever to lock the wheel in place.
3-5
Page 314 of 386
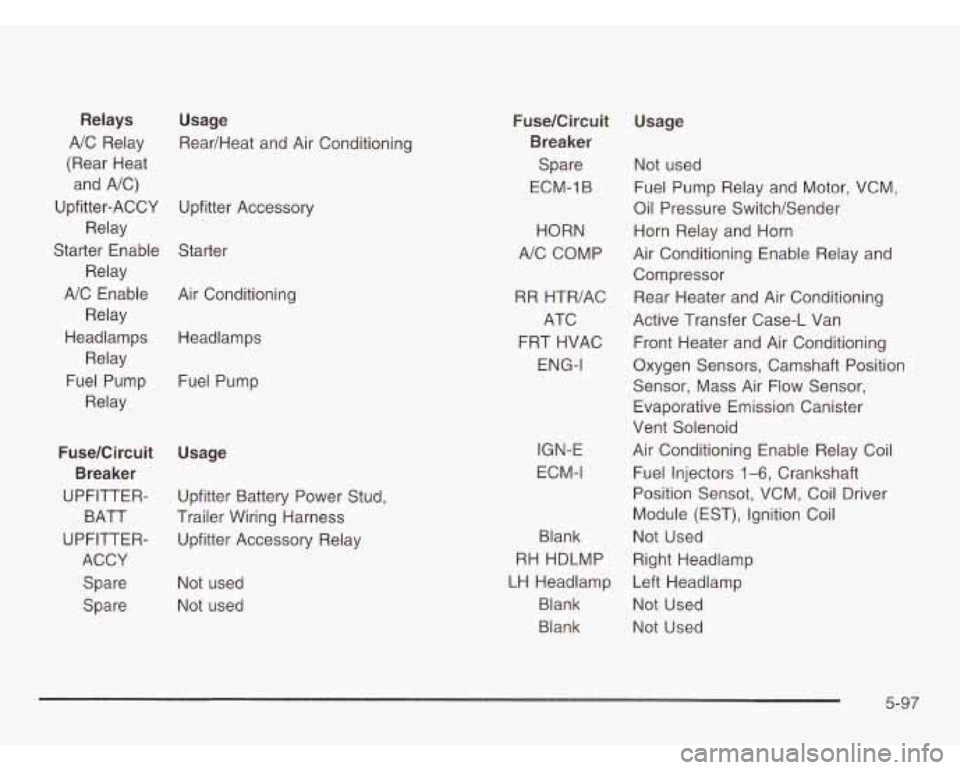
Usage
Rear/Heat and Air Conditioning
Relays
AIC Relay
(Rear Heat
and AIC)
Relay
Relay
A/C Enable
Relay
Upfitter-ACCY
Upfitter Accessory
Starter Enable Starter
Headlamps Relay
Fuel Pump
Relay Air
Conditioning
Headlamps
Fuel Pump
FuselCircuit
Usage
UPFITTER- Upfitter Battery Power Stud,
BATT Trailer Wiring Harness
UPFITTER- Upfitter Accessory Relay
ACCY
Spare Not used
Spare Not used
Breaker FuselCircuit
Breaker
Spare
ECM-1 B
HORN
AIC COMP
RR HTR/AC ATC
FRT HVAC
ENG-I
IGN-E
ECM-I
Blank
RH HDLMP
LH Headlamp
Blank
Blank
Usage
Not used
Fuel Pump Relay and Motor, VCM,
Oil Pressure Switch/Sender
Horn Relay and Horn
Air Conditioning Enable Relay and
Compressor
Rear Heater and Air Conditioning
Active Transfer Case-L Van
Front Heater and Air Conditioning
Oxygen Sensors, Camshaft Position
Sensor, Mass Air Flow Sensor,
Evaporative Emission Canister
Vent Solenoid
Air Conditioning Enable Relay Coil
Fuel Injectors
1-6, Crankshaft
Position Sensot, VCM, Coil Driver
Module (EST), Ignition Coil
Not Used
Right Headlamp
Left Headlamp
Not Used
Not Used
5-97
Page 373 of 386
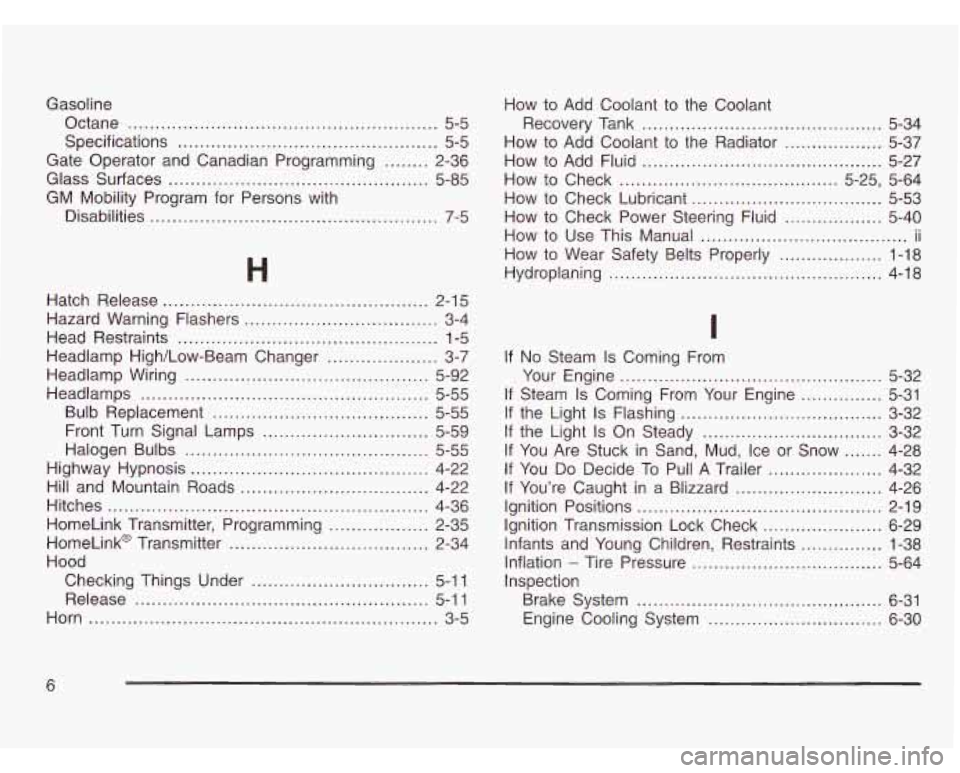
Gasoline Octane
........................................................ 5-5
Specifications
............................................... 5-5
Gate Operator and Canadian Programming
........ 2-36
Glass Surfaces
............................................... 5-85
GM Mobility Program for Persons with
Disabilities
.................................................... 7-5
Hatch R
H
e I' ease ......................... ........ 2-15
Hazard Warning Flashers
............................... 3-4
Head Restraints
............................................... 1-5
Headlamp High/Low-Beam Changer
.................... 3-7
Headlamp Wiring
............................................ 5-92
Headlamps
.................................................... 5-55
Bulb Replacement
.................................... 5-55
Front Turn Signal Lamps
.................. ..... 5-59
Halogen Bulbs
............................ ........ 5-55
Highway Hypnosis
........................................... 4-22
Hill and Mountain Roads
.................................. 4-22
Hitches
.......................................................... 4-36
HomeLink Transmitter, Programming
.................. 2-35
HomeLink@ Transmitter
.................................... 2-34
Hood Checking Things Under
................................ 5-1 1
Release
..................................................... 5-1 1
Horn
............................................................... 3-5 How
to Add Coolant to the Coolant
How to Add Coolant to the Radiator
.................. 5-37
How to Add Fluid
............................................ 5-27
How to Check
........................................ 5-25, 5-64
How to Check Lubricant
................................... 5-53
How to Check Power Steering Fluid
.................. 5-40
How to Use This Manual
...................................... ii
Recovery Tank ........................................ 5-34
How to Wear Safety Belts Properly
................... 1-18
Hydroplaning
.................................................. 4-18
I
If No Steam Is Coming From
Your Engine
............................................ 5-32
If Steam Is Coming From Your Engine ........... 5-31
If the Light
Is Flashing ..................................... 3-32
If the Light
Is On Steady ................................. 3-32
If You Are Stuck in Sand, Mud, Ice or Snow
....... 4-28
If You Do Decide
To Pull A Trailer ..................... 4-32
If You're Caught in a Blizzard ........................... 4-26
Ignition Transmission Lock Check
...................... 6-29
Infants and Young Children, Restraints
............... 1-38
Inflation
- Tire Pressure ................................... 5-64
Inspection Brake System
............................................. 6-31
Engine Cooling System
................................ 6-30
Ignition Positions
............................................. 2-19
6