buttons CHEVROLET ASTRO 2005 User Guide
[x] Cancel search | Manufacturer: CHEVROLET, Model Year: 2005, Model line: ASTRO, Model: CHEVROLET ASTRO 2005Pages: 376, PDF Size: 2.45 MB
Page 163 of 376
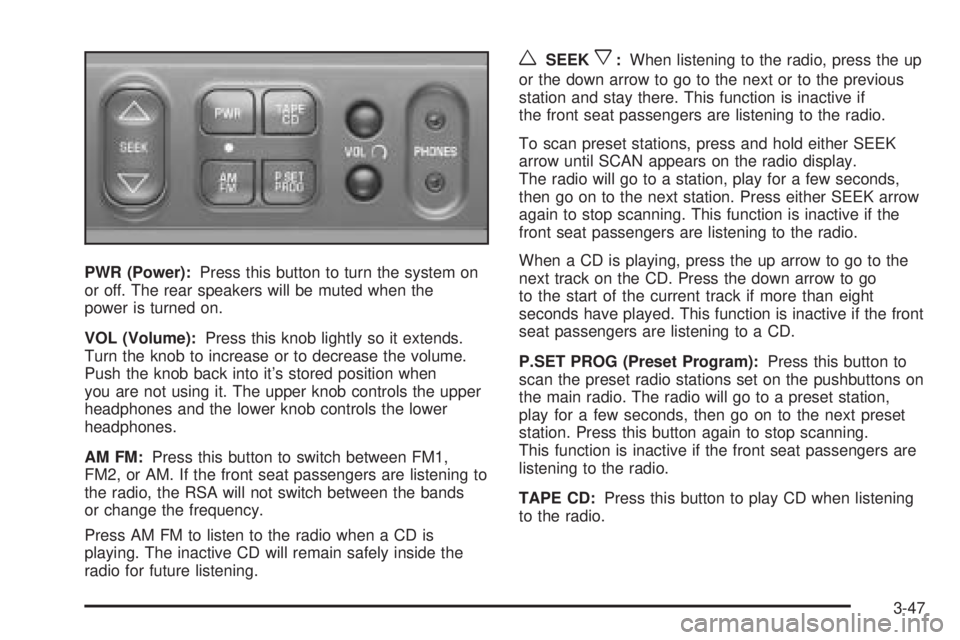
PWR (Power):Press this button to turn the system on
or off. The rear speakers will be muted when the
power is turned on.
VOL (Volume):Press this knob lightly so it extends.
Turn the knob to increase or to decrease the volume.
Push the knob back into it’s stored position when
you are not using it. The upper knob controls the upper
headphones and the lower knob controls the lower
headphones.
AM FM:Press this button to switch between FM1,
FM2, or AM. If the front seat passengers are listening to
the radio, the RSA will not switch between the bands
or change the frequency.
Press AM FM to listen to the radio when a CD is
playing. The inactive CD will remain safely inside the
radio for future listening.
wSEEKx:When listening to the radio, press the up
or the down arrow to go to the next or to the previous
station and stay there. This function is inactive if
the front seat passengers are listening to the radio.
To scan preset stations, press and hold either SEEK
arrow until SCAN appears on the radio display.
The radio will go to a station, play for a few seconds,
then go on to the next station. Press either SEEK arrow
again to stop scanning. This function is inactive if the
front seat passengers are listening to the radio.
When a CD is playing, press the up arrow to go to the
next track on the CD. Press the down arrow to go
to the start of the current track if more than eight
seconds have played. This function is inactive if the front
seat passengers are listening to a CD.
P.SET PROG (Preset Program):Press this button to
scan the preset radio stations set on the pushbuttons on
the main radio. The radio will go to a preset station,
play for a few seconds, then go on to the next preset
station. Press this button again to stop scanning.
This function is inactive if the front seat passengers are
listening to the radio.
TAPE CD:Press this button to play CD when listening
to the radio.
3-47
Page 164 of 376
Theft-Deterrent Feature
THEFTLOCK®is designed to discourage theft of your
vehicle’s radio. It works by using a secret code to
disable all radio functions whenever battery power is
interrupted.
The THEFTLOCK
®feature for the radio may be used or
ignored. If ignored, the radio plays normally and the
radio is not protected by the feature. If THEFTLOCK
®is
activated, the radio will not operate if stolen.
When THEFTLOCK
®is activated, LOC will appear on
the radio display to indicate a locked condition anytime
battery power has been interrupted. If the battery
loses power for any reason, you must unlock the radio
with the secret code before it will operate.
Activating the Theft-Deterrent Feature
The instructions which follow explain how to enter
your secret code to activate the THEFTLOCK®system.
Read through all nine steps before starting the
procedure.If you allow more than 15 seconds to elapse between
any steps, the radio automatically reverts to time
and you must start the procedure over at Step 4.
1. Write down any three or four-digit number
from 000 to 1999 and keep it in a safe place
separate from the vehicle.
2. Turn the ignition on.
3. Turn the radio off.
4. Press the 1 and 4 pushbuttons at the same time.
Hold them down until --- appears on the display.
Next you will use the secret code number which you
have written down.
5. Press MN and 000 will appear on the display.
6. Press MN again to make the last two digits agree
with your code.
7. Press HR to make the �rst one or two digits agree
with your code.
8. Press AM FM after you have con�rmed that the
code matches the secret code you have written
down. REP will appear on the display to indicate
that Steps 5 through 7 need to be repeated to
con�rm your secret code.
9. Press AM FM again. SEC will appear on the display
to indicate that the radio is secure. The LED
indicator by the volume knob will begin �ashing
when the ignition is turned off.
3-48
Page 165 of 376
Unlocking the Theft-Deterrent Feature
After a Power Loss
Enter your secret code as follows; pause no more than
15 seconds between steps:
1. Turn the ignition on. LOC will appear on the
display.
2. Press MN and 000 will appear on the display.
3. Press MN again to make the last two digits agree
with your code.
4. Press HR to make the �rst one or two digits agree
with your code.
5. Press AM FM after you have con�rmed that the
code matches the secret code you have written
down. The display will show SEC, indicating
the radio is now operable and secure.
If you enter the wrong code eight times, INOP will
appear on the display. You will have to wait an hour
with the ignition on before you can try again. When you
try again, you will only have three chances, eight
tries per chance, to enter the correct code before INOP
appears.
If you lose or forget your code, contact your GM dealer.
Disabling the Theft-Deterrent Feature
Enter your secret code as follows; pause no more than
15 seconds between steps:
1. Turn the ignition on.
2. Turn the radio off.
3. Press and hold the 1 and 4 pushbuttons at the
same time until SEC appears on the display.
4. Press MN and 000 will appear on the display.
5. Press MN again to make the last two digits agree
with your code.
6. Press HR to make the �rst one or two digits agree
with your code.
7. Press AM FM after you have con�rmed that the
code matches the secret code you have written
down. --- will appear on the display, indicating that
the radio is no longer secured.
If the code entered is incorrect, SEC will appear on the
display. The radio will remain secured until the correct
code is entered.
When battery power is removed and later applied to a
secured radio, the radio will not turn on and LOC
will appear on the display.
To unlock a secured radio, seeUnlocking the
Theft-Deterrent Feature After a Power Lossearlier in
this section.
3-49
Page 364 of 376
Audio System(s) (cont.)
Setting the Time for Radios with
HR and MN Buttons.................................3-40
Setting the Time for Radios with the
Set Button..............................................3-40
Theft-Deterrent Feature................................3-48
Understanding Radio Reception.....................3-50
Automatic Headlamp System............................3-16
Automatic Transmission
Fluid..........................................................5-23
Operation...................................................2-20
B
Battery..........................................................5-42
Run-Down Protection...................................3-17
Before Leaving on a Long Trip.........................4-20
Bench Seat....................................................1-11
Brake
Anti-Lock Brake System (ABS)........................ 4-7
Emergencies................................................ 4-8
Parking......................................................2-23
System Inspection.......................................6-29
System Warning Light..................................3-28
Brakes..........................................................5-38
Braking........................................................... 4-6
Braking in Emergencies..................................... 4-8
Break-In, New Vehicle.....................................2-16
Bucket Seats, Rear.........................................1-17Bulb Replacement...........................................5-50
Front Turn Signal and Parking Lamps.............5-54
Halogen Bulbs............................................5-50
Replacement Bulbs......................................5-56
Taillamps, Turn Signal, Stoplamps and
Back-up Lamps........................................5-55
Buying New Tires...........................................5-67
C
California Fuel.................................................. 5-6
Canadian Owners................................................ ii
Capacities and Speci�cations..........................5-101
Carbon Monoxide...........................2-26, 4-23, 4-34
Care of
Safety Belts................................................5-87
Your CD Player...........................................3-50
Your CDs ...................................................3-50
Center Rear Passenger Position, Safety Belts.....1-34
Chains, Tire...................................................5-71
Charging System Light....................................3-27
Check
Engine Light...............................................3-30
Gages Warning Light...................................3-35
Checking Things Under the Hood......................5-10
Chemical Paint Spotting...................................5-91
Child Restraints
Child Restraint Systems...............................1-46
Infants and Young Children...........................1-40
2
Page 372 of 376
Q
Questions and Answers About Safety Belts.........1-22
R
Radiator Pressure Cap....................................5-28
Radios..........................................................3-39
AM-FM Radio.............................................3-40
Care of Your CD Player...............................3-50
Care of Your CDs........................................3-50
Radio with CD............................................3-42
Rear Seat Audio..........................................3-46
Setting the Time for Radios with
HR and MN Buttons.................................3-40
Setting the Time for Radios with the
Set Button..............................................3-40
Theft-Deterrent............................................3-48
Understanding Reception..............................3-50
Rear Air Conditioning System...........................3-22
Rear Axle......................................................5-48
Locking........................................................ 4-8
Rear Doors....................................................2-11
Rear Heating System......................................3-21
Rear Safety Belt Comfort Guides......................1-35Rear Seat Audio (RSA)....................................3-46
Rear Seat Operation......................................... 1-7
Rear Seat Passengers, Safety Belts..................1-31
Rearview Mirrors.............................................2-28
Reclining Seatbacks.......................................... 1-4
Recreational Vehicle Towing.............................4-34
Remote Keyless Entry System............................ 2-3
Remote Keyless Entry System, Operation............ 2-4
Removing the Flat Tire and Installing the
Spare Tire..................................................5-76
Removing the Spare Tire and Tools...................5-73
Replacement Bulbs.........................................5-56
Reporting Safety Defects
Canadian Government..................................7-11
General Motors...........................................7-12
United States Government............................7-11
Restraint System Check
Checking Your Restraint Systems...................1-70
Replacing Restraint System Parts
After a Crash..........................................1-71
Restraint Systems
Checking....................................................1-70
Replacing Parts...........................................1-71
Retained Accessory Power (RAP)......................2-18
Right Front Passenger Position, Safety Belts......1-31
10
Page 374 of 376
Setting the Time
Radios with HR and MN Buttons...................3-40
Radios with the Set Button...........................3-40
Sheet Metal Damage.......................................5-91
Shifting Into Park (P).......................................2-24
Shifting Out of Park (P)...................................2-25
Short Trip/City Scheduled Maintenance................ 6-7
Shoulder Belt Height Adjuster...........................1-30
Signals, Turn and Lane-Change.......................... 3-7
Sliding Side Door............................................. 2-8
Spare Tire
Installing....................................................5-76
Removing...................................................5-73
Storing.......................................................5-82
Speci�cations, Capacities...............................5-101
Speedometer..................................................3-25
Starting Your Engine.......................................2-18
Steering.......................................................... 4-9
Steering, Suspension and Front Drive
Axle Boot and Seal Inspection.......................6-28
Steering Wheel, Tilt Wheel................................. 3-6
Storage Areas................................................2-33
Convenience Net.........................................2-38
Luggage Carrier..........................................2-38
Overhead Console.......................................2-35
Stuck in Sand, Mud, Ice or Snow......................4-27
Sun Visors.....................................................2-15T
Taillamps
Turn Signal, Stoplamps and Back-up Lamps....5-55
Theft-Deterrent, Radio.....................................3-48
Theft-Deterrent Systems...................................2-16
Passlock
®...................................................2-16
Throttle System Inspection...............................6-29
Tilt Wheel........................................................ 3-6
Tires.............................................................5-58
Aluminum Wheels, Cleaning..........................5-90
Buying New Tires........................................5-67
Chains.......................................................5-71
Changing a Flat Tire....................................5-72
Cleaning....................................................5-90
Compact Spare Tire.....................................5-84
If a Tire Goes Flat.......................................5-71
In�ation -- Tire Pressure...............................5-64
Inspection and Rotation................................5-65
Installing the Spare Tire................................5-76
Removing the Flat Tire.................................5-76
Removing the Spare Tire and Tools...............5-73
Storing a Flat or Spare Tire and Tools............5-82
Tire Sidewall Labelling..................................5-59
Tire Terminology and De�nitions....................5-61
Uniform Tire Quality Grading.........................5-68
Wheel Alignment and Tire Balance.................5-69
12