CHEVROLET AVALANCHE 2007 2.G Owners Manual
AVALANCHE 2007 2.G
CHEVROLET
CHEVROLET
https://www.carmanualsonline.info/img/24/8018/w960_8018-0.png
CHEVROLET AVALANCHE 2007 2.G Owners Manual
Trending: tire size, spare tire, oil type, roof rack, coolant reservoir, recommended oil, air filter
Page 171 of 618
Center Overhead Console
Your vehicle may have an overhead console
with reading lights and a small storage area.
Press the button next to the light to turn it
on and off.
Front Armrest Storage Area
Your vehicle may have a center armrest storage
compartment in the front bench seat.
To open it, fold down the armrest and press the
latch handle located at the front of the armrest.
Then, let the cover pop up and swing open.
Center Console Storage Area
Your vehicle may have a console compartment
with cupholders between the bucket seats.
To open it, press the button and lift the console
cover open.
The rear of the console has a cupholder that folds
down for the rear seat passenger to use.
Luggage Carrier
The vehicle may have a luggage carrier that can
be used to load things on top of the vehicle.
The luggage carrier has siderails attached to the
roof. It may also have crossrails which can be
moved back and forth to help secure cargo. Tie
the load to the siderails or siderail supports.
Notice:Loading cargo on the luggage carrier
that weighs more than 200 lbs (91 kg) or
hangs over the rear or sides of the vehicle
may damage your vehicle. Load cargo so
that it rests on the slats as far forward
as possible and against the side rails,
making sure to fasten it securely.
Do not exceed the maximum vehicle capacity
when loading your vehicle. For more information
on vehicle capacity and loading, seeLoading
Your Vehicle on page 402.
171
Page 172 of 618
To prevent damage or loss of cargo while you are
driving, check now and then to make sure the
luggage and cargo are still securely fastened.
Be sure the cargo is properly loaded.
If small heavy objects are placed on the roof,
cut a piece of 3/8 inch plywood to �t inside
the crossrails and siderails to spread the load.
Tie the plywood to the siderail supports.
Tie the load to the crossrails or the siderail
supports. Use the crossrails only to keep
the load from sliding. To move a crossrail, turn
the release knobs, on both sides of the rail,
counterclockwise to loosen it. Slide the
crossrail to the desired position balancing the
force side to side. Turn the release knobs,
on both sides of the rail, clockwise to tighten
it. Try to slide the crossrail back and forth
slightly to be sure it is tight.
If you need to carry long items, move the
crossrails as far apart as they will go. Tie
the load to the crossrails and the siderails
or siderail supports. Also tie the load to
the bumpers. Do not tie the load so tightly
that the crossrails or siderails are damaged.
After moving a crossrail, be sure it is securely
locked into the siderail.
Your vehicle has a Center High-Mounted
Stoplamp (CHMSL) located above the rear glass.
If items are loaded on the roof of the vehicle,
care should be taken not to block or damage
the CHMSL unit.
172
Page 173 of 618
Rear Storage Area
Your vehicle has a rear armrest/cupholder for
the rear seat passengers.
To open it, pull up and then out on the tab,
located at the top center of the armrest,
and pull the armrest down.
Cargo Cover Panels
{CAUTION:
Improperly stored cargo cover panels
could be thrown about the vehicle during
a collision or sudden maneuver. You or
others could be injured. If you remove a
panel, always store it in the proper storage
location. When you put it back, always be
sure that is securely reattached.Notice:Exceeding the weight limit of 250 lbs
(113 kg) can damage the cargo covers, and
the repairs would not be covered by your
warranty. Do not put anything on top of the
cargo covers over the weight limit.
Your vehicle may be equipped with a three-piece
cargo cover system. The cargo panels can be
removed and stored in the cargo area of the
vehicle.
173
Page 174 of 618
To remove a cargo panel(s), do the following:
1. Lower the tailgate. SeeTailgate on page 115
for more information on the tailgate.
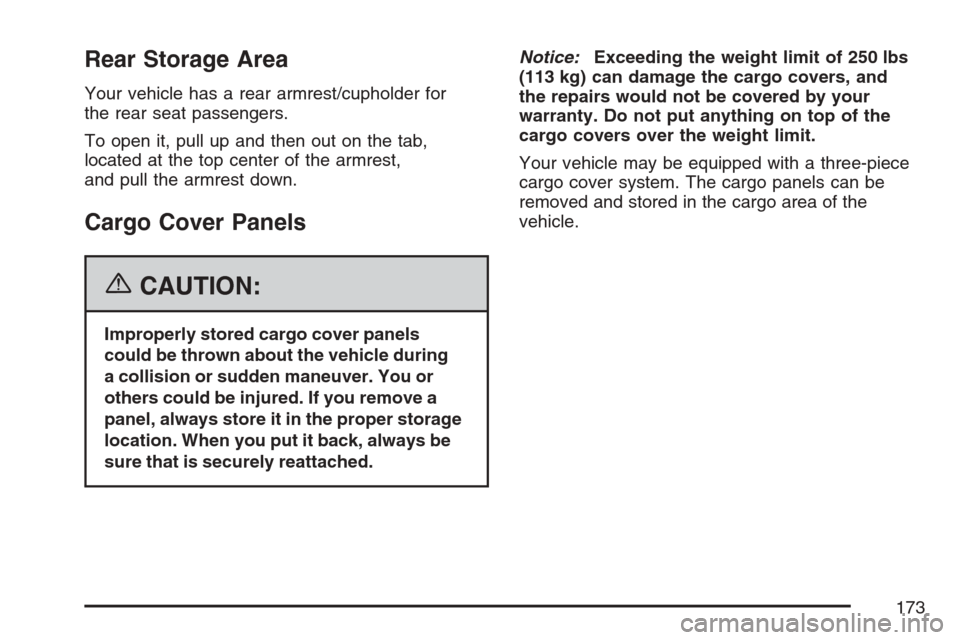
The panels are embossed on the upper center
portion with the numbers 1, 2 and 3. There are
also numbered labels on the bottom of the
panels. The numbers on the top and bottom of
the panels will be used as reference when
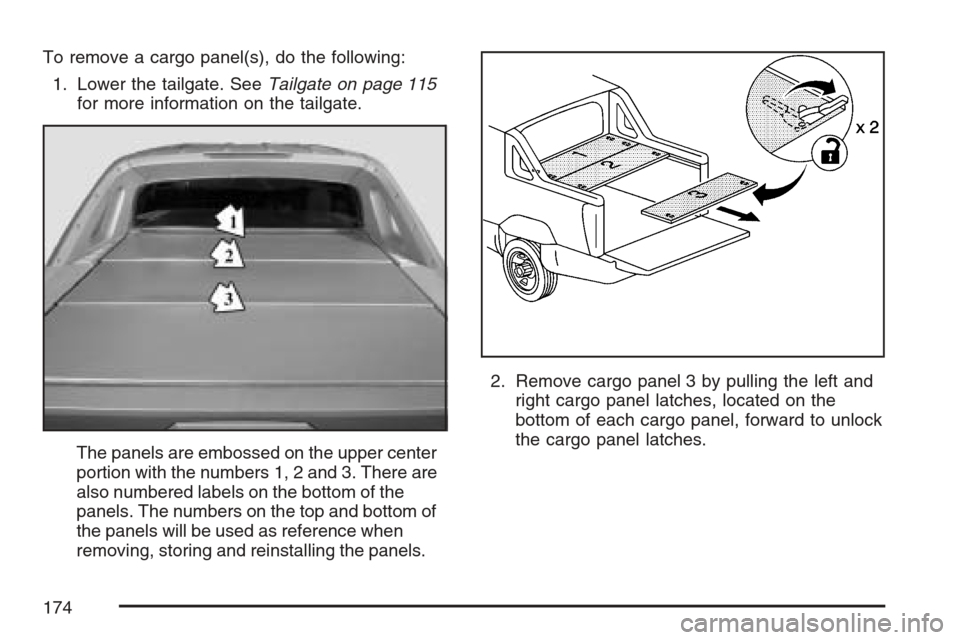
removing, storing and reinstalling the panels.2. Remove cargo panel 3 by pulling the left and
right cargo panel latches, located on the
bottom of each cargo panel, forward to unlock
the cargo panel latches.
174
Page 175 of 618
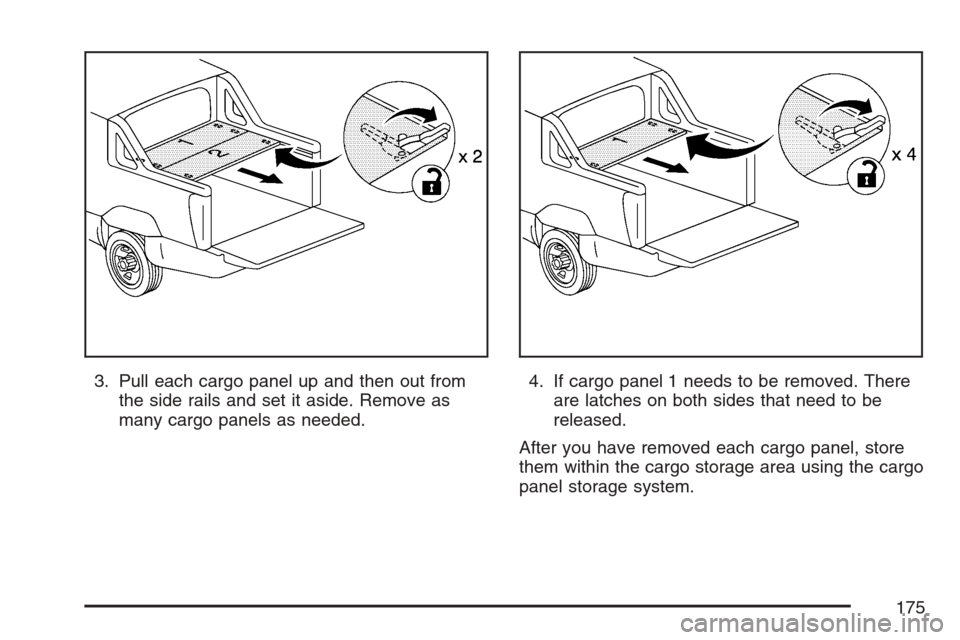
3. Pull each cargo panel up and then out from
the side rails and set it aside. Remove as
many cargo panels as needed.4. If cargo panel 1 needs to be removed. There
are latches on both sides that need to be
released.
After you have removed each cargo panel, store
them within the cargo storage area using the cargo
panel storage system.
175
Page 176 of 618
Cargo Panel Storage System
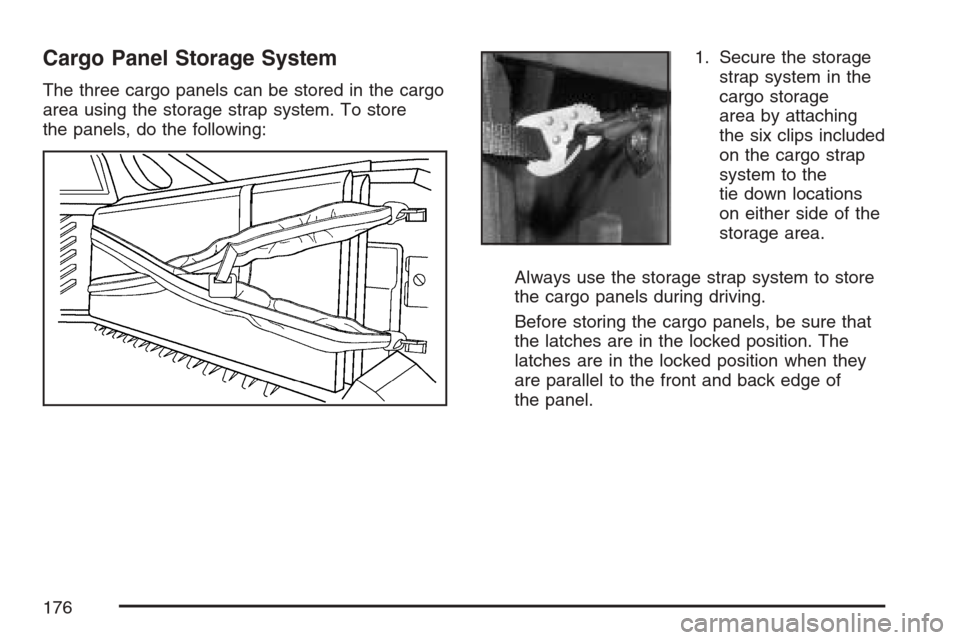
The three cargo panels can be stored in the cargo
area using the storage strap system. To store
the panels, do the following:1. Secure the storage
strap system in the
cargo storage
area by attaching
the six clips included
on the cargo strap
system to the
tie down locations
on either side of the
storage area.
Always use the storage strap system to store
the cargo panels during driving.
Before storing the cargo panels, be sure that
the latches are in the locked position. The
latches are in the locked position when they
are parallel to the front and back edge of
the panel.
176
Page 177 of 618
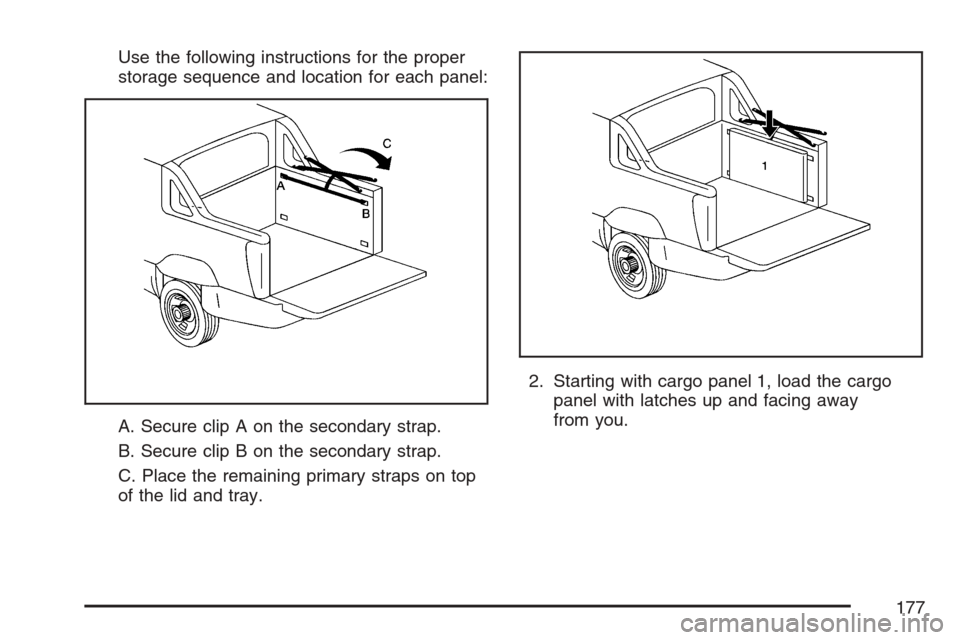
Use the following instructions for the proper
storage sequence and location for each panel:
A. Secure clip A on the secondary strap.
B. Secure clip B on the secondary strap.
C. Place the remaining primary straps on top
of the lid and tray.2. Starting with cargo panel 1, load the cargo
panel with latches up and facing away
from you.
177
Page 178 of 618
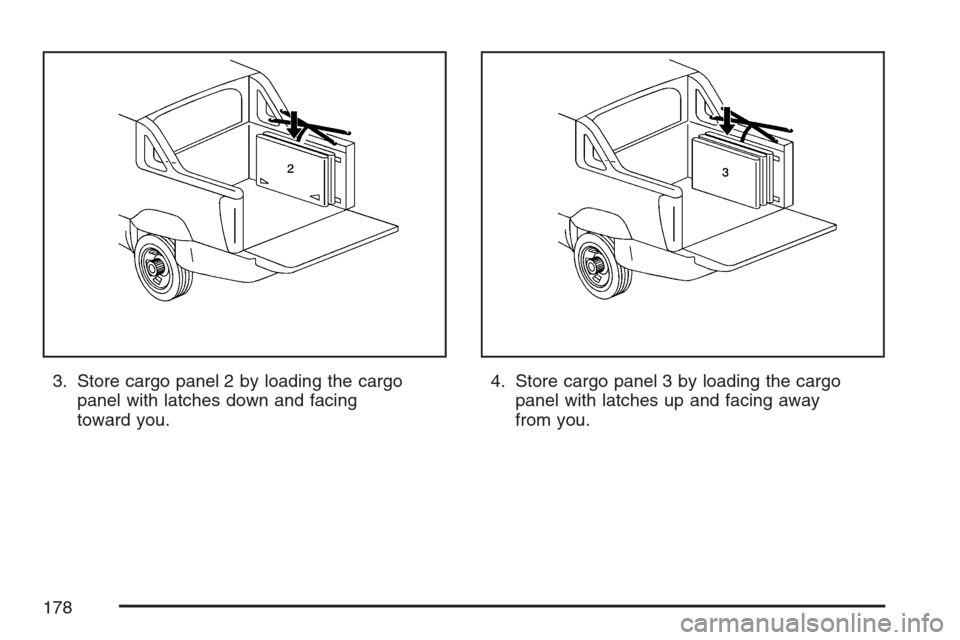
3. Store cargo panel 2 by loading the cargo
panel with latches down and facing
toward you.4. Store cargo panel 3 by loading the cargo
panel with latches up and facing away
from you.
178
Page 179 of 618
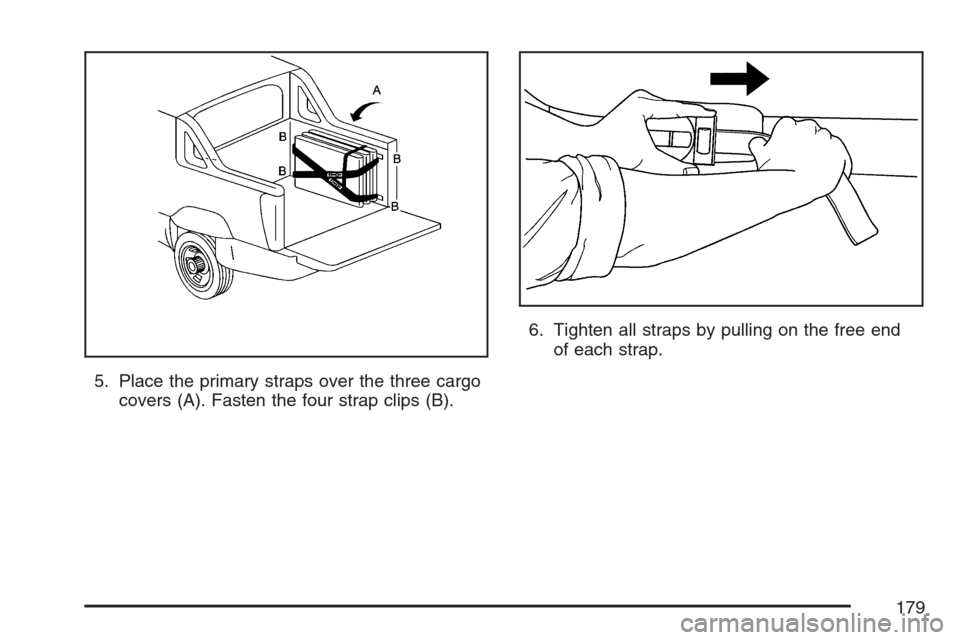
5. Place the primary straps over the three cargo
covers (A). Fasten the four strap clips (B).6. Tighten all straps by pulling on the free end
of each strap.
179
Page 180 of 618
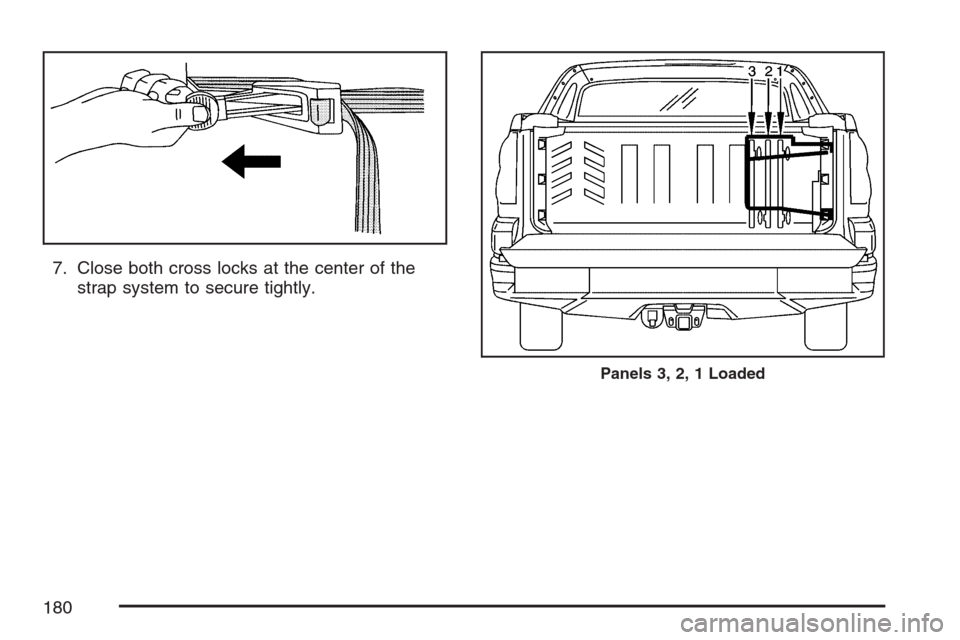
7. Close both cross locks at the center of the
strap system to secure tightly.
Panels 3, 2, 1 Loaded
180
Trending: 4WD, washer fluid, radio antenna, oil dipstick, suspension, service reset, hood release


