tires CHEVROLET AVALANCHE 2011 2.G Owner's Manual
[x] Cancel search | Manufacturer: CHEVROLET, Model Year: 2011, Model line: AVALANCHE, Model: CHEVROLET AVALANCHE 2011 2.GPages: 528, PDF Size: 7.65 MB
Page 300 of 528
Black plate (22,1)Chevrolet Avalanche Owner Manual - 2011
9-22 Driving and Operating
Repeat this until help arrives
but only when you feel really
uncomfortable from the cold.
Moving about to keep warm
also helps.
If it takes some time for help to
arrive, now and then when you run
the engine, push the accelerator
pedal slightly so the engine runs
faster than the idle speed. This
keeps the battery charged to restart
the vehicle and to signal for help
with the headlamps. Do this as little
as possible to save fuel.
If the Vehicle is Stuck
Slowly and cautiously spin the
wheels to free the vehicle when
stuck in sand, mud, ice, or snow.
See“Rocking Your Vehicle to
Get It Out” later in this section.
If the vehicle has a traction system,
it can often help to free a stuck
vehicle. Refer to the vehicle's
traction system in the Index. If stuck too severely for the traction
system to free the vehicle, turn the
traction system off and use the
rocking method.
{WARNING
If the vehicle's tires spin at high
speed, they can explode, and you
or others could be injured. The
vehicle can overheat, causing an
engine compartment fire or other
damage. Spin the wheels as little
as possible and avoid going
above 55 km/h (35 mph).
For information about using tire
chains on the vehicle, see Tire
Chains on page 10‑72.
Rocking the Vehicle to Get
it Out
Turn the steering wheel left and
right to clear the area around the
front wheels. For four-wheel-drive
vehicles with a two‐speed automatic
transfer case, shift into Four‐Wheel
High. For vehicles with StabiliTrak,
turn the traction control part of the
system off. Shift back and forth
between R (Reverse) and a forward
gear, spinning the wheels as little as
possible. To prevent transmission
wear, wait until the wheels stop
spinning before shifting gears.
Page 303 of 528
Black plate (25,1)Chevrolet Avalanche Owner Manual - 2011
Driving and Operating 9-25
The tire and loading information
label shows the number of
occupant seating positions (A),
and the maximum vehicle
capacity weight (B) in kilograms
and pounds.
The Tire and Loading
Information label also shows the
size of the original equipment
tires (C) and the recommended
cold tire inflation pressures (D).
For more information on tires
and inflation seeTires on
page 10‑49 andTire Pressure
on page 10‑58.
There is also important loading
information on the vehicle
Certification/Tire label. It tells
you the Gross Vehicle Weight
Rating (GVWR) and the Gross
Axle Weight Rating (GAWR) for
the front and rear axles. See
“Certification/Tire Label” later in
this section.Steps for Determining Correct
Load Limit
1.
Locate the statement
“The combined weight of
occupants and cargo should
never exceed XXX kg or
XXX lbs” on your vehicle's
placard.
2.Determine the combined
weight of the driver and
passengers that will be riding
in your vehicle.
3.Subtract the combined
weight of the driver and
passengers from XXX kg or
XXX lbs.
4.The resulting figure equals
the available amount of cargo
and luggage load capacity.
For example, if the “XXX”
amount equals 1400 lbs and
there will be five 150 lb
passengers in your vehicle,
the amount of available cargo
and luggage load capacity is
650 lbs (1400−750 (5 x 150)
= 650 lbs).
5.Determine the combined
weight of luggage and cargo
being loaded on the vehicle.
That weight may not safely
exceed the available cargo
and luggage load capacity
calculated in Step 4.
Page 305 of 528
Black plate (27,1)Chevrolet Avalanche Owner Manual - 2011
Driving and Operating 9-27
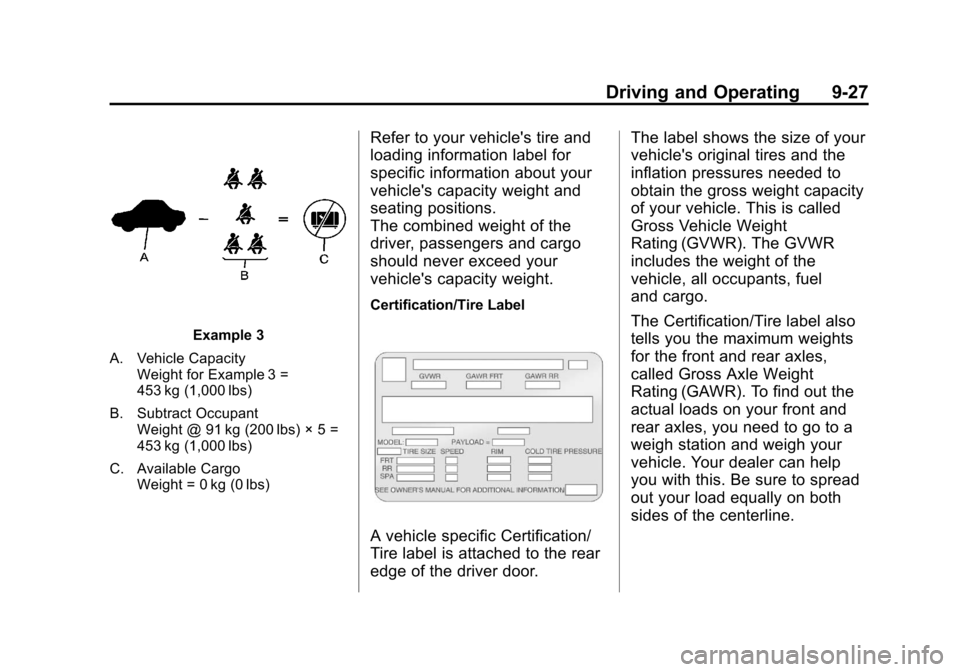
Example 3
A. Vehicle Capacity Weight for Example 3 =
453 kg (1,000 lbs)
B. Subtract Occupant Weight @ 91 kg (200 lbs) × 5 =
453 kg (1,000 lbs)
C. Available Cargo Weight = 0 kg (0 lbs)
Refer to your vehicle's tire and
loading information label for
specific information about your
vehicle's capacity weight and
seating positions.
The combined weight of the
driver, passengers and cargo
should never exceed your
vehicle's capacity weight.
Certification/Tire Label
A vehicle specific Certification/
Tire label is attached to the rear
edge of the driver door. The label shows the size of your
vehicle's original tires and the
inflation pressures needed to
obtain the gross weight capacity
of your vehicle. This is called
Gross Vehicle Weight
Rating (GVWR). The GVWR
includes the weight of the
vehicle, all occupants, fuel
and cargo.
The Certification/Tire label also
tells you the maximum weights
for the front and rear axles,
called Gross Axle Weight
Rating (GAWR). To find out the
actual loads on your front and
rear axles, you need to go to a
weigh station and weigh your
vehicle. Your dealer can help
you with this. Be sure to spread
out your load equally on both
sides of the centerline.
Page 319 of 528
Black plate (41,1)Chevrolet Avalanche Owner Manual - 2011
Driving and Operating 9-41
{WARNING
Shifting into a drive gear while the
engine is running at high speed is
dangerous. Unless your foot is
firmly on the brake pedal, the
vehicle could move very rapidly.
You could lose control and hit
people or objects. Do not shift
into a drive gear while the engine
is running at high speed.
Notice: Shifting out of P (Park) or
N (Neutral) with the engine
running at high speed may
damage the transmission. The
repairs would not be covered by
the vehicle warranty. Be sure the
engine is not running at high
speed when shifting the vehicle. D (Drive):
This position is for
normal driving. It provides the best
fuel economy for the vehicle. If you
need more power for passing, and
you are:
.Going less than about 55 km/h
(35 mph), push the accelerator
pedal about halfway down.
.Going about 55 km/h (35 mph) or
more, push the accelerator all
the way down.
D (Drive) can be used when towing
a trailer, carrying a heavy load,
driving on steep hills, or for off-road
driving. You may want to shift the
transmission to a lower gear
selection if the transmission shifts
too often.
Downshifting the transmission in
slippery road conditions could result
in skidding, see “Skidding”under
Loss of Control on page 9‑6. When temperatures are very cold,
the Hydra-Matic
®automatic
transmission's gear shifting may be
delayed providing more stable shifts
until the engine warms up. Shifts
may be more noticeable with a cold
transmission. This difference in
shifting is normal.
M (Manual Mode): This position
lets drivers select the range of gears
appropriate for current driving
conditions. See “Range Selection
Mode” underManual Mode on
page 9‑42
Notice: Spinning the tires or
holding the vehicle in one place
on a hill using only the
accelerator pedal may damage
the transmission. The repair will
not be covered by the vehicle
warranty. If you are stuck, do not
spin the tires. When stopping on
a hill, use the brakes to hold the
vehicle in place.
Page 353 of 528
Black plate (75,1)Chevrolet Avalanche Owner Manual - 2011
Driving and Operating 9-75
For information on towing the
vehicle behind another vehicle such
as a motor home, seeRecreational
Vehicle Towing on page 10‑93.
Driving Characteristics
and Towing Tips
Pulling a Trailer
Here are some important points:
.There are many different laws,
including speed limit restrictions,
having to do with trailering.
Make sure the rig will be legal,
not only where you live but
also where you will be driving.
A good source for this
information can be state or
provincial police.
.Consider using a sway control.
See “Hitches” inTowing
Equipment on page 9‑84.
.Do not tow a trailer at all during
the first 800 km (500 miles) the
new vehicle is driven. The
engine, axle or other parts could
be damaged.
.Then, during the first 800 km
(500 miles) that a trailer is
towed, do not drive over 80 km/h
(50 mph) and do not make starts
at full throttle. This helps the
engine and other parts of the
vehicle wear in at the heavier
loads.
.Vehicles can tow in D (Drive).
Shift the transmission to a lower
gear if the transmission shifts
too often under heavy loads
and/or hilly conditions. Important considerations that have
to do with weight:
.The weight of the trailer
.The weight of the trailer tongue
.The weight on the vehicle's tires
.And the weight of the trailering
combination
Page 354 of 528
Black plate (76,1)Chevrolet Avalanche Owner Manual - 2011
9-76 Driving and Operating
Driving with a Trailer
{WARNING
When towing a trailer, exhaust
gases may collect at the rear of
the vehicle and enter if the
liftgate, trunk/hatch, or rear-most
window is open.
Engine exhaust contains Carbon
Monoxide (CO) which cannot be
seen or smelled. It can cause
unconsciousness and even death.
To maximize safety when towing
a trailer:
.Have the exhaust system
inspected for leaks and make
necessary repairs before
starting a trip.
.Never drive with the liftgate,
trunk/hatch, or rear-most
window open.(Continued)
WARNING (Continued)
.Fully open the air outlets on
or under the instrument
panel.
.Adjust the Climate Control
system to a setting that
brings in only outside air and
set the fan speed to the
highest setting. See Climate
Control System in the Index.
For more information about
Carbon Monoxide, see Engine
Exhaust on page 9‑38.
Towing a trailer requires a certain
amount of experience. The
combination you are driving is
longer and not as responsive as the
vehicle itself. Get acquainted with
the handling and braking of the rig
before setting out for the open road. Before starting, check all trailer hitch
parts and attachments, safety
chains, electrical connectors,
lamps, tires and mirrors. If the trailer
has electric brakes, start the
combination moving and then apply
the trailer brake controller by hand
to be sure the brakes work.
During the trip, check occasionally
to be sure that the load is secure
and the lamps and any trailer
brakes still work.
Following Distance
Stay at least twice as far behind the
vehicle ahead as you would when
driving the vehicle without a trailer.
This can help to avoid heavy
braking and sudden turns.
Page 361 of 528
Black plate (83,1)Chevrolet Avalanche Owner Manual - 2011
Driving and Operating 9-83
Do not exceed the maximum
allowable tongue weight for the
vehicle. Choose the shortest hitch
extension that will position the hitch
ball closest to the vehicle. This will
help reduce the effect of trailer
tongue weight on the rear axle.
Trailering may be limited by the
vehicle's ability to carry tongue
weight. Tongue or kingpin weight
cannot cause the vehicle to exceed
the GVWR (Gross Vehicle Weight
Rating) or the RGAWR (Rear Gross
Axle Weight Rating). See“Total
Weight on the Vehicle's Tires” later
in this section for more information.
After loading the trailer, weigh the
trailer and then the tongue,
separately, to see if the weights are
proper. If they are not, adjustments
might be made by moving some
items around in the trailer.Total Weight on the Vehicle's
Tires
Be sure the vehicle's tires are
inflated to the inflation pressures
found on the Certification label on
the drivers door or see Vehicle Load
Limits on page 9‑24 for more
information. Make sure not to
exceed the GVWR limit for the
vehicle, or the RGAWR, with the tow
vehicle and trailer fully loaded for
the trip including the weight of the
trailer tongue. If using a weight
distributing hitch, make sure not to
exceed the RGAWR before applying
the weight distribution spring bars.
Weight of the Trailering
Combination
It is important that the combination
of the tow vehicle and trailer
does not exceed any of its weight
ratings —GCWR, GVWR, RGAWR,
Trailer Weight Rating or Tongue
Weight. The only way to be sure it is
not exceeding any of these ratings
is to weigh the tow vehicle and
trailer combination, fully loaded for
the trip, getting individual weights
for each of these items.
Page 373 of 528
Black plate (1,1)Chevrolet Avalanche Owner Manual - 2011
Vehicle Care 10-1
Vehicle Care
General Information
General Information . . . . . . . . . . 10-2
California Proposition65 Warning . . . . . . . . . . . . . . . . . 10-3
California Perchlorate Materials Requirements . . . . 10-3
Accessories and Modifications . . . . . . . . . . . . . . . 10-3
Vehicle Checks
Doing Your OwnService Work . . . . . . . . . . . . . . . 10-4
Hood . . . . . . . . . . . . . . . . . . . . . . . . 10-5
Engine Compartment Overview . . . . . . . . . . . . . . . . . . . 10-6
Engine Oil . . . . . . . . . . . . . . . . . . . 10-8
Engine Oil Life System . . . . . 10-11
Automatic Transmission Fluid . . . . . . . . . . . . . . . . . . . . . . 10-12
Engine Air Cleaner/Filter . . . . 10-16
Cooling System . . . . . . . . . . . . 10-18
Engine Coolant . . . . . . . . . . . . . 10-19
Engine Overheating . . . . . . . . 10-22 Overheated Engine
Protection
Operating Mode . . . . . . . . . . . 10-24
Engine Fan . . . . . . . . . . . . . . . . . 10-25
Power Steering Fluid . . . . . . . 10-25
Washer Fluid . . . . . . . . . . . . . . . 10-26
Brakes . . . . . . . . . . . . . . . . . . . . . 10-27
Brake Fluid . . . . . . . . . . . . . . . . . 10-28
Battery . . . . . . . . . . . . . . . . . . . . . 10-29
Four-Wheel Drive . . . . . . . . . . . 10-30
Front Axle . . . . . . . . . . . . . . . . . . 10-31
Rear Axle . . . . . . . . . . . . . . . . . . 10-32
Starter Switch Check . . . . . . . 10-33
Automatic Transmission Shift Lock Control Function
Check . . . . . . . . . . . . . . . . . . . . . 10-33
Ignition Transmission Lock Check . . . . . . . . . . . . . . . . . . . . . 10-33
Park Brake and P (Park) Mechanism Check . . . . . . . . 10-34
Wiper Blade Replacement . . . . . . . . . . . . . . 10-34
Glass Replacement . . . . . . . . 10-35
Headlamp Aiming
Headlamp Aiming . . . . . . . . . . 10-35
Bulb Replacement
Bulb Replacement . . . . . . . . . . 10-37
Halogen Bulbs . . . . . . . . . . . . . . 10-37
Taillamps, Turn Signal, Sidemarker, Stoplamps,
and Back-Up Lamps . . . . . . 10-38
License Plate Lamp . . . . . . . . 10-39
Replacement Bulbs . . . . . . . . . 10-39
Electrical System
Electrical System Overload . . . . . . . . . . . . . . . . . . 10-40
Fuses and Circuit Breakers . . . . . . . . . . . . . . . . . . 10-41
Engine Compartment Fuse Block . . . . . . . . . . . . . . . . . . . . . 10-41
Instrument Panel Fuse Block . . . . . . . . . . . . . . . . . . . . . 10-46
Wheels and Tires
Tires . . . . . . . . . . . . . . . . . . . . . . . . 10-49
Tire Sidewall Labeling . . . . . . 10-50
Tire Designations . . . . . . . . . . . 10-53
Tire Terminology and
Definitions . . . . . . . . . . . . . . . . 10-55
Tire Pressure . . . . . . . . . . . . . . . 10-58
Tire Pressure Monitor System . . . . . . . . . . . . . . . . . . . 10-59
Page 374 of 528
Black plate (2,1)Chevrolet Avalanche Owner Manual - 2011
10-2 Vehicle Care
Tire Pressure MonitorOperation . . . . . . . . . . . . . . . . . 10-61
Tire Inspection . . . . . . . . . . . . . . 10-64
Tire Rotation . . . . . . . . . . . . . . . 10-64
When It Is Time for New Tires . . . . . . . . . . . . . . . . . . . . . . 10-66
Buying New Tires . . . . . . . . . . . 10-66
Different Size Tires and Wheels . . . . . . . . . . . . . . . . . . . 10-68
Uniform Tire Quality Grading . . . . . . . . . . . . . . . . . . . 10-69
Wheel Alignment and Tire Balance . . . . . . . . . . . . . . . . . . . 10-70
Wheel Replacement . . . . . . . . 10-71
Tire Chains . . . . . . . . . . . . . . . . . 10-72
If a Tire Goes Flat . . . . . . . . . . 10-73
Tire Changing . . . . . . . . . . . . . . 10-75
Secondary Latch System . . . 10-85
Full-Size Spare Tire . . . . . . . . 10-87Jump Starting
Jump Starting . . . . . . . . . . . . . . 10-88
Towing
Towing the Vehicle . . . . . . . . . 10-93
Recreational Vehicle Towing . . . . . . . . . . . . . . . . . . . . 10-93
Appearance Care
Exterior Care . . . . . . . . . . . . . . . 10-98
Interior Care . . . . . . . . . . . . . . . 10-102
Floor Mats . . . . . . . . . . . . . . . . 10-106
General Information
For service and parts needs, visit
your dealer. You will receive
genuine GM parts and GM-trained
and supported service people.
Genuine GM parts have one of
these marks:
Page 399 of 528
Black plate (27,1)Chevrolet Avalanche Owner Manual - 2011
Vehicle Care 10-27
Brakes
This vehicle has disc brakes.
Disc brake pads have built-in wear
indicators that make a high-pitched
warning sound when the brake pads
are worn and new pads are needed.
The sound can come and go or be
heard all the time the vehicle is
moving, except when applying the
brake pedal firmly.
{WARNING
The brake wear warning sound
means that soon the brakes will
not work well. That could lead to
a crash. When the brake wear
warning sound is heard, have the
vehicle serviced.
Notice: Continuing to drive with
worn-out brake pads could result
in costly brake repair. Some driving conditions or climates
can cause a brake squeal when the
brakes are first applied or lightly
applied. This does not mean
something is wrong with the brakes.
Properly torqued wheel nuts are
necessary to help prevent brake
pulsation. When tires are rotated,
inspect brake pads for wear and
evenly tighten wheel nuts in the
proper sequence to torque
specifications in
Capacities and
Specifications on page 12‑2.
Brake linings should always be
replaced as complete axle sets.
Brake Pedal Travel
See your dealer if the brake pedal
does not return to normal height,
or if there is a rapid increase in
pedal travel. This could be a sign
that brake service might be
required.
Brake Adjustment
Every time the brakes are applied,
with or without the vehicle moving,
the brakes adjust for wear.
Replacing Brake System Parts
The braking system on a vehicle is
complex. Its many parts have to be
of top quality and work well together
if the vehicle is to have really good
braking. The vehicle was designed
and tested with top-quality brake
parts. When parts of the braking
system are replaced, be sure to get
new, approved replacement parts.
If this is not done, the brakes might
not work properly. For example,
installing disc brake pads that are
wrong for the vehicle, can change
the balance between the front and
rear brakes —for the worse. The
braking performance expected can
change in many other ways if the
wrong replacement brake parts are
installed.