manual radio set CHEVROLET AVALANCHE 2011 2.G Owners Manual
[x] Cancel search | Manufacturer: CHEVROLET, Model Year: 2011, Model line: AVALANCHE, Model: CHEVROLET AVALANCHE 2011 2.GPages: 528, PDF Size: 7.65 MB
Page 27 of 528
Black plate (21,1)Chevrolet Avalanche Owner Manual - 2011
In Brief 1-21
Storing Radio Stations
A maximum of 36 stations can
be stored as favorites using the
six softkeys located below the radio
station frequency tabs and by using
the radio FAV button. Press FAV to
go through up to six pages of
favorites, each having six favorite
stations available per page.
Each page of favorites can contain
any combination of AM, FM, or
XM stations.
For more information, see“Storing
Radio Stations” inAM-FM Radio on
page 7‑8.
Setting the Clock
To set the time and date for the
radio with CD, DVD, and USB Port:
1. Turn the ignition key to ACC/
ACCESSORY or ON/RUN, then
press
O, to turn the radio on.
2. Press
Hto display HR,
MIN, MM, DD, and YYYY
(hour, minute, month, day,
and year).
3. Press the softkey located under any one of the labels to be
changed.
4. To increase or decrease the time or date, turn
fclockwise or
counter‐clockwise.
For detailed instructions on setting
the clock for the vehicle's specific
audio system, see Clock on
page 5‑8.
Satellite Radio
XM is a satellite radio service
that is based in the 48 contiguous
United States and 10 Canadian
provinces. XM satellite radio has a
wide variety of programming and
commercial-free music, coast to
coast, and in digital-quality sound.
A fee is required to receive the
XM service.
For more information, refer to:
.www.xmradio.com or call
1-800-929-2100 (U.S.)
.www.xmradio.ca or call
1-877-438-9677 (Canada)
See “XM Satellite Radio Service”
under Satellite Radio on page 7‑9.
Page 29 of 528
Black plate (23,1)Chevrolet Avalanche Owner Manual - 2011
In Brief 1-23
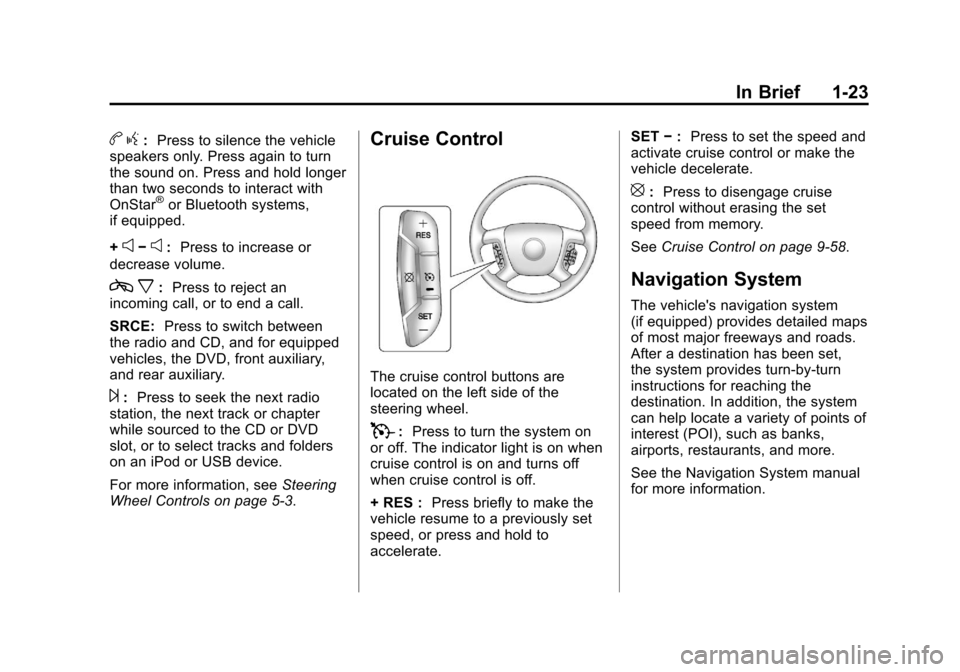
bg: Press to silence the vehicle
speakers only. Press again to turn
the sound on. Press and hold longer
than two seconds to interact with
OnStar
®or Bluetooth systems,
if equipped.
+
e−e: Press to increase or
decrease volume.
c x:Press to reject an
incoming call, or to end a call.
SRCE: Press to switch between
the radio and CD, and for equipped
vehicles, the DVD, front auxiliary,
and rear auxiliary.
¨: Press to seek the next radio
station, the next track or chapter
while sourced to the CD or DVD
slot, or to select tracks and folders
on an iPod or USB device.
For more information, see Steering
Wheel Controls on page 5‑3.
Cruise Control
The cruise control buttons are
located on the left side of the
steering wheel.
T: Press to turn the system on
or off. The indicator light is on when
cruise control is on and turns off
when cruise control is off.
+ RES : Press briefly to make the
vehicle resume to a previously set
speed, or press and hold to
accelerate. SET
−: Press to set the speed and
activate cruise control or make the
vehicle decelerate.
[: Press to disengage cruise
control without erasing the set
speed from memory.
See Cruise Control on page 9‑58.
Navigation System
The vehicle's navigation system
(if equipped) provides detailed maps
of most major freeways and roads.
After a destination has been set,
the system provides turn-by-turn
instructions for reaching the
destination. In addition, the system
can help locate a variety of points of
interest (POI), such as banks,
airports, restaurants, and more.
See the Navigation System manual
for more information.
Page 54 of 528
Black plate (18,1)Chevrolet Avalanche Owner Manual - 2011
2-18 Keys, Doors and Windows
If you set off the alarm by accident,
press unlock on the RKE transmitter
or place the key in the ignition and
turn it to START to turn off the
alarm. The alarm will not stop if you
try to unlock a door any other way.
Testing the Alarm
To test the alarm:
1. From inside the vehicle, lowerthe driver window and open the
driver door.
2. Activate the system by locking the doors with the
power door lock switch while
the door is open, or with the
RKE transmitter.
3. Get out of the vehicle, close the door and wait for the security
light to go out.
4. Then reach in through the window, unlock the door with the
manual door lock and open the
door. This should set off the
alarm. While the alarm is set, the power
door unlock switch will not work.
If the alarm does not sound when it
should but the headlamps flash,
check to see if the horn works. The
horn fuse may be blown. To replace
the fuse, see
Instrument Panel Fuse
Block on page 10‑46 andEngine
Compartment Fuse Block on
page 10‑41.
If the alarm does not sound or the
headlamps do not flash, the vehicle
should be serviced by your dealer.
Immobilizer
See Radio Frequency Statement on
page 13‑19 for information
regarding Part 15 of the Federal
Communications Commission (FCC)
rules and Industry Canada
Standards RSS-210/220/310.
Immobilizer Operation
This vehicle has PASS-Key®III+
(Personalized Automotive Security
System) theft-deterrent system.
PASS-Key III+ is a passive
theft-deterrent system.
The system is automatically armed
when the key is removed from the
ignition.
The system is automatically
disarmed when the key is turned to
ON/RUN, ACC/ACCESSORY,
or START from the LOCK/OFF
position.
You do not have to manually arm or
disarm the system.
The security light will come on if
there is a problem with arming or
disarming the theft-deterrent
system.
When the PASS-Key III+ system
senses that someone is using
the wrong key, it prevents the
vehicle from starting.
Page 149 of 528
Black plate (3,1)Chevrolet Avalanche Owner Manual - 2011
Instruments and Controls 5-3
Steering Wheel Controls
If equipped, some audio controls
can be adjusted at the steering
wheel.
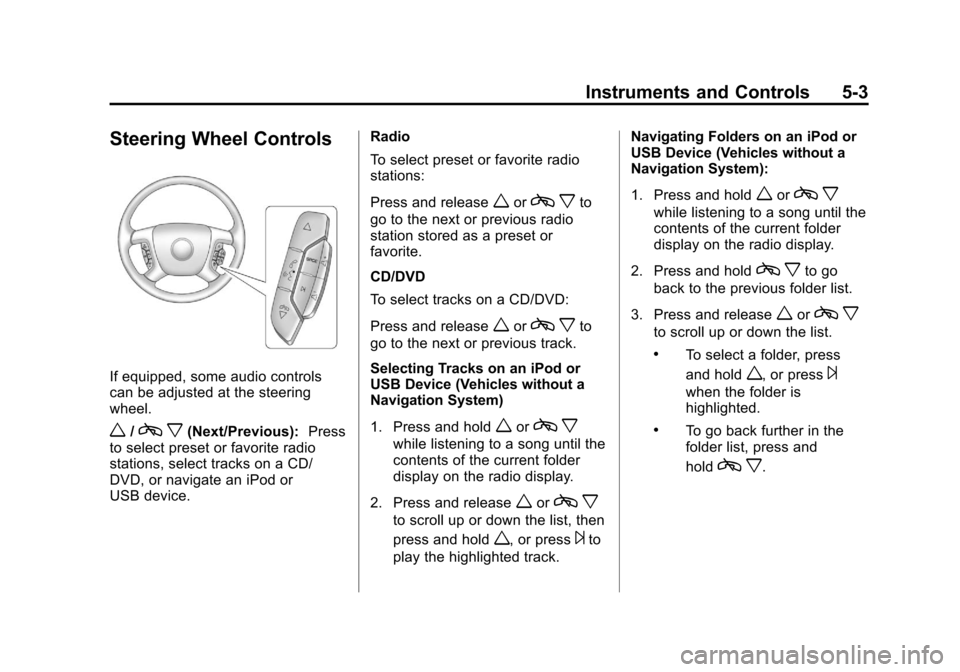
w/cx(Next/Previous): Press
to select preset or favorite radio
stations, select tracks on a CD/
DVD, or navigate an iPod or
USB device. Radio
To select preset or favorite radio
stations:
Press and release
worc
xto
go to the next or previous radio
station stored as a preset or
favorite.
CD/DVD
To select tracks on a CD/DVD:
Press and release
worc xto
go to the next or previous track.
Selecting Tracks on an iPod or
USB Device (Vehicles without a
Navigation System)
1. Press and hold
worc x
while listening to a song until the
contents of the current folder
display on the radio display.
2. Press and release
worc x
to scroll up or down the list, then
press and hold
w, or press¨to
play the highlighted track. Navigating Folders on an iPod or
USB Device (Vehicles without a
Navigation System):
1. Press and hold
worc
x
while listening to a song until the
contents of the current folder
display on the radio display.
2. Press and hold
c xto go
back to the previous folder list.
3. Press and release
worc x
to scroll up or down the list.
.To select a folder, press
and hold
w, or press¨
when the folder is
highlighted.
.To go back further in the
folder list, press and
hold
cx.
Page 151 of 528
Black plate (5,1)Chevrolet Avalanche Owner Manual - 2011
Instruments and Controls 5-5
For vehicles with a navigation
system:
1. Press and hold
¨until a beep is
heard, to place the radio into
SCAN mode. A station will play
for five seconds before moving
to the next station.
2. To stop the SCAN function, press
¨again.
While listening to a CD/DVD, press
and hold
¨to quickly move forward
through the tracks. Release to stop
on the desired track.
+
e−e(Volume): Press to
increase or to decrease the volume.
Horn
To sound the horn, press the center
pad on the steering wheel.
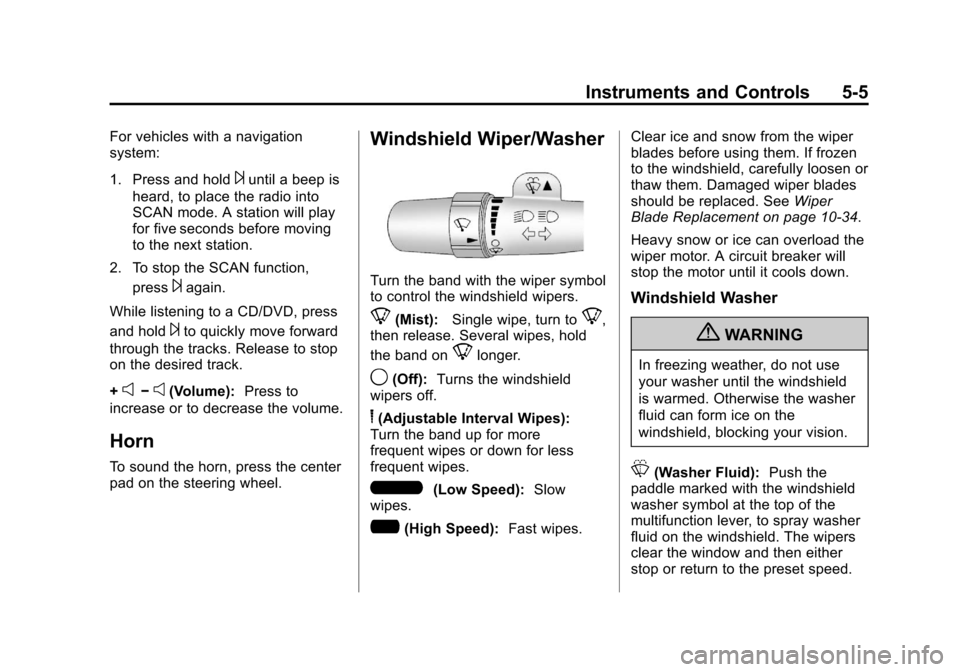
Windshield Wiper/Washer
Turn the band with the wiper symbol
to control the windshield wipers.
8(Mist): Single wipe, turn to8,
then release. Several wipes, hold
the band on
8longer.
9(Off): Turns the windshield
wipers off.
6(Adjustable Interval Wipes):
Turn the band up for more
frequent wipes or down for less
frequent wipes.
6(Low Speed): Slow
wipes.
?(High Speed): Fast wipes. Clear ice and snow from the wiper
blades before using them. If frozen
to the windshield, carefully loosen or
thaw them. Damaged wiper blades
should be replaced. See
Wiper
Blade Replacement on page 10‑34.
Heavy snow or ice can overload the
wiper motor. A circuit breaker will
stop the motor until it cools down.
Windshield Washer
{WARNING
In freezing weather, do not use
your washer until the windshield
is warmed. Otherwise the washer
fluid can form ice on the
windshield, blocking your vision.
L(Washer Fluid): Push the
paddle marked with the windshield
washer symbol at the top of the
multifunction lever, to spray washer
fluid on the windshield. The wipers
clear the window and then either
stop or return to the preset speed.
Page 154 of 528
Black plate (8,1)Chevrolet Avalanche Owner Manual - 2011
5-8 Instruments and Controls
3. Press the set/reset button tostart the compass calibration.
Or, if the vehicle does not have
DIC buttons, press and hold the
trip odometer reset stem for
two seconds to start the
compass calibration.
4. The DIC will display CALIBRATING: DRIVE IN
CIRCLES. Drive the vehicle in
tight circles at less than
8 km/h (5 mph) to complete the
calibration. The DIC will display
CALIBRATION COMPLETE for
a few seconds when the
calibration is complete.
The DIC display will then
return to the previous menu.Clock
To set the time and date:
1. Turn the ignition key to ACC/ACCESSORY or ON/RUN, then
press the
Obutton to turn the
radio on.
2. Press the
Hbutton to display
HR, MIN, MM, DD, YYYY (hour,
minute, month, day, and year).
3. Press the softkey located under any one of the tabs to change
that setting.
4. To increase the time or date, do one of the following:
.Press the softkey below the
selected tab.
.Press the¨SEEK button.
.Press the\FWD button.
.Turn thefknob clockwise. 5. To decrease the time or date, do
one of the following:
.Press the©SEEK button.
.Press thesREV button.
.Turn thefknob
counterclockwise.
To change the time default setting
from 12 hour to 24 hour or to change
the date default setting from
month/day/year to day/month/year:
1. Press the
Hbutton and then
the softkey located below the
forward arrow tab. 12H, 24H, the
date MM/DD (month and day),
and DD/MM/ (day and month)
displays.
2. Press the softkey located below the desired option.
3. Press the
Hbutton again to
apply the desired option, or let
the screen time out.
Page 202 of 528
Black plate (56,1)Chevrolet Avalanche Owner Manual - 2011
5-56 Instruments and Controls
EXIT FEATURE SETTINGS
This feature allows you to exit the
feature settings menu.
Press the customization button until
PRESS
VTO EXIT FEATURE
SETTINGS appears in the DIC
display. Press the set/reset button
once to exit the menu.
If you do not exit, pressing the
customization button again will
return you to the beginning of the
feature settings menu.
Exiting the Feature
Settings Menu
The feature settings menu will be
exited when any of the following
occurs:
.The vehicle is no longer in
ON/RUN.
.The trip/fuel or vehicle
information DIC buttons are
pressed.
.The end of the feature settings
menu is reached and exited.
.A 40 second time period has
elapsed with no selection made.
Universal Remote
System
See Radio Frequency Statement on
page 13‑19 for information
regarding Part 15 of the Federal
Communications Commission (FCC)
rules and Industry Canada
Standards RSS-210/220/310.
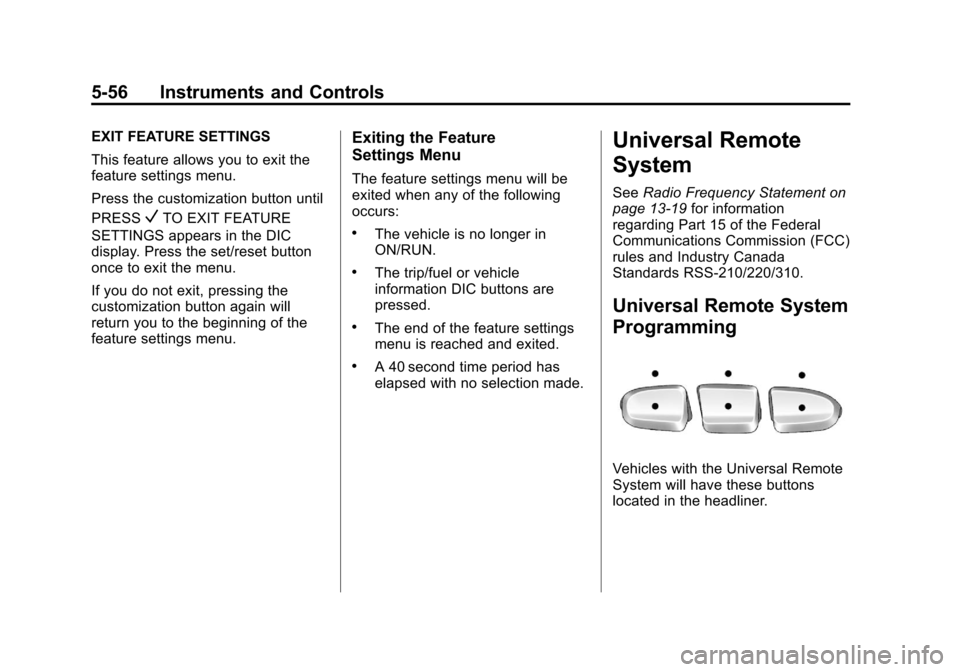
Universal Remote System
Programming
Vehicles with the Universal Remote
System will have these buttons
located in the headliner.
Page 218 of 528
Black plate (2,1)Chevrolet Avalanche Owner Manual - 2011
7-2 Infotainment System
Introduction
Determine which radio the vehicle
has and read the following pages to
become familiar with its features.
{WARNING
Taking your eyes off the road for
extended periods could cause a
crash resulting in injury or
death to you or others. Do not
give extended attention to
entertainment tasks while driving.
This system provides access to
many audio and non‐audio listings. To minimize taking your eyes off the
road while driving, do the following
while the vehicle is parked:
.Become familiar with the
operation and controls of the
audio system.
.Set up the tone, speaker
adjustments, and preset
radio stations.
For more information, see Defensive
Driving on page 9‑2.
Notice: Contact your dealer
before adding any equipment.
Adding audio or communication
equipment could interfere with
the operation of the vehicle's
engine, radio, or other systems,
and could damage them. Follow
federal rules covering mobile
radio and telephone equipment. The vehicle has Retained
Accessory Power (RAP). With RAP,
the audio system can be played
even after the ignition is turned off.
See
Retained Accessory Power
(RAP) on page 9‑34 for more
information.Navigation/Radio System
For vehicles with a navigation radio
system, see the separate Navigation
System Manual.
Theft-Deterrent Feature
TheftLock®is designed to
discourage theft of the vehicle's
radio by learning a portion of the
Vehicle Identification Number (VIN).
The radio does not operate if it is
stolen or moved to a different
vehicle.
Page 221 of 528
Black plate (5,1)Chevrolet Avalanche Owner Manual - 2011
Infotainment System 7-5
Using the Radio
O(Power/Volume):Press to turn
the system on and off.
Turn clockwise or counterclockwise
to increase or decrease the volume.
Speed Compensated Volume
(SCV): Radios with Speed
Compensated Volume (SCV)
automatically adjusts the radio
volume to compensate for road and
wind noise as the vehicle's speed
changes while driving, so that the
volume level stays consistent.
To activate SCV:
1. Set the radio volume to the
desired level.
2. Press the MENU button to display the radio setup menu.
3. Press the softkey under the AUTO VOLUM (automatic
volume) tab on the radio display. 4. Press the softkey under the
desired Speed Compensated
Volume setting (OFF, Low, Med,
or High) to select the level of
radio volume compensation.
The display times out after
approximately 10 seconds.
Each higher setting allows
for more radio volume
compensation at faster
vehicle speeds.
Noise Compensation
Technology: Vehicles with the
LTZ package and a Bose Audio
System include the Bose
AudioPilot
®noise compensation
technology. When turned on,
AudioPilot continuously adjusts the
audio system equalization, to
compensate for background noise,
so that music always sounds the
same at the set volume level. This feature is most effective at
lower radio volume settings where
background noise can affect how
well the music is heard. At higher
volume settings, where the music is
much louder than the background
noise, there might be little or no
adjustments by AudioPilot.
To activate:
1. Set the radio volume to the
desired level.
2. Press the MENU button to display the radio setup menu.
3. Press the softkey under the AUTO VOLUM (automatic
volume) tab on the radio display.
4. Press the softkey under the ON tab. The display times out
after approximately 10 seconds.
For additional information on
AudioPilot, please visit
www.bose.com/audiopilot.
Page 222 of 528
Black plate (6,1)Chevrolet Avalanche Owner Manual - 2011
7-6 Infotainment System
Setting the Tone
(Bass/Midrange/Treble)
BASS/MID/TREB (Bass, Midrange,
or Treble):To adjust the bass,
midrange, or treble:
1. Press the
fknob until the
tone control tabs display.
2. Highlight the desired tone control tab by doing one of
the following:
.Pressing thefknob.
.Press the softkey under the
desired tab.
3. Adjust the setting by doing one of the following:
.Turn thefknob clockwise
or counterclockwise.
.Press the¨SEEK, or
©SEEK button.
.Press the\FWD, or
sREV button. If a station's frequency is weak or if
there is static, decrease the treble.
To quickly adjust bass, midrange,
or treble to the middle position,
press the softkey positioned under
the BASS, MID, or TREB tab for
more than 2 seconds. A beep
sounds and the level adjusts to the
middle position.
To quickly adjust all tone and
speaker controls to the middle
position, press the
fknob for more
than 2 seconds until a beep sounds.
EQ (Equalization): Press this
button to choose bass and treble
equalization settings designed for
different types of music. Selecting
MANUAL or changing bass or
treble, returns the EQ to the manual
bass and treble settings.
Unique EQ settings can be saved
for each source.
If the radio has a Bose audio
system, the EQ settings are
either MANUAL or TALK. Digital Signal Processing (DSP):
Press the EQ button to change the
DSP settings (only available on
Bose systems with the LTZ option
package). DSP settings provide a
choice of different listening
experiences.
The following DSP settings are
available:
.Normal
—Select this setting to
adjust the audio for normal
mode. This provides the best
sound quality for all seating
positions.
.Driver —Select this setting to
adjust the audio for the driver to
receive the best possible sound
quality.
.Rear —Select this setting to
adjust the audio for the rear seat
passengers to receive the best
possible sound quality.