tow CHEVROLET AVALANCHE 2012 2.G Owners Manual
[x] Cancel search | Manufacturer: CHEVROLET, Model Year: 2012, Model line: AVALANCHE, Model: CHEVROLET AVALANCHE 2012 2.GPages: 508, PDF Size: 7.78 MB
Page 1 of 508

Black plate (1,1)Chevrolet Avalanche Owner Manual - 2012
2012 Chevrolet Avalanche Owner ManualM
In Brief. . . . . . . . . . . . . . . . . . . . . . . . 1-1
Instrument Panel . . . . . . . . . . . . . . 1-2
Initial Drive Information . . . . . . . . 1-4
Vehicle Features . . . . . . . . . . . . . 1-19
Performance and Maintenance . . . . . . . . . . . . . . . . 1-25
Keys, Doors, and Windows . . . . . . . . . . . . . . . . . . . . 2-1
Keys and Locks . . . . . . . . . . . . . . . 2-2
Doors . . . . . . . . . . . . . . . . . . . . . . . . . . 2-9
Vehicle Security . . . . . . . . . . . . . . 2-17
Exterior Mirrors . . . . . . . . . . . . . . . 2-20
Interior Mirrors . . . . . . . . . . . . . . . . 2-22
Windows . . . . . . . . . . . . . . . . . . . . . 2-23
Roof . . . . . . . . . . . . . . . . . . . . . . . . . . 2-25
Seats and Restraints . . . . . . . . . 3-1
Head Restraints . . . . . . . . . . . . . . . 3-2
Front Seats . . . . . . . . . . . . . . . . . . . . 3-3
Rear Seats . . . . . . . . . . . . . . . . . . . 3-10
Safety Belts . . . . . . . . . . . . . . . . . . 3-12
Airbag System . . . . . . . . . . . . . . . . 3-22
Child Restraints . . . . . . . . . . . . . . 3-36 Storage
. . . . . . . . . . . . . . . . . . . . . . . 4-1
Storage Compartments . . . . . . . . 4-1
Luggage/Load Locations . . . . . . . 4-2
Additional Storage Features . . . 4-6
Roof Rack System . . . . . . . . . . . 4-13
Instruments and Controls . . . . 5-1
Controls . . . . . . . . . . . . . . . . . . . . . . . 5-2
Warning Lights, Gauges, and Indicators . . . . . . . . . . . . . . . . . . . 5-10
Information Displays . . . . . . . . . . 5-26
Vehicle Messages . . . . . . . . . . . . 5-35
Vehicle Personalization . . . . . . . 5-45
Universal Remote System . . . . 5-53
Lighting . . . . . . . . . . . . . . . . . . . . . . . 6-1
Exterior Lighting . . . . . . . . . . . . . . . 6-1
Interior Lighting . . . . . . . . . . . . . . . . 6-7
Lighting Features . . . . . . . . . . . . . . 6-8
Infotainment System . . . . . . . . . 7-1
Introduction . . . . . . . . . . . . . . . . . . . . 7-1
Radio . . . . . . . . . . . . . . . . . . . . . . . . . . 7-8
Audio Players . . . . . . . . . . . . . . . . 7-14 Rear Seat Infotainment . . . . . . . 7-35
Phone . . . . . . . . . . . . . . . . . . . . . . . . 7-47
Trademarks and License
Agreements . . . . . . . . . . . . . . . . . 7-54
Climate Controls . . . . . . . . . . . . . 8-1
Climate Control Systems . . . . . . 8-1
Air Vents . . . . . . . . . . . . . . . . . . . . . 8-10
Driving and Operating . . . . . . . . 9-1
Driving Information . . . . . . . . . . . . . 9-2
Starting and Operating . . . . . . . 9-22
Engine Exhaust . . . . . . . . . . . . . . 9-31
Automatic Transmission . . . . . . 9-32
Drive Systems . . . . . . . . . . . . . . . . 9-37
Brakes . . . . . . . . . . . . . . . . . . . . . . . 9-44
Ride Control Systems . . . . . . . . 9-46
Cruise Control . . . . . . . . . . . . . . . . 9-51
Object Detection Systems . . . . 9-54
Fuel . . . . . . . . . . . . . . . . . . . . . . . . . . 9-60
Towing . . . . . . . . . . . . . . . . . . . . . . . 9-66
Conversions and Add-Ons . . . 9-84
Page 2 of 508

Black plate (2,1)Chevrolet Avalanche Owner Manual - 2012
2012 Chevrolet Avalanche Owner ManualM
Vehicle Care. . . . . . . . . . . . . . . . . 10-1
General Information . . . . . . . . . . 10-2
Vehicle Checks . . . . . . . . . . . . . . . 10-4
Headlamp Aiming . . . . . . . . . . . 10-35
Bulb Replacement . . . . . . . . . . 10-38
Electrical System . . . . . . . . . . . . 10-40
Wheels and Tires . . . . . . . . . . . 10-49
Jump Starting . . . . . . . . . . . . . . . 10-86
Towing . . . . . . . . . . . . . . . . . . . . . . 10-91
Appearance Care . . . . . . . . . . . 10-96 Service and Maintenance
. . . 11-1
General Information . . . . . . . . . . 11-1
Maintenance Schedule . . . . . . . 11-3
Special Application
Services . . . . . . . . . . . . . . . . . . . . 11-8
Additional Maintenance and Care . . . . . . . . . . . . . . . . . . . . 11-9
Recommended Fluids,
Lubricants, and Parts . . . . . . 11-12
Maintenance Records . . . . . . . 11-15
Technical Data . . . . . . . . . . . . . . . 12-1
Vehicle Identification . . . . . . . . . 12-1
Vehicle Data . . . . . . . . . . . . . . . . . . 12-2 Customer Information
. . . . . . . 13-1
Customer Information . . . . . . . . 13-1
Reporting Safety Defects . . . . 13-17
Vehicle Data Recording and
Privacy . . . . . . . . . . . . . . . . . . . . 13-19
OnStar . . . . . . . . . . . . . . . . . . . . . . . 14-1
OnStar Overview . . . . . . . . . . . . . 14-1
OnStar Services . . . . . . . . . . . . . . 14-2
OnStar Additional
Information . . . . . . . . . . . . . . . . . . 14-5
Index . . . . . . . . . . . . . . . . . . . . . i-1
Page 5 of 508

Black plate (5,1)Chevrolet Avalanche Owner Manual - 2012
Introduction v
Vehicle Symbol Chart
Here are some additional symbols
that may be found on the vehicle
and what they mean. For more
information on the symbol, refer to
the Index.
0:Adjustable Pedals
9:Airbag Readiness Light
#:Air Conditioning
!:Antilock Brake System (ABS)
%:Audio Steering Wheel Controls
or OnStar®
$: Brake System Warning Light
":Charging System
I:Cruise Control
B: Engine Coolant Temperature
O:Exterior Lamps
#:Fog Lamps
.: Fuel Gauge
+:Fuses
3: Headlamp High/Low-Beam
Changer
(: Heated Steering Wheel
j:LATCH System Child
Restraints
*: Malfunction Indicator Lamp
::Oil Pressure
g:Outside Power Foldaway
Mirrors
}: Power
/:Remote Vehicle Start
>:Safety Belt Reminders
7:Tire Pressure Monitor
_: Tow/Haul Mode
d:Traction Control/StabiliTrak®
M:Windshield Washer Fluid
Page 9 of 508

Black plate (3,1)Chevrolet Avalanche Owner Manual - 2012
In Brief 1-3
A.Air Vents on page 8‑10.
B. Turn and Lane‐Change Lever. See Turn and Lane-Change
Signals on page 6‑5.
Windshield Wiper/Washer on
page 5‑5.
C. Instrument Cluster on
page 5‑11.
D. Hazard Warning Flashers on
page 6‑5 (Out of View).
E. Shift Lever. See Automatic
Transmission on page 9‑32.
F. Tow/Haul Mode on page 9‑36
(If Equipped).
G. Driver Information Center (DIC) Buttons. See Driver Information
Center (DIC) on page 5‑26.
H. AM-FM Radio on page 7‑8.
I. Exterior Lamp Controls on
page 6‑1. J. Dome Lamp Override. See
Dome Lamps on page 6‑7.
Instrument Panel Illumination
Control on page 6‑7.
Fog Lamps on page 6‑6
(If Equipped).
K. Automatic Transfer Case Control (If Equipped). See
Four-Wheel Drive (Two Speed
Automatic Transfer Case) on
page 9‑37 orFour-Wheel Drive
(Single Speed Automatic
Transfer Case) on page 9‑42.
L. Data Link Connector (DLC) (Out of View). See Malfunction
Indicator Lamp on page 5‑19.
M. Cruise Control on page 9‑51.
N. Steering Wheel Adjustment on
page 5‑2.
O. Horn on page 5‑5. P.
Steering Wheel Controls on
page 5‑3.
Q. Climate Control Systems on
page 8‑1 (If Equipped).
Dual Automatic Climate Control
System on page 8‑4
(If Equipped).
R. Power Outlets on page 5‑9.
S. StabiliTrak
®System on
page 9‑46.
Pedal Adjust Control (If
Equipped). See Adjustable
Throttle and Brake Pedal on
page 9‑22.
Ultrasonic Parking Assist on
page 9‑54 (If Equipped).
Power Assist Steps on
page 2‑16 (If Equipped).
T. Glove Box on page 4‑1.
Page 12 of 508
Black plate (6,1)Chevrolet Avalanche Owner Manual - 2012
1-6 In Brief
Midgate®
This vehicle is equipped with a
Midgate and a removable rear glass
panel. The Midgate allows you to
extend the length of the vehicle's
cargo area.
For more information seeMidgate
®
on page 2‑9.
Tailgate
Use the Remote Keyless
Entry (RKE) transmitter or power
door lock switch to lock and unlock
the tailgate.
Open the tailgate by lifting up on its
handle while pulling the tailgate
toward you.
To close the tailgate, push it firmly
upward until it latches. Push and
pull on the tailgate to be sure it is
latched securely.
Tailgate Removal
The tailgate is not to be removed.
Removing the tailgate may cause
damage to the electrical connector
resulting in a loss of lock/unlock and
rear vision camera function.
SeeTailgate on page 2‑16.
Windows
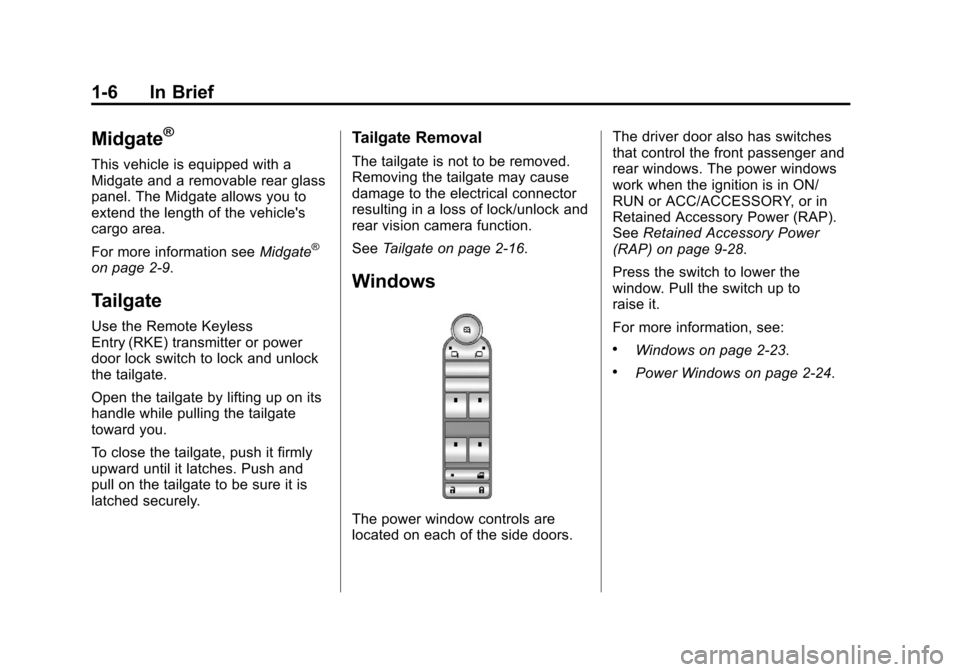
The power window controls are
located on each of the side doors. The driver door also has switches
that control the front passenger and
rear windows. The power windows
work when the ignition is in ON/
RUN or ACC/ACCESSORY, or in
Retained Accessory Power (RAP).
See
Retained Accessory Power
(RAP) on page 9‑28.
Press the switch to lower the
window. Pull the switch up to
raise it.
For more information, see:
.Windows on page 2‑23.
.Power Windows on page 2‑24.
Page 19 of 508
Black plate (13,1)Chevrolet Avalanche Owner Manual - 2012
In Brief 1-13
Power Foldaway Mirrors
To fold the mirrors:
1. Press (C) to fold the mirrors outto the driving position.
2. Press (D) to fold the mirrors in to the folded position.
Manual Foldaway Mirrors
Manually fold the mirrors inward
to prevent damage when going
through an automatic car wash.
To fold, pull the mirror toward the
vehicle. Push the mirror outward,
to return to its original position.
See Folding Mirrors on page 2‑21.
Interior Mirror
Vehicles with a manual rearview
mirror can be adjusted to see clearly
behind the vehicle. Hold the mirror
in the center to move it up or
down and side to side. To reduce
headlamp glare during nighttime
use, push the tab forward for
daytime use and pull it for
nighttime use. Vehicles with the automatic dimming
feature will automatically reduce the
glare of headlamps from behind the
vehicle. The dimming feature comes
on and the indicator light illuminates
each time the vehicle is started.
See
Automatic Dimming Rearview
Mirror on page 2‑22 for more
information.
Steering Wheel
Adjustment
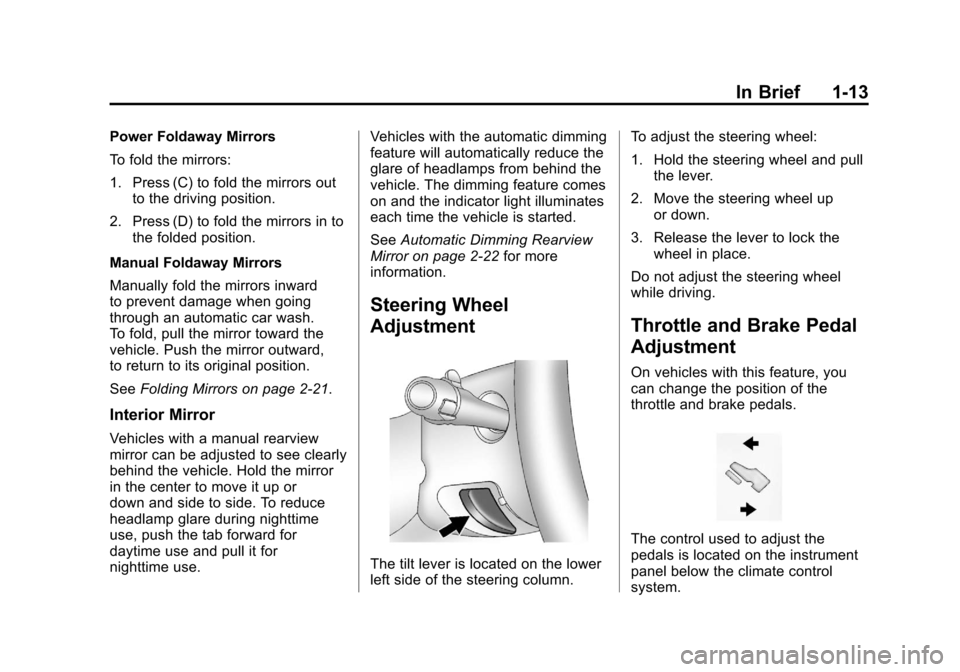
The tilt lever is located on the lower
left side of the steering column. To adjust the steering wheel:
1. Hold the steering wheel and pull
the lever.
2. Move the steering wheel up or down.
3. Release the lever to lock the wheel in place.
Do not adjust the steering wheel
while driving.
Throttle and Brake Pedal
Adjustment
On vehicles with this feature, you
can change the position of the
throttle and brake pedals.
The control used to adjust the
pedals is located on the instrument
panel below the climate control
system.
Page 24 of 508
Black plate (18,1)Chevrolet Avalanche Owner Manual - 2012
1-18 In Brief
2. Press the plus/minus buttons,located on the steering column
shift lever, to select the desired
range of gears for current driving
conditions. See Manual Mode on
page 9‑35.
While using Range Selection Mode,
cruise control and the Tow/Haul
mode can be used.
Grade Braking is not available when
Range Selection Mode is active.
See Tow/Haul Mode on page 9‑36.Four-Wheel Drive
If the vehicle has Four-Wheel Drive,
you can send the engine's driving
power to all four wheels for extra
traction.
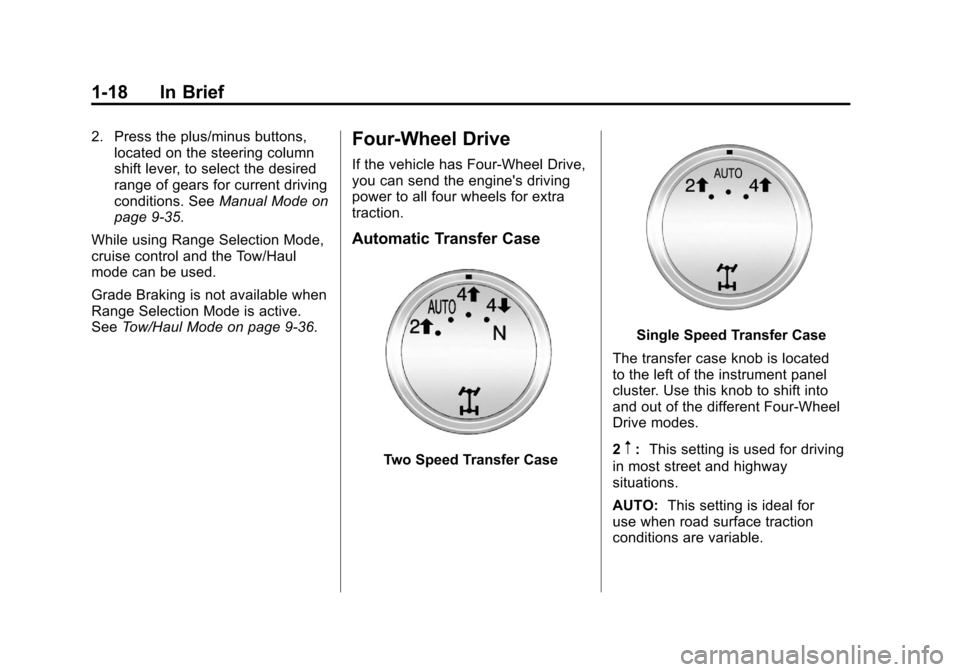
Automatic Transfer Case
Two Speed Transfer Case
Single Speed Transfer Case
The transfer case knob is located
to the left of the instrument panel
cluster. Use this knob to shift into
and out of the different Four-Wheel
Drive modes.
2
m: This setting is used for driving
in most street and highway
situations.
AUTO: This setting is ideal for
use when road surface traction
conditions are variable.
Page 25 of 508
Black plate (19,1)Chevrolet Avalanche Owner Manual - 2012
In Brief 1-19
4m:Use the Four-Wheel-Drive
High position when extra traction is
needed, such as on snowy or icy
roads or in most off-road situations.
4
n: Vehicles with a two speed
transfer case have a
Four-Wheel-Drive Low position. This
setting sends maximum power to all
four wheels. You might choose
Four-Wheel-Drive Low if you are
driving off-road in deep sand, deep
mud, deep snow, and while climbing
or descending steep hills.
N (Neutral): Vehicles with a two
speed transfer case have a
N (Neutral) position. Shift the
transfer case to N (Neutral) only
when towing the vehicle. See
Recreational Vehicle Towing on
page 10‑91 orTowing the Vehicle
on page 10‑91.
See Four-Wheel Drive (Two Speed
Automatic Transfer Case) on
page 9‑37 orFour-Wheel Drive
(Single Speed Automatic Transfer
Case) on page 9‑42.
Vehicle Features
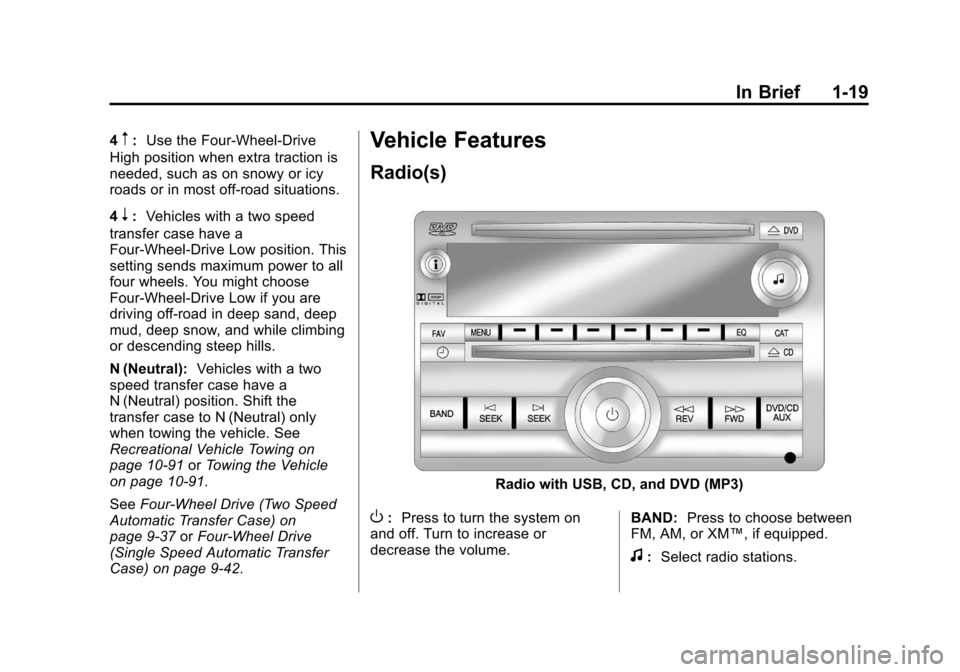
Radio(s)
Radio with USB, CD, and DVD (MP3)
O: Press to turn the system on
and off. Turn to increase or
decrease the volume. BAND:
Press to choose between
FM, AM, or XM™, if equipped.
f: Select radio stations.
Page 45 of 508
Black plate (11,1)Chevrolet Avalanche Owner Manual - 2012
Keys, Doors, and Windows 2-11
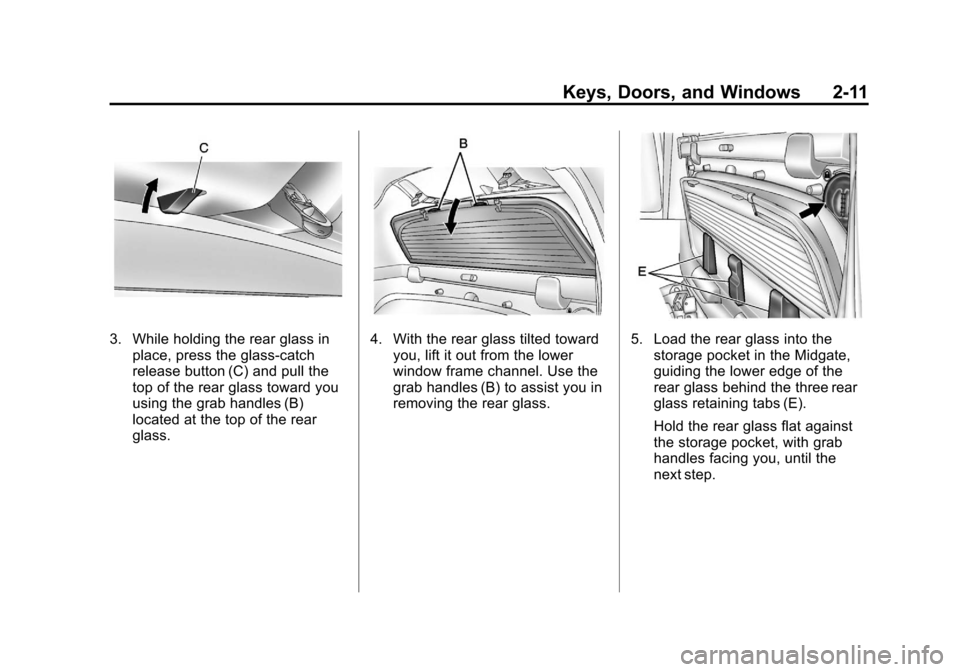
3. While holding the rear glass inplace, press the glass-catch
release button (C) and pull the
top of the rear glass toward you
using the grab handles (B)
located at the top of the rear
glass.4. With the rear glass tilted towardyou, lift it out from the lower
window frame channel. Use the
grab handles (B) to assist you in
removing the rear glass.5. Load the rear glass into thestorage pocket in the Midgate,
guiding the lower edge of the
rear glass behind the three rear
glass retaining tabs (E).
Hold the rear glass flat against
the storage pocket, with grab
handles facing you, until the
next step.
Page 48 of 508
Black plate (14,1)Chevrolet Avalanche Owner Manual - 2012
2-14 Keys, Doors, and Windows
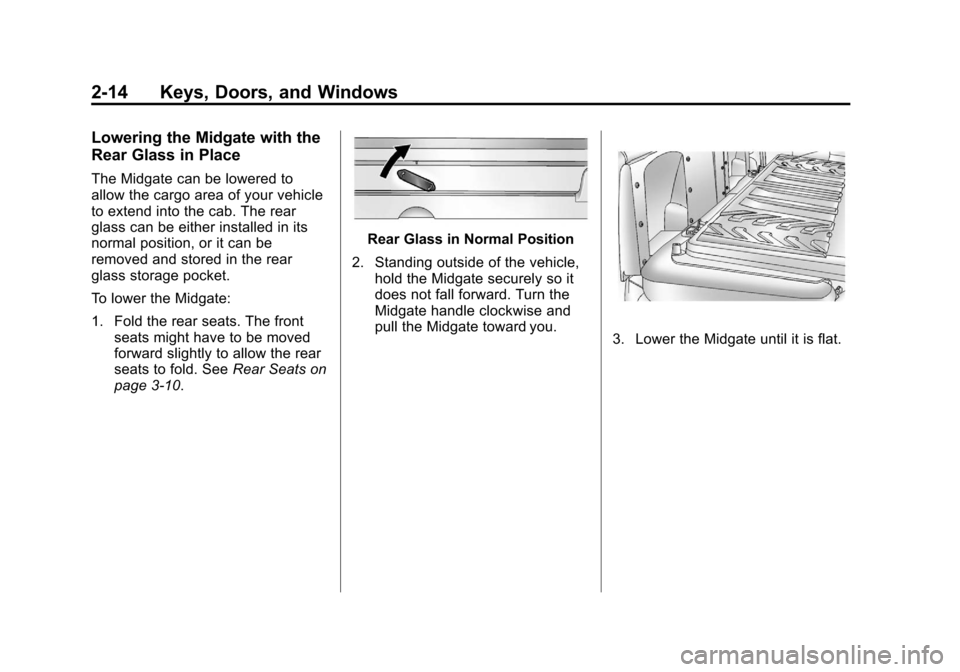
Lowering the Midgate with the
Rear Glass in Place
The Midgate can be lowered to
allow the cargo area of your vehicle
to extend into the cab. The rear
glass can be either installed in its
normal position, or it can be
removed and stored in the rear
glass storage pocket.
To lower the Midgate:
1. Fold the rear seats. The frontseats might have to be moved
forward slightly to allow the rear
seats to fold. See Rear Seats on
page 3‑10.
Rear Glass in Normal Position
2. Standing outside of the vehicle, hold the Midgate securely so it
does not fall forward. Turn the
Midgate handle clockwise and
pull the Midgate toward you.
3. Lower the Midgate until it is flat.