wheel size CHEVROLET AVEO 2002 Service Repair Manual
[x] Cancel search | Manufacturer: CHEVROLET, Model Year: 2002, Model line: AVEO, Model: CHEVROLET AVEO 2002Pages: 5127, PDF Size: 41.82 MB
Page 1684 of 5127
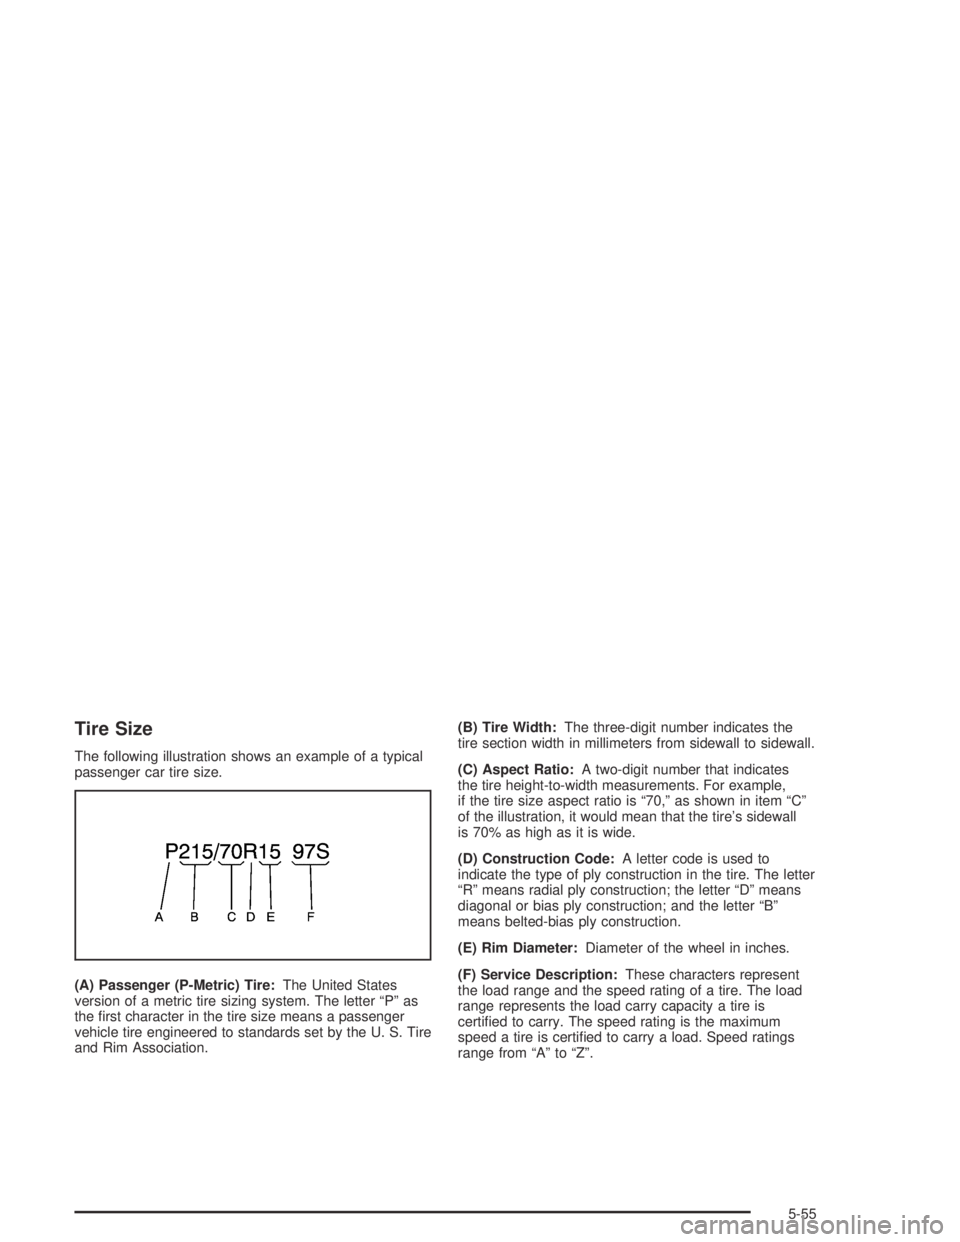
Tire Size
The following illustration shows an example of a typical
passenger car tire size.
(A) Passenger (P-Metric) Tire:The United States
version of a metric tire sizing system. The letter “P” as
the first character in the tire size means a passenger
vehicle tire engineered to standards set by the U. S. Tire
and Rim Association.(B) Tire Width:The three-digit number indicates the
tire section width in millimeters from sidewall to sidewall.
(C) Aspect Ratio:A two-digit number that indicates
the tire height-to-width measurements. For example,
if the tire size aspect ratio is “70,” as shown in item “C”
of the illustration, it would mean that the tire’s sidewall
is 70% as high as it is wide.
(D) Construction Code:A letter code is used to
indicate the type of ply construction in the tire. The letter
“R” means radial ply construction; the letter “D” means
diagonal or bias ply construction; and the letter “B”
means belted-bias ply construction.
(E) Rim Diameter:Diameter of the wheel in inches.
(F) Service Description:These characters represent
the load range and the speed rating of a tire. The load
range represents the load carry capacity a tire is
certified to carry. The speed rating is the maximum
speed a tire is certified to carry a load. Speed ratings
range from “A” to “Z”.
5-55
Page 1690 of 5127
After the tires have been rotated, adjust the front and
rear inflation pressures as shown on the tire and loading
information label. Make certain that all wheel nuts are
properly tightened. See “Wheel Nut Torque” under
Capacities and Specifications on page 5-91.
{CAUTION:
Rust or dirt on a wheel, or on the parts to
which it is fastened, can make wheel nuts
become loose after a time. The wheel could
come off and cause an accident. When you
change a wheel, remove any rust or dirt from
places where the wheel attaches to the vehicle.
In an emergency, you can use a cloth or a
paper towel to do this; but be sure to use a
scraper or wire brush later, if you need to, to
get all the rust or dirt off. See “Changing a Flat
Tire” in the Index.
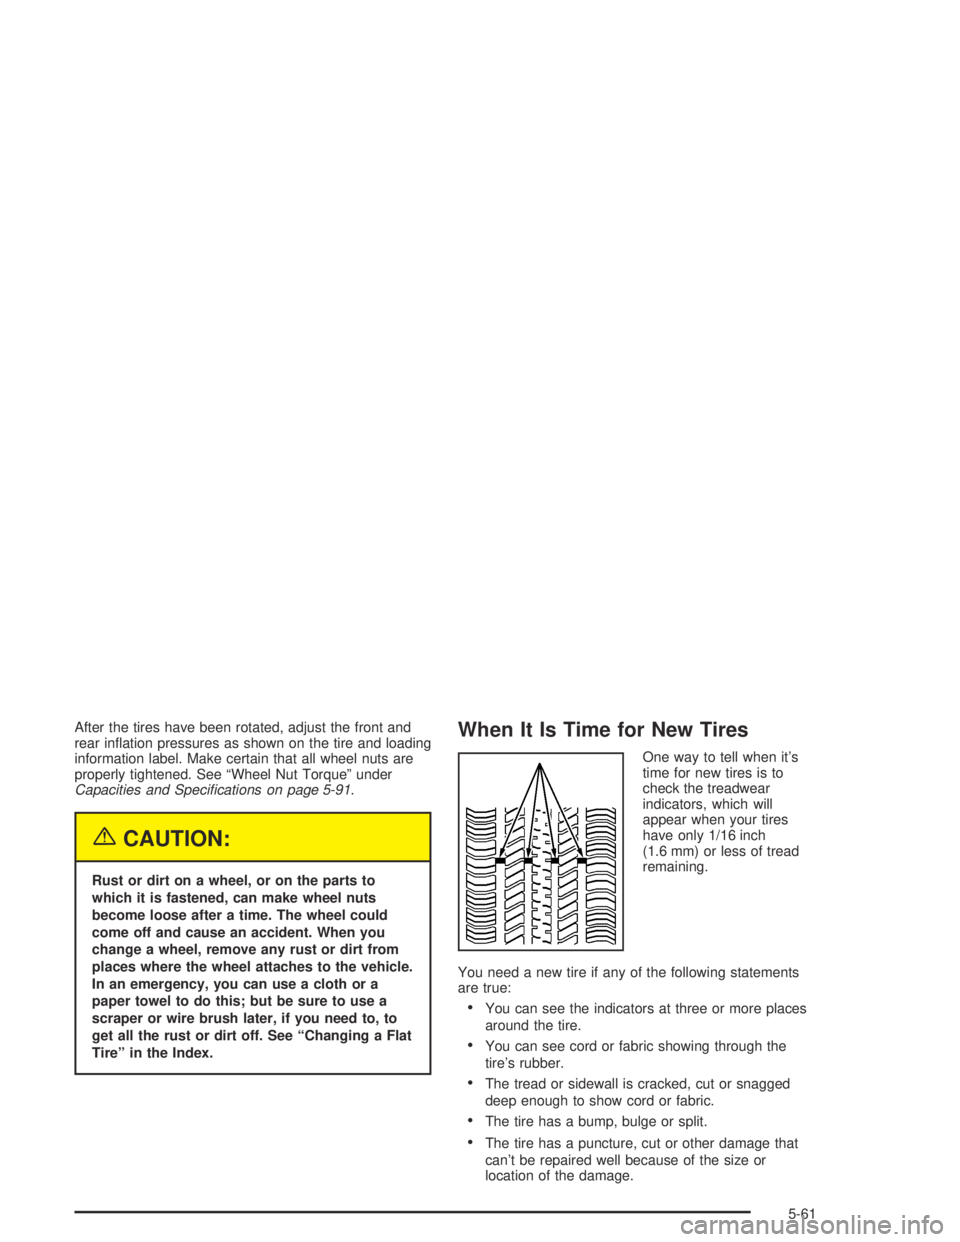
When It Is Time for New Tires
One way to tell when it’s
time for new tires is to
check the treadwear
indicators, which will
appear when your tires
have only 1/16 inch
(1.6 mm) or less of tread
remaining.
You need a new tire if any of the following statements
are true:
•You can see the indicators at three or more places
around the tire.
•You can see cord or fabric showing through the
tire’s rubber.
•The tread or sidewall is cracked, cut or snagged
deep enough to show cord or fabric.
•The tire has a bump, bulge or split.
•The tire has a puncture, cut or other damage that
can’t be repaired well because of the size or
location of the damage.
5-61
Page 1691 of 5127
Buying New Tires
To find out what kind and size of tires you need, look at
the Tire-Loading Information label.
Make sure the replacements are the same size, load
range, speed rating and construction type (bias,
bias-belted or radial) as your original tires.
{CAUTION:
Mixing tires could cause you to lose control
while driving. If you mix tires of different sizes
or types (radial and bias-belted tires), the
vehicle may not handle properly, and you
could have a crash. Using tires of different
sizes may also cause damage to your vehicle.
Be sure to use the same size and type tires on
all wheels. It’s all right to drive with your
compact spare temporarily, it was developed
for use on your vehicle. See “Compact Spare
Tire” in the Index.
{CAUTION:
If you use bias-ply tires on your vehicle, the
wheel rim �anges could develop cracks after
many miles of driving. A tire and/or wheel
could fail suddenly, causing a crash. Use only
radial-ply tires with the wheels on your vehicle.
5-62
Page 1695 of 5127
Tire Chains
Notice:Use tire chains only where legal and only
when you must. Use only SAE Class “S” type chains
that are the proper size for your tires. Install them on
the front tires and tighten them as tightly as possible
with the ends securely fastened. Drive slowly and
follow the chain manufacturer’s instructions. If you
can hear the chains contacting your vehicle, stop and
retighten them. If the contact continues, slow down
until it stops. Driving too fast or spinning the wheels
with chains on will damage your vehicle.
If a Tire Goes Flat
It’s unusual for a tire to “blowout” while you’re driving,
especially if you maintain your tires properly. If air goes
out of a tire, it’s much more likely to leak out slowly.
But if you should ever have a “blowout,” here are a few
tips about what to expect and what to do:
If a front tire fails, the flat tire will create a drag that
pulls the vehicle toward that side. Take your foot off the
accelerator pedal and grip the steering wheel firmly.
Steer to maintain lane position, and then gently brake to
a stop well out of the traffic lane.A rear blowout, particularly on a curve, acts much like a
skid and may require the same correction you’d use
in a skid. In any rear blowout, remove your foot from the
accelerator pedal. Get the vehicle under control by
steering the way you want the vehicle to go. It may be
very bumpy and noisy, but you can still steer. Gently
brake to a stop, well off the road if possible.
{CAUTION:
Lifting a vehicle and getting under it to do
maintenance or repairs is dangerous without
the appropriate safety equipment and training.
The jack provided with your vehicle is
designed only for changing a �at tire. If it is
used for anything else, you or others could be
badly injured or killed if the vehicle slips off
the jack. Use the jack provided with your
vehicle only for changing a �at tire.
If a tire goes flat, the next part shows how to use your
jacking equipment to change a flat tire safely.
5-66
Page 1704 of 5127
Compact Spare Tire
Although the compact spare tire was fully inflated when
your vehicle was new, it can lose air after a time.
Check the inflation pressure regularly. It should be
60 psi (420 kPa).
After installing the compact spare on your vehicle,
you should stop as soon as possible and make sure
your spare tire is correctly inflated. The compact spare
is made to perform well at speeds up to 50 mph
(80 km/h), so you can finish your trip and have your
full-size tire repaired or replaced where you want.
Of course, it is best to replace your spare with a full-size
tire as soon as you can. Your spare will last longer
and be in good shape in case you need it again.Notice:When the compact spare is installed, don’t
take your vehicle through an automatic car wash
with guide rails. The compact spare can get caught
on the rails. That can damage the tire and wheel,
and maybe other parts of your vehicle.
Do not use your compact spare on other vehicles.
And do not mix your compact spare tire or wheel with
other wheels or tires. They will not fit. Keep your
spare tire and its wheel together.
Notice:Tire chains won’t �t your compact spare.
Using them can damage your vehicle and can
damage the chains too. Don’t use tire chains on
your compact spare.
5-75
Page 1775 of 5127
Service Bulletins.............................................7-11
Service Manuals.............................................7-11
Setting Preset Stations............................3-35, 3-36
Setting the Tone (Bass/Treble)..................3-35, 3-37
Sheet Metal Damage.......................................5-81
Shift Speeds..................................................2-27
Shifting Into Park (P).......................................2-29
Shifting Out of Park (P)...................................2-30
Short Trip/City Definition.................................... 6-5
Short Trip/City Intervals..................................... 6-5
Short Trip/City Scheduled Maintenance................ 6-7
Shoulder Belt Height Adjuster...........................1-17
Skidding........................................................4-14
Some Other Rainy Weather Tips.......................4-18
Special Fabric Cleaning Problems.....................5-77
Specifications, Capacities.................................5-91
Speedometer..................................................3-19
Starter Switch Check.......................................6-21
Starting Your Engine.......................................2-20
Steering........................................................4-10
Steering in Emergencies..................................4-11
Steering, Suspension and Front Drive Axle
Boot and Seal Inspection..............................6-24
Steering Tips..................................................4-10
Steering Wheel, Tilt Wheel................................. 3-4
Storage Areas................................................2-36
Cupholder(s)...............................................2-36
Glove Box..................................................2-36
Sunglasses Storage Compartment..................2-37Storing the Flat Tire and Tools..........................5-74
Storing the Spare Tire and Tools.......................5-74
Stuck in Sand, Mud, Ice or Snow......................4-28
Sun Visors.....................................................2-14
Sunglasses Storage Compartment.....................2-37
Sunroof.........................................................2-37
T
Tachometer....................................................3-19
Taillamps
Turn Signal, Stoplamps and Back-up Lamps......5-49
Theft-Deterrent, Radio.....................................3-43
Theft-Deterrent System....................................2-15
Theft-Deterrent Systems...................................2-15
Immobilizer.................................................2-17
Immobilizer Operation...................................2-17
Throttle System Inspection...............................6-25
Tilt Wheel........................................................ 3-4
Tire Inflation Check.........................................6-19
Tire Sidewall Labeling......................................5-52
Tire Size.......................................................5-55
Tire Terminology and Definitions........................5-56
Tires.............................................................5-51
Buying New Tires........................................5-62
Chains.......................................................5-66
Changing a Flat Tire....................................5-67
Compact Spare Tire.....................................5-75
12
Page 2000 of 5127
Service............................................................5-3
Accessories and Modifications..........................5-3
California Proposition 65 Warning.....................5-3
Doing Your Own Service Work.........................5-4
Adding Equipment to the Outside of Your
Vehicle......................................................5-4
Fuel................................................................5-5
Gasoline Octane............................................5-5
Gasoline Specifications....................................5-5
California Fuel...............................................5-5
Additives.......................................................5-6
Fuels in Foreign Countries...............................5-6
Filling the Tank..............................................5-7
Filling a Portable Fuel Container.......................5-9
Checking Things Under the Hood....................5-10
Hood Release..............................................5-10
Engine Compartment Overview.......................5-12
Engine Oil...................................................5-13
Engine Air Cleaner/Filter................................5-17
Automatic Transaxle Fluid..............................5-19
Manual Transaxle Fluid..................................5-21
Hydraulic Clutch...........................................5-21
Engine Coolant.............................................5-22
Coolant Surge Tank Pressure Cap..................5-24
Engine Overheating.......................................5-24
Cooling System............................................5-26Power Steering Fluid.....................................5-30
Windshield Washer Fluid................................5-31
Brakes........................................................5-32
Battery........................................................5-35
Jump Starting...............................................5-36
Headlamp Aiming...........................................5-39
Bulb Replacement..........................................5-40
Halogen Bulbs..............................................5-40
Headlamps..................................................5-40
Front Turn Signal and Parking Lamps..............5-42
Turn Signal Lamps (Side)..............................5-42
Taillamps, Turn Signal, Stoplamps and
Back-up Lamps.........................................5-43
Replacement Bulbs.......................................5-44
Windshield Wiper Blade Replacement..............5-44
Tires..............................................................5-45
Tire Sidewall Labeling...................................5-46
Tire Terminology and Definitions.....................5-48
Inflation - Tire Pressure.................................5-51
Tire Inspection and Rotation...........................5-52
When It Is Time for New Tires.......................5-53
Buying New Tires.........................................5-54
Different Size Tires and Wheels......................5-54
Uniform Tire Quality Grading..........................5-55
Wheel Alignment and Tire Balance..................5-56
Wheel Replacement......................................5-56
Section 5 Service and Appearance Care
5-1
Page 2047 of 5127
Tire Size
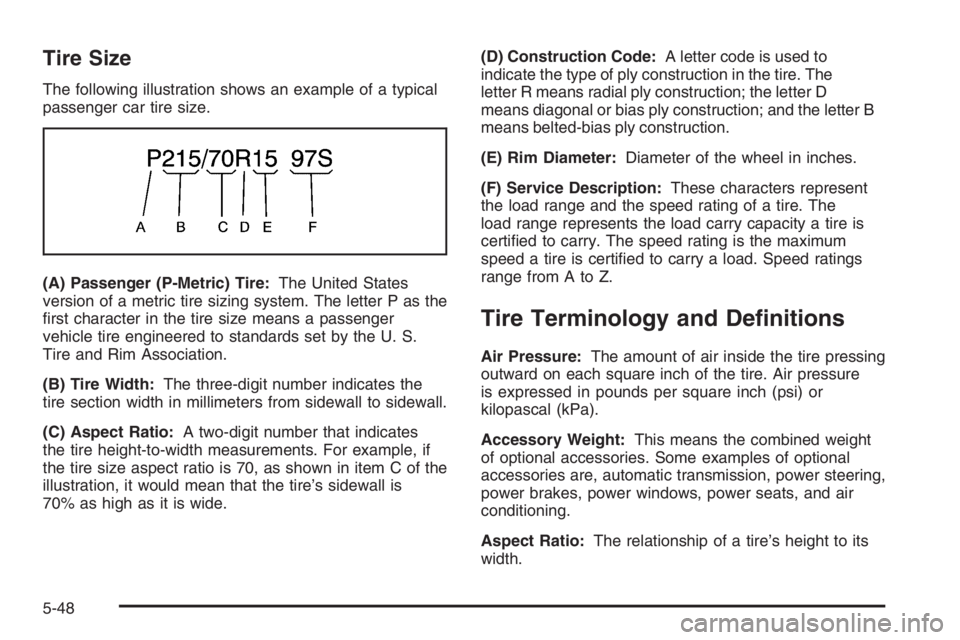
The following illustration shows an example of a typical
passenger car tire size.
(A) Passenger (P-Metric) Tire:The United States
version of a metric tire sizing system. The letter P as the
first character in the tire size means a passenger
vehicle tire engineered to standards set by the U. S.
Tire and Rim Association.
(B) Tire Width:The three-digit number indicates the
tire section width in millimeters from sidewall to sidewall.
(C) Aspect Ratio:A two-digit number that indicates
the tire height-to-width measurements. For example, if
the tire size aspect ratio is 70, as shown in item C of the
illustration, it would mean that the tire’s sidewall is
70% as high as it is wide.(D) Construction Code:A letter code is used to
indicate the type of ply construction in the tire. The
letter R means radial ply construction; the letter D
means diagonal or bias ply construction; and the letter B
means belted-bias ply construction.
(E) Rim Diameter:Diameter of the wheel in inches.
(F) Service Description:These characters represent
the load range and the speed rating of a tire. The
load range represents the load carry capacity a tire is
certified to carry. The speed rating is the maximum
speed a tire is certified to carry a load. Speed ratings
range from A to Z.
Tire Terminology and De�nitions
Air Pressure:The amount of air inside the tire pressing
outward on each square inch of the tire. Air pressure
is expressed in pounds per square inch (psi) or
kilopascal (kPa).
Accessory Weight:This means the combined weight
of optional accessories. Some examples of optional
accessories are, automatic transmission, power steering,
power brakes, power windows, power seats, and air
conditioning.
Aspect Ratio:The relationship of a tire’s height to its
width.
5-48
Page 2052 of 5127
Make certain that all wheel nuts are properly tightened.
See “Wheel Nut Torque” underCapacities and
Specifications on page 5-80.
{CAUTION:
Rust or dirt on a wheel, or on the parts to
which it is fastened, can make wheel nuts
become loose after a time. The wheel could
come off and cause an accident. When you
change a wheel, remove any rust or dirt from
places where the wheel attaches to the vehicle.
In an emergency, you can use a cloth or a
paper towel to do this; but be sure to use a
scraper or wire brush later, if needed, to get all
the rust or dirt off. SeeChanging a Flat Tire on
page 5-58.
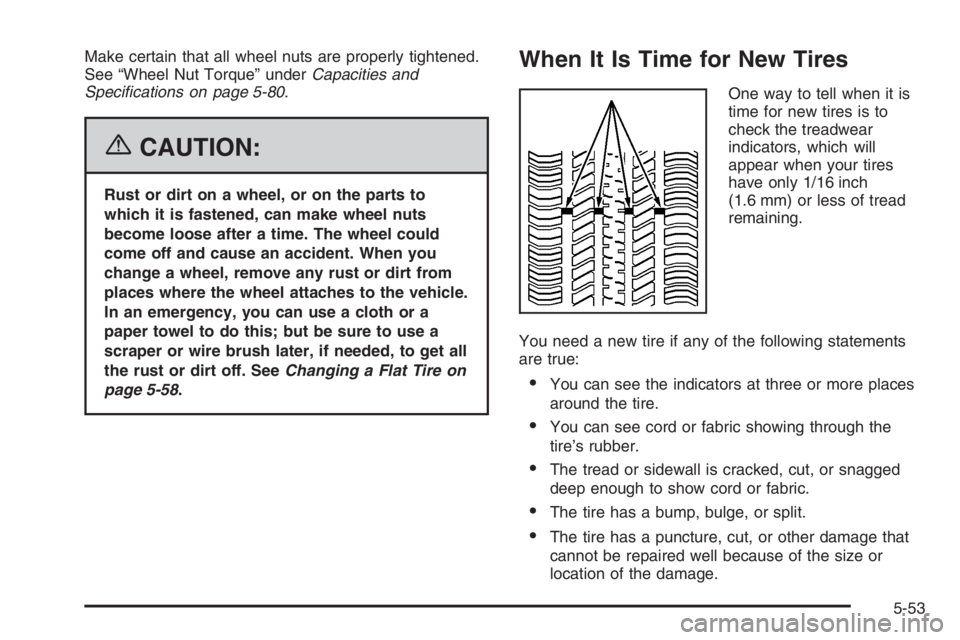
When It Is Time for New Tires
One way to tell when it is
time for new tires is to
check the treadwear
indicators, which will
appear when your tires
have only 1/16 inch
(1.6 mm) or less of tread
remaining.
You need a new tire if any of the following statements
are true:
•You can see the indicators at three or more places
around the tire.
•You can see cord or fabric showing through the
tire’s rubber.
•The tread or sidewall is cracked, cut, or snagged
deep enough to show cord or fabric.
•The tire has a bump, bulge, or split.
•The tire has a puncture, cut, or other damage that
cannot be repaired well because of the size or
location of the damage.
5-53
Page 2053 of 5127
Buying New Tires
GM has developed and matched specific tires for your
vehicle. If you need replacement tires, GM strongly
recommends that you get tires that are the same size,
brand, load range, speed rating, and construction
type (radial and bias-belted tires) as your vehicle’s
original tires. This way, your vehicle will continue to have
tires that are designed to give the same performance
and vehicle safety, during normal use, as the original
tires. SeeTire Sidewall Labeling on page 5-46for
additional information.
{CAUTION:
Mixing tires could cause you to lose control
while driving. If you mix tires of different sizes,
brands, or types (radial and bias-belted tires),
the vehicle may not handle properly, and you
could have a crash. Using tires of different
sizes, brands, or types may also cause
damage to your vehicle. Be sure to use the
correct size, brand, and type of tires on all
wheels. It is all right to drive with your
compact spare temporarily, as it was
developed for use on your vehicle. See
Compact Spare Tire on page 5-66.
{CAUTION:
If you use bias-ply tires on your vehicle, the
wheel rim �anges could develop cracks after
many miles of driving. A tire and/or wheel
could fail suddenly, causing a crash. Use only
radial-ply tires with the wheels on your vehicle.
Your vehicle’s original equipment tires are listed on the
Tire and Loading Information Label. This label is
attached to the vehicle’s center pillar (B-pillar). See
Loading Your Vehicle on page 4-27, for more information
about the Tire and Loading Information Label.
Different Size Tires and Wheels
If you add wheels or tires that are a different size than
your original equipment wheels and tires, this may
affect the way your vehicle performs, including its
braking, ride and handling characteristics, stability, and
resistance to rollover. Additionally, if your vehicle
has electronic systems such as, anti-lock brakes,
traction control, and electronic stability control, the
performance of these systems can be affected.
5-54