headlamp CHEVROLET AVEO 2008 1.G User Guide
[x] Cancel search | Manufacturer: CHEVROLET, Model Year: 2008, Model line: AVEO, Model: CHEVROLET AVEO 2008 1.GPages: 384, PDF Size: 6.67 MB
Page 223 of 384
Service............................................................5-3
Accessories and Modifications..........................5-3
California Proposition 65 Warning.....................5-4
California Perchlorate Materials Requirements.....5-4
Doing Your Own Service Work.........................5-4
Adding Equipment to the Outside
of Your Vehicle...........................................5-5
Fuel................................................................5-5
Gasoline Octane............................................5-5
Gasoline Specifications....................................5-5
California Fuel...............................................5-6
Additives.......................................................5-6
Fuels in Foreign Countries...............................5-7
Filling the Tank..............................................5-7
Filling a Portable Fuel Container.......................5-9
Checking Things Under the Hood....................5-10
Hood Release..............................................5-10
Engine Compartment Overview.......................5-12
Engine Oil...................................................5-13
Engine Air Cleaner/Filter................................5-17
Automatic Transmission Fluid.........................5-19
Manual Transmission Fluid.............................5-21
Hydraulic Clutch...........................................5-21
Engine Coolant.............................................5-22
Coolant Surge Tank Pressure Cap..................5-25
Engine Overheating.......................................5-25
Cooling System............................................5-26Power Steering Fluid.....................................5-30
Windshield Washer Fluid................................5-31
Brakes........................................................5-32
Battery........................................................5-35
Jump Starting...............................................5-36
Headlamp Aiming...........................................5-40
Bulb Replacement..........................................5-41
Halogen Bulbs
..............................................5-41
Headlamps (Hatchback).................................5-41
Headlamps (Sedan)......................................5-42
Front Turn Signal and Parking Lamps
(Hatchback)..............................................5-43
Front Turn Signal and Parking Lamps (Sedan).....5-44
Turn Signal Lamps (Side)..............................5-45
Center High-Mounted Stoplamp (CHMSL)
(Sedan)...................................................5-46
Taillamps, Turn Signal, Stoplamps and
Back-up Lamps.........................................5-47
License Plate Lamp......................................5-48
Replacement Bulbs.......................................5-48
Windshield Wiper Blade Replacement..............5-49
Tires..............................................................5-50
Tire Sidewall Labeling...................................5-51
Tire Terminology and Definitions.....................5-54
Inflation - Tire Pressure.................................5-57
Tire Pressure Monitor System.........................5-58
Tire Pressure Monitor Operation.....................5-60
Section 5 Service and Appearance Care
5-1
Page 224 of 384
Tire Inspection and Rotation...........................5-61
When It Is Time for New Tires.......................5-63
Buying New Tires.........................................5-64
Different Size Tires and Wheels......................5-65
Uniform Tire Quality Grading..........................5-66
Wheel Alignment and Tire Balance..................5-67
Wheel Replacement......................................5-67
Tire Chains..................................................5-69
If a Tire Goes Flat........................................5-69
Changing a Flat Tire.....................................5-70
Removing the Spare Tire and Tools................5-71
Removing the Flat Tire and Installing
the Spare Tire..........................................5-73
Storing a Flat or Spare Tire and Tools............5-78
Compact Spare Tire......................................5-78
Appearance Care............................................5-79
Interior Cleaning...........................................5-79
Fabric/Carpet...............................................5-80
Leather.......................................................5-81
Instrument Panel, Vinyl, and
Other Plastic Surfaces................................5-82
Care of Safety Belts......................................5-82
Weatherstrips...............................................5-82
Washing Your Vehicle...................................5-83
Cleaning Exterior Lamps/Lenses.....................5-83
Finish Care..................................................5-83Windshield and Wiper Blades.........................5-84
Aluminum Wheels.........................................5-85
Tires...........................................................5-85
Sheet Metal Damage.....................................5-85
Finish Damage.............................................5-86
Underbody Maintenance................................5-86
Chemical Paint Spotting.................................5-86
Vehicle Care/Appearance Materials..................5-87
Vehicle Identi�cation......................................5-88
Vehicle Identification Number (VIN).................5-88
Service Parts Identification Label.....................5-88
Electrical System............................................5-88
Add-On Electrical Equipment..........................5-88
Headlamp Wiring..........................................5-89
Windshield Wiper Fuses................................5-89
Power Windows and Other
Power Options..........................................5-89
Fuses and Circuit Breakers............................5-89
Instrument Panel Fuse Block..........................5-90
Engine Compartment Fuse Block....................5-94
Capacities and Speci�cations..........................5-99
Normal Maintenance Replacement Parts.........5-100
Normal Maintenance Replacement Parts.........5-100
Engine Drive Belt Routing............................5-101
Section 5 Service and Appearance Care
5-2
Page 262 of 384
Notice:If the jumper cables are connected or
removed in the wrong order, electrical shorting may
occur and damage the vehicle. The repairs would
not be covered by your warranty. Always connect
and remove the jumper cables in the correct
order, making sure that the cables do not touch
each other or other metal.
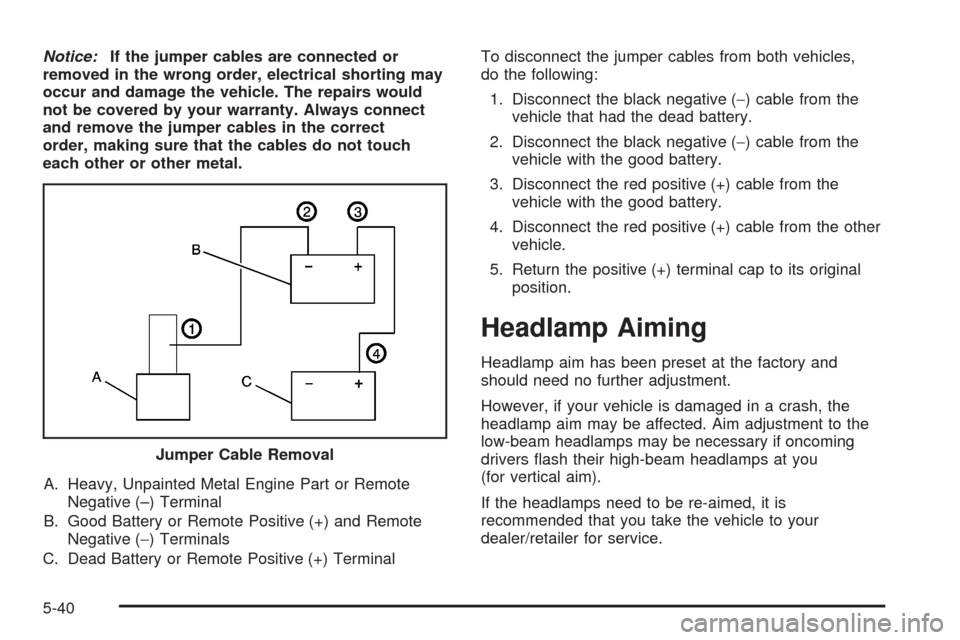
A. Heavy, Unpainted Metal Engine Part or Remote
Negative (–) Terminal
B. Good Battery or Remote Positive (+) and Remote
Negative (−) Terminals
C. Dead Battery or Remote Positive (+) TerminalTo disconnect the jumper cables from both vehicles,
do the following:
1. Disconnect the black negative (−) cable from the
vehicle that had the dead battery.
2. Disconnect the black negative (−) cable from the
vehicle with the good battery.
3. Disconnect the red positive (+) cable from the
vehicle with the good battery.
4. Disconnect the red positive (+) cable from the other
vehicle.
5. Return the positive (+) terminal cap to its original
position.
Headlamp Aiming
Headlamp aim has been preset at the factory and
should need no further adjustment.
However, if your vehicle is damaged in a crash, the
headlamp aim may be affected. Aim adjustment to the
low-beam headlamps may be necessary if oncoming
drivers flash their high-beam headlamps at you
(for vertical aim).
If the headlamps need to be re-aimed, it is
recommended that you take the vehicle to your
dealer/retailer for service. Jumper Cable Removal
5-40
Page 263 of 384
Bulb Replacement
For the proper type of replacement bulbs, see
Replacement Bulbs on page 5-48.
For any bulb changing procedure not listed in this
section, contact your dealer/retailer.
Halogen Bulbs
{CAUTION:
Halogen bulbs have pressurized gas inside and
can burst if you drop or scratch the bulb. You or
others could be injured. Be sure to read and
follow the instructions on the bulb package.
Headlamps (Hatchback)
To replace a headlamp bulb:
1. Open the hood. SeeHood Release on page 5-10
for more information.
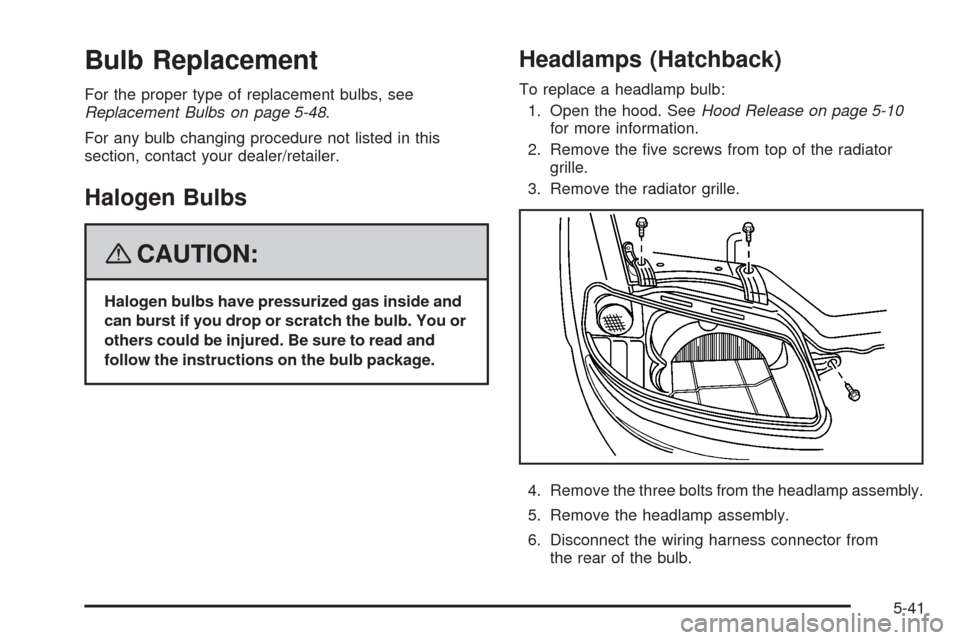
2. Remove the five screws from top of the radiator
grille.
3. Remove the radiator grille.
4. Remove the three bolts from the headlamp assembly.
5. Remove the headlamp assembly.
6. Disconnect the wiring harness connector from
the rear of the bulb.
5-41
Page 264 of 384
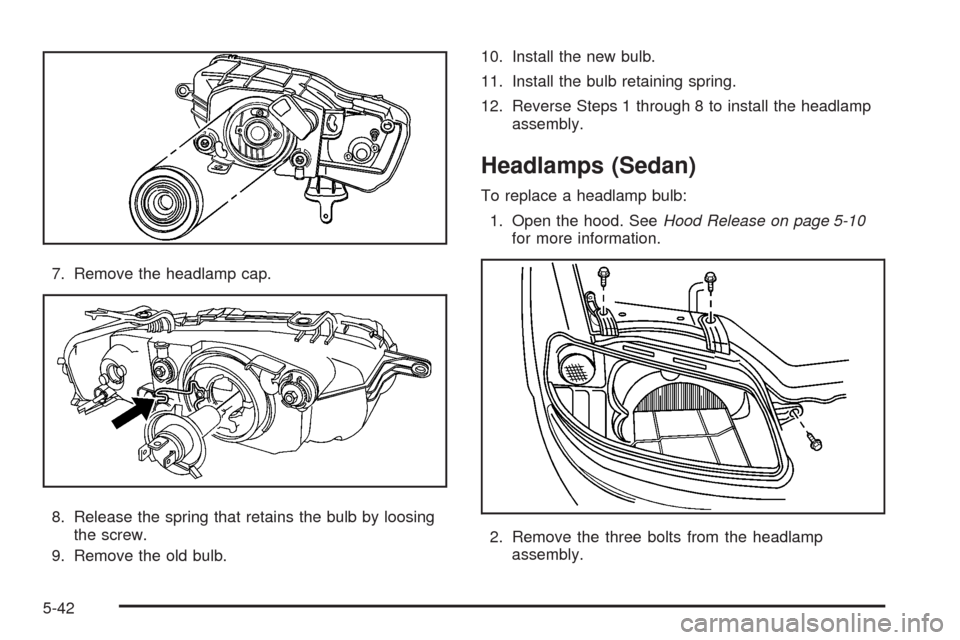
7. Remove the headlamp cap.
8. Release the spring that retains the bulb by loosing
the screw.
9. Remove the old bulb.10. Install the new bulb.
11. Install the bulb retaining spring.
12. Reverse Steps 1 through 8 to install the headlamp
assembly.
Headlamps (Sedan)
To replace a headlamp bulb:
1. Open the hood. SeeHood Release on page 5-10
for more information.
2. Remove the three bolts from the headlamp
assembly.
5-42
Page 265 of 384
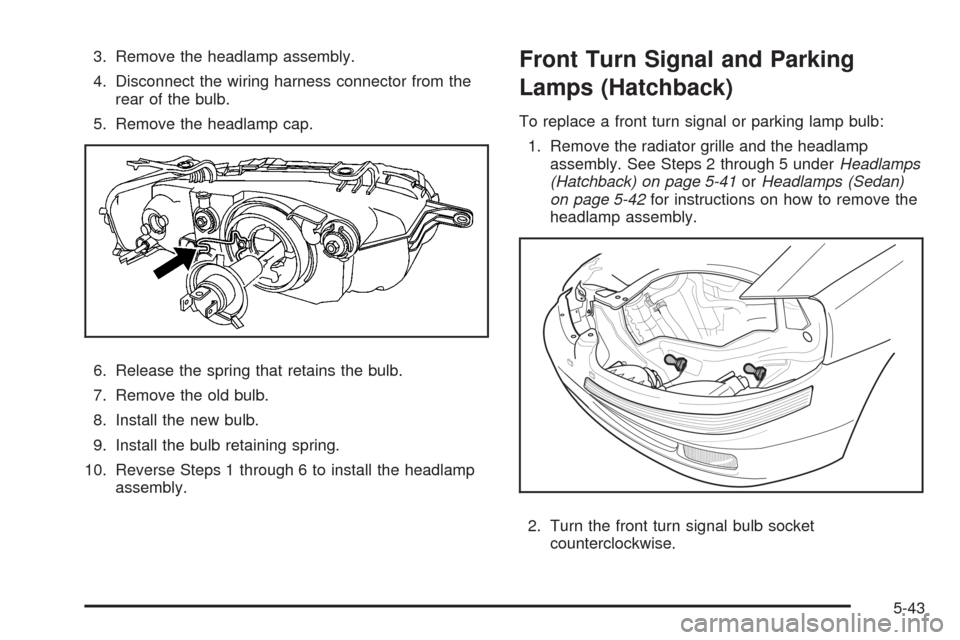
3. Remove the headlamp assembly.
4. Disconnect the wiring harness connector from the
rear of the bulb.
5. Remove the headlamp cap.
6. Release the spring that retains the bulb.
7. Remove the old bulb.
8. Install the new bulb.
9. Install the bulb retaining spring.
10. Reverse Steps 1 through 6 to install the headlamp
assembly.Front Turn Signal and Parking
Lamps (Hatchback)
To replace a front turn signal or parking lamp bulb:
1. Remove the radiator grille and the headlamp
assembly. See Steps 2 through 5 underHeadlamps
(Hatchback) on page 5-41orHeadlamps (Sedan)
on page 5-42for instructions on how to remove the
headlamp assembly.
2. Turn the front turn signal bulb socket
counterclockwise.
5-43
Page 266 of 384
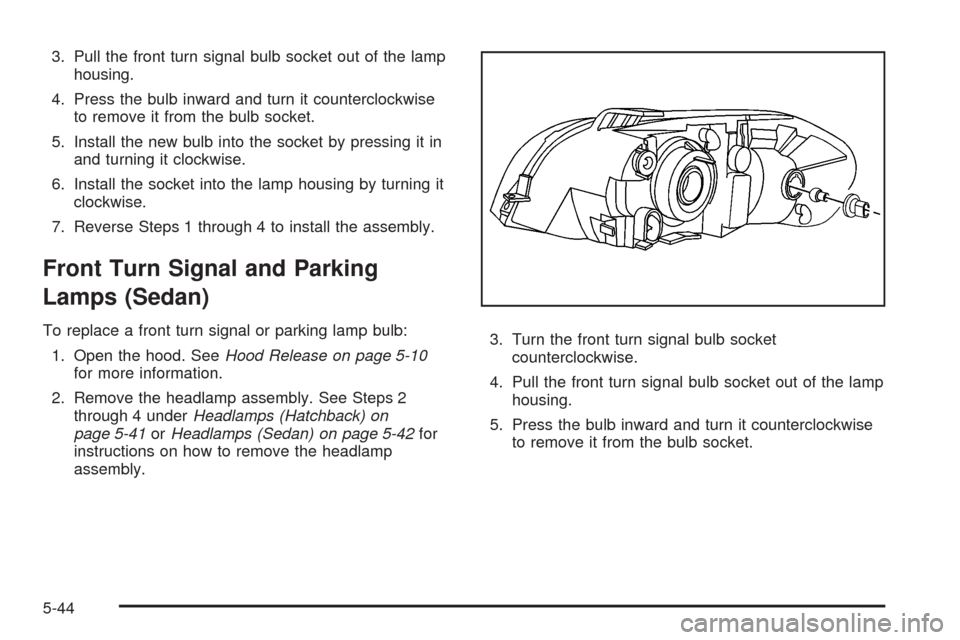
3. Pull the front turn signal bulb socket out of the lamp
housing.
4. Press the bulb inward and turn it counterclockwise
to remove it from the bulb socket.
5. Install the new bulb into the socket by pressing it in
and turning it clockwise.
6. Install the socket into the lamp housing by turning it
clockwise.
7. Reverse Steps 1 through 4 to install the assembly.
Front Turn Signal and Parking
Lamps (Sedan)
To replace a front turn signal or parking lamp bulb:
1. Open the hood. SeeHood Release on page 5-10
for more information.
2. Remove the headlamp assembly. See Steps 2
through 4 underHeadlamps (Hatchback) on
page 5-41orHeadlamps (Sedan) on page 5-42for
instructions on how to remove the headlamp
assembly.3. Turn the front turn signal bulb socket
counterclockwise.
4. Pull the front turn signal bulb socket out of the lamp
housing.
5. Press the bulb inward and turn it counterclockwise
to remove it from the bulb socket.
5-44
Page 267 of 384
6. Install the new bulb into the socket by pressing it in
and turning it clockwise.
7. Install the socket into the lamp housing by turning it
clockwise.
8. Reverse Steps 1 through 2 underHeadlamps
(Hatchback) on page 5-41orHeadlamps (Sedan)
on page 5-42to install the assembly.
Turn Signal Lamps (Side)
To replace a side turn signal bulb:
1. Open the hood. SeeHood Release on page 5-10
for more information.
2. See Steps 2 through 5 underHeadlamps
(Hatchback) on page 5-41orHeadlamps (Sedan)
on page 5-42to access the side turn signal lamps.
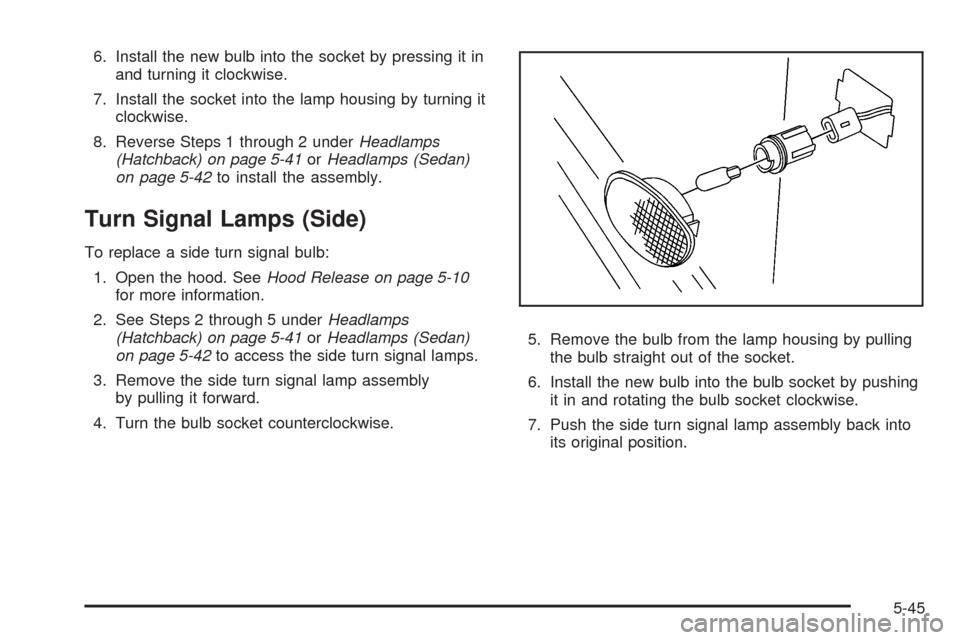
3. Remove the side turn signal lamp assembly
by pulling it forward.
4. Turn the bulb socket counterclockwise.5. Remove the bulb from the lamp housing by pulling
the bulb straight out of the socket.
6. Install the new bulb into the bulb socket by pushing
it in and rotating the bulb socket clockwise.
7. Push the side turn signal lamp assembly back into
its original position.
5-45
Page 270 of 384
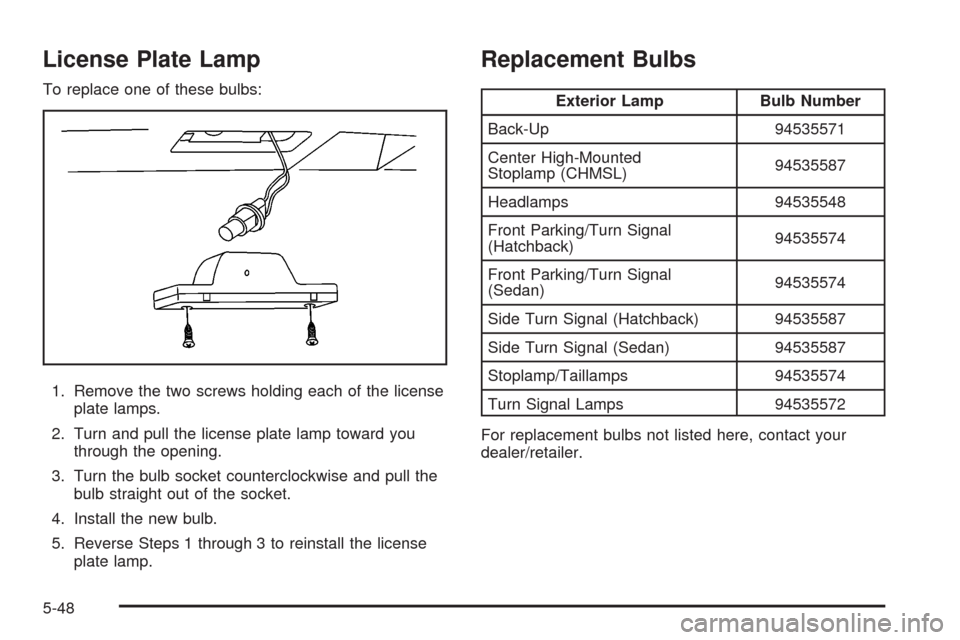
License Plate Lamp
To replace one of these bulbs:
1. Remove the two screws holding each of the license
plate lamps.
2. Turn and pull the license plate lamp toward you
through the opening.
3. Turn the bulb socket counterclockwise and pull the
bulb straight out of the socket.
4. Install the new bulb.
5. Reverse Steps 1 through 3 to reinstall the license
plate lamp.
Replacement Bulbs
Exterior Lamp Bulb Number
Back-Up 94535571
Center High-Mounted
Stoplamp (CHMSL)94535587
Headlamps 94535548
Front Parking/Turn Signal
(Hatchback)94535574
Front Parking/Turn Signal
(Sedan)94535574
Side Turn Signal (Hatchback) 94535587
Side Turn Signal (Sedan) 94535587
Stoplamp/Taillamps 94535574
Turn Signal Lamps 94535572
For replacement bulbs not listed here, contact your
dealer/retailer.
5-48
Page 290 of 384
Each new wheel should have the same load-carrying
capacity, diameter, width, offset, and be mounted the
same way as the one it replaces.
If you need to replace any of your wheels, wheel bolts,
wheel nuts, or Tire Pressure Monitor System (TPMS)
sensors, replace them only with new GM original
equipment parts. This way, you will be sure to have
the right wheel, wheel bolts, wheel nuts, and TPMS
sensors for your vehicle.
{CAUTION:
Using the wrong replacement wheels, wheel
bolts, or wheel nuts on your vehicle can be
dangerous. It could affect the braking and
handling of your vehicle, make your tires lose
air and make you lose control. You could have
a collision in which you or others could be
injured. Always use the correct wheel, wheel
bolts, and wheel nuts for replacement.Notice:The wrong wheel can also cause problems
with bearing life, brake cooling, speedometer or
odometer calibration, headlamp aim, bumper height,
vehicle ground clearance, and tire or tire chain
clearance to the body and chassis.
SeeChanging a Flat Tire on page 5-70for more
information.
Used Replacement Wheels
{CAUTION:
Putting a used wheel on your vehicle is
dangerous. You cannot know how it has been
used or how far it has been driven. It could
fail suddenly and cause a crash. If you have
to replace a wheel, use a new GM original
equipment wheel.
5-68