seats CHEVROLET AVEO 2008 1.G User Guide
[x] Cancel search | Manufacturer: CHEVROLET, Model Year: 2008, Model line: AVEO, Model: CHEVROLET AVEO 2008 1.GPages: 384, PDF Size: 6.67 MB
Page 31 of 384
Lap-Shoulder Belt
All seating positions in your vehicle have a
lap-shoulder belt.
If you are using a rear seating position with a detachable
safety belt and the safety belt is not attached, see
Rear Seat Operation (Sedan) on page 1-7orRear Seat
Operation (Hatchback) on page 1-10for instruction
on reconnecting the safety belt to the mini-buckle.
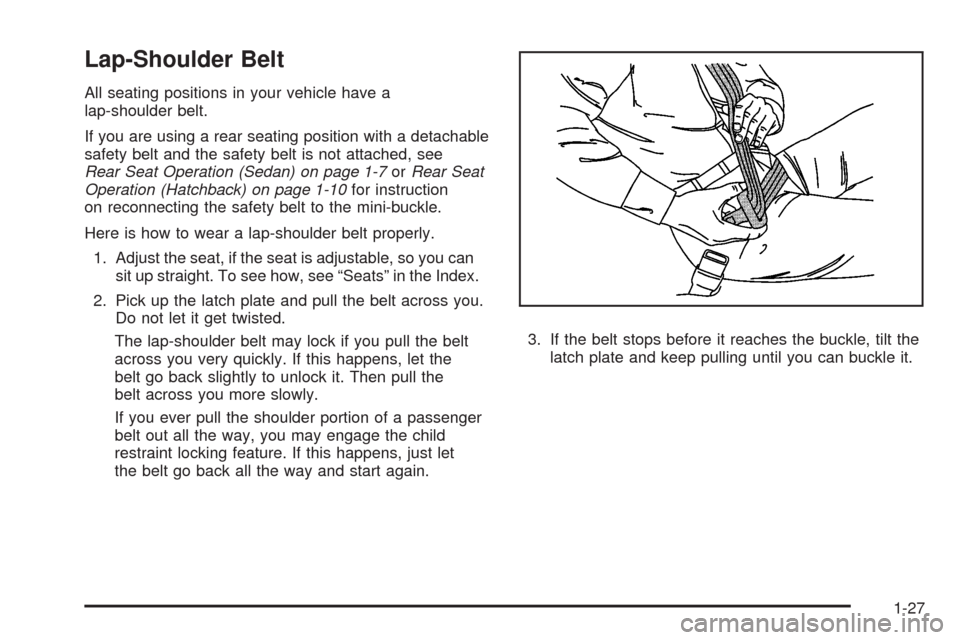
Here is how to wear a lap-shoulder belt properly.
1. Adjust the seat, if the seat is adjustable, so you can
sit up straight. To see how, see “Seats” in the Index.
2. Pick up the latch plate and pull the belt across you.
Do not let it get twisted.
The lap-shoulder belt may lock if you pull the belt
across you very quickly. If this happens, let the
belt go back slightly to unlock it. Then pull the
belt across you more slowly.
If you ever pull the shoulder portion of a passenger
belt out all the way, you may engage the child
restraint locking feature. If this happens, just let
the belt go back all the way and start again.3. If the belt stops before it reaches the buckle, tilt the
latch plate and keep pulling until you can buckle it.
1-27
Page 35 of 384
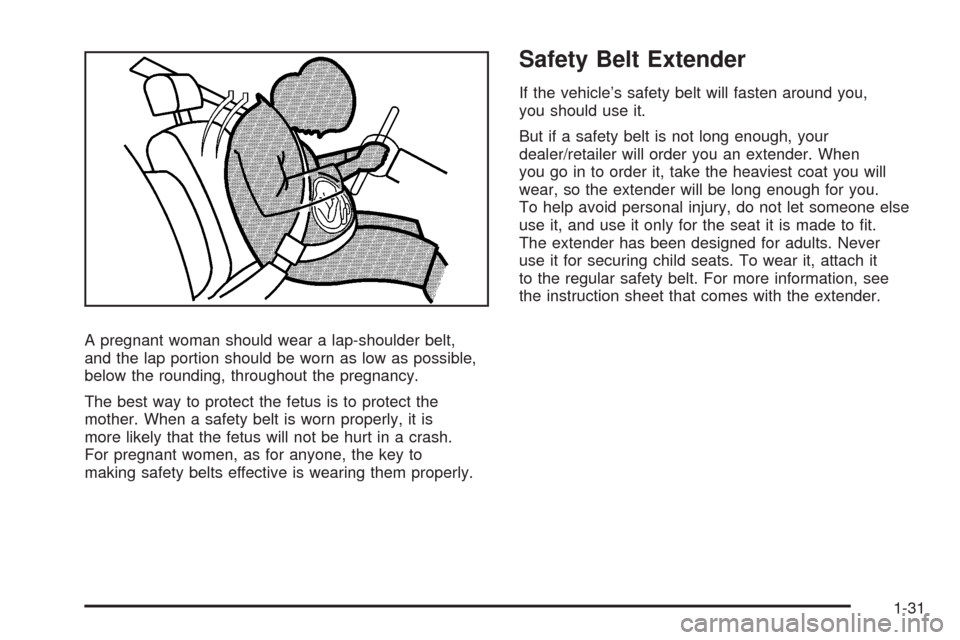
A pregnant woman should wear a lap-shoulder belt,
and the lap portion should be worn as low as possible,
below the rounding, throughout the pregnancy.
The best way to protect the fetus is to protect the
mother. When a safety belt is worn properly, it is
more likely that the fetus will not be hurt in a crash.
For pregnant women, as for anyone, the key to
making safety belts effective is wearing them properly.
Safety Belt Extender
If the vehicle’s safety belt will fasten around you,
you should use it.
But if a safety belt is not long enough, your
dealer/retailer will order you an extender. When
you go in to order it, take the heaviest coat you will
wear, so the extender will be long enough for you.
To help avoid personal injury, do not let someone else
use it, and use it only for the seat it is made to fit.
The extender has been designed for adults. Never
use it for securing child seats. To wear it, attach it
to the regular safety belt. For more information, see
the instruction sheet that comes with the extender.
1-31
Page 36 of 384
Child Restraints
Older Children
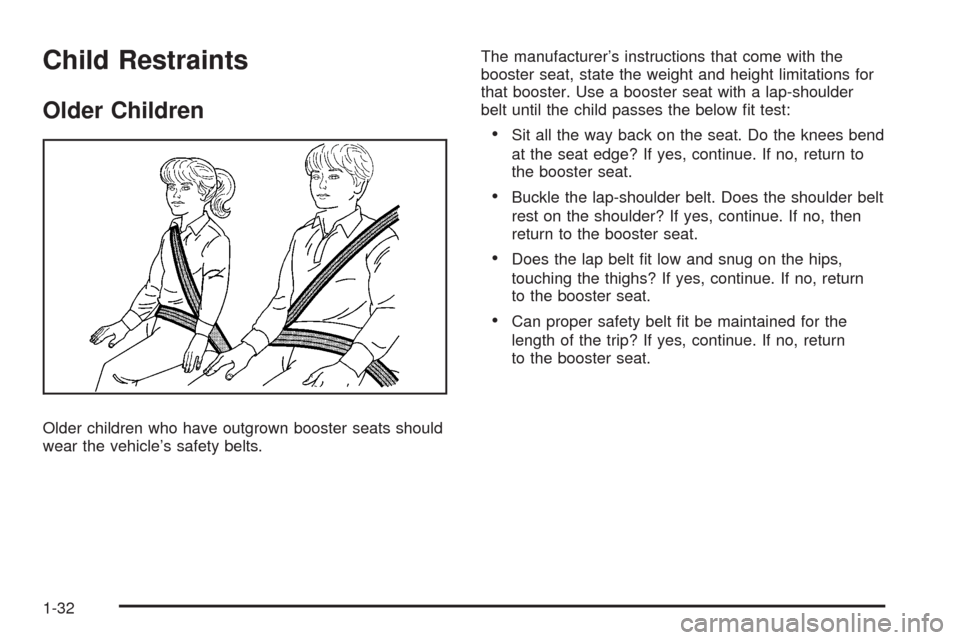
Older children who have outgrown booster seats should
wear the vehicle’s safety belts.The manufacturer’s instructions that come with the
booster seat, state the weight and height limitations for
that booster. Use a booster seat with a lap-shoulder
belt until the child passes the below fit test:
•Sit all the way back on the seat. Do the knees bend
at the seat edge? If yes, continue. If no, return to
the booster seat.
•Buckle the lap-shoulder belt. Does the shoulder belt
rest on the shoulder? If yes, continue. If no, then
return to the booster seat.
•Does the lap belt fit low and snug on the hips,
touching the thighs? If yes, continue. If no, return
to the booster seat.
•Can proper safety belt fit be maintained for the
length of the trip? If yes, continue. If no, return
to the booster seat.
1-32
Page 43 of 384
Securing an Add-On Child Restraint
in the Vehicle
{CAUTION:
A child can be seriously injured or killed in
a crash if the child restraint is not properly
secured in the vehicle. Make sure the child
restraint is properly installed in the vehicle
using the vehicle’s safety belt or LATCH
system, following the instructions that came
with that restraint, and also the instructions
in this manual.
To help reduce the chance of injury, the child restraint
must be secured in the vehicle. Child restraint systems
must be secured in vehicle seats by lap belts or the
lap belt portion of a lap-shoulder belt, or by the LATCH
system. SeeLower Anchors and Tethers for Children
(LATCH) on page 1-42for more information. A child
can be endangered in a crash if the child restraint is
not properly secured in the vehicle.When securing an add-on child restraint, refer to the
instructions that come with the restraint which may be
on the restraint itself or in a booklet, or both, and to this
manual. The child restraint instructions are important,
so if they are not available, obtain a replacement
copy from the manufacturer.
Keep in mind that an unsecured child restraint can
move around in a collision or sudden stop and injure
people in the vehicle. Be sure to properly secure
any child restraint in your vehicle — even when no
child is in it.
Securing the Child Within the
Child Restraint
{CAUTION:
A child can be seriously injured or killed
in a crash if the child is not properly secured
in the child restraint. Because there are
different systems, it is important to refer to
the instructions that come with the restraint.
Make sure the child is properly secured,
following the instructions that came with
that restraint.
1-39
Page 75 of 384
Adding Equipment to Your
Airbag-Equipped Vehicle
Q:Is there anything I might add to or change
about the vehicle that could keep the airbags
from working properly?
A:Yes. If you add things that change your vehicle’s
frame, bumper system, height, front end or side
sheet metal, they may keep the airbag system from
working properly. Changing or moving any parts
of the front seats, safety belts, the airbag sensing
and diagnostic module, steering wheel, instrument
panel, front sensors, or airbag wiring can affect
the operation of the airbag system.
In addition, your vehicle has a passenger sensing
system for the right front passenger’s position,
which includes sensors that are part of the
passenger’s seat. The passenger sensing system
may not operate properly if the original seat
trim is replaced with non-GM covers, upholstery
or trim, or with GM covers, upholstery or trim
designed for a different vehicle. Any object, such
as an aftermarket seat heater or a comfort
enhancing pad or device, installed under or on
top of the seat fabric, could also interfere with
the operation of the passenger sensing system.This could either prevent proper deployment of
the passenger airbag(s) or prevent the passenger
sensing system from properly turning off the
passenger airbag(s). SeePassenger Sensing
System on page 1-65.
If you have any questions about this, you should
contact Customer Assistance before you modify
your vehicle. The phone numbers and addresses
for Customer Assistance are in Step Two of
the Customer Satisfaction Procedure in this manual.
SeeCustomer Satisfaction Procedure on page 7-2.
Q:Because I have a disability, I have to get
my vehicle modi�ed. How can I �nd out whether
this will affect my airbag system?
A:If you have questions, call Customer Assistance.
The phone numbers and addresses for Customer
Assistance are in Step Two of the Customer
Satisfaction Procedure in this manual. See
Customer Satisfaction Procedure on page 7-2.
In addition, your dealer/retailer and the service manual
have information about the location of the airbag
sensors, sensing and diagnostic module and airbag
wiring.
1-71
Page 99 of 384
How long should you keep the coolant heater plugged in?
The answer depends on the outside temperature, the
kind of oil you have, and some other things. Instead of
trying to list everything here, we ask that you contact your
dealer/retailer in the area where you will be parking your
vehicle. The dealer/retailer can give you the best advice
for that particular area.
Automatic Transmission Operation
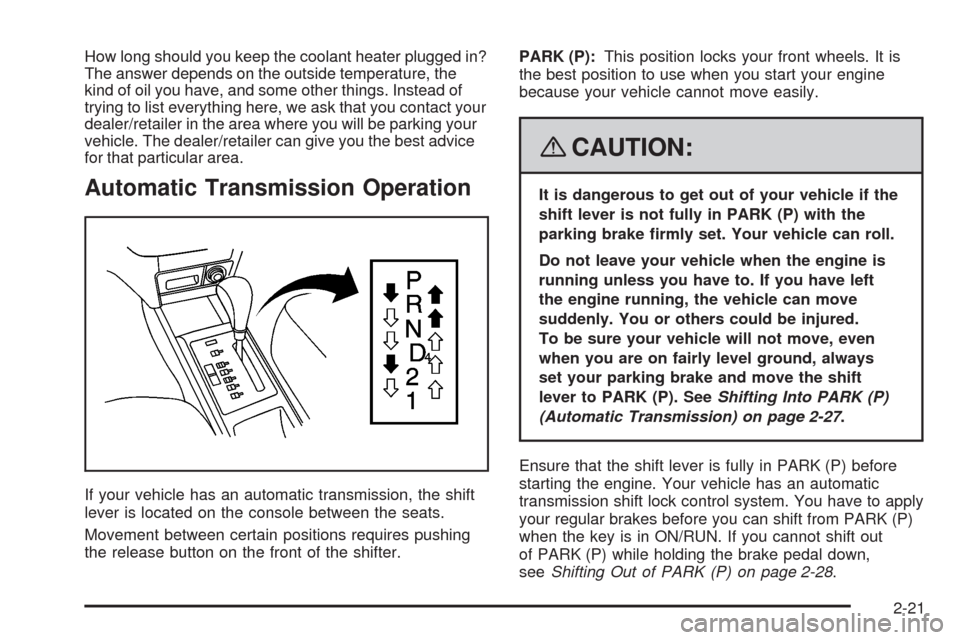
If your vehicle has an automatic transmission, the shift
lever is located on the console between the seats.
Movement between certain positions requires pushing
the release button on the front of the shifter.PARK (P):This position locks your front wheels. It is
the best position to use when you start your engine
because your vehicle cannot move easily.
{CAUTION:
It is dangerous to get out of your vehicle if the
shift lever is not fully in PARK (P) with the
parking brake �rmly set. Your vehicle can roll.
Do not leave your vehicle when the engine is
running unless you have to. If you have left
the engine running, the vehicle can move
suddenly. You or others could be injured.
To be sure your vehicle will not move, even
when you are on fairly level ground, always
set your parking brake and move the shift
lever to PARK (P). SeeShifting Into PARK (P)
(Automatic Transmission) on page 2-27.
Ensure that the shift lever is fully in PARK (P) before
starting the engine. Your vehicle has an automatic
transmission shift lock control system. You have to apply
your regular brakes before you can shift from PARK (P)
when the key is in ON/RUN. If you cannot shift out
of PARK (P) while holding the brake pedal down,
seeShifting Out of PARK (P) on page 2-28.
2-21
Page 104 of 384
Shift Speeds
{CAUTION:
If you skip a gear when you downshift, you could
lose control of your vehicle. You could injure
yourself or others. Do not shift down more than
one gear at a time when you downshift.
Parking Brake
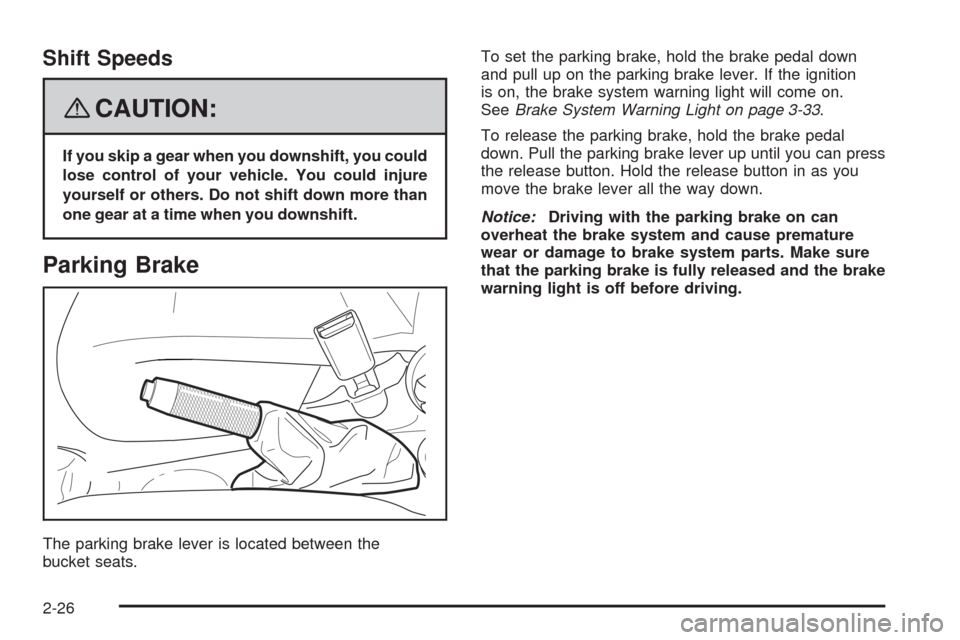
The parking brake lever is located between the
bucket seats.To set the parking brake, hold the brake pedal down
and pull up on the parking brake lever. If the ignition
is on, the brake system warning light will come on.
SeeBrake System Warning Light on page 3-33.
To release the parking brake, hold the brake pedal
down. Pull the parking brake lever up until you can press
the release button. Hold the release button in as you
move the brake lever all the way down.
Notice:Driving with the parking brake on can
overheat the brake system and cause premature
wear or damage to brake system parts. Make sure
that the parking brake is fully released and the brake
warning light is off before driving.
2-26
Page 135 of 384
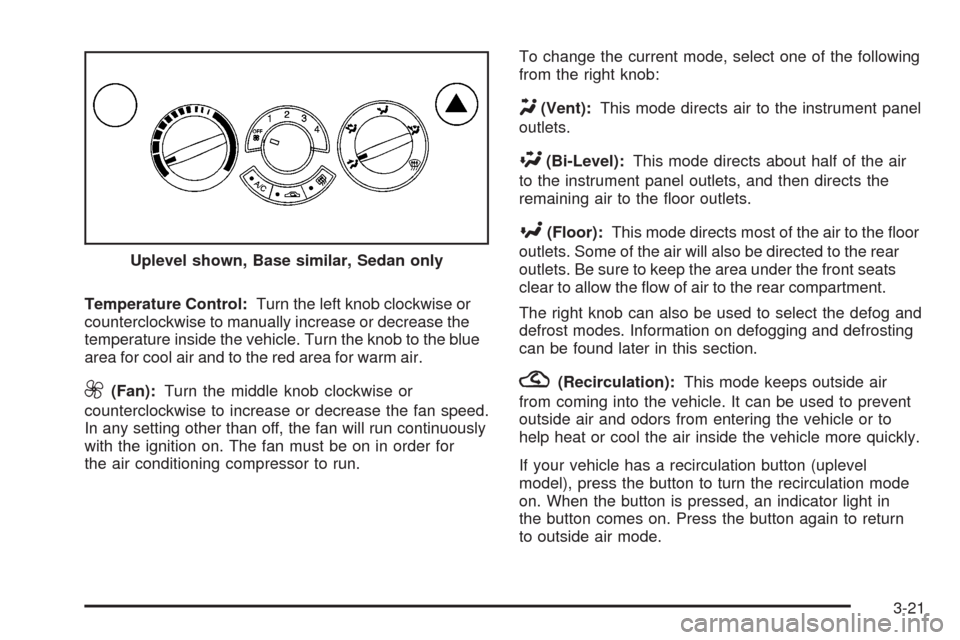
Temperature Control:Turn the left knob clockwise or
counterclockwise to manually increase or decrease the
temperature inside the vehicle. Turn the knob to the blue
area for cool air and to the red area for warm air.
9(Fan):Turn the middle knob clockwise or
counterclockwise to increase or decrease the fan speed.
In any setting other than off, the fan will run continuously
with the ignition on. The fan must be on in order for
the air conditioning compressor to run.To change the current mode, select one of the following
from the right knob:
Y(Vent):This mode directs air to the instrument panel
outlets.
\(Bi-Level):This mode directs about half of the air
to the instrument panel outlets, and then directs the
remaining air to the floor outlets.
[(Floor):This mode directs most of the air to the floor
outlets. Some of the air will also be directed to the rear
outlets. Be sure to keep the area under the front seats
clear to allow the flow of air to the rear compartment.
The right knob can also be used to select the defog and
defrost modes. Information on defogging and defrosting
can be found later in this section.
?(Recirculation):This mode keeps outside air
from coming into the vehicle. It can be used to prevent
outside air and odors from entering the vehicle or to
help heat or cool the air inside the vehicle more quickly.
If your vehicle has a recirculation button (uplevel
model), press the button to turn the recirculation mode
on. When the button is pressed, an indicator light in
the button comes on. Press the button again to return
to outside air mode. Uplevel shown, Base similar, Sedan only
3-21
Page 138 of 384
Outlet Adjustment
To open an outlet, press on its cover. Turn the cover to
change the direction of the airflow.
Operation Tips
•
Clear away any ice, snow or leaves from the air
inlets at the base of the windshield that may
block the flow of air into your vehicle.
•Use of non-GM approved hood deflectors may
adversely affect the performance of the system.
•Keep the path under the front seats clear of objects
to help circulate the air inside of your vehicle more
effectively.
Passenger Compartment Air Filter
Your vehicle may have a passenger compartment
air filter. It is located behind the glove box and can be
accessed after removing the glove box from its housing.
The filter traps most of the pollen from air entering
the module. The air cleaner/filter may need to be
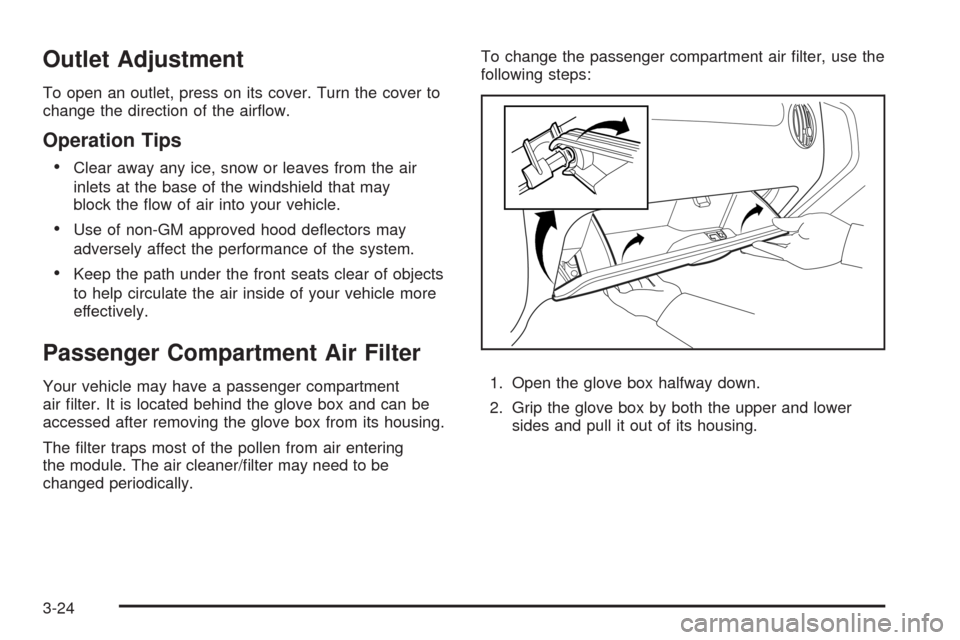
changed periodically.To change the passenger compartment air filter, use the
following steps:
1. Open the glove box halfway down.
2. Grip the glove box by both the upper and lower
sides and pull it out of its housing.
3-24
Page 220 of 384
And, if you do have a heavy load, you should
spread it out. See “Steps for Determining Correct
Load Limit” earlier in this section.
{CAUTION:
Do not load your vehicle any heavier than
the Gross Vehicle Weight Rating (GVWR),
or either the maximum front or rear Gross
Axle Weight Rating (GAWR). If you do,
parts on your vehicle can break, and it
can change the way your vehicle handles.
These could cause you to lose control and
crash. Also, overloading can shorten the
life of your vehicle.
Notice:Overloading your vehicle may cause
damage. Repairs would not be covered by
your warranty. Do not overload your vehicle.If you put things inside your vehicle — like
suitcases, tools, packages, or anything else — they
will go as fast as the vehicle goes. If you have to
stop or turn quickly, or if there is a crash, they will
keep going.{CAUTION:
Things you put inside your vehicle can
strike and injure people in a sudden stop
or turn, or in a crash.
Put things in the cargo area of your
vehicle. Try to spread the weight
evenly.
Never stack heavier things, like
suitcases, inside the vehicle so that
some of them are above the tops of
the seats.
Do not leave an unsecured child
restraint in your vehicle.
When you carry something inside the
vehicle, secure it whenever you can.
Do not leave a seat folded down
unless you need to.
4-26