bulb CHEVROLET BLAZER 1995 2.G Owners Manual
[x] Cancel search | Manufacturer: CHEVROLET, Model Year: 1995, Model line: BLAZER, Model: CHEVROLET BLAZER 1995 2.GPages: 380, PDF Size: 20.04 MB
Page 90 of 380
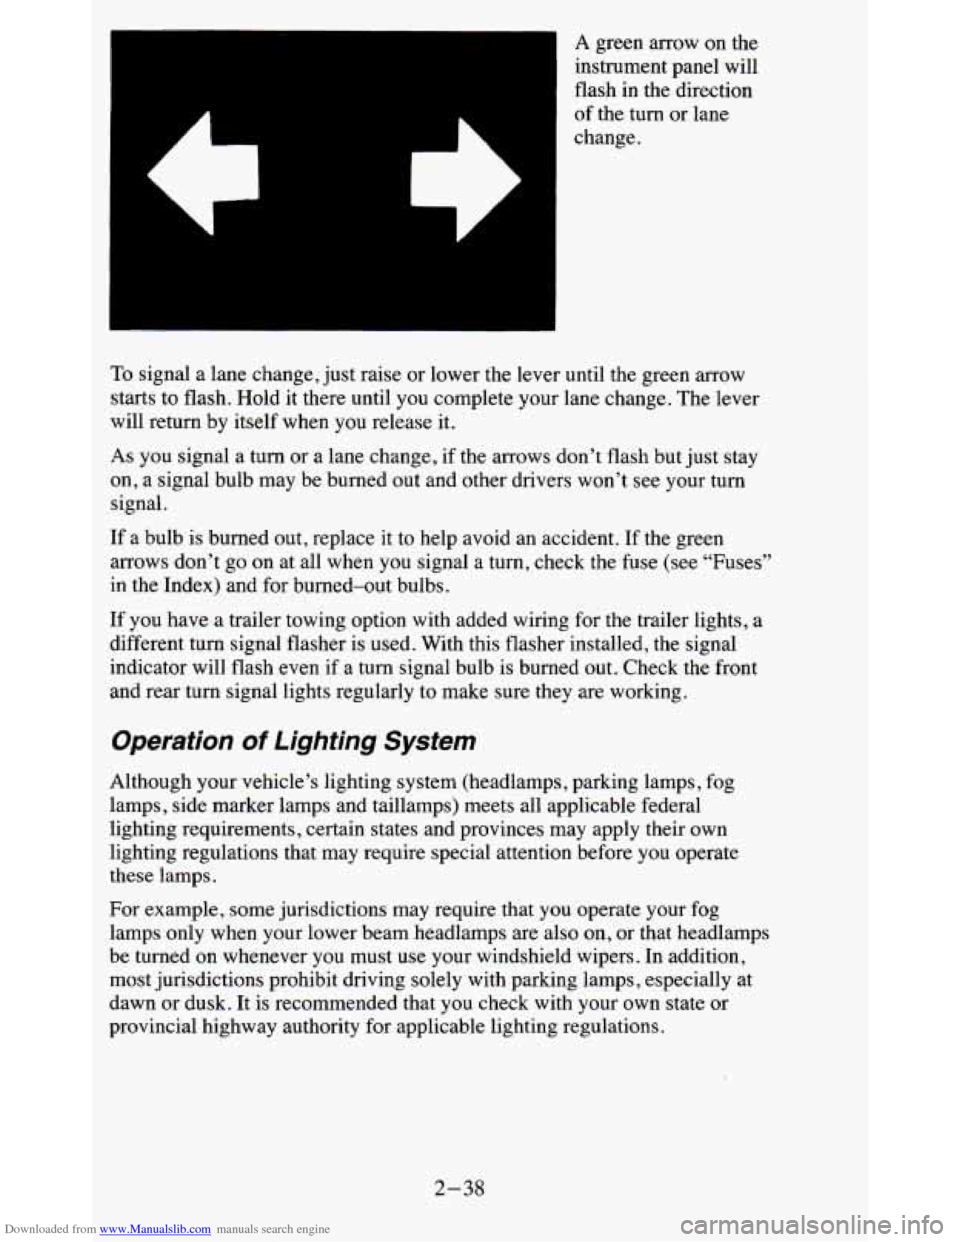
Downloaded from www.Manualslib.com manuals search engine A green arrow on the
instrument panel will
flash
in the direction
of the turn or lane
change.
To signal a lane change, just raise or lower the lever until the green arrow
starts to flash. Hold it there until you complete your lane change. The lever
will return by itself when you release it.
As you signal a turn or a lane change, if the arrows don’t flash but just stay
on, a signal bulb may be burned out and other drivers won’t see your turn
signal.
If a bulb is burned out, replace it to help avoid an accident. If the green
arrows don’t go on at all when
you signal a turn, check the fuse (see “Fuses”
in the Index) and for burned-out bulbs.
If you have a trailer towing option with added wiring for the trailer lights, a
different turn signal flasher is used. With this flasher instal\
led, the signal
indicator will flash even if
a turn signal bulb is burned out. Check the front
and rear turn signal lights regularly to make sure they are w\
orking.
Operation of Lighting System
Although your vehicle’s lighting system (headlamps, parking lamps, fog
lamps, side marker lamps and taillamps) meets all applicable federal
lighting requirements, certain states and provinces may apply their own
lighting regulations that may require special attention before you operate
these lamps.
For example, some jurisdictions may require that you operate your fog
lamps only when your lower beam headlamps are also on,
or that headlamps
be turned on whenever you must use your windshield wipers. In \
addition,
most jurisdictions prohibit driving solely with parking lamps, especially at
dawn or dusk. It is recommended that you check with your own state or
provincial highway authority for applicable lighting regulations.
2-38
Page 199 of 380
Downloaded from www.Manualslib.com manuals search engine Passing
You’ll need more passing distance up ahead when you’re towing a trailer.
And, because you’re a good deal longer, you’ll need to go much farther
beyond the passed vehicle before you can return to your lane.
Backing Up
Hold the bottom of the steering wheel with one hand. Then, to move the
trailer to the left, just move that hand to the left. To move the trailer to the
right, move your hand to the right. Always back up slowly and, if possible,
have someone guide you.
Making Turns
NOTICE:
Making very sharp turns while trailering could cause the traile\
r
to come in contact with the vehicle. Your vehicle could be
damaged. Avoid making very sharp turns while trailering.
When you’re turning with a trailer, make wider turns than normal. Do this
so your trailer won’t strike soft shoulders, curbs, road signs, trees, or other
objects. Avoid jerky or sudden maneuvers. Signal well in advance.
Turn Signals When Towing a Trailer
When you tow a trailer, your vehicle has to have extra wiring and a
heavy-duty
turn signal flasher (included in the optional trailering package).
The green arrows on your instrument panel will flash whenever you signal a
turn or lane change. Properly hooked up, the trailer lamps will also flash,
telling other drivers you’re about to turn, change lanes or stop.
When towing a trailer, the green arrows on your instrument panel will flash
for turns even if the bulbs on the trailer are burned out. Thus, you may think
drivers behind you are seeing your signal when they are not. It’s important
to check occasionally to be sure the trailer bulbs are still working.
Driving On Grades
Reduce speed and shift to a lower gear before you start down a long or steep
downgrade. If you don’t shift down, you might have to use your brakes
so
much that they would get hot and no longer work well.
On a long uphill grade, shift down and reduce your speed to around 45 mph
(70 Wh) to reduce the possibility of engine and transmission overheating.
4-45
Page 271 of 380
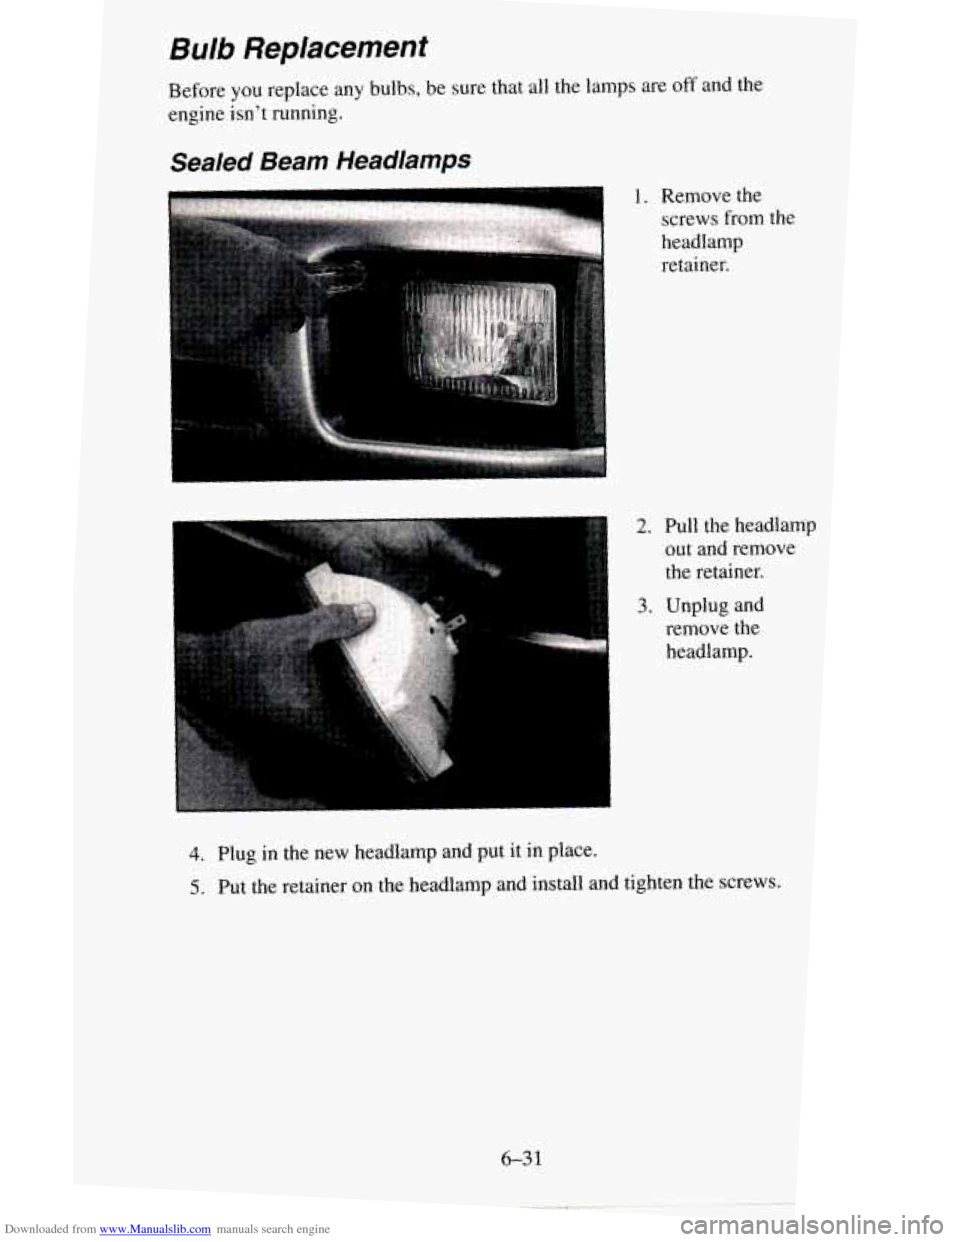
Downloaded from www.Manualslib.com manuals search engine Bulb Replacement
Before you replace any bulbs, be sure that all the lamps are off and the
engine isn’t running.
c
2. Pull the headlamp
out and remove
the retainer.
3. Unplug and
remove the
headlamp.
Page 272 of 380
Downloaded from www.Manualslib.com manuals search engine Halogen Bulbs
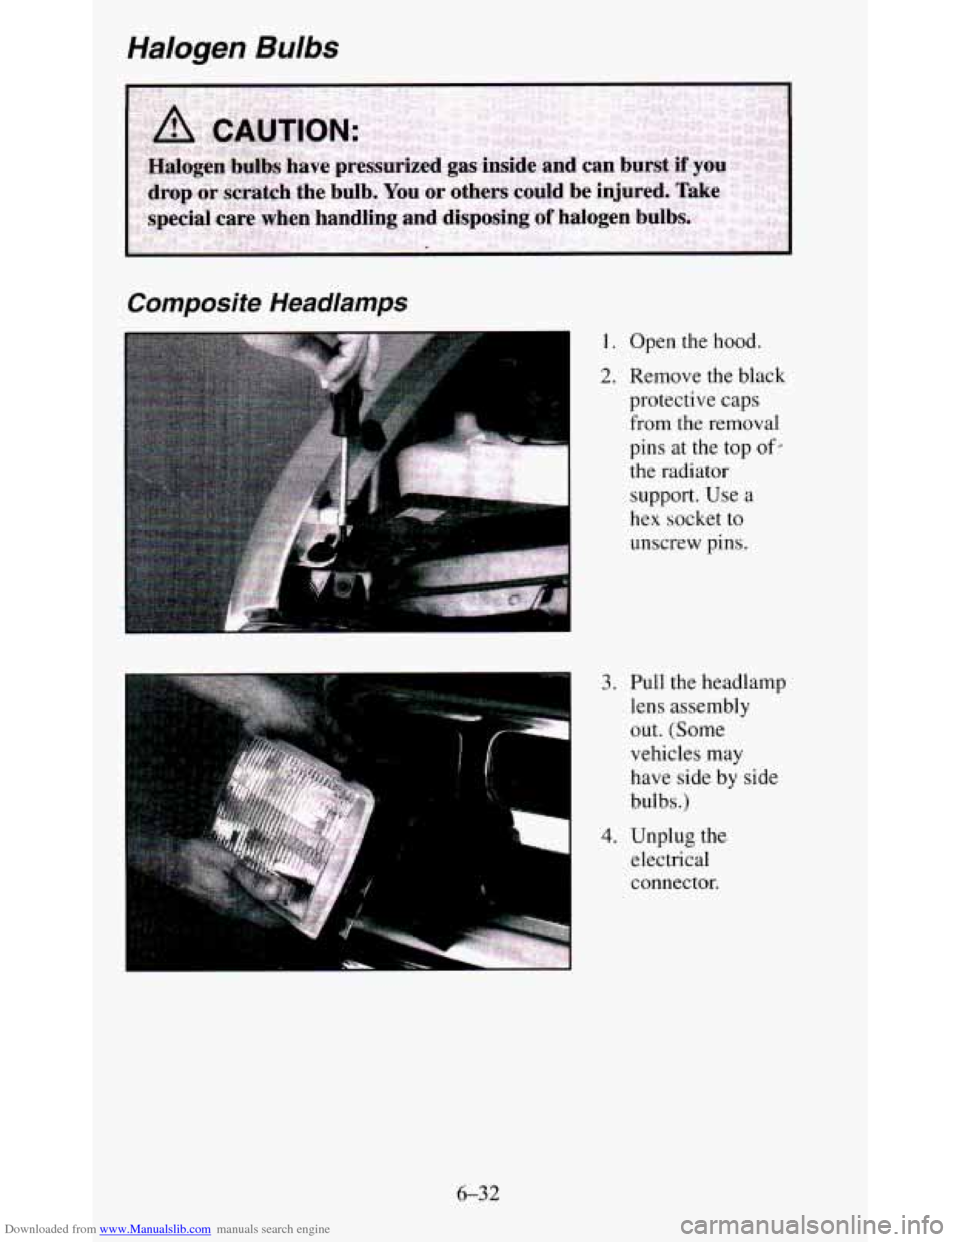
Composite Headlamps
I. Open the hood.
2. Remove the black
protective caps
from the removal
pins at the top
of-
the radiator support.
Use a
hex socket
to
unscrew pins.
3. Pull the headlamp
lens assembly
out. (Some
vehicles may
have side by side
bulbs.)
4. Unplug the electrical
connector.
6-32
Page 273 of 380
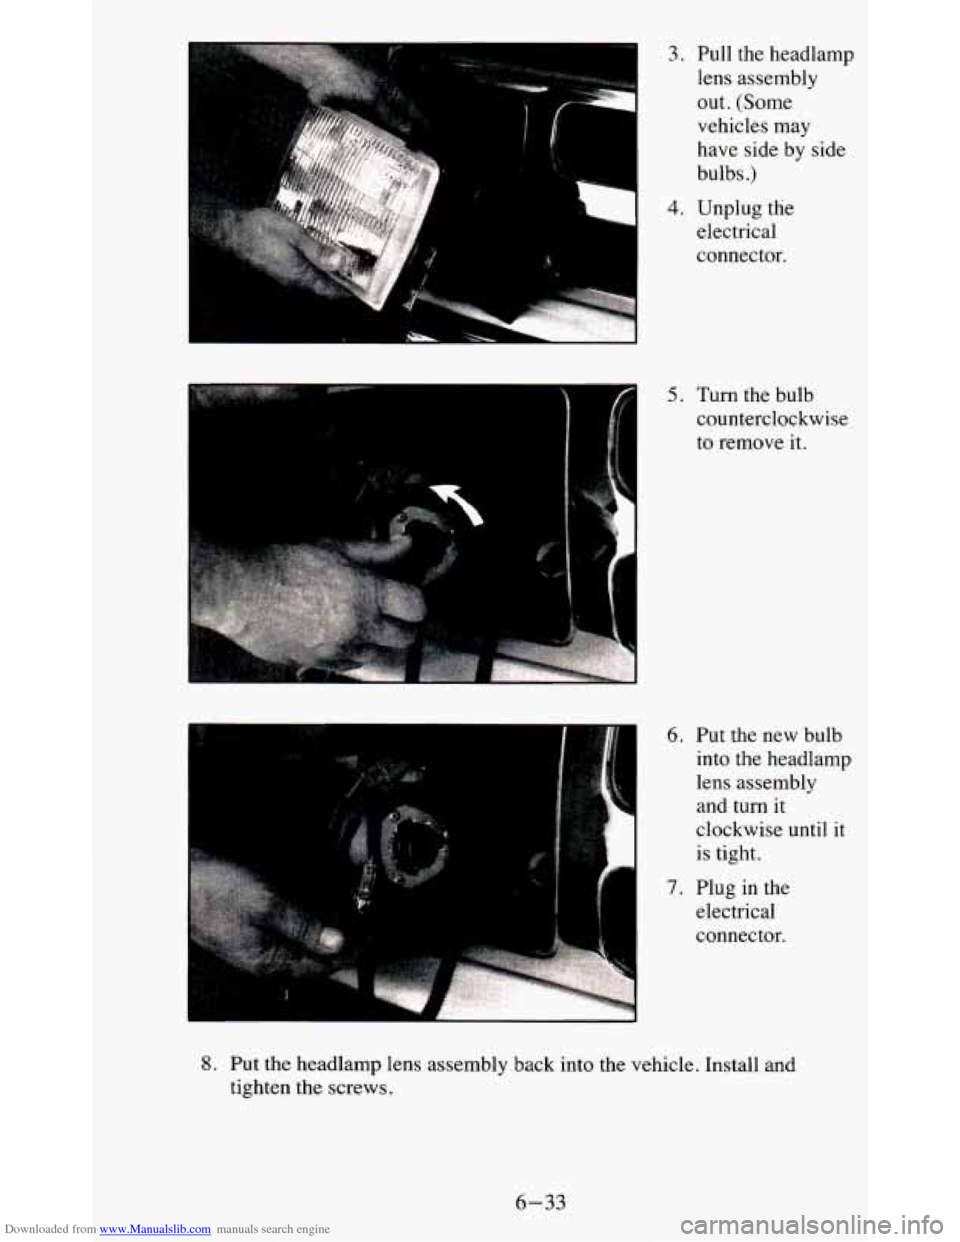
Downloaded from www.Manualslib.com manuals search engine 3. Pull the headlamp .. lens assembly
out. (Some
vehicles may
have side by side
bulbs
.)
4. Unplug the
electrical
connector.
_I , .
I 5. Turn the bulb
counterclockwise
to remove it.
6. Put the new bulb
I into the headlamp
lens assembly
and turn it
clockwise until it
is tight.
7. Plug in the
electrical
connector.
L
8. Put the headlamp lens assembly back into the vehicle. Install and
tighten the screws.
6-33
Page 274 of 380
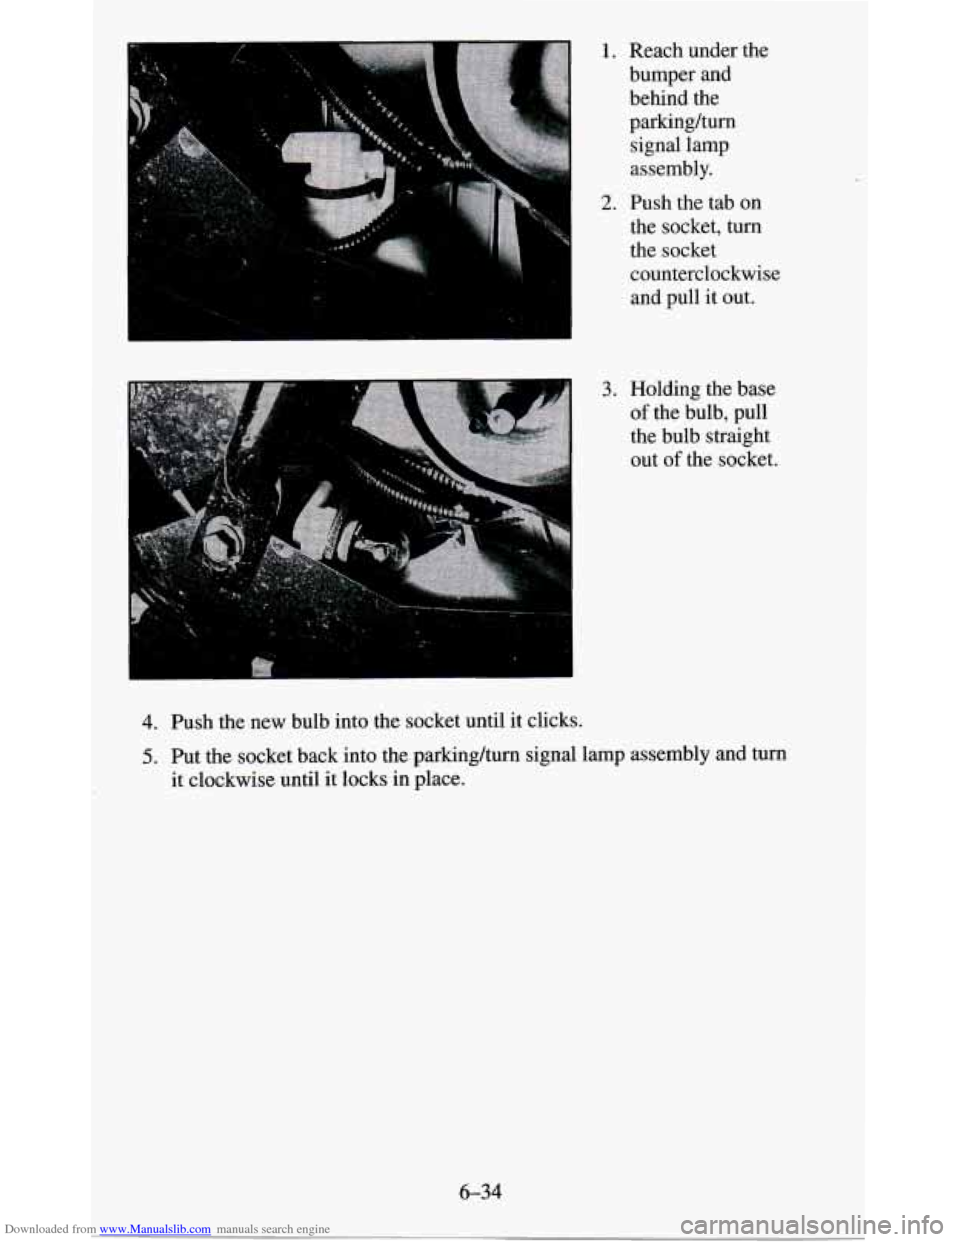
Downloaded from www.Manualslib.com manuals search engine 1. Reach under the
bumper and behind the parkinghrn
signal lamp
assembly.
2. Push the tab on
the socket, turn
the socket counterclockwise and pull it out.
3. Holding the base
of the bulb, pull
the bulb straight out
of the socket.
4. Push the new bulb into the socket until it clicks.
5. Put the socket back into the parking/turn signal lamp assembly and turn
it clockwise until it locks in place.
6-34
Page 275 of 380
Downloaded from www.Manualslib.com manuals search engine Rear Lamps
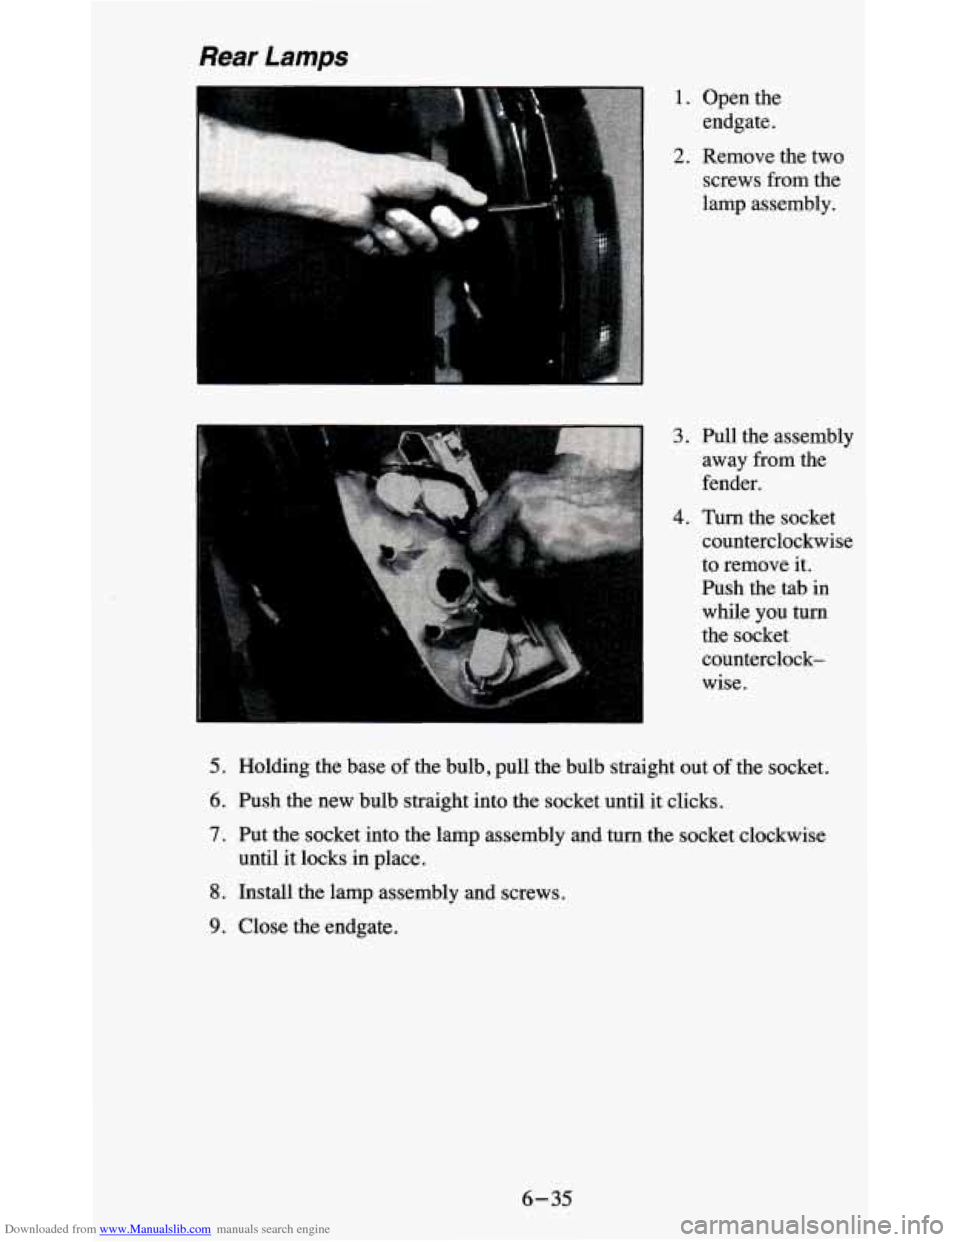
r 1. Open the
endgate.
2. Remove the two
screws from the
lamp assembly.
3. Pull the assembly
away from the
fender.
4. Turn the socket
counterclockwise
to remove it.
Push the tab in
while you turn
the socket
counterclock-
wise.
5. Holding the base of the bulb, pull the bulb straight out of the socket.
6. Push the new bulb straight into the socket until it clicks.
7. Put the socket into the lamp assembly and turn the socket clockwise
until it locks in place.
8. Install the lamp assembly and screws.
9. Close the endgate.
6-35
Page 276 of 380
Downloaded from www.Manualslib.com manuals search engine Center High Mounted Stop Lamp (CHMSL)
A
P
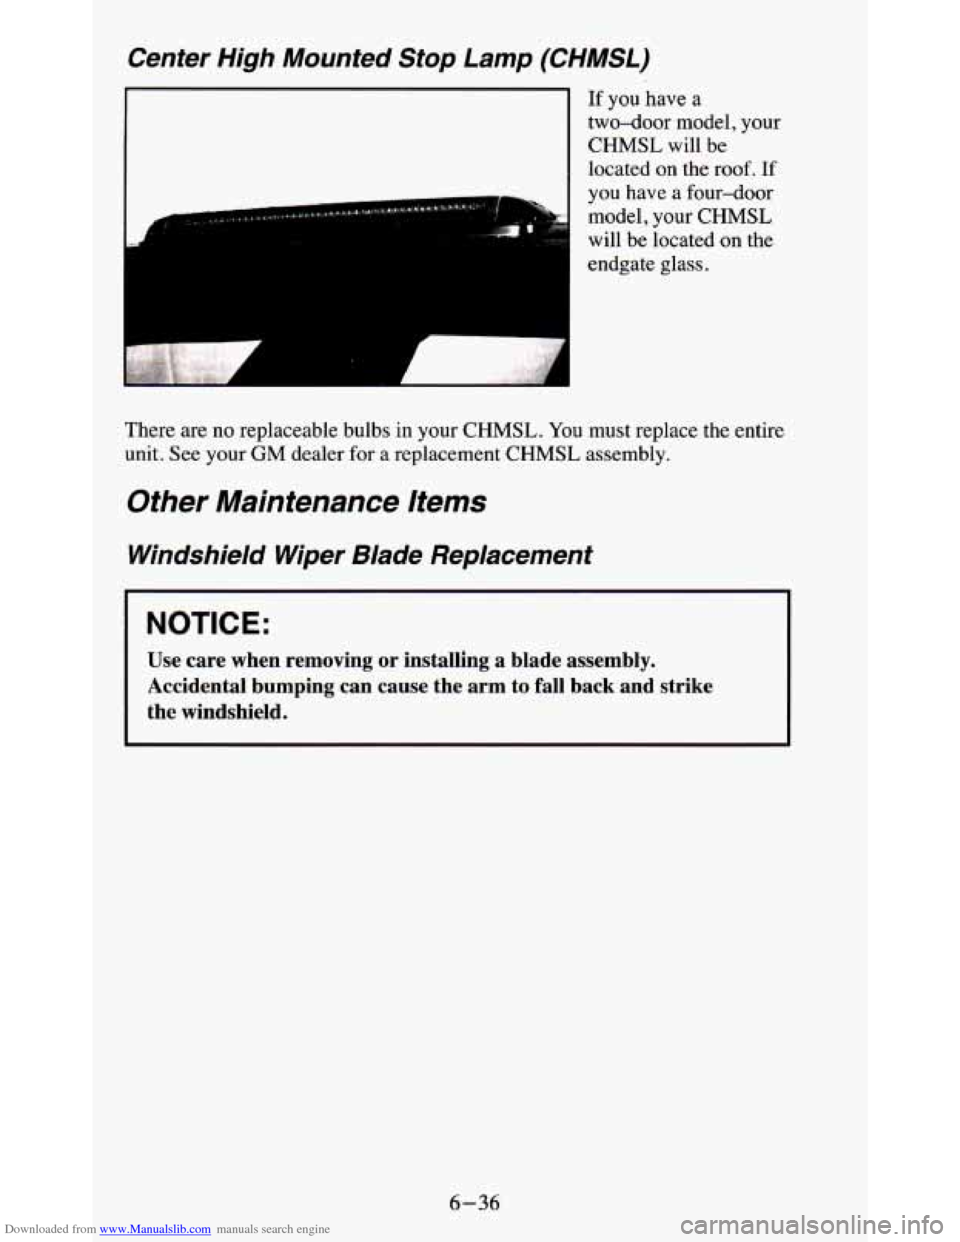
If you have a
two-door model, your
CHMSL will be
located on the roof. If
you have a four-door
model, your CHMSL
will be located on the
endgate glass.
There
are no replaceable bulbs in your CHMSL. You must replace the entire
unit. See your
GM dealer for a replacement CHMSL assembly.
Other Maintenance Items
Whdshield Wiper Blade Replacement
NOTICE:
Use care when removing or installing a blade assembly.
Accidental bumping can cause the arm to fall back and strike
the windshield.
6-36
Page 304 of 380
Downloaded from www.Manualslib.com manuals search engine Lamp and Bulb Dafa
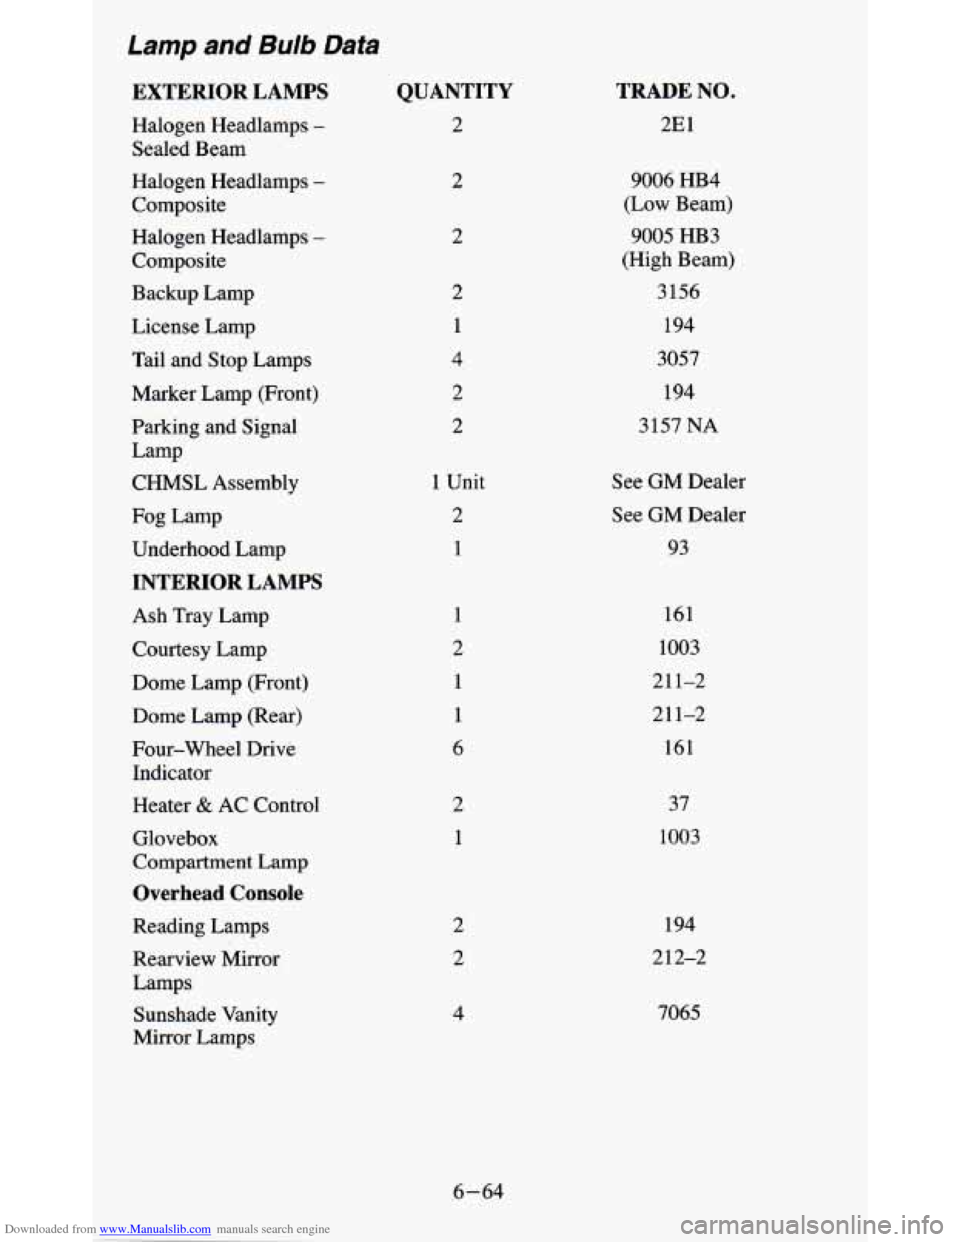
EXTERIOR LAMPS
Halogen Headlamps -
Sealed Beam
Halogen Headlamps
-
Composite
Halogen Headlamps
-
Composite
Backup Lamp
License Lamp
Tail and Stop Lamps
Marker Lamp (Front)
Parking and Signal
CHMSL Assembly
Lamp
Fog Lamp
Underhood Lamp
INTERIOR LAMPS
Ash Tray Lamp
Courtesy Lamp
Dome Lamp (Front)
Dome Lamp (Rear)
Four-wheel Drive Indicator
Heater
& AC Control
Glovebox
Compartment Lamp
Overhead Console
Reading Lamps
Rearview Mirror
Lamps
Sunshade Vanity
Mirror Lamps
QUANTITY
2
2
2
2
1
4
2
2
1 Unit 2
1
1
2 1
1
6
2
1
2
2
4
TRADE NO.
2E1
9006 HB4
(Low Beam)
9005 HB3
(High Beam)
3 156
194
3057
194
3157
NA
See GM Dealer
See GM Dealer
93
161
1003
211-2
211-2 161
37
1003
194
212-2
7065
6-64
Page 305 of 380
Downloaded from www.Manualslib.com manuals search engine Instrument Cluster Lamps
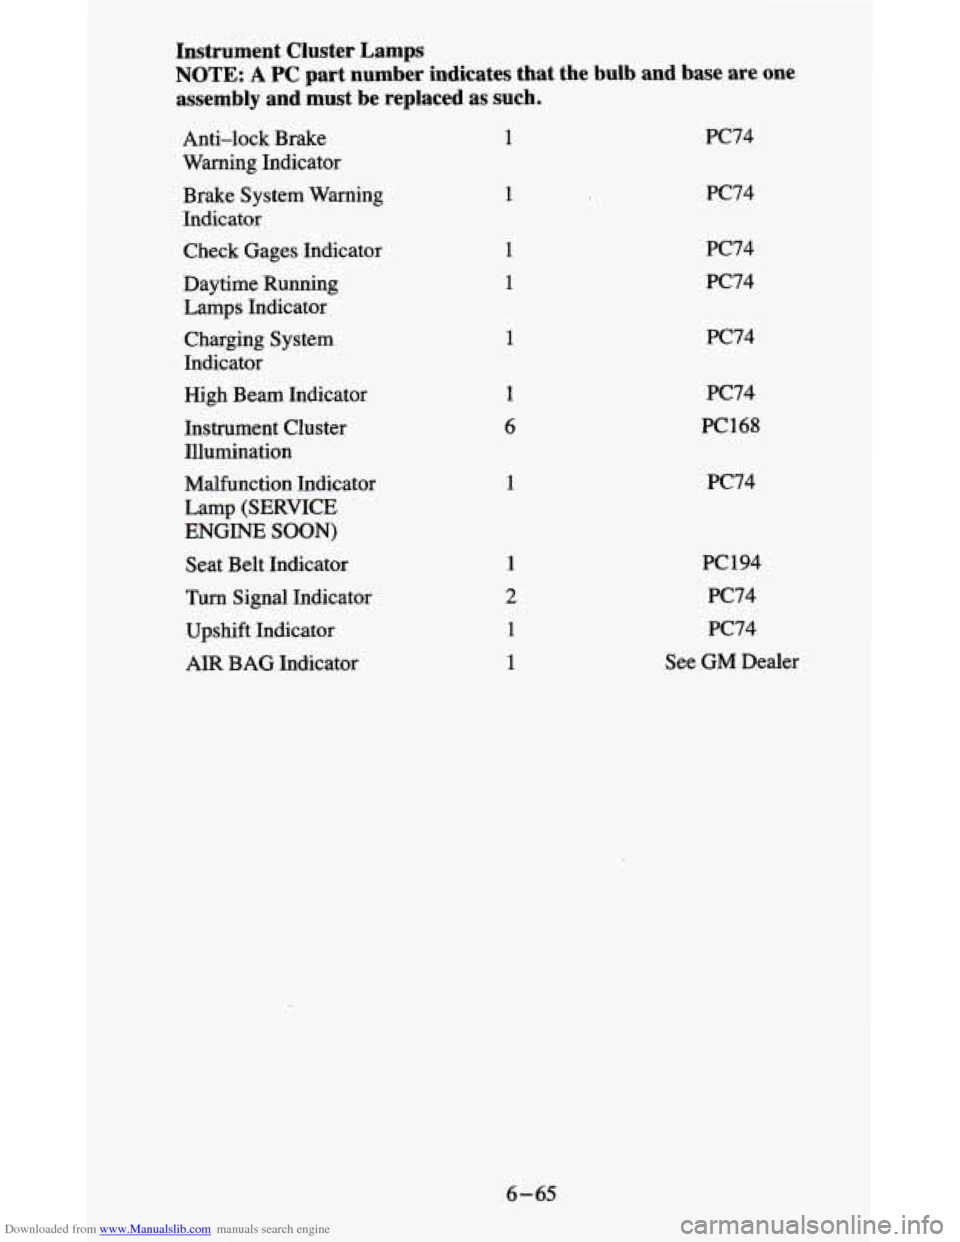
NOTE: A PC part number indicates that the bulb and base are one
assembly and must be replaced as such.
Anti-lock Brake
Warning Indicator
Brake System Warning
Indicator
Check Gages Indicator
Daytime Running
Lamps Indicator
Charging System
Indicator
High Beam Indicator
Instrument Cluster
Illumination
Malfunction Indicator
Lamp (SERVICE
ENGINE
SOON)
Seat Belt Indicator
Turn Signal Indicator
Upshift Indicator
AIR BAG Indicator
1
1
1
1
1
1
6
1
1
2
1
1
PC74
PC74
PC74 PC74
PC74
PC74
PC168
PC74
PC 194
PC74 PC74
See
GM Dealer
6-65