brake CHEVROLET BLAZER 2020 Get To Know Guide
[x] Cancel search | Manufacturer: CHEVROLET, Model Year: 2020, Model line: BLAZER, Model: CHEVROLET BLAZER 2020Pages: 20, PDF Size: 3.74 MB
Page 2 of 20
2
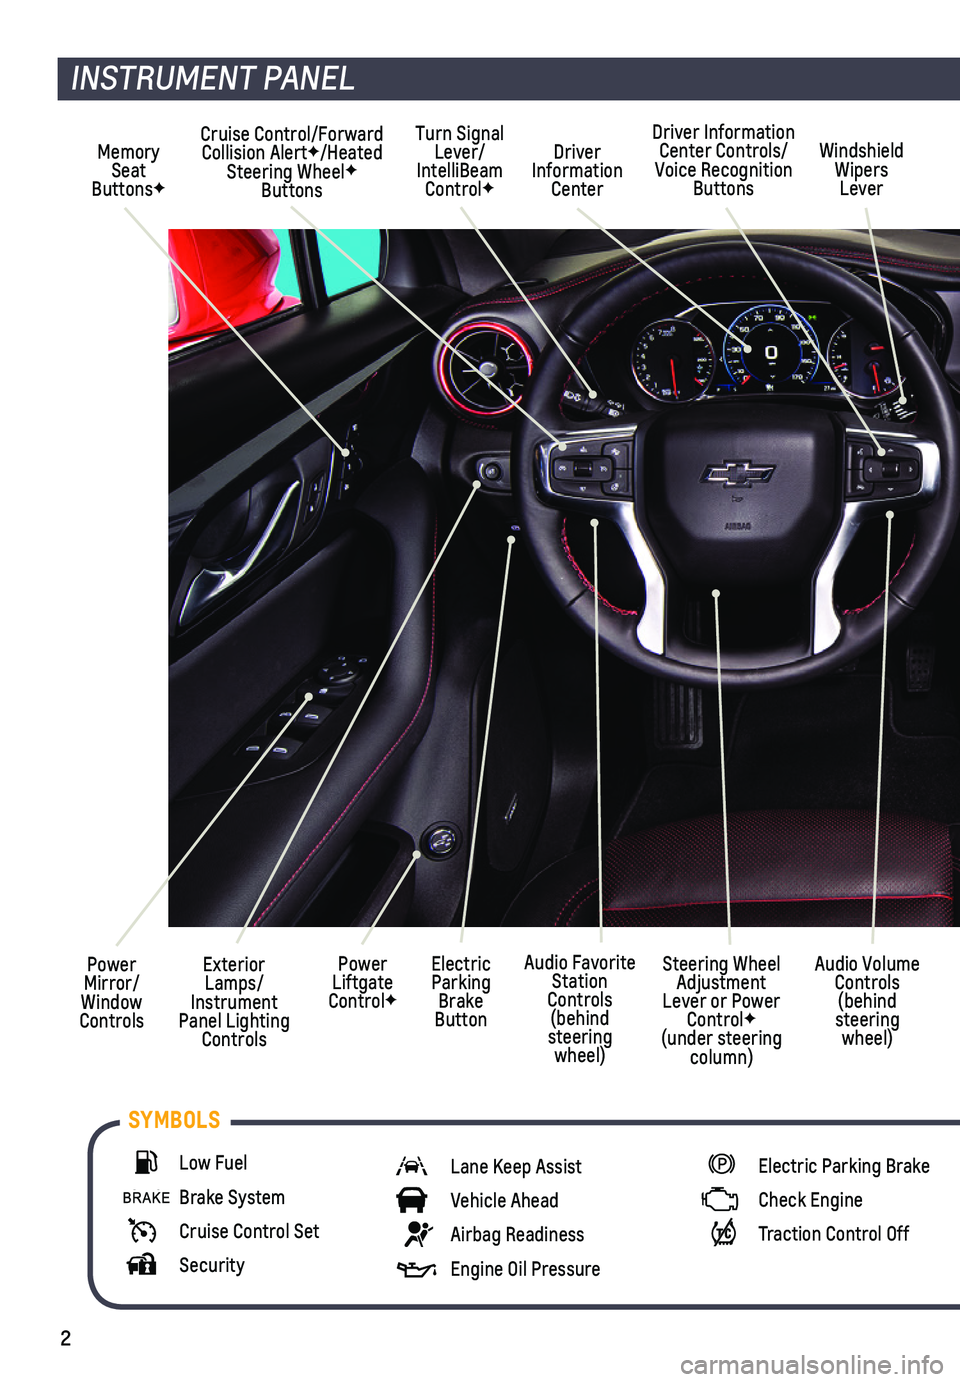
Power Mirror/ Window Controls
Cruise Control/Forward Collision AlertF/Heated Steering WheelF Buttons
Driver Information Center
Driver Information Center Controls/Voice Recognition Buttons
Windshield Wipers Lever
Exterior Lamps/ Instrument Panel Lighting Controls
Turn Signal Lever/IntelliBeam ControlF
Power Liftgate ControlF
Electric Parking Brake Button
Memory Seat ButtonsF
INSTRUMENT PANEL
Audio Volume Controls (behind steering wheel)
Steering Wheel Adjustment Lever or Power ControlF (under steering column)
Audio Favorite Station Controls (behind steering wheel)
Low Fuel
Brake System
Cruise Control Set
Security
Lane Keep Assist
Vehicle Ahead
Airbag Readiness
Engine Oil Pressure
Electric Parking Brake
Check Engine
Traction Control Off
SYMBOLS
Page 3 of 20
3
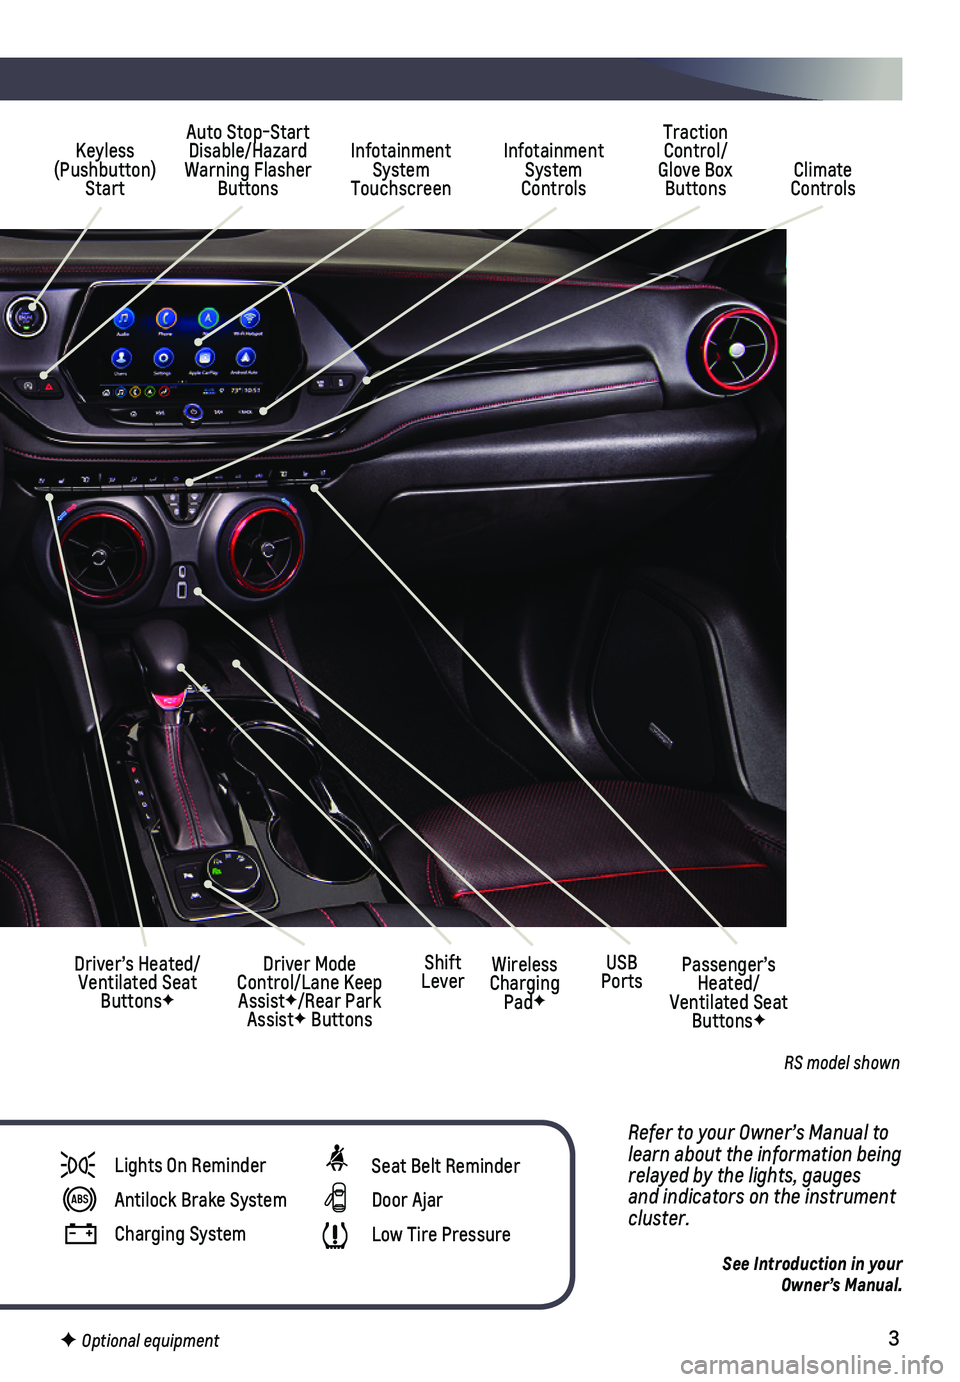
Refer to your Owner’s Manual to learn about the information being relayed by the lights, gauges and indicators on the instrument cluster.
See Introduction in your Owner’s Manual.
Infotainment System Touchscreen
Auto Stop-Start Disable/Hazard Warning Flasher Buttons
Infotainment System Controls Climate Controls
Traction Control/Glove Box Buttons
Driver’s Heated/Ventilated Seat ButtonsF
Driver Mode Control/Lane Keep AssistF/Rear Park AssistF Buttons
Keyless (Pushbutton) Start
USB PortsWireless Charging PadF
Shift LeverPassenger’s Heated/Ventilated Seat ButtonsF
Lights On Reminder
Antilock Brake System
Charging System
Seat Belt Reminder
Door Ajar
Low Tire Pressure
F Optional equipment
RS model shown
Page 5 of 20
5
KEYLESS (PUSHBUTTON) START
AUTO ENGINE STOP/START OPERATION
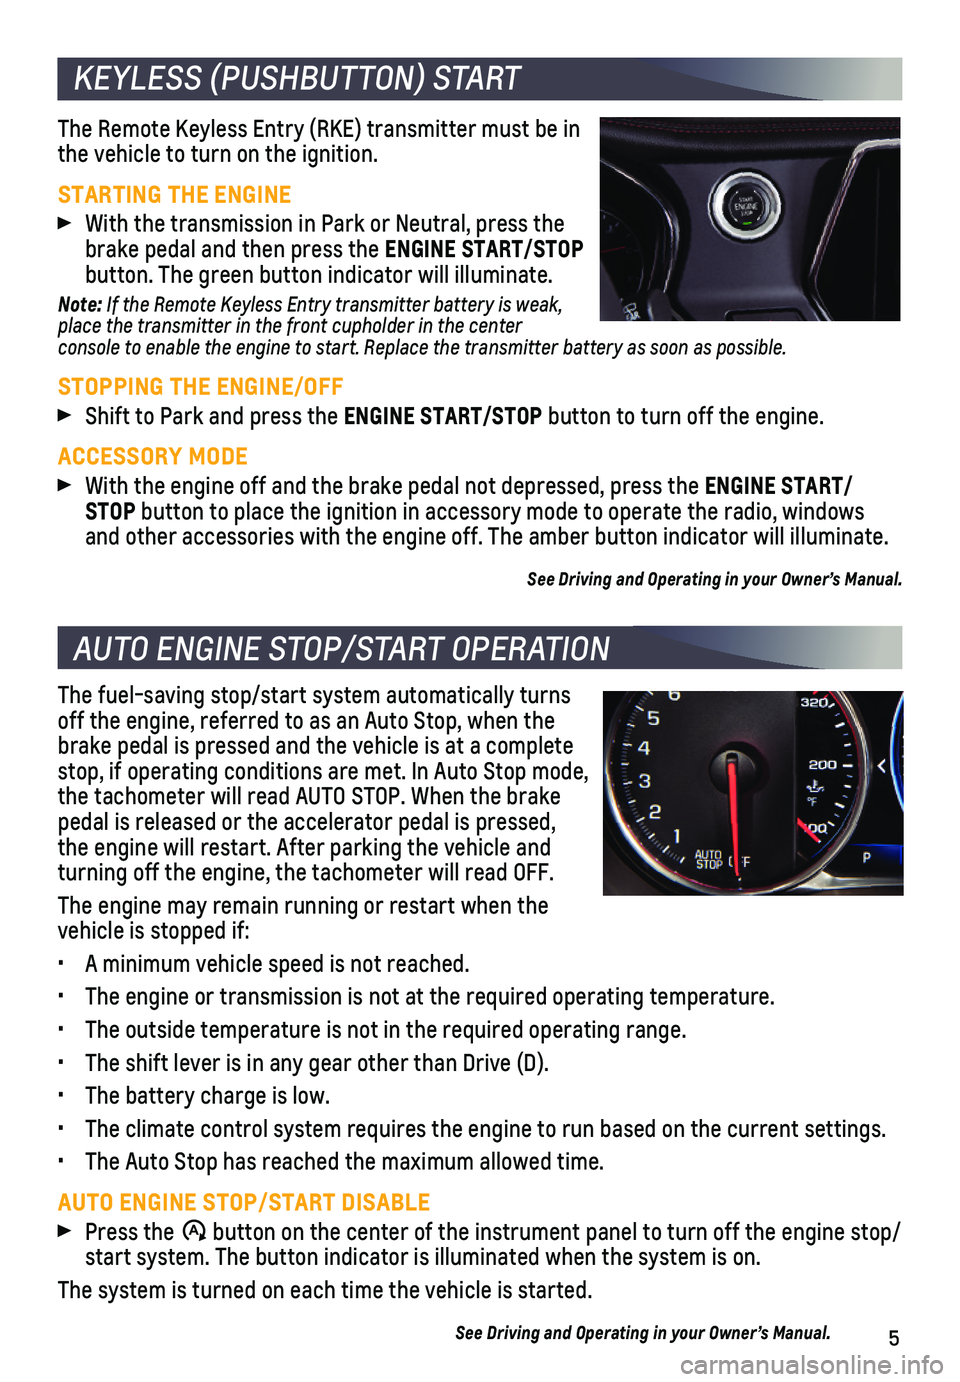
The Remote Keyless Entry (RKE) transmitter must be in the vehicle to turn on the ignition.
STARTING THE ENGINE
With the transmission in Park or Neutral, press the brake pedal and then press the ENGINE START/STOP button. The green button indicator will illuminate.
Note: If the Remote Keyless Entry transmitter battery is weak, place the transmitter in the front cupholder in the center console to enable the engine to start. Replace the transmitter battery a\
s soon as possible.
STOPPING THE ENGINE/OFF
Shift to Park and press the ENGINE START/STOP button to turn off the engine.
ACCESSORY MODE
With the engine off and the brake pedal not depressed, press the ENGINE START/ STOP button to place the ignition in accessory mode to operate the radio, wi\
ndows and other accessories with the engine off. The amber button indicator wi\
ll illuminate.
See Driving and Operating in your Owner’s Manual.
The fuel-saving stop/start system automatically turns off the engine, referred to as an Auto Stop, when the brake pedal is pressed and the vehicle is at a complete stop, if operating conditions are met. In Auto Stop mode, the tachometer will read AUTO STOP. When the brake pedal is released or the accelerator pedal is pressed, the engine will restart. After parking the vehicle and turning off the engine, the tachometer will read OFF.
The engine may remain running or restart when the vehicle is stopped if:
• A minimum vehicle speed is not reached.
• The engine or transmission is not at the required operating temperature.\
• The outside temperature is not in the required operating range.
• The shift lever is in any gear other than Drive (D).
• The battery charge is low.
• The climate control system requires the engine to run based on the curre\
nt settings.
• The Auto Stop has reached the maximum allowed time.
AUTO ENGINE STOP/START DISABLE
Press the �$ button on the center of the instrument panel to turn off the engine sto\
p/start system. The button indicator is illuminated when the system is on.\
The system is turned on each time the vehicle is started.
See Driving and Operating in your Owner’s Manual.
Page 8 of 20
8F Optional equipment
DRIVER INFORMATION CENTER
ELECTRIC PARKING BRAKE
UNIVERSAL REMOTE SYSTEMF
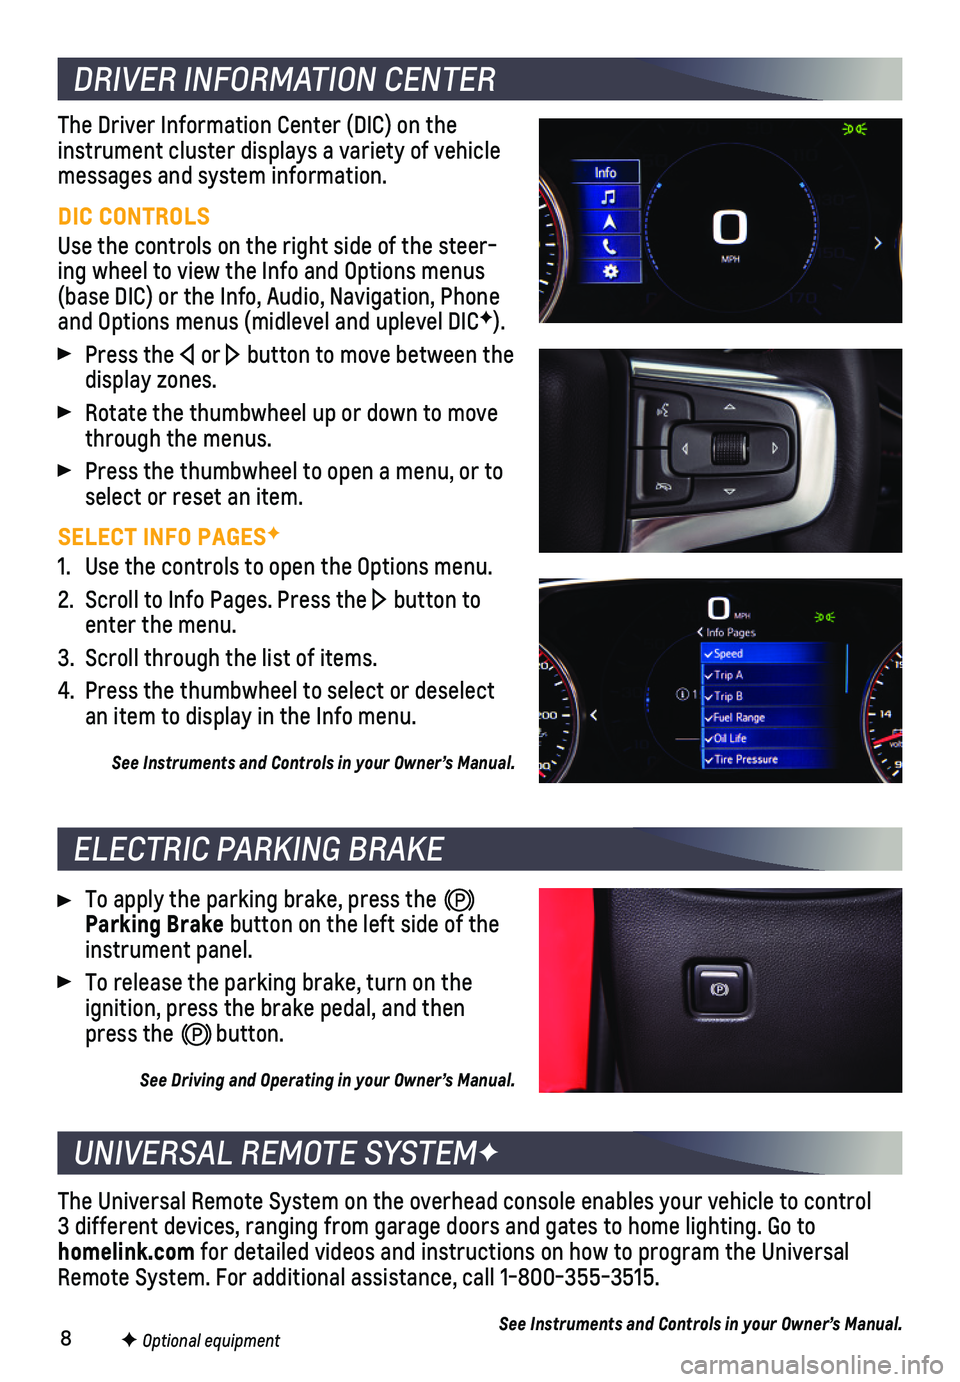
The Driver Information Center (DIC) on the instrument cluster displays a variety of vehicle messages and system information.
DIC CONTROLS
Use the controls on the right side of the steer-ing wheel to view the Info and Options menus (base DIC) or the Info, Audio, Navigation, Phone and Options menus (midlevel and uplevel DICF).
Press the or button to move between the display zones.
Rotate the thumbwheel up or down to move through the menus.
Press the thumbwheel to open a menu, or to select or reset an item.
SELECT INFO PAGESF
1. Use the controls to open the Options menu.
2. Scroll to Info Pages. Press the button to enter the menu.
3. Scroll through the list of items.
4. Press the thumbwheel to select or deselect an item to display in the Info menu.
See Instruments and Controls in your Owner’s Manual.
To apply the parking brake, press the Parking Brake button on the left side of the instrument panel.
To release the parking brake, turn on the ignition, press the brake pedal, and then press the button.
See Driving and Operating in your Owner’s Manual.
The Universal Remote System on the overhead console enables your vehicle\
to control 3 different devices, ranging from garage doors and gates to home lightin\
g. Go to homelink.com for detailed videos and instructions on how to program the Universal Remote System. For additional assistance, call 1-800-355-3515.
See Instruments and Controls in your Owner’s Manual.
Page 16 of 20
16
DRIVER ASSISTANCE SYSTEMSF
Safety or driver assistance features are no substitute for the driver’\
s responsibility to operate the vehicle in a safe manner. The driver should remain attentive to traffic, surroundings and road conditions at all times. Read your Owner’s Manual for important feature limitations and information.
SAFETY ALERT SEAT – The driver’s seat pulses — left side, right side or simultan\
eously — to alert the driver of the direction of potential hazards.
Audible alerts or seat pulsing alerts may be selected. To change the ale\
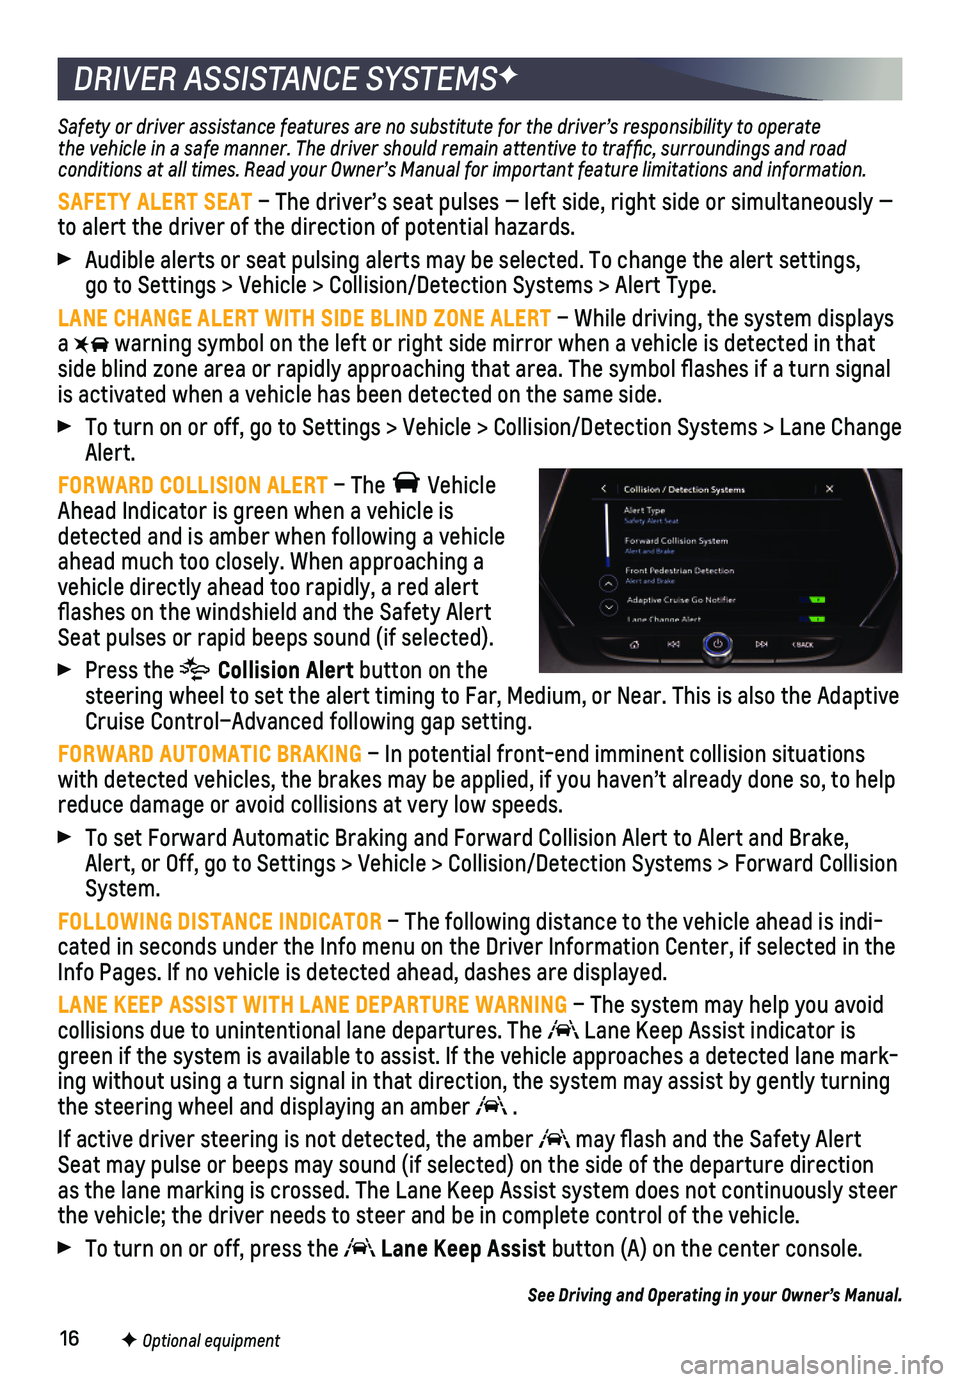
rt settings, go to Settings > Vehicle > Collision/Detection Systems > Alert Type.
LANE CHANGE ALERT WITH SIDE BLIND ZONE ALERT – While driving, the system displays a warning symbol on the left or right side mirror when a vehicle is detect\
ed in that side blind zone area or rapidly approaching that area. The symbol flas\
hes if a turn signal is activated when a vehicle has been detected on the same side.
To turn on or off, go to Settings > Vehicle > Collision/Detection System\
s > Lane Change Alert.
FORWARD COLLISION ALERT – The Vehicle Ahead Indicator is green when a vehicle is detected and is amber when following a vehicle ahead much too closely. When approaching a vehicle directly ahead too rapidly, a red alert flashes on the windshield and the Safety Alert Seat pulses or rapid beeps sound (if selected).
Press the Collision Alert button on the steering wheel to set the alert timing to Far, Medium, or Near. This is \
also the Adaptive Cruise Control–Advanced following gap setting.
FORWARD AUTOMATIC BRAKING – In potential front-end imminent collision situations with detected vehicles, the brakes may be applied, if you haven’t alr\
eady done so, to help reduce damage or avoid collisions at very low speeds.
To set Forward Automatic Braking and Forward Collision Alert to Alert an\
d Brake, Alert, or Off, go to Settings > Vehicle > Collision/Detection Systems > \
Forward Collision System.
FOLLOWING DISTANCE INDICATOR – The following distance to the vehicle ahead is indi-cated in seconds under the Info menu on the Driver Information Center, i\
f selected in the Info Pages. If no vehicle is detected ahead, dashes are displayed.
LANE KEEP ASSIST WITH LANE DEPARTURE WARNING – The system may help you avoid collisions due to unintentional lane departures. The Lane Keep Assist indicator is green if the system is available to assist. If the vehicle approaches a \
detected lane mark-ing without using a turn signal in that direction, the system may assist\
by gently turning the steering wheel and displaying an amber .
If active driver steering is not detected, the amber may flash and the Safety Alert Seat may pulse or beeps may sound (if selected) on the side of the dep\
arture direction as the lane marking is crossed. The Lane Keep Assist system does not con\
tinuously steer the vehicle; the driver needs to steer and be in complete control of the\
vehicle.
To turn on or off, press the Lane Keep Assist button (A) on the center console.
See Driving and Operating in your Owner’s Manual.
F Optional equipment
Page 17 of 20
17
DRIVER ASSISTANCE SYSTEMSF
REAR VISION CAMERA/SURROUND VISIONF
FRONT PEDESTRIAN BRAKING – During daytime driving, the system detects pedestri-ans directly ahead up to a distance of approximately 131 ft. and display\
s an amber indicator. When approaching a detected pedestrian too quickly, a red ale\
rt flashes on the windshield and the Safety Alert Seat pulses or rapid beeps sound (if se\
lected). The
system may prepare the brakes or automatically brake the vehicle.
To set to Alert and Brake, Alert, or Off, go to Settings > Vehicle > Col\
lision/Detection Systems > Front Pedestrian Detection.
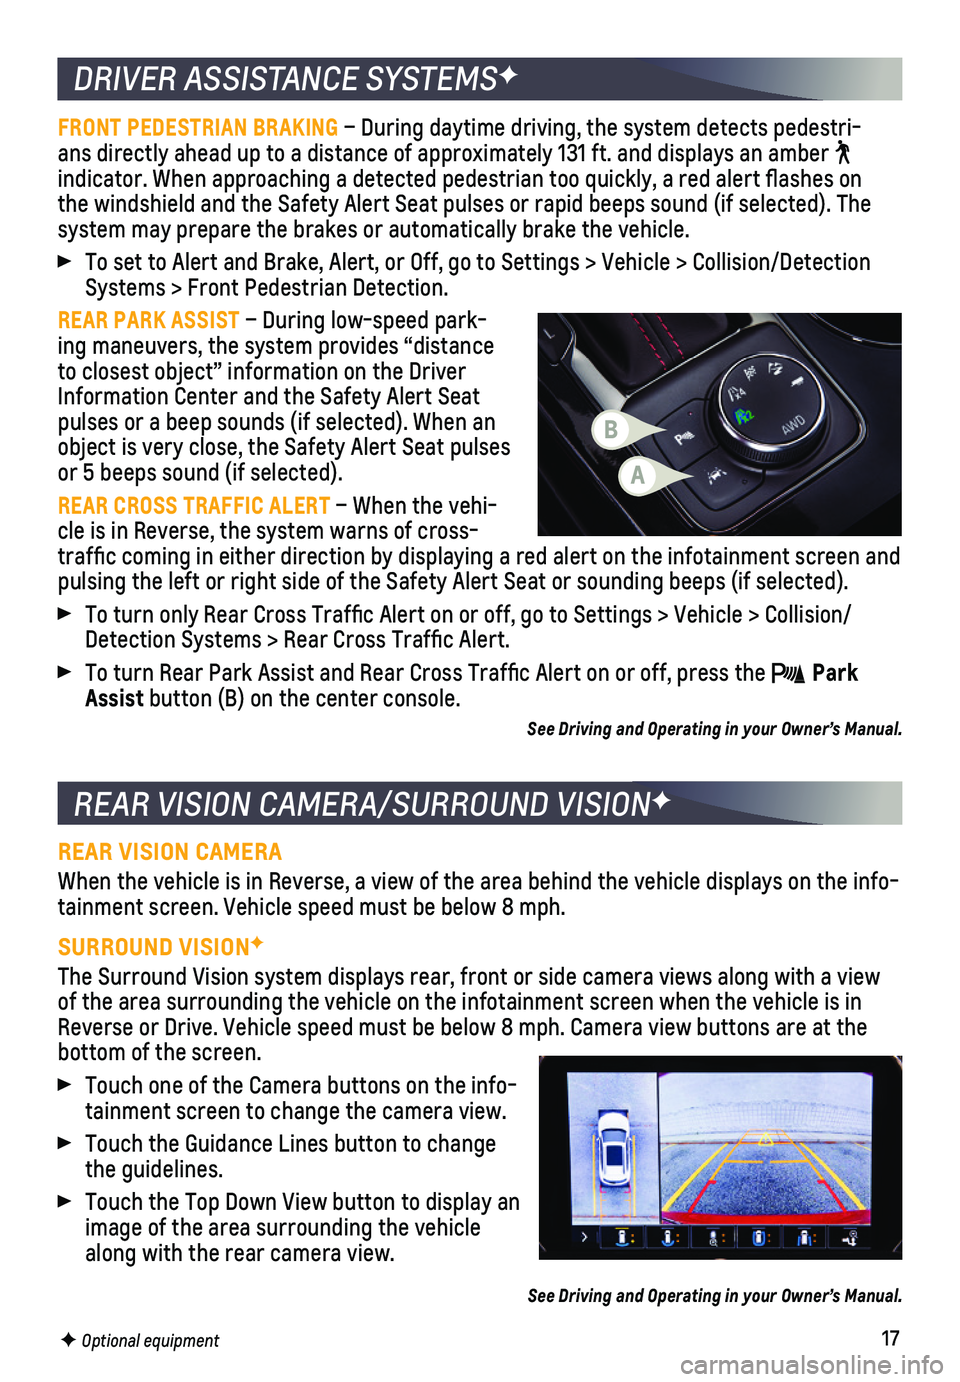
REAR PARK ASSIST – During low-speed park-ing maneuvers, the system provides “distance to closest object” information on the Driver Information Center and the Safety Alert Seat pulses or a beep sounds (if selected). When an object is very close, the Safety Alert Seat pulses or 5 beeps sound (if selected).
REAR CROSS TRAFFIC ALERT – When the vehi-cle is in Reverse, the system warns of cross-traffic coming in either direction by displaying a red alert on the in\
fotainment screen and pulsing the left or right side of the Safety Alert Seat or sounding beep\
s (if selected).
To turn only Rear Cross Traffic Alert on or off, go to Settings > Vehi\
cle > Collision/Detection Systems > Rear Cross Traffic Alert.
To turn Rear Park Assist and Rear Cross Traffic Alert on or off, press\
the Park Assist button (B) on the center console.
See Driving and Operating in your Owner’s Manual.
REAR VISION CAMERA
When the vehicle is in Reverse, a view of the area behind the vehicle di\
splays on the info-tainment screen. Vehicle speed must be below 8 mph.
SURROUND VISIONF
The Surround Vision system displays rear, front or side camera views alo\
ng with a view of the area surrounding the vehicle on the infotainment screen when the \
vehicle is in Reverse or Drive. Vehicle speed must be below 8 mph. Camera view buttons\
are at the bottom of the screen.
Touch one of the Camera buttons on the info-tainment screen to change the camera view.
Touch the Guidance Lines button to change the guidelines.
Touch the Top Down View button to display an image of the area surrounding the vehicle along with the rear camera view.
See Driving and Operating in your Owner’s Manual.
F Optional equipment
A
B
Page 18 of 20
18
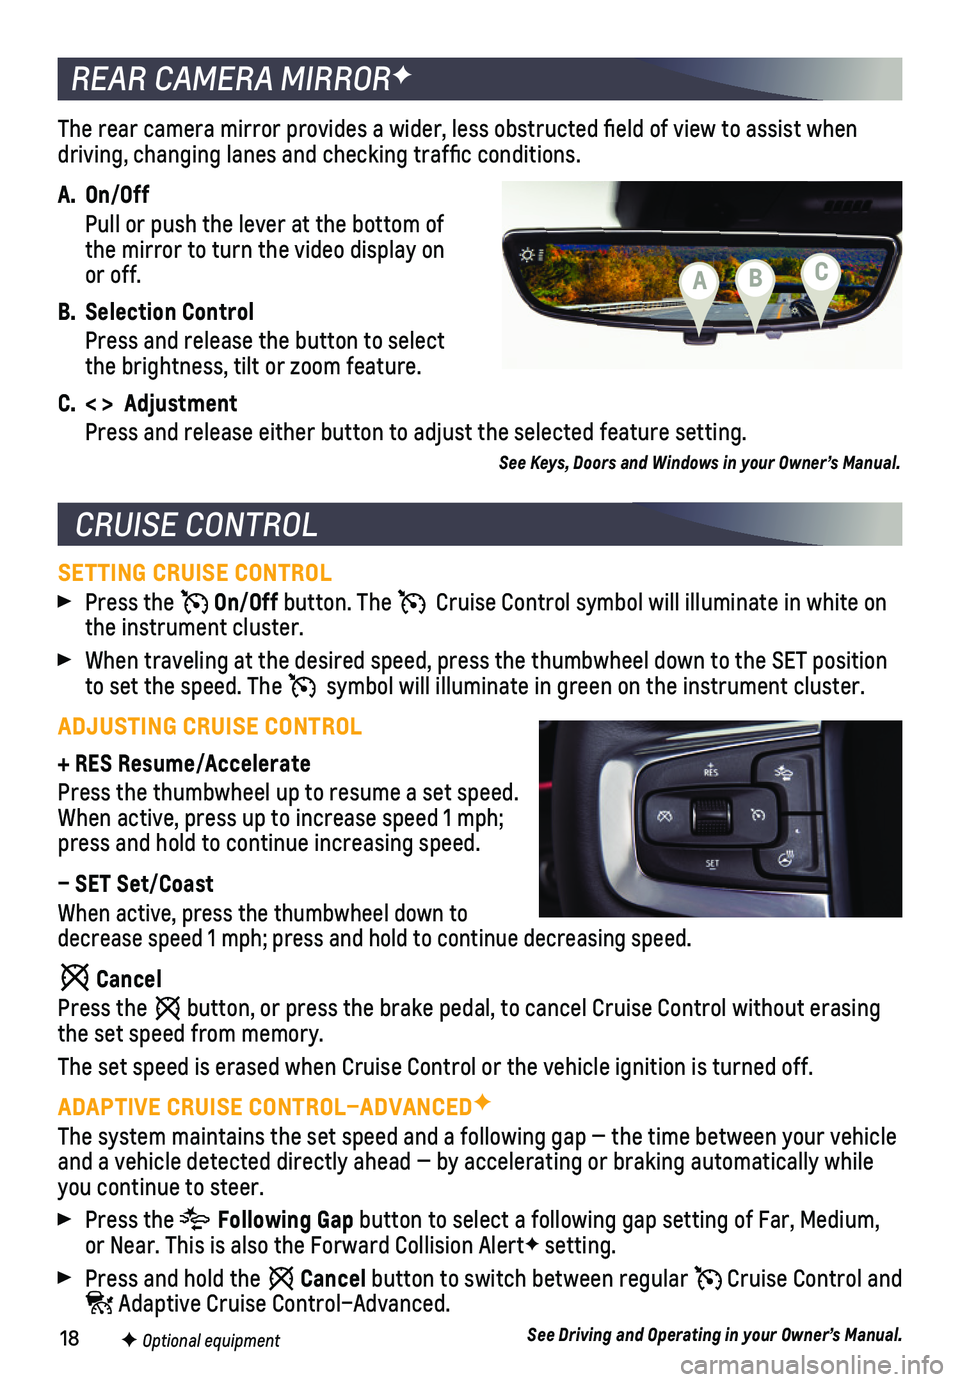
The rear camera mirror provides a wider, less obstructed field of view\
to assist when driving, changing lanes and checking traffic conditions.
A. On/Off
Pull or push the lever at the bottom of the mirror to turn the video display on or off.
B. Selection Control
Press and release the button to select the brightness, tilt or zoom feature.
C. < > Adjustment
Press and release either button to adjust the selected feature setting.
See Keys, Doors and Windows in your Owner’s Manual.
REAR CAMERA MIRRORF
CRUISE CONTROL
SETTING CRUISE CONTROL
Press the On/Off button. The Cruise Control symbol will illuminate in white on the instrument cluster.
When traveling at the desired speed, press the thumbwheel down to the SE\
T position to set the speed. The symbol will illuminate in green on the instrument cluster.
ADJUSTING CRUISE CONTROL
+ RES Resume/Accelerate
Press the thumbwheel up to resume a set speed. When active, press up to increase speed 1 mph; press and hold to continue increasing speed.
– SET Set/Coast
When active, press the thumbwheel down to decrease speed 1 mph; press and hold to continue decreasing speed.
Cancel
Press the button, or press the brake pedal, to cancel Cruise Control without eras\
ing the set speed from memory.
The set speed is erased when Cruise Control or the vehicle ignition is t\
urned off.
ADAPTIVE CRUISE CONTROL–ADVANCEDF
The system maintains the set speed and a following gap — the time bet\
ween your vehicle and a vehicle detected directly ahead — by accelerating or braking au\
tomatically while you continue to steer.
Press the Following Gap button to select a following gap setting of Far, Medium, or Near. This is also the Forward Collision AlertF setting.
Press and hold the Cancel button to switch between regular Cruise Control and Adaptive Cruise Control–Advanced.
See Driving and Operating in your Owner’s Manual.F Optional equipment
CBA