wheel CHEVROLET BLAZER 2020 Get To Know Guide
[x] Cancel search | Manufacturer: CHEVROLET, Model Year: 2020, Model line: BLAZER, Model: CHEVROLET BLAZER 2020Pages: 20, PDF Size: 3.74 MB
Page 2 of 20
2
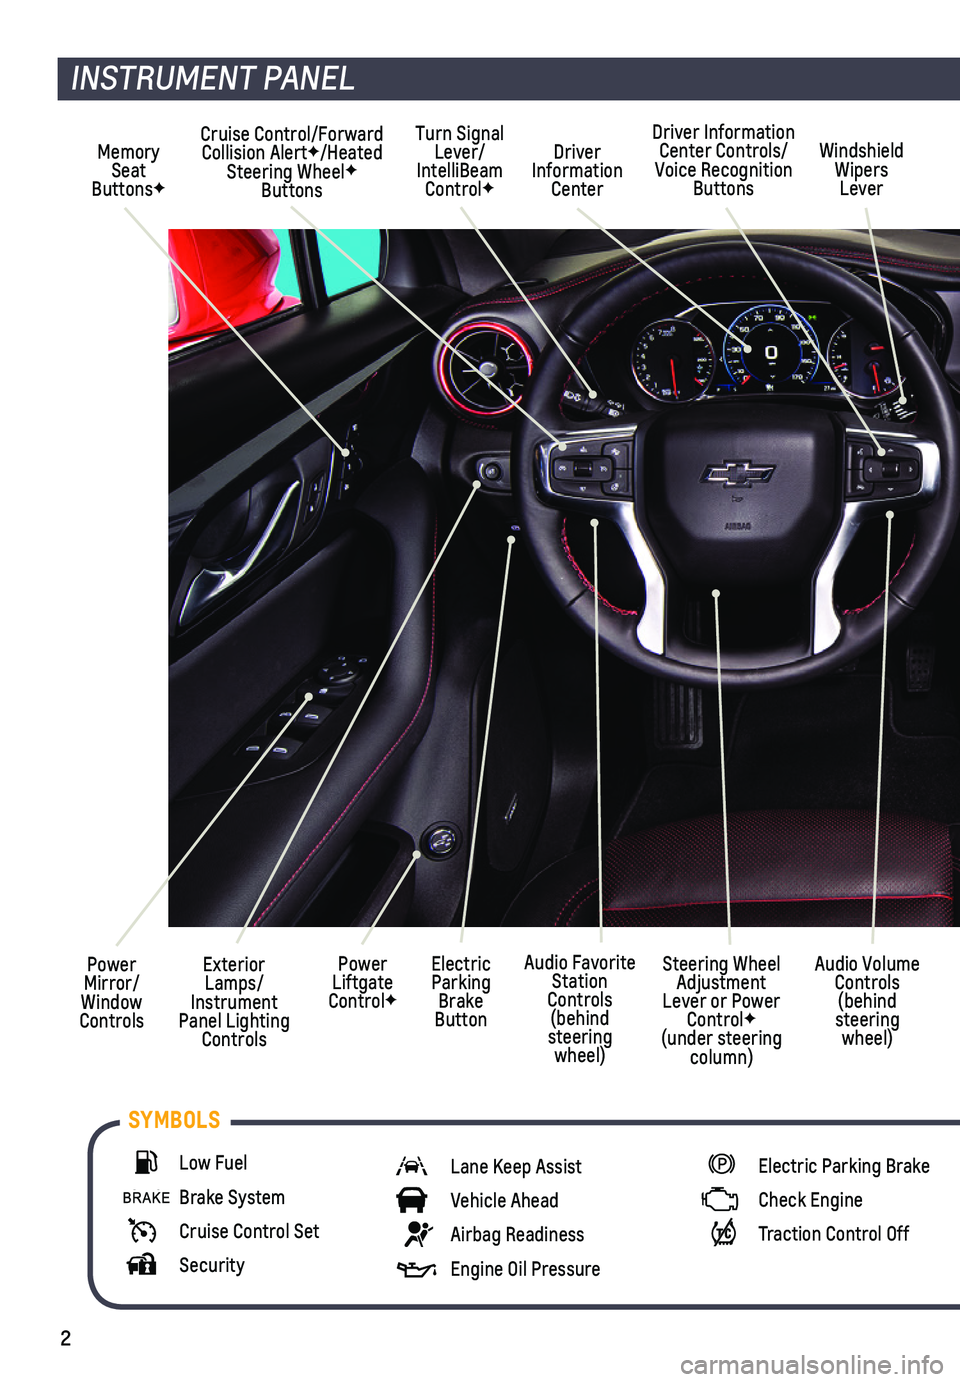
Power Mirror/ Window Controls
Cruise Control/Forward Collision AlertF/Heated Steering WheelF Buttons
Driver Information Center
Driver Information Center Controls/Voice Recognition Buttons
Windshield Wipers Lever
Exterior Lamps/ Instrument Panel Lighting Controls
Turn Signal Lever/IntelliBeam ControlF
Power Liftgate ControlF
Electric Parking Brake Button
Memory Seat ButtonsF
INSTRUMENT PANEL
Audio Volume Controls (behind steering wheel)
Steering Wheel Adjustment Lever or Power ControlF (under steering column)
Audio Favorite Station Controls (behind steering wheel)
Low Fuel
Brake System
Cruise Control Set
Security
Lane Keep Assist
Vehicle Ahead
Airbag Readiness
Engine Oil Pressure
Electric Parking Brake
Check Engine
Traction Control Off
SYMBOLS
Page 7 of 20
7
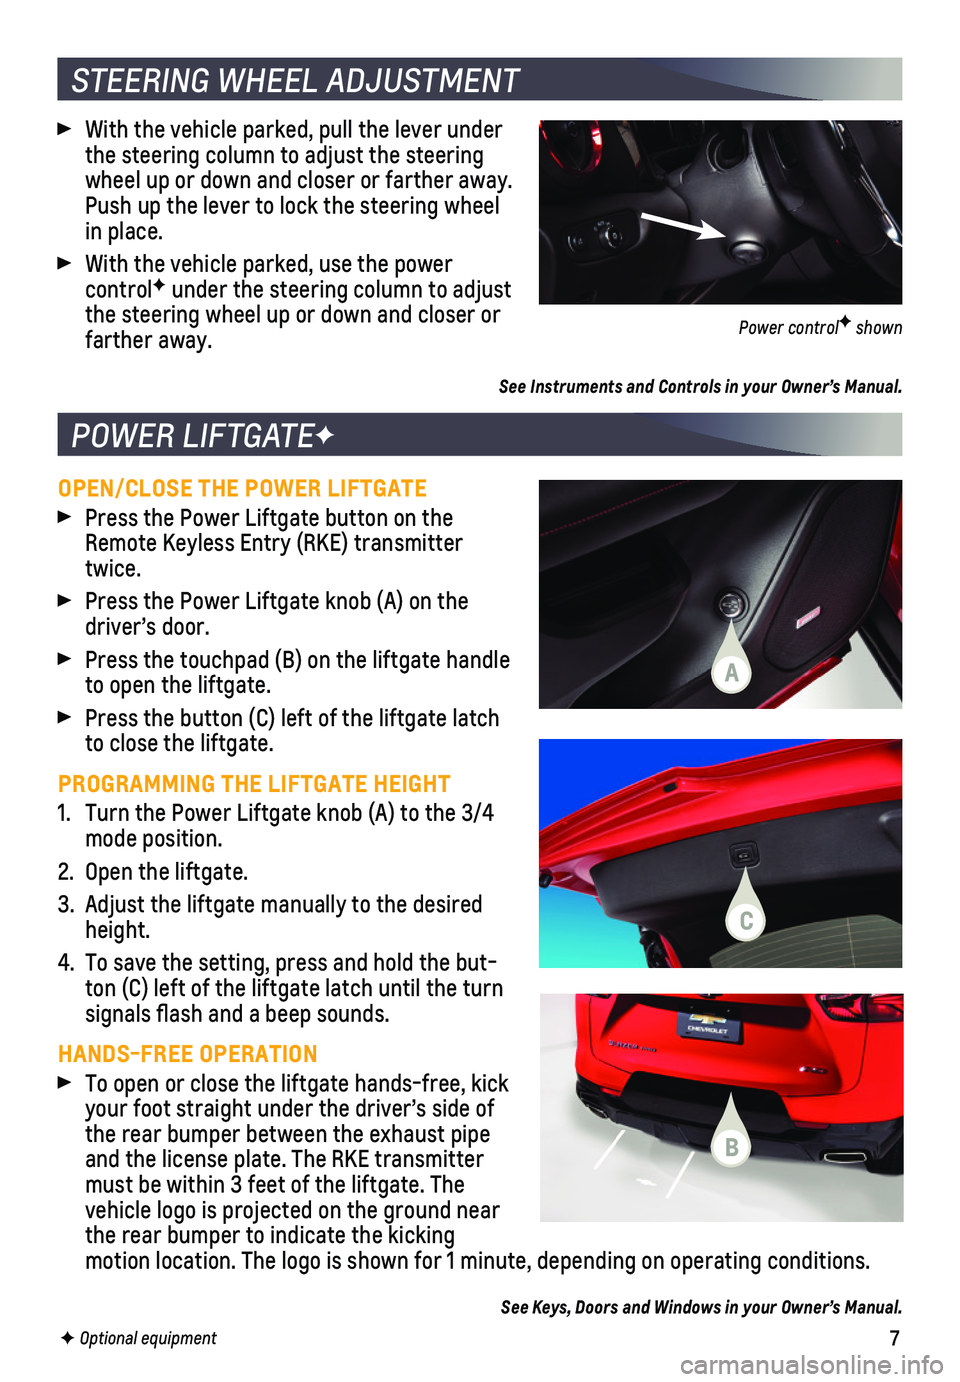
OPEN/CLOSE THE POWER LIFTGATE
Press the Power Liftgate button on the Remote Keyless Entry (RKE) transmitter twice.
Press the Power Liftgate knob (A) on the driver’s door.
Press the touchpad (B) on the liftgate handle to open the liftgate.
Press the button (C) left of the liftgate latch to close the liftgate.
PROGRAMMING THE LIFTGATE HEIGHT
1. Turn the Power Liftgate knob (A) to the 3/4 mode position.
2. Open the liftgate.
3. Adjust the liftgate manually to the desired height.
4. To save the setting, press and hold the but-ton (C) left of the liftgate latch until the turn signals flash and a beep sounds.
HANDS-FREE OPERATION
To open or close the liftgate hands-free, kick your foot straight under the driver’s side of the rear bumper between the exhaust pipe and the license plate. The RKE transmitter must be within 3 feet of the liftgate. The vehicle logo is projected on the ground near the rear bumper to indicate the kicking motion location. The logo is shown for 1 minute, depending on operating \
conditions.
See Keys, Doors and Windows in your Owner’s Manual.
POWER LIFTGATEF
F Optional equipment
STEERING WHEEL ADJUSTMENT
With the vehicle parked, pull the lever under the steering column to adjust the steering wheel up or down and closer or farther away. Push up the lever to lock the steering wheel in place.
With the vehicle parked, use the power controlF under the steering column to adjust the steering wheel up or down and closer or farther away.
See Instruments and Controls in your Owner’s Manual.
Power controlF shown
A
B
C
Page 8 of 20
8F Optional equipment
DRIVER INFORMATION CENTER
ELECTRIC PARKING BRAKE
UNIVERSAL REMOTE SYSTEMF
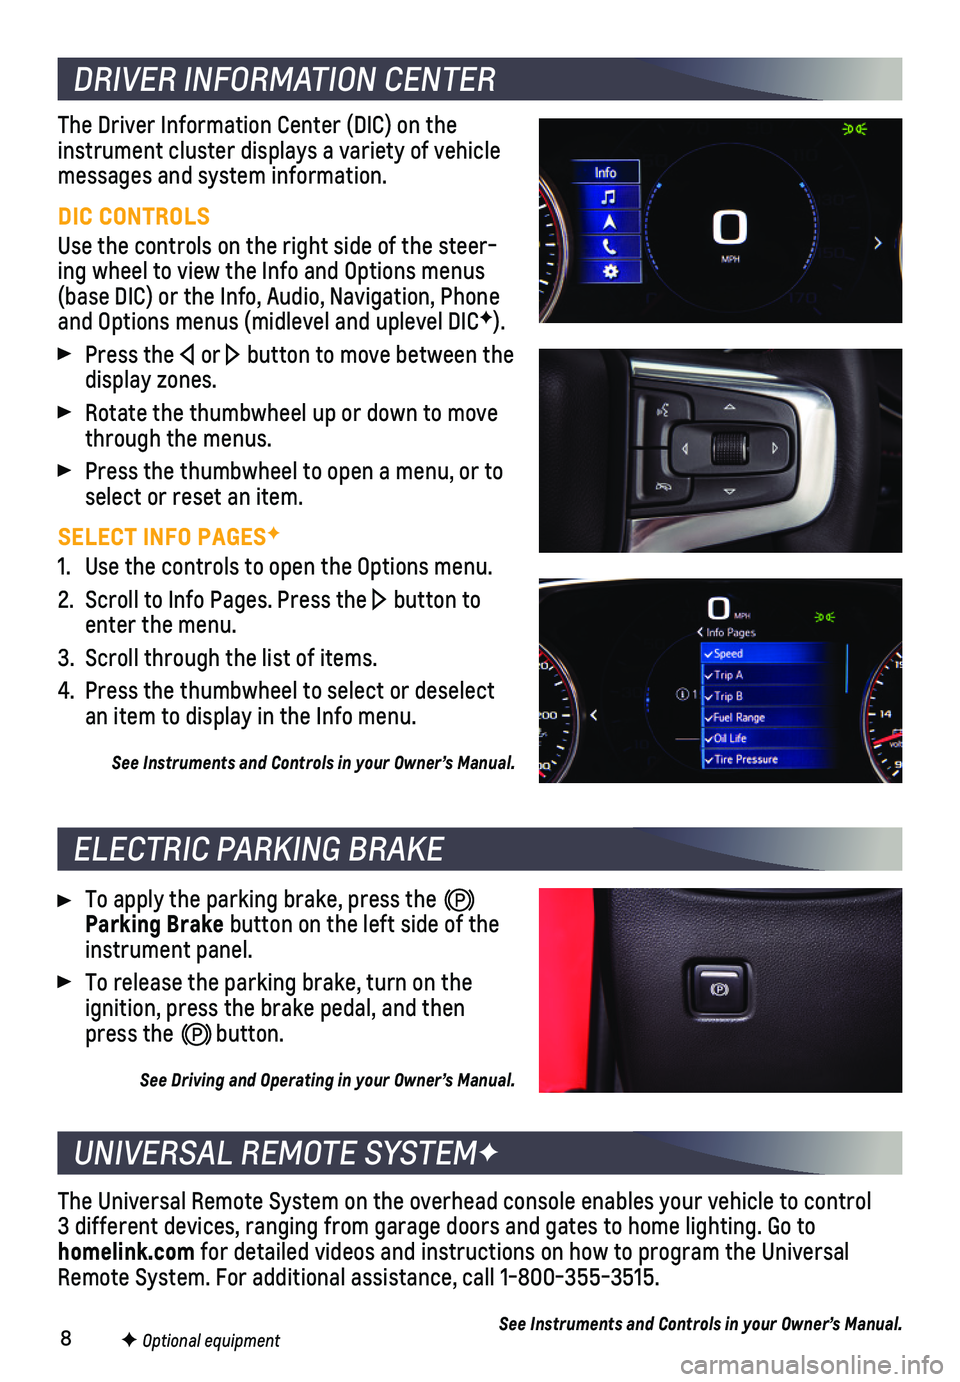
The Driver Information Center (DIC) on the instrument cluster displays a variety of vehicle messages and system information.
DIC CONTROLS
Use the controls on the right side of the steer-ing wheel to view the Info and Options menus (base DIC) or the Info, Audio, Navigation, Phone and Options menus (midlevel and uplevel DICF).
Press the or button to move between the display zones.
Rotate the thumbwheel up or down to move through the menus.
Press the thumbwheel to open a menu, or to select or reset an item.
SELECT INFO PAGESF
1. Use the controls to open the Options menu.
2. Scroll to Info Pages. Press the button to enter the menu.
3. Scroll through the list of items.
4. Press the thumbwheel to select or deselect an item to display in the Info menu.
See Instruments and Controls in your Owner’s Manual.
To apply the parking brake, press the Parking Brake button on the left side of the instrument panel.
To release the parking brake, turn on the ignition, press the brake pedal, and then press the button.
See Driving and Operating in your Owner’s Manual.
The Universal Remote System on the overhead console enables your vehicle\
to control 3 different devices, ranging from garage doors and gates to home lightin\
g. Go to homelink.com for detailed videos and instructions on how to program the Universal Remote System. For additional assistance, call 1-800-355-3515.
See Instruments and Controls in your Owner’s Manual.
Page 10 of 20
10F Optional equipment
INFOTAINMENT SYSTEM
STORING FAVORITES
Radio stations from all bands (AM, FM or SiriusXMF) can be stored in any order. The audio source options are on the left side of the page.
1. Display the desired radio station.
2. Select the desired page of favorite screen buttons.
3. Touch and hold one of the favorite screen buttons until a beep is heard.\
4. Repeat the steps to store another favorite item.
Note: To change the number of favorites displayed, go to Settings > System > Favorites.
NATURAL VOICE RECOGNITION
Control the music source and make phone calls hands-free (after pairing\
your Bluetooth-enabled phone) using the natural voice recognition system.
1. Press the Press to Talk button on the steering wheel.
2. The radio will play a prompt followed by a beep.
3. After the beep, say what you want it to do using natural speech. Example\
s: “Call Dave” or “Tune to 99.5 FM.” Say “Help” for assistance.
SIRIUSXM® WITH 360L
SiriusXM with 360L provides subscribers an enhanced in-vehicle listening\
experience with unique satellite and streaming channels, on-demand content, persona\
lized recom-mendations, and an interactive interface. For the full SiriusXM with 360\
L experience, OnStar Connected Access is required. Learn more about OnStar services at\
onstar.com.
APPLE CARPLAY
Apple CarPlay capability is available through a compatible smartphone us\
ing the Apple CarPlay icon on the Home page of the infotainment system. No app is requ\
ired.
1. Connect your compatible phone by plugging the Lightning cable into a USB\
data port. Use your device’s factory-provided Lightning cable. Aftermarket cable\
s may not work.
2. The Apple CarPlay icon will illuminate. Touch the Apple CarPlay icon to \
have your apps displayed.
Press the Home button to exit Apple CarPlay. To return to the last page viewed in Apple CarPlay, press and hold the Home button.
ANDROID AUTO
Android Auto capability is available through a compatible smartphone usi\
ng the Android Auto icon on the Home page of the infotainment system.
1. Download the Android Auto app to your phone from the Google Play Store.
2. Connect your compatible phone by plugging the phone’s USB cable into \
a USB data port. Use your device’s factory-provided USB cable. Aftermarket cable\
s may not work.
3. The Android Auto icon will illuminate. Touch the Android Auto icon to ha\
ve your apps displayed.
Press the Home button to exit Android Auto. To return to the last page viewed in Android Auto, press and hold the Home button.
See your Infotainment System Manual.
Page 11 of 20
11F Optional equipment
BLUETOOTH® SYSTEM
Read your Owner’s Manual for important information about using the Bluetooth system while driving.
Before using a Bluetooth-enabled device in the vehicle, it must be paire\
d with the in-vehicle Bluetooth system. The pairing process is disabled when the vehic\
le is moving. Not all devices will support all functions. Visit my.chevrolet.com/learn for more information.
PAIR A PHONE
1. To use voice recognition, press the Press to Talk button; after the beep, say “Pair phone”; or to use the infotainment screen, select the Phone icon > Co\
nnect Phone > Add Phone.
2. Start the pairing process on your phone. From the phone’s Bluetooth s\
ettings, select the name shown on the infotainment screen.
3. Follow the pairing instructions.
4. When pairing is complete, the phone screen is displayed. Depending on th\
e phone, your phone book may be downloaded automatically.
SECONDARY PHONE
A secondary phone can be paired to the Bluetooth system. The system conn\
ects to the phone that is set to First to Connect. The secondary phone can only rece\
ive calls.
To set the first and secondary phones, go to Settings > System > Phone\
s and select the Information icon.
See your Infotainment System Manual.
AUDIO STEERING WHEEL CONTROLSF
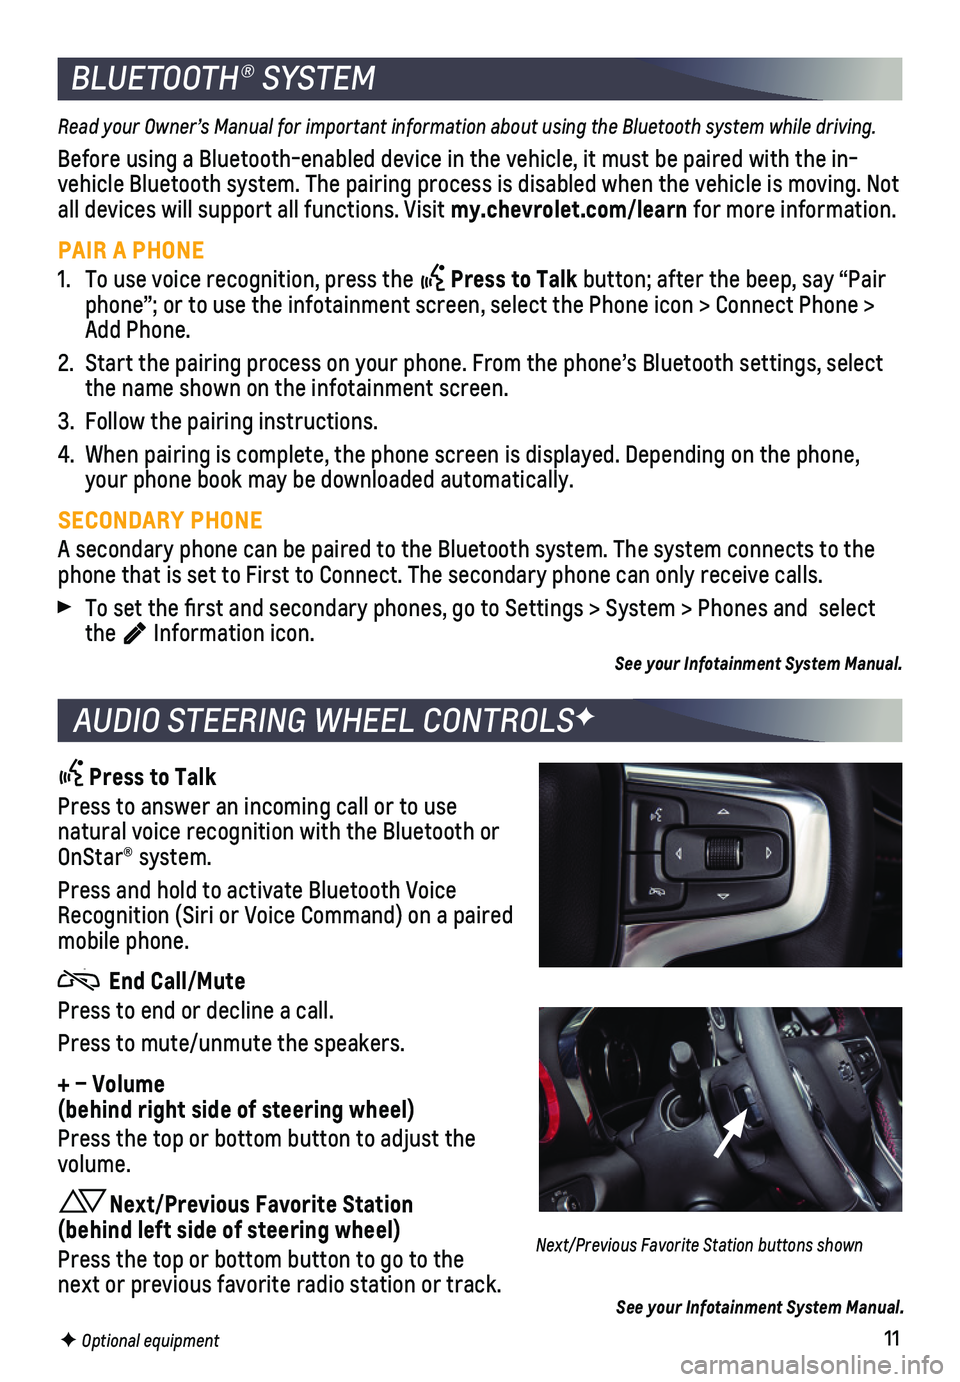
Press to Talk
Press to answer an incoming call or to use natural voice recognition with the Bluetooth or OnStar® system.
Press and hold to activate Bluetooth Voice Recognition (Siri or Voice Command) on a paired mobile phone.
End Call/Mute
Press to end or decline a call.
Press to mute/unmute the speakers.
+ – Volume (behind right side of steering wheel)
Press the top or bottom button to adjust the volume.
Next/Previous Favorite Station (behind left side of steering wheel)
Press the top or bottom button to go to the next or previous favorite radio station or track.
Next/Previous Favorite Station buttons shown
See your Infotainment System Manual.
Page 13 of 20
13
When the vehicle is on, the automatic heated seats and heated steering w\
heel or auto-matic ventilated seats will activate based on the vehicle’s interior \
temperature. Manually turn off the heated or ventilated seats using the seat controls. Manuall\
y turn off the heated steering wheel using the steering wheel control.
To turn the auto heated seats and auto ventilated seats on or off, go to\
Settings > Vehicle > Climate and Air Quality > Auto Heated Seats or Auto Cooled Sea\
ts.
See Seats and Restraints in your Owner’s Manual.
AUTO HEATED/VENTILATED SEATSF
F Optional equipment
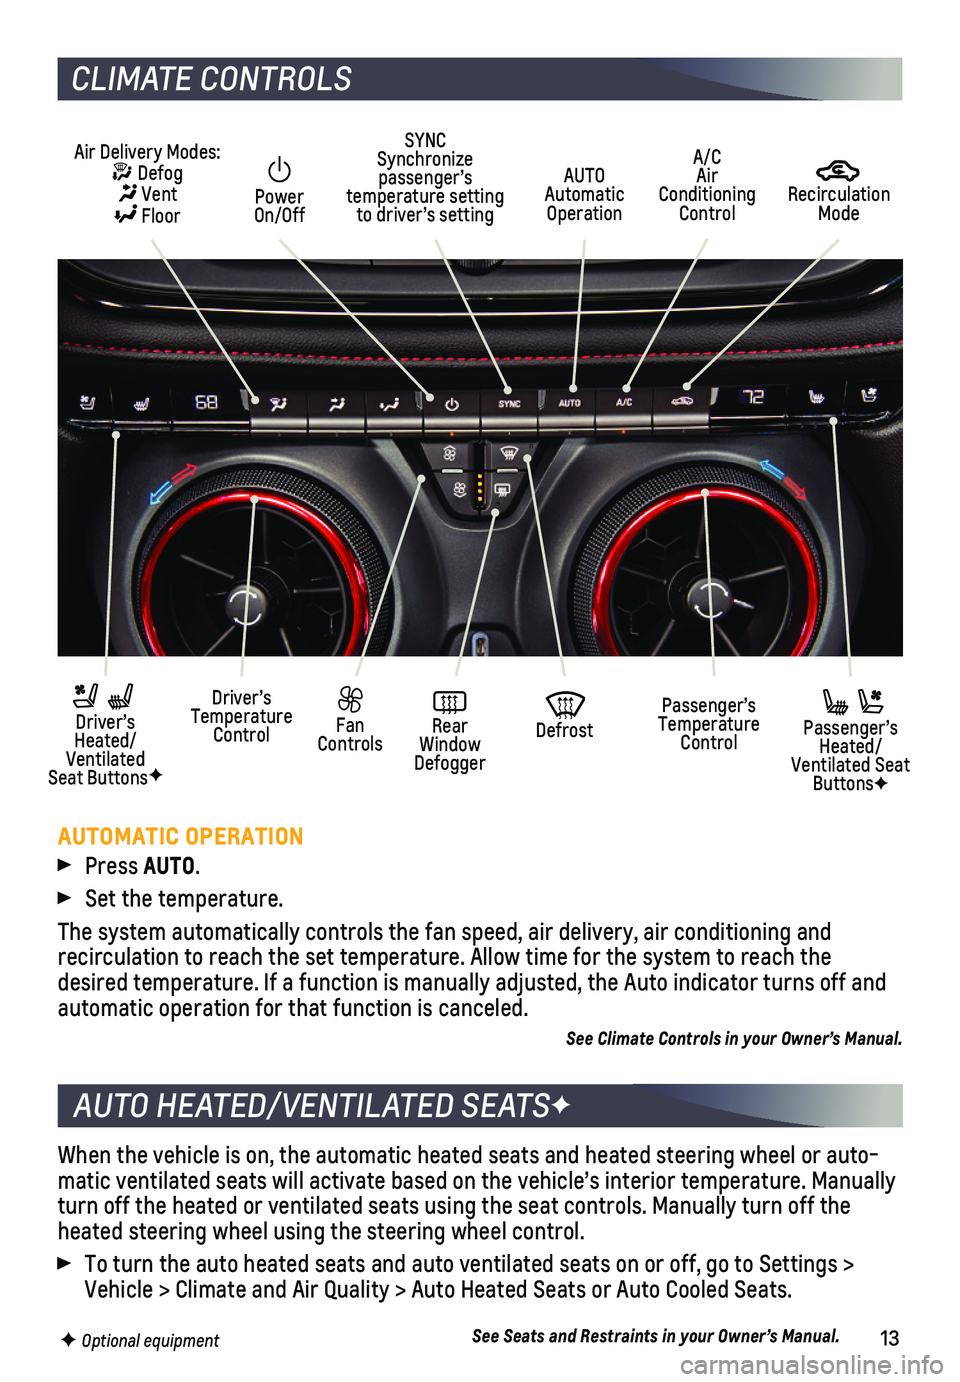
CLIMATE CONTROLS
AUTOMATIC OPERATION
Press AUTO.
Set the temperature.
The system automatically controls the fan speed, air delivery, air condi\
tioning and
recirculation to reach the set temperature. Allow time for the system to\
reach the desired temperature. If a function is manually adjusted, the Auto indica\
tor turns off and automatic operation for that function is canceled.
See Climate Controls in your Owner’s Manual.
Recirculation Mode
AUTO Automatic Operation
Power On/Off
Passenger’s Temperature Control
Fan Controls
Driver’s Temperature Control
Driver’s Heated/Ventilated Seat ButtonsF
Defrost
Air Delivery Modes: Defog Vent Floor
Passenger’s Heated/Ventilated Seat ButtonsF
SYNC Synchronize passenger’s temperature setting to driver’s setting
Rear Window Defogger
A/C Air Conditioning Control
Page 15 of 20

15
SUNROOFF
DRIVER MODE CONTROL
The sunroof has a comfort stop feature that stops the sunroof from fully opening. This reduces potential wind noise.
Press and release the rear of the Sunroof switch (A) to vent the sunroof. Press the rear of the switch again to express-open the sunroof to the comfort stop position. Press it again to fully open the sunroof.
Press and release the front of the Sunroof switch (A) to express-close the sunroof.
Press and release the rear or front of the Sunshade switch (B) to express-open or express-close the sunshade. Press it again to stop the sunshade.
See Keys, Doors and Windows in your Owner’s Manual.
The Driver Mode Control automatically adjusts various vehicle control sy\
stems based on driving preferences, weather and road conditions on Front-Wheel Drive (\
FWD) and All-Wheel Drive (AWD) models.
Rotate the Driver Mode Control knob on the center console to select the desired mode.
FWD Models
Tour – Use for normal driving
Snow/Ice – Use for enhanced acceleration on snowy roads
Sport – Use for enhanced handling and acceleration on dry pavement
AWD Models
Tour – Use for normal driving
All-Wheel Drive – Use for enhanced responsiveness
Sport – Use for enhanced handling and acceleration on dry pavement
Off-Road – Use for enhanced driving on unpaved roads
Tow/Haul – Use to reduce shift cycling when towing or hauling heavy loads
See Driving and Operating in your Owner’s Manual.
F Optional equipment
FWD model shown
AWD model shown
AB
Page 16 of 20
16
DRIVER ASSISTANCE SYSTEMSF
Safety or driver assistance features are no substitute for the driver’\
s responsibility to operate the vehicle in a safe manner. The driver should remain attentive to traffic, surroundings and road conditions at all times. Read your Owner’s Manual for important feature limitations and information.
SAFETY ALERT SEAT – The driver’s seat pulses — left side, right side or simultan\
eously — to alert the driver of the direction of potential hazards.
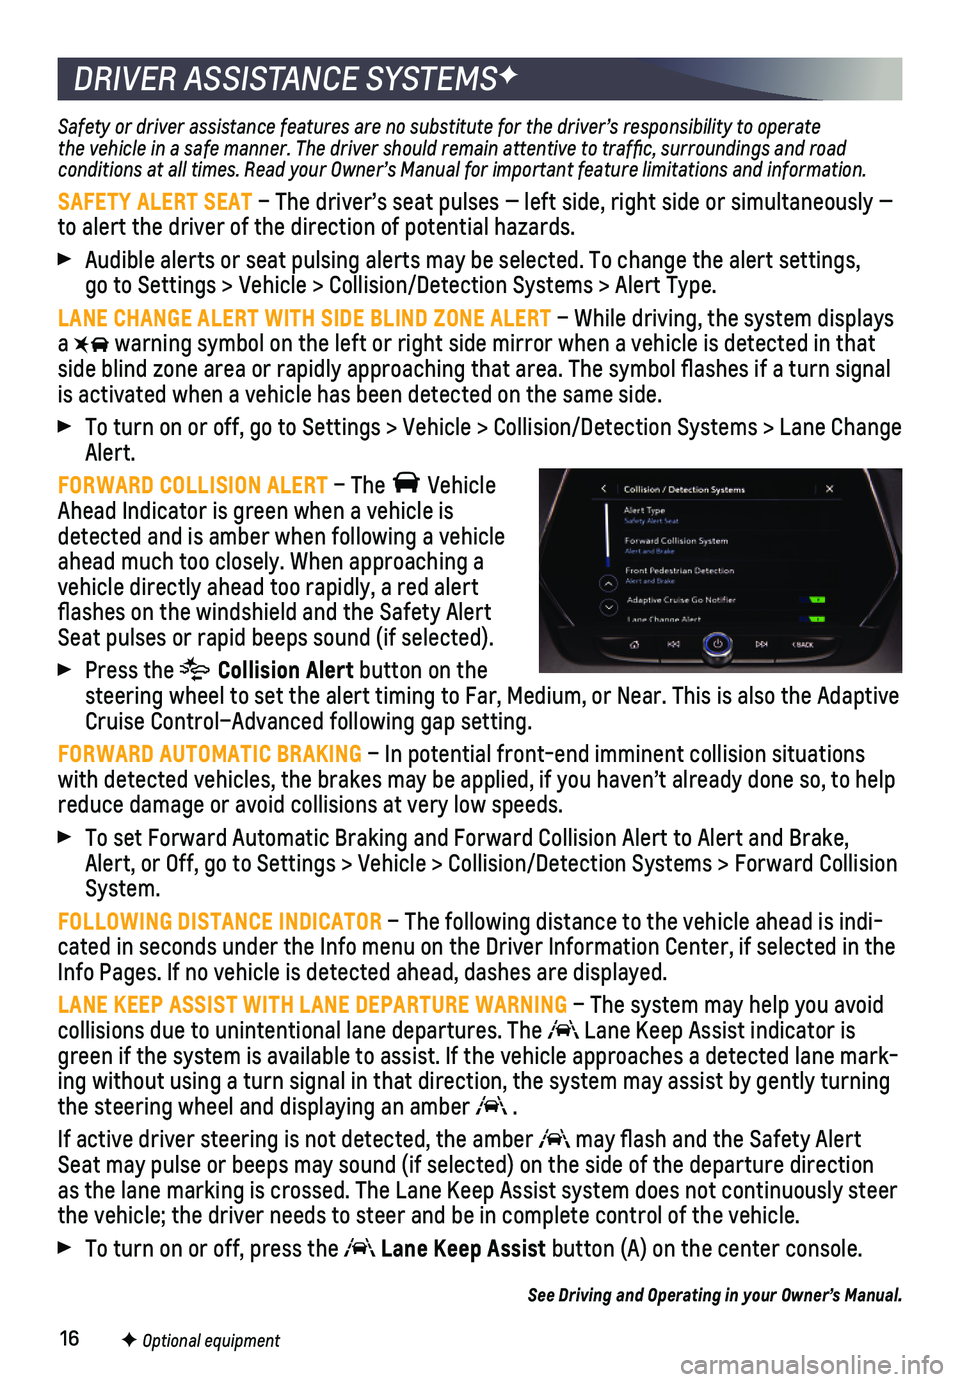
Audible alerts or seat pulsing alerts may be selected. To change the ale\
rt settings, go to Settings > Vehicle > Collision/Detection Systems > Alert Type.
LANE CHANGE ALERT WITH SIDE BLIND ZONE ALERT – While driving, the system displays a warning symbol on the left or right side mirror when a vehicle is detect\
ed in that side blind zone area or rapidly approaching that area. The symbol flas\
hes if a turn signal is activated when a vehicle has been detected on the same side.
To turn on or off, go to Settings > Vehicle > Collision/Detection System\
s > Lane Change Alert.
FORWARD COLLISION ALERT – The Vehicle Ahead Indicator is green when a vehicle is detected and is amber when following a vehicle ahead much too closely. When approaching a vehicle directly ahead too rapidly, a red alert flashes on the windshield and the Safety Alert Seat pulses or rapid beeps sound (if selected).
Press the Collision Alert button on the steering wheel to set the alert timing to Far, Medium, or Near. This is \
also the Adaptive Cruise Control–Advanced following gap setting.
FORWARD AUTOMATIC BRAKING – In potential front-end imminent collision situations with detected vehicles, the brakes may be applied, if you haven’t alr\
eady done so, to help reduce damage or avoid collisions at very low speeds.
To set Forward Automatic Braking and Forward Collision Alert to Alert an\
d Brake, Alert, or Off, go to Settings > Vehicle > Collision/Detection Systems > \
Forward Collision System.
FOLLOWING DISTANCE INDICATOR – The following distance to the vehicle ahead is indi-cated in seconds under the Info menu on the Driver Information Center, i\
f selected in the Info Pages. If no vehicle is detected ahead, dashes are displayed.
LANE KEEP ASSIST WITH LANE DEPARTURE WARNING – The system may help you avoid collisions due to unintentional lane departures. The Lane Keep Assist indicator is green if the system is available to assist. If the vehicle approaches a \
detected lane mark-ing without using a turn signal in that direction, the system may assist\
by gently turning the steering wheel and displaying an amber .
If active driver steering is not detected, the amber may flash and the Safety Alert Seat may pulse or beeps may sound (if selected) on the side of the dep\
arture direction as the lane marking is crossed. The Lane Keep Assist system does not con\
tinuously steer the vehicle; the driver needs to steer and be in complete control of the\
vehicle.
To turn on or off, press the Lane Keep Assist button (A) on the center console.
See Driving and Operating in your Owner’s Manual.
F Optional equipment
Page 18 of 20
18
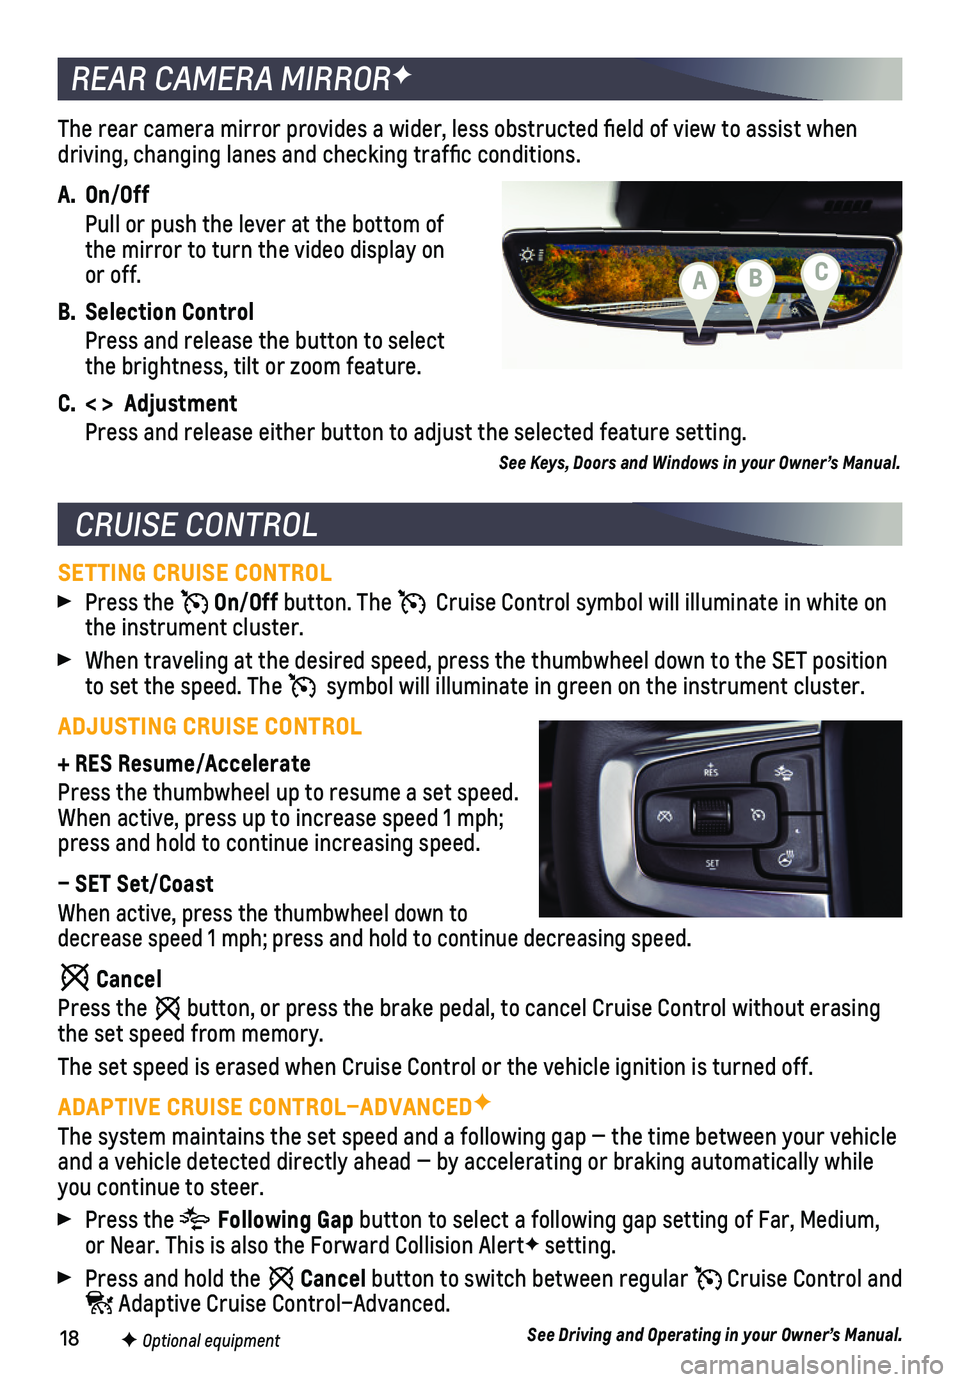
The rear camera mirror provides a wider, less obstructed field of view\
to assist when driving, changing lanes and checking traffic conditions.
A. On/Off
Pull or push the lever at the bottom of the mirror to turn the video display on or off.
B. Selection Control
Press and release the button to select the brightness, tilt or zoom feature.
C. < > Adjustment
Press and release either button to adjust the selected feature setting.
See Keys, Doors and Windows in your Owner’s Manual.
REAR CAMERA MIRRORF
CRUISE CONTROL
SETTING CRUISE CONTROL
Press the On/Off button. The Cruise Control symbol will illuminate in white on the instrument cluster.
When traveling at the desired speed, press the thumbwheel down to the SE\
T position to set the speed. The symbol will illuminate in green on the instrument cluster.
ADJUSTING CRUISE CONTROL
+ RES Resume/Accelerate
Press the thumbwheel up to resume a set speed. When active, press up to increase speed 1 mph; press and hold to continue increasing speed.
– SET Set/Coast
When active, press the thumbwheel down to decrease speed 1 mph; press and hold to continue decreasing speed.
Cancel
Press the button, or press the brake pedal, to cancel Cruise Control without eras\
ing the set speed from memory.
The set speed is erased when Cruise Control or the vehicle ignition is t\
urned off.
ADAPTIVE CRUISE CONTROL–ADVANCEDF
The system maintains the set speed and a following gap — the time bet\
ween your vehicle and a vehicle detected directly ahead — by accelerating or braking au\
tomatically while you continue to steer.
Press the Following Gap button to select a following gap setting of Far, Medium, or Near. This is also the Forward Collision AlertF setting.
Press and hold the Cancel button to switch between regular Cruise Control and Adaptive Cruise Control–Advanced.
See Driving and Operating in your Owner’s Manual.F Optional equipment
CBA
Page 19 of 20

19
The Low Tire Pressure warning light on the instrument cluster illuminates wh\
en one or more of the vehicle’s tires is significantly underinflated. Fi\
ll the tires to the proper tire pressures listed on the Tire and Loading Information label, located belo\
w the driver’s door latch. Current tire pressures can be viewed on the Driver Informati\
on Center.
With the ignition On or in Accessory mode, the Tire Fill Alert will prov\
ide visual and audi-ble alerts to help when inflating a tire to the recommended tire press\
ure (does not apply to spare tire). When the recommended pressure is reached, the horn soun\
ds and the turn signals change from flashing to solid.
See Vehicle Care in your Owner’s Manual.
UNDERFLOOR REAR CARGO STORAGE
Lift up the rear cargo floor for additional storage space. Use the hook to hold up the floor cover while in use.
CARGO MANAGEMENT SYSTEMF
The cargo management system features a rail sys-tem and cargo fence that divides the cargo area for smaller items.
Adjust the Fence Position
1. Turn each knob on the posts to align the Unlock symbol with the button arrow.
2. Push the button and slide the fence to the desired position along each rail until it clicks into place.
3. Turn each knob to the Lock position.
Remove the Fence
1. Turn each knob on the posts to align the Unlock symbol with the button arrow.
2. Press the buttons on the rail sliders and pull up the posts to remove th\
e fence. Store the fence in front of the spare tire under the cargo floor.
3. Move the rail sliders to the open slot on the rail to remove the sliders\
.
See Storage in your Owner’s Manual.
TIRE PRESSURE MONITOR
CARGO STORAGE FEATURES
F Optional equipment
The traction control system limits wheelspin in difficult driving cond\
itions. The system turns on automatically every time the vehicle is started. Turn off tract\
ion control if the vehicle is stuck and rocking the vehicle is required.
Press the Traction Control button on the center of the instrument panel to turn traction control off or on again. The Traction Control Off light illuminates on the instrument cluster when the system is off.
See Driving and Operating in your Owner’s Manual.
TRACTION CONTROL