clock CHEVROLET BLAZER 2020 Owner's Manual
[x] Cancel search | Manufacturer: CHEVROLET, Model Year: 2020, Model line: BLAZER, Model: CHEVROLET BLAZER 2020Pages: 390, PDF Size: 6.5 MB
Page 13 of 390
Chevrolet Blazer Owner Manual (GMNA-Localizing-U.S./Canada/Mexico-
13557845) - 2020 - CRC - 3/24/20
12 Keys, Doors, and Windows
Programming Transmitters to
the Vehicle
Only RKE transmitters programmed
to the vehicle will work. If a
transmitter is lost or stolen, a
replacement can be purchased and
programmed through your dealer.
The vehicle can be reprogrammed
so that lost or stolen transmitters no
longer work. Each vehicle can have
up to eight transmitters matched
to it.
Programming with Recognized
Transmitters
A new transmitter can be
programmed to the vehicle when
there are two recognized
transmitters.
To program, the vehicle must be off
and all of the transmitters, both
currently recognized and new, must
be with you.1. Remove the key lock cylinder cap on the driver door handle.
See Door Locks 017. Place
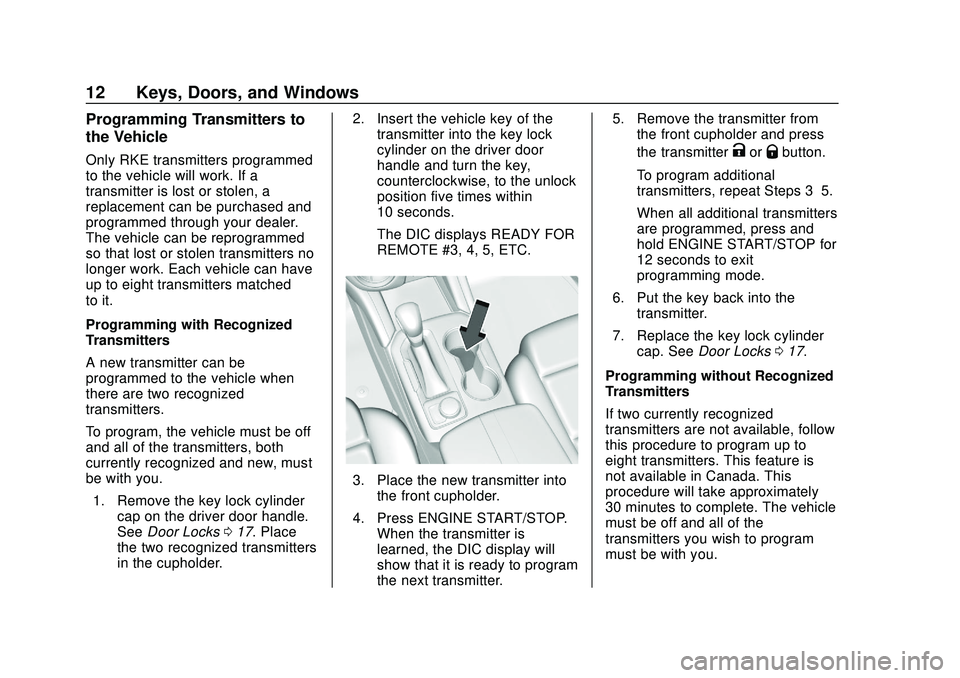
the two recognized transmitters
in the cupholder. 2. Insert the vehicle key of the
transmitter into the key lock
cylinder on the driver door
handle and turn the key,
counterclockwise, to the unlock
position five times within
10 seconds.
The DIC displays READY FOR
REMOTE #3, 4, 5, ETC.
3. Place the new transmitter intothe front cupholder.
4. Press ENGINE START/STOP. When the transmitter is
learned, the DIC display will
show that it is ready to program
the next transmitter. 5. Remove the transmitter from
the front cupholder and press
the transmitter
KorQbutton.
To program additional
transmitters, repeat Steps 3–5.
When all additional transmitters
are programmed, press and
hold ENGINE START/STOP for
12 seconds to exit
programming mode.
6. Put the key back into the transmitter.
7. Replace the key lock cylinder cap. See Door Locks 017.
Programming without Recognized
Transmitters
If two currently recognized
transmitters are not available, follow
this procedure to program up to
eight transmitters. This feature is
not available in Canada. This
procedure will take approximately
30 minutes to complete. The vehicle
must be off and all of the
transmitters you wish to program
must be with you.
Page 14 of 390
Chevrolet Blazer Owner Manual (GMNA-Localizing-U.S./Canada/Mexico-
13557845) - 2020 - CRC - 3/24/20
Keys, Doors, and Windows 13
1. Remove the key lock cylindercap on the driver door handle.
See Door Locks 017. Insert
the vehicle key of the
transmitter into the key lock
cylinder on the driver door
handle and turn the key,
counterclockwise, to the unlock
position five times within
10 seconds.
The DIC displays REMOTE
LEARN PENDING,
PLEASE WAIT.
2. Wait for 10 minutes until the DIC displays PRESS ENGINE
START BUTTON TO LEARN
and then press ENGINE
START/STOP.
The DIC will again display
REMOTE LEARN PENDING,
PLEASE WAIT.
3. Repeat Step 2 two additional times. After the third time all
previously known transmitters
will no longer work with the
vehicle. Remaining transmitters
can be relearned during the
next steps. The DIC should now display
READY FOR REMOTE # 1.
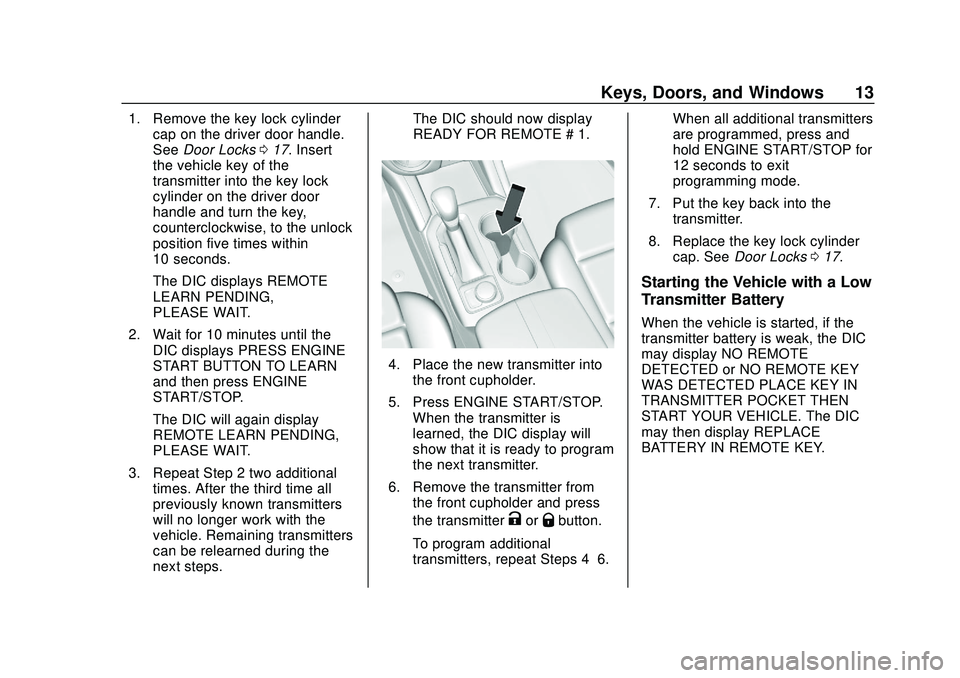
4. Place the new transmitter into
the front cupholder.
5. Press ENGINE START/STOP. When the transmitter is
learned, the DIC display will
show that it is ready to program
the next transmitter.
6. Remove the transmitter from the front cupholder and press
the transmitter
KorQbutton.
To program additional
transmitters, repeat Steps 4–6. When all additional transmitters
are programmed, press and
hold ENGINE START/STOP for
12 seconds to exit
programming mode.
7. Put the key back into the transmitter.
8. Replace the key lock cylinder cap. See Door Locks 017.
Starting the Vehicle with a Low
Transmitter Battery
When the vehicle is started, if the
transmitter battery is weak, the DIC
may display NO REMOTE
DETECTED or NO REMOTE KEY
WAS DETECTED PLACE KEY IN
TRANSMITTER POCKET THEN
START YOUR VEHICLE. The DIC
may then display REPLACE
BATTERY IN REMOTE KEY.
Page 99 of 390
Chevrolet Blazer Owner Manual (GMNA-Localizing-U.S./Canada/Mexico-
13557845) - 2020 - CRC - 3/24/20
98 Instruments and Controls
Instruments and
Controls
Controls
Steering Wheel Adjustment . . . . 99
Steering Wheel Controls . . . . . . . 99
Heated Steering Wheel . . . . . . . . 99
Horn . . . . . . . . . . . . . . . . . . . . . . . . . . 100
Windshield Wiper/Washer . . . . 100
Rear Window Wiper/Washer . . . . . . . . . . . . . . . . . . . . . 101
Compass . . . . . . . . . . . . . . . . . . . . . 102
Clock . . . . . . . . . . . . . . . . . . . . . . . . . 102
Power Outlets . . . . . . . . . . . . . . . . 102
Wireless Charging . . . . . . . . . . . . 104
Warning Lights, Gauges, and
Indicators
Warning Lights, Gauges, and Indicators . . . . . . . . . . . . . . . . . . . 107
Instrument Cluster (Base and
Midlevel) . . . . . . . . . . . . . . . . . . . . 108
Instrument Cluster (Uplevel) . . . . . . . . . . . . . . . . . . . . 112
Speedometer . . . . . . . . . . . . . . . . . 114
Odometer . . . . . . . . . . . . . . . . . . . . . 114
Trip Odometer . . . . . . . . . . . . . . . . 114
Tachometer . . . . . . . . . . . . . . . . . . . 114 Fuel Gauge . . . . . . . . . . . . . . . . . . . 115
Engine Oil Temperature
Gauge . . . . . . . . . . . . . . . . . . . . . . 116
Engine Coolant Temperature Gauge . . . . . . . . . . . . . . . . . . . . . . 116
Voltmeter Gauge . . . . . . . . . . . . . . 117
Seat Belt Reminders . . . . . . . . . . 118
Airbag Readiness Light . . . . . . . 119
Passenger Airbag Status Indicator . . . . . . . . . . . . . . . . . . . . . 119
Charging System Light . . . . . . . 120
Malfunction Indicator Lamp (Check Engine Light) . . . . . . . . 120
Brake System Warning Light . . . . . . . . . . . . . . . . . . . . . . . . 122
Electric Parking Brake Light . . . . . . . . . . . . . . . . . . . . . . . . 123
Service Electric Parking Brake Light . . . . . . . . . . . . . . . . . . . . . . . . 123
Antilock Brake System (ABS) Warning Light . . . . . . . . . . . . . . . 123
Tow/Haul Mode Light . . . . . . . . . 124
Lane Keep Assist (LKA) Light . . . . . . . . . . . . . . . . . . . . . . . . 124
Vehicle Ahead Indicator . . . . . . 124
Pedestrian Ahead Indicator . . . 125
Traction Off Light . . . . . . . . . . . . . 125
StabiliTrak OFF Light . . . . . . . . . 125
Traction Control System (TCS)/ StabiliTrak Light . . . . . . . . . . . . . 126 Engine Coolant Temperature
Warning Light . . . . . . . . . . . . . . . 126
Tire Pressure Light . . . . . . . . . . . 126
Engine Oil Pressure Light . . . . 127
Low Fuel Warning Light . . . . . . 127
Security Light . . . . . . . . . . . . . . . . . 128
High-Beam On Light . . . . . . . . . . 128
Lamps On Reminder . . . . . . . . . 128
Cruise Control Light . . . . . . . . . . 128
Door Ajar Light . . . . . . . . . . . . . . . 129
Information Displays
Driver Information Center (DIC) (Base and Midlevel) . . . . . . . . . 129
Driver Information Center (DIC) (Uplevel) . . . . . . . . . . . . . . . . . . . . 133
Vehicle Messages
Vehicle Messages . . . . . . . . . . . . 136
Engine Power Messages . . . . . 136
Vehicle Speed Messages . . . . . 136
Vehicle Personalization
Vehicle Personalization . . . . . . . 137
Universal Remote System
Universal Remote System . . . . 141
Universal Remote SystemProgramming . . . . . . . . . . . . . . . 141
Universal Remote System Operation . . . . . . . . . . . . . . . . . . . 144
Page 103 of 390
Chevrolet Blazer Owner Manual (GMNA-Localizing-U.S./Canada/Mexico-
13557845) - 2020 - CRC - 3/24/20
102 Instruments and Controls
windshield wiper is performing
interval wipes, then the rear wiper
automatically performs interval
wipes.
This feature can be turned on or off.
SeeVehicle Personalization 0137.
The windshield washer reservoir is
used for the windshield and the rear
window. Check the fluid level in the
reservoir if either washer is not
working. See Washer Fluid 0265.
Rear Camera Washer
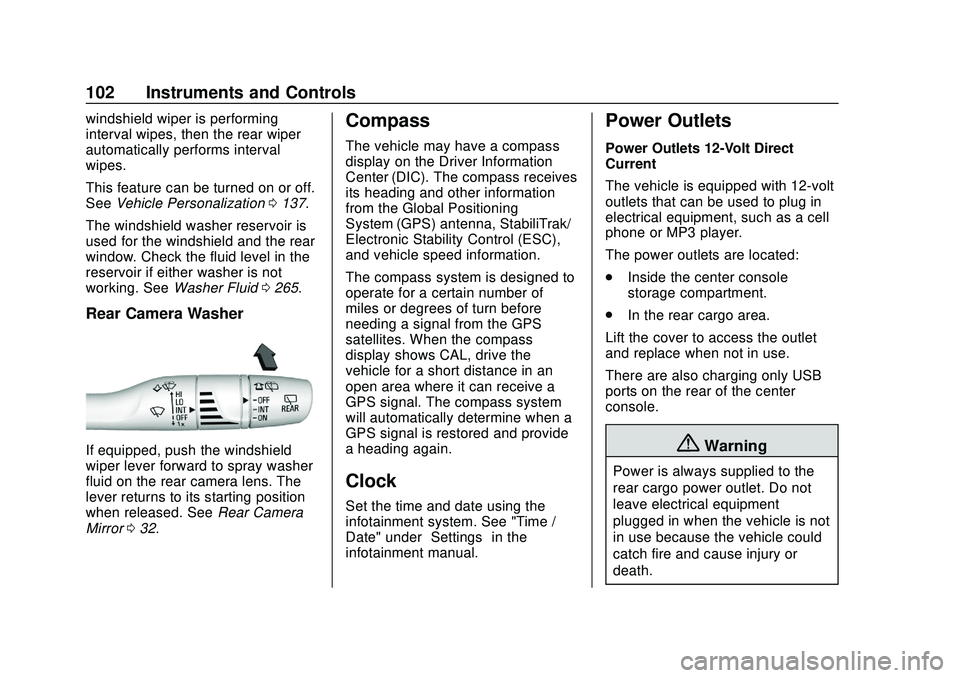
If equipped, push the windshield
wiper lever forward to spray washer
fluid on the rear camera lens. The
lever returns to its starting position
when released. See Rear Camera
Mirror 032.
Compass
The vehicle may have a compass
display on the Driver Information
Center (DIC). The compass receives
its heading and other information
from the Global Positioning
System (GPS) antenna, StabiliTrak/
Electronic Stability Control (ESC),
and vehicle speed information.
The compass system is designed to
operate for a certain number of
miles or degrees of turn before
needing a signal from the GPS
satellites. When the compass
display shows CAL, drive the
vehicle for a short distance in an
open area where it can receive a
GPS signal. The compass system
will automatically determine when a
GPS signal is restored and provide
a heading again.
Clock
Set the time and date using the
infotainment system. See "Time /
Date" under “Settings”in the
infotainment manual.
Power Outlets
Power Outlets 12-Volt Direct
Current
The vehicle is equipped with 12-volt
outlets that can be used to plug in
electrical equipment, such as a cell
phone or MP3 player.
The power outlets are located:
. Inside the center console
storage compartment.
. In the rear cargo area.
Lift the cover to access the outlet
and replace when not in use.
There are also charging only USB
ports on the rear of the center
console.
{Warning
Power is always supplied to the
rear cargo power outlet. Do not
leave electrical equipment
plugged in when the vehicle is not
in use because the vehicle could
catch fire and cause injury or
death.
Page 151 of 390

Chevrolet Blazer Owner Manual (GMNA-Localizing-U.S./Canada/Mexico-
13557845) - 2020 - CRC - 3/24/20
150 Lighting
Interior Lighting
Instrument Panel
Illumination Control
The brightness of the instrument
cluster display, infotainment display
and controls, steering wheel
controls, and all other illuminated
controls, as well as feature status
indicators can be adjusted.
The knob for this feature is on the
instrument panel beside the steering
column.
Push the knob in all the way until it
extends out and then turn the knob
clockwise or counterclockwise to
brighten or dim the lights.
Courtesy Lamps
The courtesy lamps come on when
any door is opened unless the dome
lamp override is activated. To
deactivate the dome lamp override,
press
jOFF and the indicator
light on the button will turn off.
The reading lamps, located on the
front overhead console and the
headliner above the rear seat
passengers, can be controlled
independent of the courtesy lamps.
Dome Lamps
The dome lamp controls are in the
overhead console.
To operate, press the following
buttons:
jOFF : Press to turn off the
dome lamps when a door is open.
An indicator light on the button will
turn on when the dome lamp
override is activated. Press
j
OFF again to deactivate this feature
and the indicator light will turn off.
The dome lamps will come on when
doors are opened.
+ ON/OFF : Press to turn the dome
lamps on manually. Press again to
turn the dome lamps off.
Reading Lamps
There are reading lamps on the
overhead console and over the rear
seats. These lamps come on when
any door is opened.
Page 158 of 390
Chevrolet Blazer Owner Manual (GMNA-Localizing-U.S./Canada/Mexico-
13557845) - 2020 - CRC - 3/24/20
Climate Controls 157
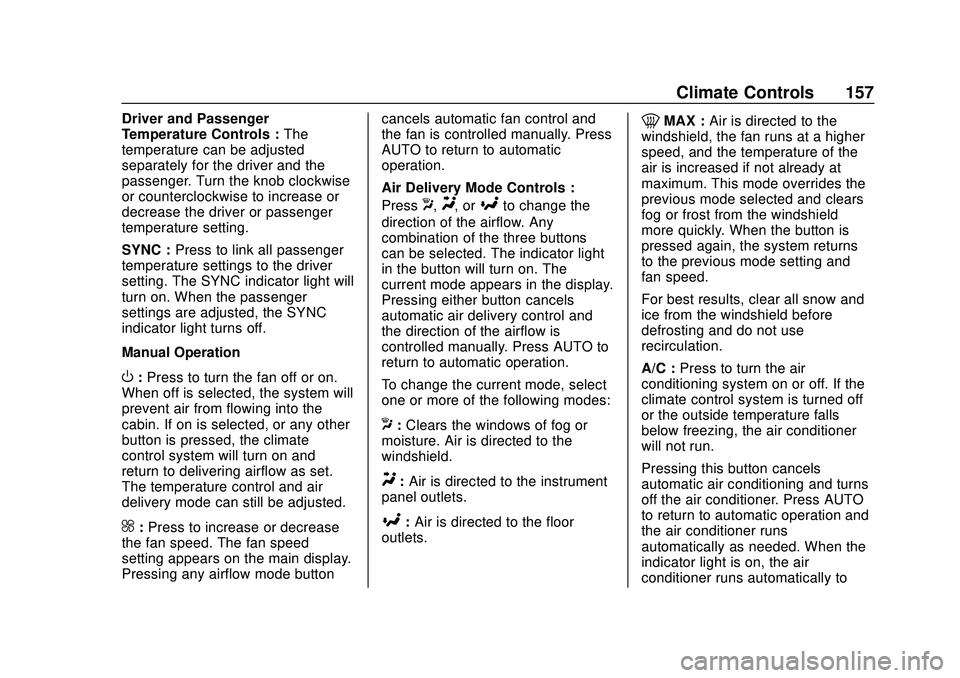
Driver and Passenger
Temperature Controls :The
temperature can be adjusted
separately for the driver and the
passenger. Turn the knob clockwise
or counterclockwise to increase or
decrease the driver or passenger
temperature setting.
SYNC : Press to link all passenger
temperature settings to the driver
setting. The SYNC indicator light will
turn on. When the passenger
settings are adjusted, the SYNC
indicator light turns off.
Manual Operation
O: Press to turn the fan off or on.
When off is selected, the system will
prevent air from flowing into the
cabin. If on is selected, or any other
button is pressed, the climate
control system will turn on and
return to delivering airflow as set.
The temperature control and air
delivery mode can still be adjusted.
^: Press to increase or decrease
the fan speed. The fan speed
setting appears on the main display.
Pressing any airflow mode button cancels automatic fan control and
the fan is controlled manually. Press
AUTO to return to automatic
operation.
Air Delivery Mode Controls :
Press
X,Y, or[to change the
direction of the airflow. Any
combination of the three buttons
can be selected. The indicator light
in the button will turn on. The
current mode appears in the display.
Pressing either button cancels
automatic air delivery control and
the direction of the airflow is
controlled manually. Press AUTO to
return to automatic operation.
To change the current mode, select
one or more of the following modes:
X: Clears the windows of fog or
moisture. Air is directed to the
windshield.
Y: Air is directed to the instrument
panel outlets.
[: Air is directed to the floor
outlets.
0MAX : Air is directed to the
windshield, the fan runs at a higher
speed, and the temperature of the
air is increased if not already at
maximum. This mode overrides the
previous mode selected and clears
fog or frost from the windshield
more quickly. When the button is
pressed again, the system returns
to the previous mode setting and
fan speed.
For best results, clear all snow and
ice from the windshield before
defrosting and do not use
recirculation.
A/C : Press to turn the air
conditioning system on or off. If the
climate control system is turned off
or the outside temperature falls
below freezing, the air conditioner
will not run.
Pressing this button cancels
automatic air conditioning and turns
off the air conditioner. Press AUTO
to return to automatic operation and
the air conditioner runs
automatically as needed. When the
indicator light is on, the air
conditioner runs automatically to
Page 160 of 390
Chevrolet Blazer Owner Manual (GMNA-Localizing-U.S./Canada/Mexico-
13557845) - 2020 - CRC - 3/24/20
Climate Controls 159
Remote Start Climate Control
Operation :If equipped with remote
start, the climate control system
may run when the vehicle is started
remotely. The system will use the
defrost setting if it is cold outside or
turn on using the coldest settings if
it is hot outside. The rear defog may
come on during remote start based
on cold ambient conditions. The
rear defog indicator light does not
come on during a remote start.
If equipped, the heated seats will
turn on if it is cold outside or the
ventilated seats will turn on if it is
hot outside. The heated and
ventilated seat indicator lights may
not come on during a remote start.
If equipped, the heated steering
wheel will come on in a remote start
if it is cold outside. The heated
steering wheel indicator light may
not come on. See Remote Vehicle
Start 015 and
Heated and Ventilated Front Seats
0 47.Sensor
The solar sensor, on top of the
instrument panel near the
windshield, monitors the solar heat.
The climate control system uses the
sensor information to adjust the
temperature, fan speed,
recirculation, and air delivery mode
for best comfort.
Do not cover the sensor; otherwise
the automatic climate control system
may not work properly.
Air Vents
Use the air outlets in the center and
on the side of the instrument panel
to direct the airflow. Turn the center
knobs on the air outlets
counterclockwise or clockwise to
open or close off the airflow.
Operation Tips
.
Clear away any ice, snow,
or leaves from the air inlets at
the base of the windshield that
can block the flow of air into the
vehicle.
. Clear snow off the hood to
improve visibility and help
decrease moisture drawn into
the vehicle.
. Use of non-GM approved hood
deflectors can adversely affect
the performance of the system.
Page 264 of 390
Chevrolet Blazer Owner Manual (GMNA-Localizing-U.S./Canada/Mexico-
13557845) - 2020 - CRC - 3/24/20
Vehicle Care 263
water and DEX-COOL coolant. Be
sure the cooling system, including
the coolant surge tank pressure
cap, is cool before you do it.
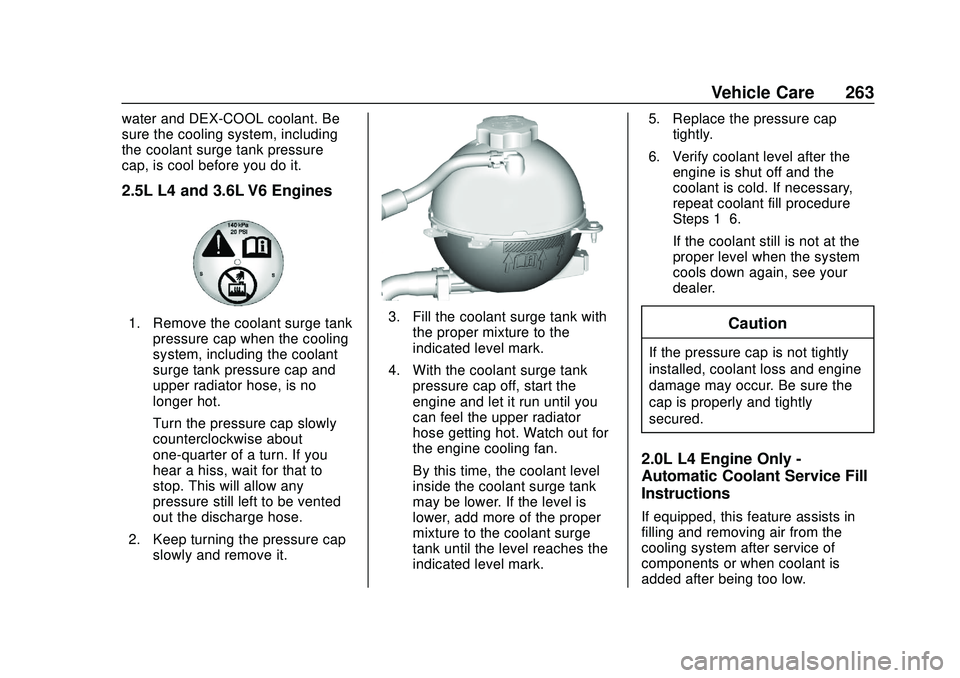
2.5L L4 and 3.6L V6 Engines
1. Remove the coolant surge tankpressure cap when the cooling
system, including the coolant
surge tank pressure cap and
upper radiator hose, is no
longer hot.
Turn the pressure cap slowly
counterclockwise about
one-quarter of a turn. If you
hear a hiss, wait for that to
stop. This will allow any
pressure still left to be vented
out the discharge hose.
2. Keep turning the pressure cap slowly and remove it.3. Fill the coolant surge tank withthe proper mixture to the
indicated level mark.
4. With the coolant surge tank pressure cap off, start the
engine and let it run until you
can feel the upper radiator
hose getting hot. Watch out for
the engine cooling fan.
By this time, the coolant level
inside the coolant surge tank
may be lower. If the level is
lower, add more of the proper
mixture to the coolant surge
tank until the level reaches the
indicated level mark. 5. Replace the pressure cap
tightly.
6. Verify coolant level after the engine is shut off and the
coolant is cold. If necessary,
repeat coolant fill procedure
Steps 1–6.
If the coolant still is not at the
proper level when the system
cools down again, see your
dealer.Caution
If the pressure cap is not tightly
installed, coolant loss and engine
damage may occur. Be sure the
cap is properly and tightly
secured.
2.0L L4 Engine Only -
Automatic Coolant Service Fill
Instructions
If equipped, this feature assists in
filling and removing air from the
cooling system after service of
components or when coolant is
added after being too low.
Page 275 of 390
Chevrolet Blazer Owner Manual (GMNA-Localizing-U.S./Canada/Mexico-
13557845) - 2020 - CRC - 3/24/20
274 Vehicle Care
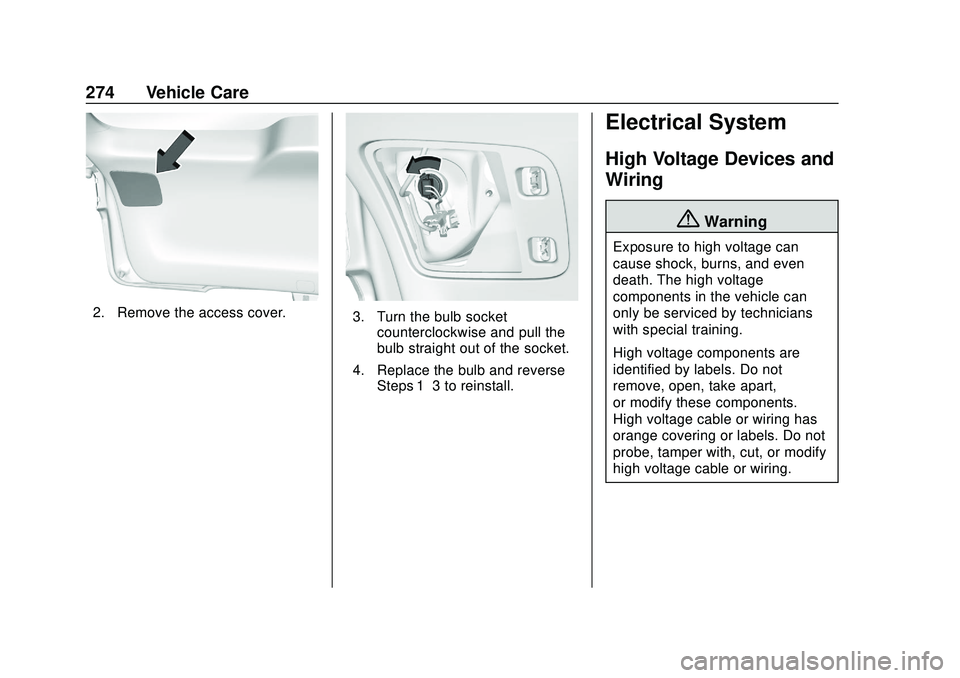
2. Remove the access cover.3. Turn the bulb socketcounterclockwise and pull the
bulb straight out of the socket.
4. Replace the bulb and reverse Steps 1–3 to reinstall.
Electrical System
High Voltage Devices and
Wiring
{Warning
Exposure to high voltage can
cause shock, burns, and even
death. The high voltage
components in the vehicle can
only be serviced by technicians
with special training.
High voltage components are
identified by labels. Do not
remove, open, take apart,
or modify these components.
High voltage cable or wiring has
orange covering or labels. Do not
probe, tamper with, cut, or modify
high voltage cable or wiring.
Page 310 of 390
Chevrolet Blazer Owner Manual (GMNA-Localizing-U.S./Canada/Mexico-
13557845) - 2020 - CRC - 3/24/20
Vehicle Care 309
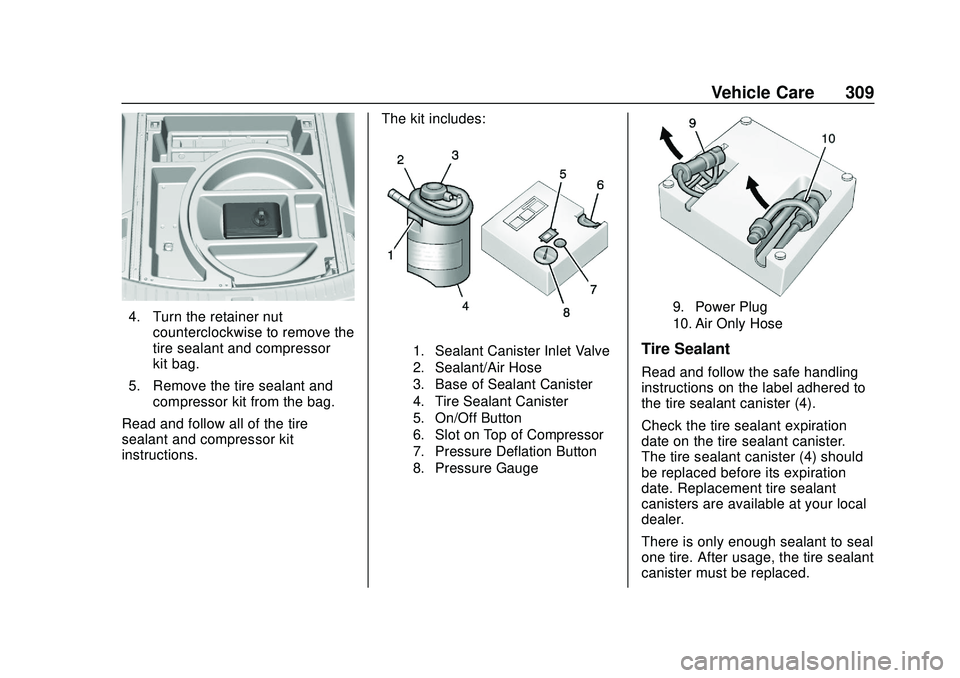
4. Turn the retainer nutcounterclockwise to remove the
tire sealant and compressor
kit bag.
5. Remove the tire sealant and compressor kit from the bag.
Read and follow all of the tire
sealant and compressor kit
instructions. The kit includes:
1. Sealant Canister Inlet Valve
2. Sealant/Air Hose
3. Base of Sealant Canister
4. Tire Sealant Canister
5. On/Off Button
6. Slot on Top of Compressor
7. Pressure Deflation Button
8. Pressure Gauge
9. Power Plug
10. Air Only Hose
Tire Sealant
Read and follow the safe handling
instructions on the label adhered to
the tire sealant canister (4).
Check the tire sealant expiration
date on the tire sealant canister.
The tire sealant canister (4) should
be replaced before its expiration
date. Replacement tire sealant
canisters are available at your local
dealer.
There is only enough sealant to seal
one tire. After usage, the tire sealant
canister must be replaced.