ECO mode CHEVROLET BLAZER 2022 Owners Manual
[x] Cancel search | Manufacturer: CHEVROLET, Model Year: 2022, Model line: BLAZER, Model: CHEVROLET BLAZER 2022Pages: 386, PDF Size: 13.37 MB
Page 12 of 386
Chevrolet Blazer Owner Manual (GMNA-Localizing-U.S./Canada/Mexico-
15165663) - 2022 - CRC - 4/27/21
Keys, Doors, and Windows 11
4. Press ENGINE START/STOP. When thetransmitter is learned, the DIC display
will show that it is ready to program the
next transmitter.
5. Remove the transmitter from the front cupholder and press the transmitter
K
orQbutton.
To program additional transmitters,
repeat Steps 3–5.
When all additional transmitters are
programmed, press and hold ENGINE
START/STOP for 12 seconds to exit
programming mode.
6. Put the key back into the transmitter.
7. Replace the key lock cylinder cap. See Door Locks 014.
Programming without Recognized
Transmitters
If two currently recognized transmitters are
not available, follow this procedure to
program up to eight transmitters. This
feature is not available in Canada. This
procedure will take approximately
30 minutes to complete. The vehicle must
be off and all of the transmitters you wish
to program must be with you. 1. Remove the key lock cylinder cap on the
driver door handle. See Door Locks014.
Insert the vehicle key of the transmitter
into the key lock cylinder on the driver
door handle and turn the key,
counterclockwise, to the unlock position
five times within 10 seconds.
The DIC displays REMOTE LEARN
PENDING, PLEASE WAIT.
2. Wait for 10 minutes until the DIC displays PRESS ENGINE START BUTTON TO
LEARN and then press ENGINE
START/STOP.
The DIC will again display REMOTE LEARN
PENDING, PLEASE WAIT.
3. Repeat Step 2 two additional times. After the third time all previously known
transmitters will no longer work with the
vehicle. Remaining transmitters can be
relearned during the next steps.
The DIC should now display READY FOR
REMOTE # 1.
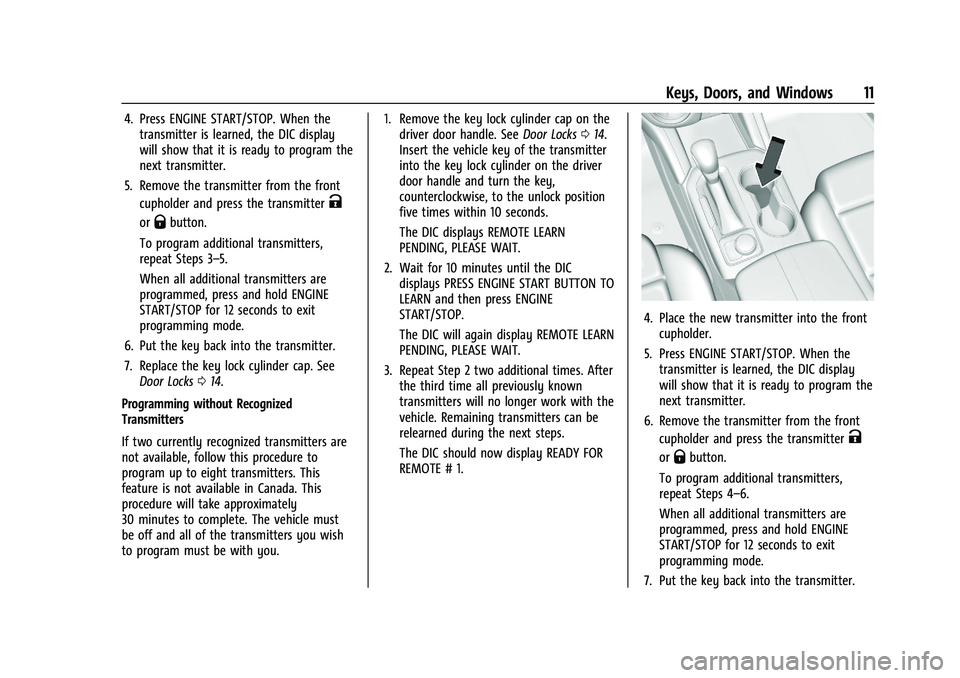
4. Place the new transmitter into the frontcupholder.
5. Press ENGINE START/STOP. When the transmitter is learned, the DIC display
will show that it is ready to program the
next transmitter.
6. Remove the transmitter from the front cupholder and press the transmitter
K
orQbutton.
To program additional transmitters,
repeat Steps 4–6.
When all additional transmitters are
programmed, press and hold ENGINE
START/STOP for 12 seconds to exit
programming mode.
7. Put the key back into the transmitter.
Page 15 of 386
Chevrolet Blazer Owner Manual (GMNA-Localizing-U.S./Canada/Mexico-
15165663) - 2022 - CRC - 4/27/21
14 Keys, Doors, and Windows
Other conditions can affect the performance
of the transmitter. SeeRemote Keyless Entry
(RKE) System 07.
Starting the Engine Using Remote Start
1. Press and release
Qon the RKE
transmitter.
2. Immediately press and hold
/for at
least four seconds or until the turn
signal lamps flash. The turn signal lamps
flashing confirms the request to remote
start the vehicle has been received.
During the remote start the doors will be
locked and the parking lamps will remain
on as long as the engine is running.
The engine will shut off after 15 minutes
unless a time extension is done or the
vehicle is started.
3. With the RKE transmitter in the vehicle, press the brake pedal and start the
vehicle to drive.
Extending Engine Run Time
The engine run time can also be extended
by another 15 minutes, if during the first
15 minutes Steps 1 and 2 are repeated while
the engine is still running. An extension can
be requested 30 seconds after starting. This
provides a total of 30 minutes. The remote start can only be extended once.
When the remote start is extended, the
second 15-minute period is added on to the
first 15 minutes for a total of 30 minutes.
A maximum of two remote starts, or a
remote start with an extension, are allowed
between ignition cycles.
The vehicle must be started normally before
the remote start procedure can be used
again.
Canceling a Remote Start
To cancel a remote start, do any of the
following:
.Press and hold/until the parking lamps
turn off.
.Turn on the hazard warning flashers.
.Turn the vehicle on and then off.
Conditions in Which Remote Start Will
Not Work
The remote start will not operate if any of
the following occur:
.An RKE transmitter is in the vehicle.
.The hood is not closed.
.The ignition is in any mode other
than off.
.The hazard warning flashers are on.
.There is an emission control system
malfunction.
.The engine coolant temperature is
too high.
.The oil pressure is low.
.Two remote vehicle starts or a start with
an extension have already been used.
.The vehicle is not in P (Park).
Door Locks
{Warning
Unlocked doors can be dangerous.
.Passengers, especially children, can
easily open the doors and fall out of a
moving vehicle. The doors can be
unlocked and opened while the vehicle
is moving. The chance of being thrown
out of the vehicle in a crash is
increased if the doors are not locked.
So, all passengers should wear seat
belts properly and the doors should be
locked whenever the vehicle is driven.
.Young children who get into unlocked
vehicles may be unable to get out.
A child can be overcome by extreme
heat and can suffer permanent injuries (Continued)
Page 20 of 386
Chevrolet Blazer Owner Manual (GMNA-Localizing-U.S./Canada/Mexico-
15165663) - 2022 - CRC - 4/27/21
Keys, Doors, and Windows 19
To open the liftgate, press the touch pad in
the liftgate handle and lift up. Unlocking all
doors will also unlock the liftgate.
Use the pull cup to lower and close the
liftgate. Do not press the touch pad while
closing the liftgate. This will cause the
liftgate to be unlatched.
The liftgate can be opened when locked if
the RKE transmitter is within 1 m (3 ft) of
the touch pad. SeeRemote Keyless Entry
(RKE) System Operation 07.
The liftgate has an electric latch. If the
battery is disconnected or has low voltage,
the liftgate will not open. The liftgate will
resume operation when the battery is
reconnected and charged.
Power Liftgate Operation
{Warning
You or others could be injured if caught
in the path of the power liftgate. Make
sure there is no one in the way of the
liftgate as it is opening and closing.
Caution
Driving with an open and unsecured
liftgate may result in damage to the
power liftgate components.
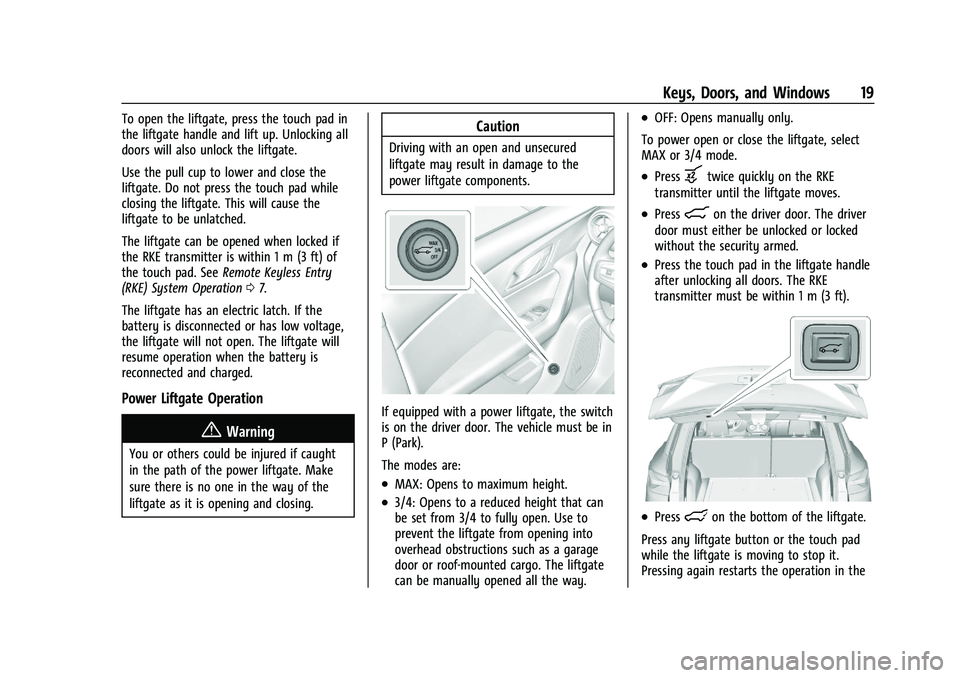
If equipped with a power liftgate, the switch
is on the driver door. The vehicle must be in
P (Park).
The modes are:
.MAX: Opens to maximum height.
.3/4: Opens to a reduced height that can
be set from 3/4 to fully open. Use to
prevent the liftgate from opening into
overhead obstructions such as a garage
door or roof-mounted cargo. The liftgate
can be manually opened all the way.
.OFF: Opens manually only.
To power open or close the liftgate, select
MAX or 3/4 mode.
.Pressbtwice quickly on the RKE
transmitter until the liftgate moves.
.Press8on the driver door. The driver
door must either be unlocked or locked
without the security armed.
.Press the touch pad in the liftgate handle
after unlocking all doors. The RKE
transmitter must be within 1 m (3 ft).
.Presslon the bottom of the liftgate.
Press any liftgate button or the touch pad
while the liftgate is moving to stop it.
Pressing again restarts the operation in the
Page 21 of 386
Chevrolet Blazer Owner Manual (GMNA-Localizing-U.S./Canada/Mexico-
15165663) - 2022 - CRC - 4/27/21
20 Keys, Doors, and Windows
reverse direction. The touch pad in the
liftgate handle cannot be used to close the
liftgate.
Caution
Manually forcing the liftgate to open or
close during a power cycle can damage
the vehicle. Allow the power cycle to
complete.
The power liftgate may be temporarily
disabled under extreme low temperatures,
or after repeated power cycling over a short
period of time. If this occurs, the liftgate can
still be operated manually.
If the vehicle is shifted out of P (Park) while
the power function is in progress, the
liftgate will continue to completion. If the
vehicle is accelerated before the liftgate has
completed moving, the liftgate may stop or
reverse direction. Check for Driver
Information Center (DIC) messages and make
sure the liftgate is closed and latched before
driving.
Falling Liftgate Detection
If the power liftgate automatically closes
after a power opening cycle, it indicates that
the system is reacting to excess weight on
the liftgate or a possible support strut failure. A repetitive chime will sound while
the falling liftgate detection feature is
operating. Remove any excess weight. If the
liftgate continues to automatically close
after opening, see your dealer for service
before using the power liftgate.
Interfering with the power liftgate motion
or manually closing the liftgate too quickly
after power opening may resemble a
support strut failure. This could also activate
the falling liftgate detection feature. Allow
the liftgate to complete its operation and
wait a few seconds before manually closing
the liftgate.
Obstacle Detection Features
If the liftgate encounters an obstacle during
a power open or close cycle, a warning
chime may sound and the liftgate will
automatically reverse direction and move a
short distance away from the obstacle. After
removing the obstruction, the power liftgate
operation can be used again. If the liftgate
encounters multiple obstacles on the same
power cycle, the power function will
deactivate. After removing the obstructions,
manually close the liftgate which will allow
normal power operation functions to
resume.
If the vehicle is locked while the liftgate is
closing, and an obstacle is encountered that
prevents the liftgate from completely
closing, the horn will sound as an alert that
the liftgate did not close.
Setting the 3/4 Mode
To change the position the liftgate stops at
when opening:
1. Select MAX or 3/4 mode and power open the liftgate.
2. Stop the liftgate movement at the desired height by pressing any liftgate
switch. Manually adjust the liftgate
position if needed.
3. Press and hold
lat the bottom of the
liftgate until the turn signals flash and a
beep sounds. This indicates the setting
has been recorded.
The liftgate cannot be set below a minimum
programmable height. If there is no light
flash or sound, then the height adjustment
may be too low.
Manual Operation
Select OFF to manually operate the liftgate.
See “Manual Liftgate” at the beginning of
this section.
Page 46 of 386

Chevrolet Blazer Owner Manual (GMNA-Localizing-U.S./Canada/Mexico-
15165663) - 2022 - CRC - 4/27/21
Seats and Restraints 45
This vehicle has indicators as a reminder to
buckle the seat belts. SeeSeat Belt
Reminders 0101.
Why Seat Belts Work
When riding in a vehicle, you travel as fast
as the vehicle does. If the vehicle stops
suddenly, you keep going until something
stops you. It could be the windshield, the
instrument panel, or the seat belts!
When you wear a seat belt, you and the
vehicle slow down together. There is more
time to stop because you stop over a longer
distance and, when worn properly, your
strongest bones take the forces from the
seat belts. That is why wearing seat belts
makes such good sense.
Questions and Answers About Seat Belts
Q: Will I be trapped in the vehicle after a
crash if I am wearing a seat belt?
A: You could be— whether you are
wearing a seat belt or not. Your chance
of being conscious during and after a
crash, so you canunbuckle and get out,
is much greater if you are belted.
Q: If my vehicle has airbags, why should I have to wear seat belts?
A: Airbags are supplemental systems only.
They work withseat belts —not instead
of them. Whether or not an airbag is
provided, all occupants still have to
buckle up to get the most protection.
Also, in nearly all states and in all
Canadian provinces, the law requires
wearing seat belts.
Buckle To Drive
If equipped, this feature prevents the vehicle
from being shifted out of P (Park) when
Teen Driver is active, and the driver seat
belt is not buckled. See Teen Driver0172 or
Teen Driver 0175. If the engine is running,
the driver seat belt is not buckled, and the
brake pedal is pressed with the vehicle in
P (Park), a message displays in the Driver Information Center (DIC). Buckle the driver
seat belt to shift out of P (Park). Shifting
from P (Park) will be prevented once for
each ignition cycle.
For some fleet vehicles, shifting from
P (Park) will be prevented each time the
above conditions exist whether Teen Driver
is ON or OFF.
On some models, Buckle to Drive may also
prevent shifting out of P (Park) if a front
passenger is unbuckled under similar
conditions. A message displays in the DIC.
Buckle the front passenger seat belt to shift
out of P (Park). This feature may not allow
the vehicle to shift out of P (Park) if an
object, such as a briefcase, handbag, grocery
bag, laptop, or other electronic device, is on
the front passenger seat. If this happens,
remove the object from the seat or buckle
the seat belt to shift out of P (Park).
If the driver, or on some vehicles, the
present front passenger, remains unbuckled,
the DIC message will turn off after several
seconds and the vehicle can be shifted out
of P (Park). See
“Seat Belts”and“Child
Restraints” in the Index for information
about the importance of proper
restraint use.
Page 55 of 386
Chevrolet Blazer Owner Manual (GMNA-Localizing-U.S./Canada/Mexico-
15165663) - 2022 - CRC - 4/27/21
54 Seats and Restraints
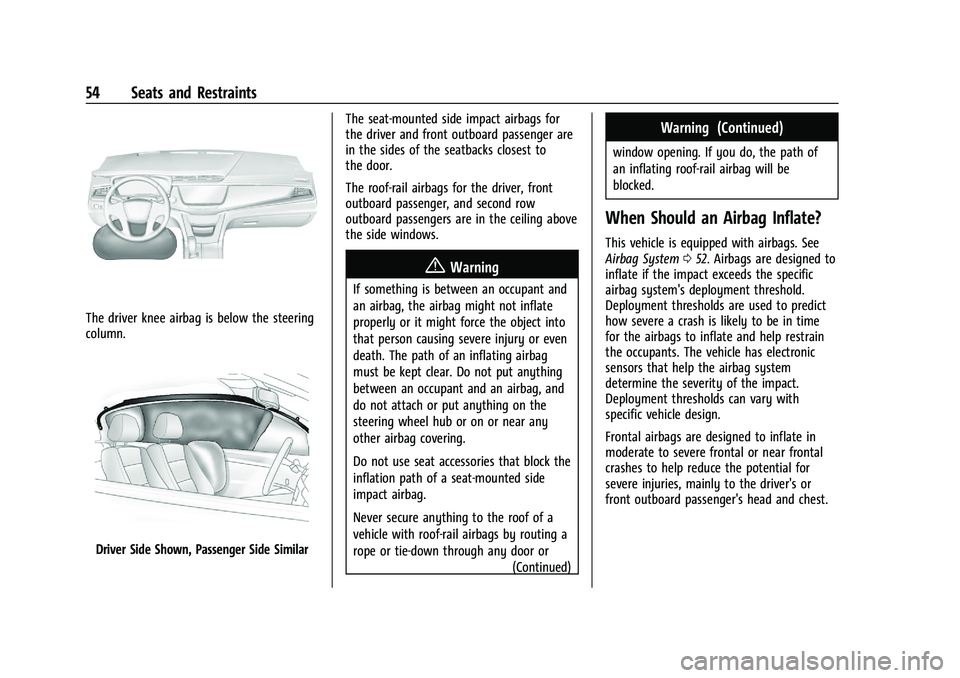
The driver knee airbag is below the steering
column.
Driver Side Shown, Passenger Side SimilarThe seat-mounted side impact airbags for
the driver and front outboard passenger are
in the sides of the seatbacks closest to
the door.
The roof-rail airbags for the driver, front
outboard passenger, and second row
outboard passengers are in the ceiling above
the side windows.
{Warning
If something is between an occupant and
an airbag, the airbag might not inflate
properly or it might force the object into
that person causing severe injury or even
death. The path of an inflating airbag
must be kept clear. Do not put anything
between an occupant and an airbag, and
do not attach or put anything on the
steering wheel hub or on or near any
other airbag covering.
Do not use seat accessories that block the
inflation path of a seat-mounted side
impact airbag.
Never secure anything to the roof of a
vehicle with roof-rail airbags by routing a
rope or tie‐down through any door or
(Continued)
Warning (Continued)
window opening. If you do, the path of
an inflating roof-rail airbag will be
blocked.
When Should an Airbag Inflate?
This vehicle is equipped with airbags. See
Airbag System052. Airbags are designed to
inflate if the impact exceeds the specific
airbag system's deployment threshold.
Deployment thresholds are used to predict
how severe a crash is likely to be in time
for the airbags to inflate and help restrain
the occupants. The vehicle has electronic
sensors that help the airbag system
determine the severity of the impact.
Deployment thresholds can vary with
specific vehicle design.
Frontal airbags are designed to inflate in
moderate to severe frontal or near frontal
crashes to help reduce the potential for
severe injuries, mainly to the driver's or
front outboard passenger's head and chest.
Page 56 of 386
Chevrolet Blazer Owner Manual (GMNA-Localizing-U.S./Canada/Mexico-
15165663) - 2022 - CRC - 4/27/21
Seats and Restraints 55
Whether the frontal airbags will or should
inflate is not based primarily on how fast
the vehicle is traveling. It depends on what
is hit, the direction of the impact, and how
quickly the vehicle slows down.
Frontal airbags may inflate at different crash
speeds depending on whether the vehicle
hits an object straight on or at an angle,
and whether the object is fixed or moving,
rigid or deformable, narrow or wide.
Frontal airbags are not intended to inflate
during vehicle rollovers, in rear impacts,
or in many side impacts.
In addition, the vehicle has advanced
technology frontal airbags. Advanced
technology frontal airbags adjust the
restraint according to crash severity.
Knee airbags are designed to inflate in
moderate to severe frontal or near frontal
impacts. Knee airbags are not designed to
inflate during vehicle rollovers, in rear
impacts, or in many side impacts.
Seat-mounted side impact airbags are
designed to inflate in moderate to severe
side crashes, depending on the location of
the impact. These airbags are also designed
to inflate in some moderate to severe
frontal or near-frontal impacts that couldresult in the occupant moving toward the
side of the vehicle. Seat-mounted side
impact airbags are not designed to inflate in
rollovers, or rear impacts. A seat-mounted
side impact airbag is designed to inflate on
the side of the vehicle that is struck.
Roof-rail airbags are designed to inflate in
moderate to severe side crashes depending
on the location of the impact. In addition,
these roof-rail airbags are designed to inflate
during a rollover or in a severe frontal
impact. Roof-rail airbags are not designed to
inflate in rear impacts. Both roof-rail airbags
will inflate when either side of the vehicle is
struck, if the sensing system predicts that
the vehicle is about to roll over on its side,
or in a severe frontal impact.
In any particular crash, no one can say
whether an airbag should have inflated
simply because of the vehicle damage or
repair costs.
What Makes an Airbag Inflate?
In a deployment event, the sensing system
sends an electrical signal triggering a release
of gas from the inflator. Gas from the
inflator fills the airbag causing the bag to
break out of the cover. The inflator, the
airbag, and related hardware are all part of
the airbag module.
For airbag locations, see
Where Are the
Airbags? 053.
How Does an Airbag Restrain?
In moderate to severe frontal or near frontal
collisions, even belted occupants can contact
the steering wheel or the instrument panel.
In moderate to severe side collisions, even
belted occupants can contact the inside of
the vehicle.
Airbags supplement the protection provided
by seat belts by distributing the force of the
impact more evenly over the
occupant's body.
Rollover capable roof-rail airbags are
designed to help contain the head and chest
of occupants in the outboard seating
positions in the first and second rows. The
rollover capable roof-rail airbags are
designed to help reduce the risk of full or
partial ejection in rollover events, although
no system can prevent all such ejections.
Page 65 of 386
Chevrolet Blazer Owner Manual (GMNA-Localizing-U.S./Canada/Mexico-
15165663) - 2022 - CRC - 4/27/21
64 Seats and Restraints
{Warning
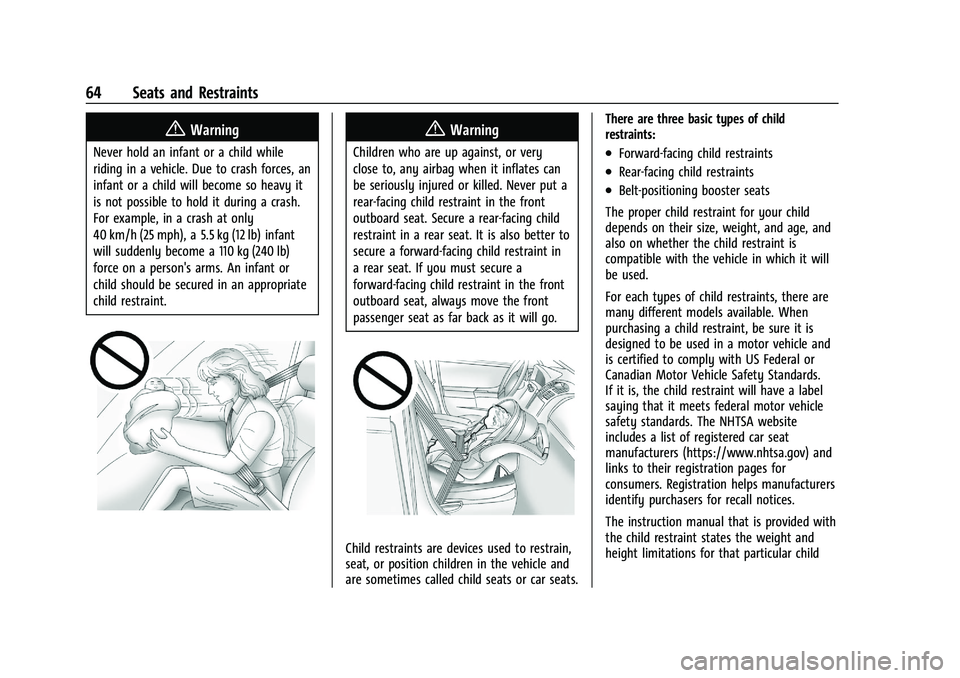
Never hold an infant or a child while
riding in a vehicle. Due to crash forces, an
infant or a child will become so heavy it
is not possible to hold it during a crash.
For example, in a crash at only
40 km/h (25 mph), a 5.5 kg (12 lb) infant
will suddenly become a 110 kg (240 lb)
force on a person's arms. An infant or
child should be secured in an appropriate
child restraint.
{Warning
Children who are up against, or very
close to, any airbag when it inflates can
be seriously injured or killed. Never put a
rear-facing child restraint in the front
outboard seat. Secure a rear-facing child
restraint in a rear seat. It is also better to
secure a forward-facing child restraint in
a rear seat. If you must secure a
forward-facing child restraint in the front
outboard seat, always move the front
passenger seat as far back as it will go.
Child restraints are devices used to restrain,
seat, or position children in the vehicle and
are sometimes called child seats or car seats.There are three basic types of child
restraints:
.Forward-facing child restraints
.Rear-facing child restraints
.Belt-positioning booster seats
The proper child restraint for your child
depends on their size, weight, and age, and
also on whether the child restraint is
compatible with the vehicle in which it will
be used.
For each types of child restraints, there are
many different models available. When
purchasing a child restraint, be sure it is
designed to be used in a motor vehicle and
is certified to comply with US Federal or
Canadian Motor Vehicle Safety Standards.
If it is, the child restraint will have a label
saying that it meets federal motor vehicle
safety standards. The NHTSA website
includes a list of registered car seat
manufacturers (https://www.nhtsa.gov) and
links to their registration pages for
consumers. Registration helps manufacturers
identify purchasers for recall notices.
The instruction manual that is provided with
the child restraint states the weight and
height limitations for that particular child
Page 104 of 386
Chevrolet Blazer Owner Manual (GMNA-Localizing-U.S./Canada/Mexico-
15165663) - 2022 - CRC - 4/27/21
Instruments and Controls 103
Charging System Light
The charging system light comes on briefly
when the ignition is turned on, but the
engine is not running, as a check to show
the light is working. It should go out when
the engine is started.
If the light stays on, or comes on while
driving, there may be a problem with the
electrical charging system. Have it checked
by your dealer. Driving while this light is on
could drain the battery.
When this light comes on, or is flashing, the
Driver Information Center (DIC) also displays
a message.
If a short distance must be driven with the
light on, be sure to turn off all accessories,
such as the radio and air conditioner. Find a
safe place to stop the vehicle.
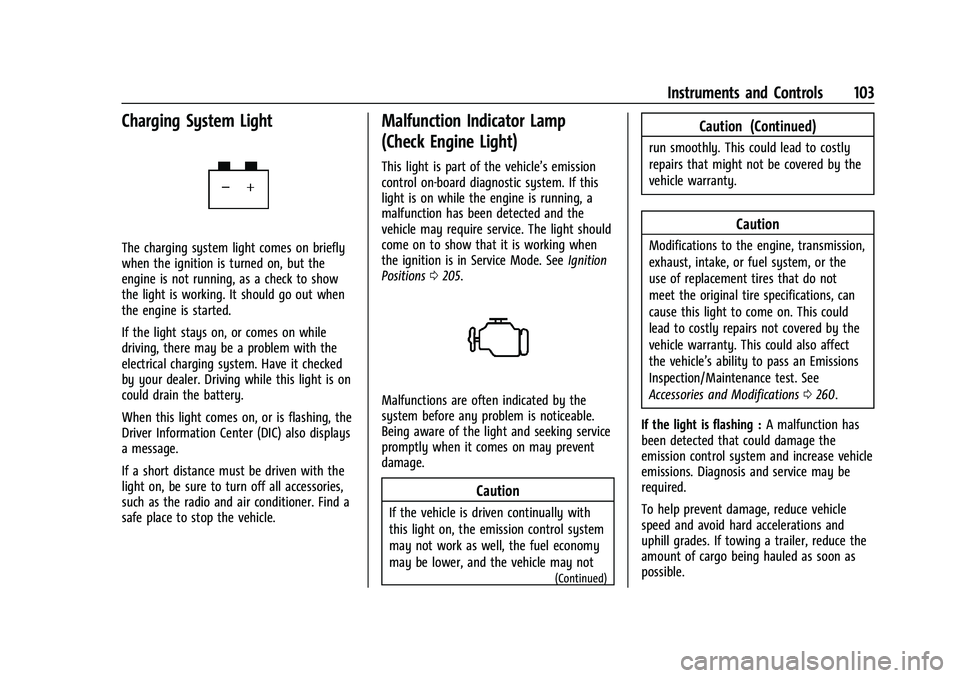
Malfunction Indicator Lamp
(Check Engine Light)
This light is part of the vehicle’s emission
control on-board diagnostic system. If this
light is on while the engine is running, a
malfunction has been detected and the
vehicle may require service. The light should
come on to show that it is working when
the ignition is in Service Mode. SeeIgnition
Positions 0205.
Malfunctions are often indicated by the
system before any problem is noticeable.
Being aware of the light and seeking service
promptly when it comes on may prevent
damage.
Caution
If the vehicle is driven continually with
this light on, the emission control system
may not work as well, the fuel economy
may be lower, and the vehicle may not
(Continued)
Caution (Continued)
run smoothly. This could lead to costly
repairs that might not be covered by the
vehicle warranty.
Caution
Modifications to the engine, transmission,
exhaust, intake, or fuel system, or the
use of replacement tires that do not
meet the original tire specifications, can
cause this light to come on. This could
lead to costly repairs not covered by the
vehicle warranty. This could also affect
the vehicle’s ability to pass an Emissions
Inspection/Maintenance test. See
Accessories and Modifications 0260.
If the light is flashing : A malfunction has
been detected that could damage the
emission control system and increase vehicle
emissions. Diagnosis and service may be
required.
To help prevent damage, reduce vehicle
speed and avoid hard accelerations and
uphill grades. If towing a trailer, reduce the
amount of cargo being hauled as soon as
possible.
Page 105 of 386
Chevrolet Blazer Owner Manual (GMNA-Localizing-U.S./Canada/Mexico-
15165663) - 2022 - CRC - 4/27/21
104 Instruments and Controls
If the light continues to flash, find a safe
place to park. Turn the vehicle off and wait
at least 10 seconds before restarting the
engine. If the light is still flashing, follow
the previous guidelines and see your dealer
for service as soon as possible.
If the light is on steady :A malfunction has
been detected. Diagnosis and service may be
required.
Check the following:
.If fuel has been added to the vehicle
using the capless fuel funnel adapter,
make sure that it has been removed. See
“Filling the Tank with a Portable Gas Can”
under Filling the Tank 0245. The
diagnostic system can detect if the
adapter has been left installed in the
vehicle, allowing fuel to evaporate into
the atmosphere. A few driving trips with
the adapter removed may turn off the
light.
.Poor fuel quality can cause inefficient
engine operation and poor driveability,
which may go away once the engine is
warmed up. If this occurs, change the fuel
brand. It may require at least one full
tank of the proper fuel to turn the light
off. See Recommended Fuel 0244.
If the light remains on, see your dealer.
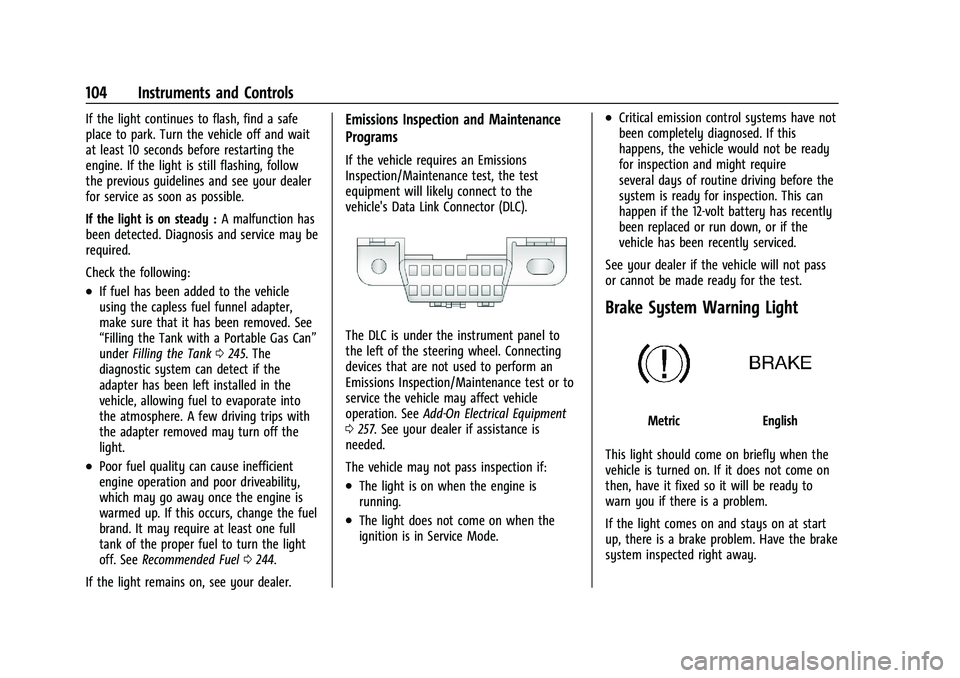
Emissions Inspection and Maintenance
Programs
If the vehicle requires an Emissions
Inspection/Maintenance test, the test
equipment will likely connect to the
vehicle's Data Link Connector (DLC).
The DLC is under the instrument panel to
the left of the steering wheel. Connecting
devices that are not used to perform an
Emissions Inspection/Maintenance test or to
service the vehicle may affect vehicle
operation. See Add-On Electrical Equipment
0 257. See your dealer if assistance is
needed.
The vehicle may not pass inspection if:
.The light is on when the engine is
running.
.The light does not come on when the
ignition is in Service Mode.
.Critical emission control systems have not
been completely diagnosed. If this
happens, the vehicle would not be ready
for inspection and might require
several days of routine driving before the
system is ready for inspection. This can
happen if the 12-volt battery has recently
been replaced or run down, or if the
vehicle has been recently serviced.
See your dealer if the vehicle will not pass
or cannot be made ready for the test.
Brake System Warning Light
MetricEnglish
This light should come on briefly when the
vehicle is turned on. If it does not come on
then, have it fixed so it will be ready to
warn you if there is a problem.
If the light comes on and stays on at start
up, there is a brake problem. Have the brake
system inspected right away.