power outlets CHEVROLET BLAZER 2022 Owners Manual
[x] Cancel search | Manufacturer: CHEVROLET, Model Year: 2022, Model line: BLAZER, Model: CHEVROLET BLAZER 2022Pages: 386, PDF Size: 13.37 MB
Page 19 of 386
Chevrolet Blazer Owner Manual (GMNA-Localizing-U.S./Canada/Mexico-
15165663) - 2022 - CRC - 4/27/21
18 Keys, Doors, and Windows
If equipped, the safety lock is on the inside
edge of the rear doors. To use the
safety lock:1. Move the lever down to the lock position.
2. Close the door.
3. Do the same for the other rear door.
To open a rear door when the safety lock
is on: 1. Unlock the door by activating the inside handle, by pressing the power door lock
switch, or by using the Remote Keyless
Entry (RKE) transmitter.
2. Open the door from the outside.
When the safety lock is enabled, adults and
older children will not be able to open the
rear door from the inside. Cancel the safety
locks to enable the doors to open from the
inside.
To cancel the safety lock: 1. Unlock the door and open it from the outside.
2. Move the lever up to unlock. Do the same for the other door.Doors
Liftgate
{Warning
Exhaust gases can enter the vehicle if it
is driven with the liftgate or trunk/hatch
open, or with any objects that pass
through the seal between the body and
the trunk/hatch or liftgate. Engine
exhaust contains carbon monoxide (CO)
which cannot be seen or smelled. It can
cause unconsciousness and even death.
If the vehicle must be driven with the
liftgate or trunk/hatch open:
.Close all of the windows.
.Fully open the air outlets on or under
the instrument panel.
.Adjust the climate control system to a
setting that brings in only outside air
and set the fan speed to the highest
setting. See “Climate Control Systems”
in the Index.
(Continued)
Warning (Continued)
.If the vehicle is equipped with a
power liftgate, disable the power
liftgate function.
See Engine Exhaust 0211.
Caution
To avoid damage to the liftgate or
liftgate glass, make sure the area above
and behind the liftgate is clear before
opening it.
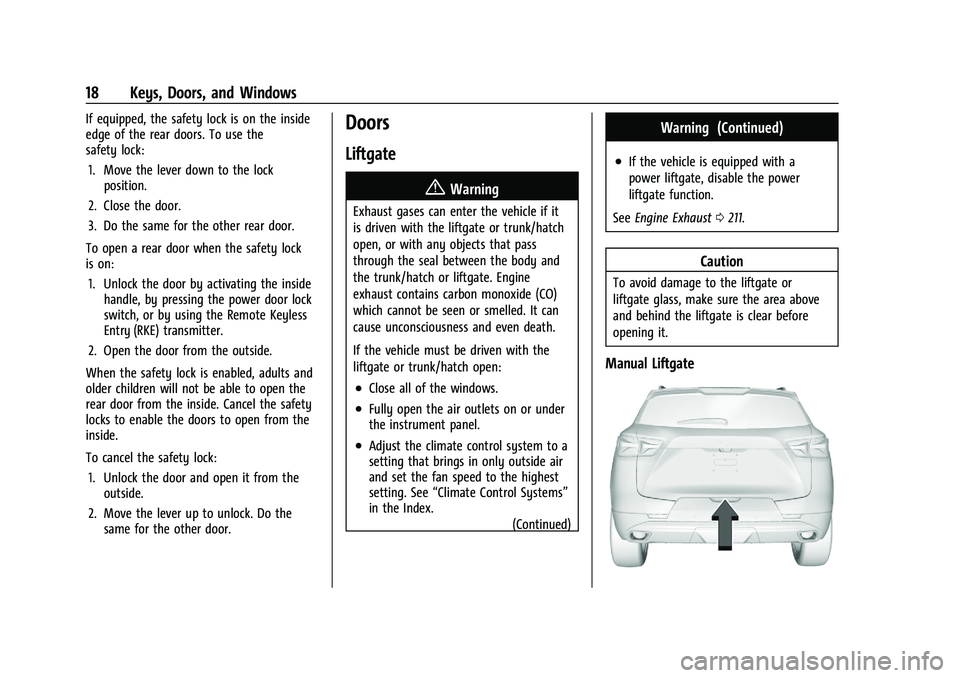
Manual Liftgate
Page 86 of 386
Chevrolet Blazer Owner Manual (GMNA-Localizing-U.S./Canada/Mexico-
15165663) - 2022 - CRC - 4/27/21
Instruments and Controls 85
Instruments and Controls
Controls
Steering Wheel Adjustment . . . . . . . . . . . . 86
Steering Wheel Controls . . . . . . . . . . . . . . . 86
Heated Steering Wheel . . . . . . . . . . . . . . . . . 86
Horn . . . . . . . . . . . . . . . . . . . . . . . . . . . . . . . . . . . 87
Windshield Wiper/Washer . . . . . . . . . . . . . . 87
Rear Window Wiper/Washer . . . . . . . . . . . 88
Compass . . . . . . . . . . . . . . . . . . . . . . . . . . . . . . . 88
Clock . . . . . . . . . . . . . . . . . . . . . . . . . . . . . . . . . . . 89
Power Outlets . . . . . . . . . . . . . . . . . . . . . . . . . . 89
Wireless Charging . . . . . . . . . . . . . . . . . . . . . . 90
Warning Lights, Gauges, and Indicators
Warning Lights, Gauges, andIndicators . . . . . . . . . . . . . . . . . . . . . . . . . . . . . 92
Instrument Cluster (Base and Midlevel) . . . . . . . . . . . . . . . . . . . . . . . . . . . . . 93
Instrument Cluster (Uplevel) . . . . . . . . . . . 96
Speedometer . . . . . . . . . . . . . . . . . . . . . . . . . . . 97
Odometer . . . . . . . . . . . . . . . . . . . . . . . . . . . . . . 98
Trip Odometer . . . . . . . . . . . . . . . . . . . . . . . . . 98
Tachometer . . . . . . . . . . . . . . . . . . . . . . . . . . . . 98
Fuel Gauge . . . . . . . . . . . . . . . . . . . . . . . . . . . . . 98
Engine Oil Temperature Gauge (Uplevel only) . . . . . . . . . . . . . . . . . . . . . . . . 99
Engine Coolant Temperature Gauge . . . . 99
Voltmeter Gauge (Uplevel only) . . . . . . . 100
Seat Belt Reminders . . . . . . . . . . . . . . . . . . . 101 Airbag Readiness Light . . . . . . . . . . . . . . . . . 101
Passenger Airbag Status Indicator . . . . . 102
Charging System Light . . . . . . . . . . . . . . . . 103
Malfunction Indicator Lamp (Check
Engine Light) . . . . . . . . . . . . . . . . . . . . . . . . 103
Brake System Warning Light . . . . . . . . . . 104
Electric Parking Brake Light . . . . . . . . . . . . 105
Service Electric Parking Brake Light . . . . 105
Antilock Brake System (ABS) Warning Light . . . . . . . . . . . . . . . . . . . . . . . . . . . . . . . . . 105
Lane Keep Assist (LKA) Light . . . . . . . . . . . 106
Vehicle Ahead Indicator . . . . . . . . . . . . . . . 106
Pedestrian Ahead Indicator . . . . . . . . . . . . 106
Traction Off Light . . . . . . . . . . . . . . . . . . . . . . 107
StabiliTrak OFF Light . . . . . . . . . . . . . . . . . . . 107
Traction Control System (TCS)/ StabiliTrak Light . . . . . . . . . . . . . . . . . . . . . 107
Engine Coolant Temperature Warning Light . . . . . . . . . . . . . . . . . . . . . . . . . . . . . . . . . 108
Driver Mode Control Light . . . . . . . . . . . . . 108
Tire Pressure Light . . . . . . . . . . . . . . . . . . . . 108
Engine Oil Pressure Light . . . . . . . . . . . . . . 109
Low Fuel Warning Light . . . . . . . . . . . . . . . 109
Security Light . . . . . . . . . . . . . . . . . . . . . . . . . 109
High-Beam On Light . . . . . . . . . . . . . . . . . . . 110
Lamps On Reminder . . . . . . . . . . . . . . . . . . . 110
Cruise Control Light . . . . . . . . . . . . . . . . . . . . 110
Door Ajar Light . . . . . . . . . . . . . . . . . . . . . . . . 110
Information Displays
Driver Information Center (DIC) (Base and Midlevel) . . . . . . . . . . . . . . . . . . . . . . . . . 111
Driver Information Center (DIC) (Uplevel) . . . . . . . . . . . . . . . . . . . . . . . . . . . . . 114
Vehicle Messages
Vehicle Messages . . . . . . . . . . . . . . . . . . . . . . 116
Engine Power Messages . . . . . . . . . . . . . . . 116
Vehicle Speed Messages . . . . . . . . . . . . . . . 117
Vehicle Personalization
Vehicle Personalization . . . . . . . . . . . . . . . . . 117
Universal Remote System
Universal Remote System . . . . . . . . . . . . . . 121
Universal Remote SystemProgramming . . . . . . . . . . . . . . . . . . . . . . . . . 121
Universal Remote System Operation . . . 123
Page 90 of 386
Chevrolet Blazer Owner Manual (GMNA-Localizing-U.S./Canada/Mexico-
15165663) - 2022 - CRC - 4/27/21
Instruments and Controls 89
signal. The compass system will
automatically determine when a GPS signal
is restored and provide a heading again.
Clock
Set the time and date using the
infotainment system. See "Time / Date"
underSettings 0166.
Power Outlets
Power Outlets 12-Volt Direct Current
The vehicle is equipped with 12-volt outlets
that can be used to plug in electrical
equipment, such as a cell phone or MP3
player.
The power outlets are located:
.Inside the center console storage
compartment.
.In the rear cargo area.
Lift the cover to access the outlet and
replace when not in use.
There are also charging only USB ports on
the rear of the center console.
{Warning
Power is always supplied to the rear
cargo power outlet. Do not leave
electrical equipment plugged in when the
vehicle is not in use because the vehicle
could catch fire and cause injury or
death.
Caution
Leaving electrical equipment plugged in
for an extended period of time while the
ignition is off will drain the battery.
Always unplug electrical equipment when
not in use and do not plug in equipment
that exceeds the maximum 15 amp
rating.
Certain accessory plugs may not be
compatible with the accessory power outlet
and could overload vehicle and adapter
fuses. If a problem is experienced, see your
dealer.
When adding electrical equipment, be sure
to follow the proper installation instructions
included with the equipment. See Add-On
Electrical Equipment 0257.
Caution
Hanging heavy equipment from the
power outlet can cause damage not
covered by the vehicle warranty. The
power outlets are designed for accessory
power plugs only, such as cell phone
charge cords.
Power Outlet 110-V/120-V Alternating
Current
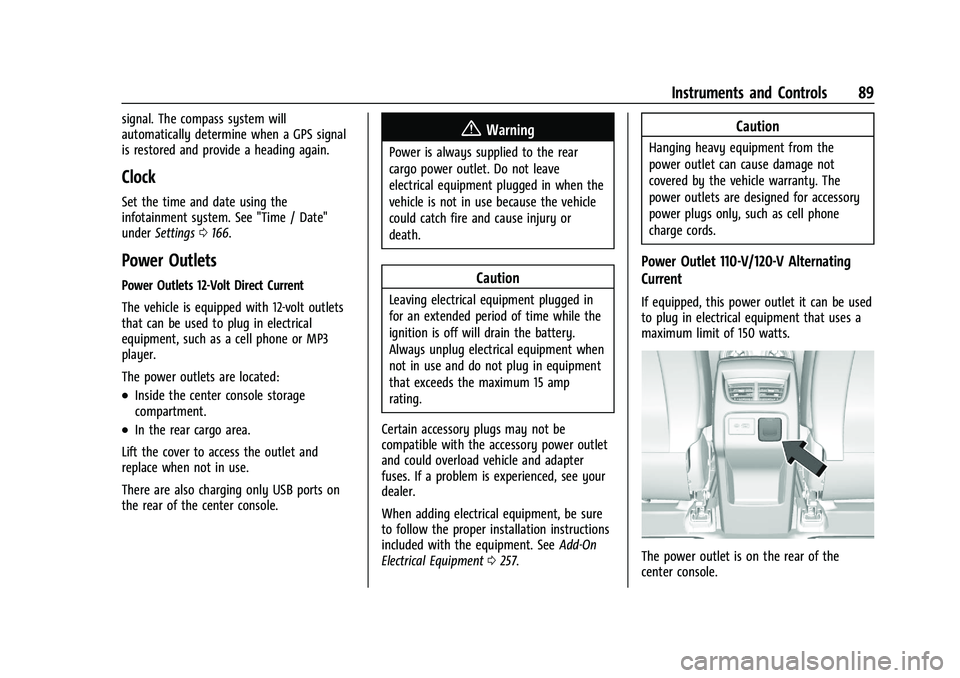
If equipped, this power outlet it can be used
to plug in electrical equipment that uses a
maximum limit of 150 watts.
The power outlet is on the rear of the
center console.
Page 130 of 386
Chevrolet Blazer Owner Manual (GMNA-Localizing-U.S./Canada/Mexico-
15165663) - 2022 - CRC - 4/27/21
Lighting 129
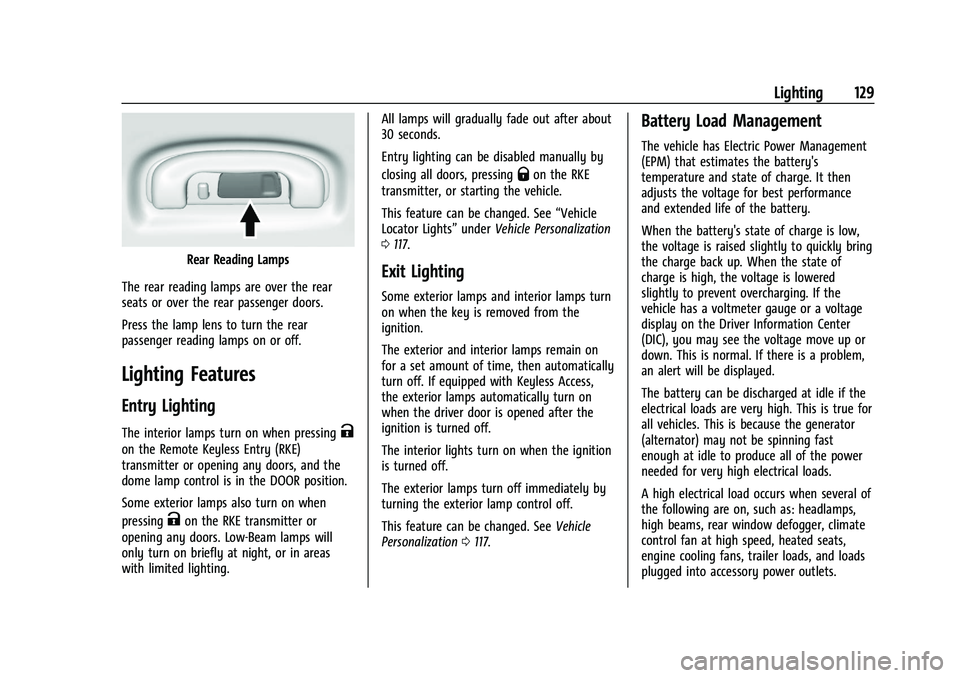
Rear Reading Lamps
The rear reading lamps are over the rear
seats or over the rear passenger doors.
Press the lamp lens to turn the rear
passenger reading lamps on or off.
Lighting Features
Entry Lighting
The interior lamps turn on when pressingK
on the Remote Keyless Entry (RKE)
transmitter or opening any doors, and the
dome lamp control is in the DOOR position.
Some exterior lamps also turn on when
pressing
Kon the RKE transmitter or
opening any doors. Low-Beam lamps will
only turn on briefly at night, or in areas
with limited lighting. All lamps will gradually fade out after about
30 seconds.
Entry lighting can be disabled manually by
closing all doors, pressing
Qon the RKE
transmitter, or starting the vehicle.
This feature can be changed. See “Vehicle
Locator Lights” underVehicle Personalization
0 117.
Exit Lighting
Some exterior lamps and interior lamps turn
on when the key is removed from the
ignition.
The exterior and interior lamps remain on
for a set amount of time, then automatically
turn off. If equipped with Keyless Access,
the exterior lamps automatically turn on
when the driver door is opened after the
ignition is turned off.
The interior lights turn on when the ignition
is turned off.
The exterior lamps turn off immediately by
turning the exterior lamp control off.
This feature can be changed. See Vehicle
Personalization 0117.
Battery Load Management
The vehicle has Electric Power Management
(EPM) that estimates the battery's
temperature and state of charge. It then
adjusts the voltage for best performance
and extended life of the battery.
When the battery's state of charge is low,
the voltage is raised slightly to quickly bring
the charge back up. When the state of
charge is high, the voltage is lowered
slightly to prevent overcharging. If the
vehicle has a voltmeter gauge or a voltage
display on the Driver Information Center
(DIC), you may see the voltage move up or
down. This is normal. If there is a problem,
an alert will be displayed.
The battery can be discharged at idle if the
electrical loads are very high. This is true for
all vehicles. This is because the generator
(alternator) may not be spinning fast
enough at idle to produce all of the power
needed for very high electrical loads.
A high electrical load occurs when several of
the following are on, such as: headlamps,
high beams, rear window defogger, climate
control fan at high speed, heated seats,
engine cooling fans, trailer loads, and loads
plugged into accessory power outlets.
Page 141 of 386
Chevrolet Blazer Owner Manual (GMNA-Localizing-U.S./Canada/Mexico-
15165663) - 2022 - CRC - 4/27/21
140 Infotainment System
SiriusXM with 360L
SiriusXM with 360L interface has enhanced
in-vehicle listening experience for
subscribers. The experience now offers more
categories and system learned
recommendations toward discovering more
personalized content.
To use the full SiriusXM 360L program,
including streaming content and listening
recommendations, OnStar Connected Access
is required. Connected vehicle services vary
by model and require a complete working
electrical system, cell reception, and GPS
signal. An active connected plan is required.
Reference the SiriusXM user guide for use
and subscription information.
Radio Reception
Unplug electronic devices from the accessory
power outlets if there is interference or
static in the radio.
FM
FM signals only reach about 16 to 65 km
(10 to 40 mi). Although the radio has a
built-in electronic circuit that automaticallyworks to reduce interference, some static
can occur, especially around tall buildings or
hills, causing the sound to fade in and out.
AM
The range for most AM stations is greater
than for FM, especially at night. The longer
range can cause station frequencies to
interfere with each other. Static can also
occur when things like storms and power
lines interfere with radio reception. When
this happens, try reducing the treble on the
radio.
SiriusXM Satellite Radio Service
If equipped, SiriusXM Satellite Radio Service
provides digital radio reception. Tall
buildings or hills can interfere with satellite
radio signals, causing the sound to fade in
and out. In addition, traveling or standing
under heavy foliage, bridges, garages,
or tunnels may cause loss of the SiriusXM
signal for a period of time. Some cellular
services may interfere with SXM reception
causing loss of signal.
Mobile Device Usage
Mobile device usage, such as making or
receiving calls, charging, or just having the
mobile device on may cause static
interference in the radio. Unplug the mobile
device or turn it off if this happens.
Multi-Band Antenna
The roof antenna may be used for radio,
navigation, and OnStar, depending on the
equipped options. Keep clear of obstructions
for clear reception. If the vehicle has a
sunroof, and it is open, reception can also
be affected.
Audio Players
Avoiding Untrusted Media Devices
When using media devices such as SD cards,
USB devices, and mobile devices, consider
the source. Untrusted media devices could
contain files that affect system operation or
performance. Avoid use if the content or
origin cannot be trusted.
USB Port
Audio stored on a USB device may be
listened to.
Page 315 of 386
Chevrolet Blazer Owner Manual (GMNA-Localizing-U.S./Canada/Mexico-
15165663) - 2022 - CRC - 4/27/21
314 Vehicle Care
Using the Tire Sealant and Compressor
Kit to Temporarily Seal and Inflate a
Punctured Tire
When using the tire sealant and compressor
kit during cold temperatures, warm the kit
in a heated environment for five minutes.
This will help to inflate the tire faster.
If a tire goes flat, avoid further tire and
wheel damage by driving slowly to a level
place. Turn on the hazard warning flashers.
SeeHazard Warning Flashers 0127.
See If a Tire Goes Flat 0311 for other
important safety warnings.
Do not remove any objects that have
penetrated the tire.
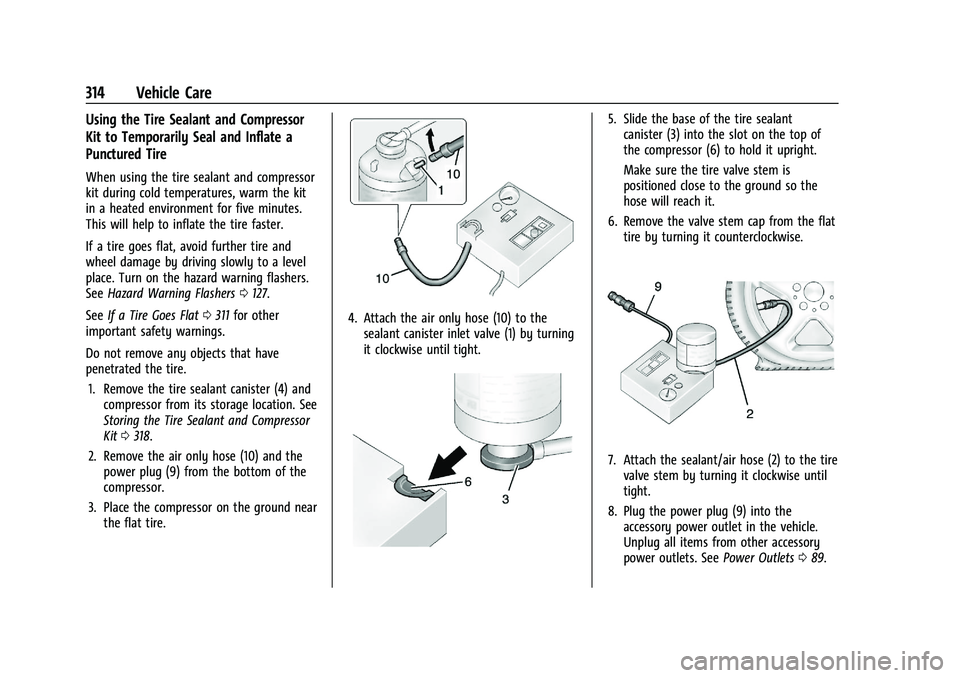
1. Remove the tire sealant canister (4) and compressor from its storage location. See
Storing the Tire Sealant and Compressor
Kit 0318.
2. Remove the air only hose (10) and the power plug (9) from the bottom of the
compressor.
3. Place the compressor on the ground near the flat tire.
4. Attach the air only hose (10) to thesealant canister inlet valve (1) by turning
it clockwise until tight.
5. Slide the base of the tire sealantcanister (3) into the slot on the top of
the compressor (6) to hold it upright.
Make sure the tire valve stem is
positioned close to the ground so the
hose will reach it.
6. Remove the valve stem cap from the flat tire by turning it counterclockwise.
7. Attach the sealant/air hose (2) to the tirevalve stem by turning it clockwise until
tight.
8. Plug the power plug (9) into the accessory power outlet in the vehicle.
Unplug all items from other accessory
power outlets. See Power Outlets089.
Page 318 of 386
Chevrolet Blazer Owner Manual (GMNA-Localizing-U.S./Canada/Mexico-
15165663) - 2022 - CRC - 4/27/21
Vehicle Care 317
1. Remove the compressor from its storagelocation. See Storing the Tire Sealant and
Compressor Kit 0318.
2. Remove the air only hose (10) and the power plug (9) from the bottom of the
compressor.
3. Place the compressor on the ground near the flat tire.
Make sure the tire valve stem is
positioned close to the ground so the
hose will reach it.
4. Remove the valve stem cap from the flat tire by turning it counterclockwise.
5. Attach the air only hose (10) to the tire valve stem by turning it clockwise until
tight.
6. Plug the power plug (9) into the accessory power outlet in the vehicle.
Unplug all items from other accessory
power outlets. See Power Outlets089.
If the vehicle has an accessory power
outlet, do not use the cigarette lighter.
If the vehicle only has a cigarette lighter,
use the cigarette lighter.
Do not pinch the power plug cord in the
door or window. 7. Start the vehicle. The vehicle must be
running while using the air compressor.
8. Press the on/off button (5) to turn the tire sealant and compressor kit on.
The compressor will inflate the tire with
air only.
9. Inflate the tire to the recommended inflation pressure using the pressure
gauge (8). The recommended inflation
pressure can be found on the Tire and
Loading Information label. See Tire
Pressure 0299.
The pressure gauge (8) may read higher
than the actual tire pressure while the
compressor is on. Turn the compressor
off to get an accurate pressure reading.
The compressor may be turned on/off
until the correct pressure is reached.
Caution
If the recommended pressure cannot be
reached after approximately 25 minutes,
the vehicle should not be driven farther.
The tire is too severely damaged and the
tire sealant and compressor kit cannot
inflate the tire. Remove the power plug
from the accessory power outlet and
(Continued)
Caution (Continued)
unscrew the inflating hose from the tire
valve. See Roadside Assistance Program
0 358.
10. Press the on/off button (5) to turn the tire sealant and compressor kit off.
Be careful while handling the compressor
as it could be warm after usage.
11. Unplug the power plug (9) from the accessory power outlet in the vehicle.
12. Turn the air only hose (10) counterclockwise to remove it from the
tire valve stem.
13. Replace the tire valve stem cap.
14. Return the air only hose (10) and power plug (9) back to their original storage
location.
15. Return the equipment to its original storage location in the vehicle.
The tire sealant and compressor kit has
accessory adapters located in a
compartment on the bottom of its housing
that can be used to inflate air mattresses,
balls, etc.
Page 381 of 386
Chevrolet Blazer Owner Manual (GMNA-Localizing-U.S./Canada/Mexico-
15165663) - 2022 - CRC - 4/27/21
380 Index
Loss of Control . . . . . . . . . . . . . . . . . . . . . . . . . . 195
Low Fuel Warning Light . . . . . . . . . . . . . . . . . 109
Lower Anchors and Tethers forChildren (LATCH System) . . . . . . . . . . . . . . . . 68
Lumbar Adjustment . . . . . . . . . . . . . . . . . . . . . . . 38 Front Seats . . . . . . . . . . . . . . . . . . . . . . . . . . . . . 38
M
MaintenanceRecords . . . . . . . . . . . . . . . . . . . . . . . . . . . . . . . . 350
Maintenance and Care Additional . . . . . . . . . . . . . . . . . . . . . . . . . . . . . 344
Maintenance Schedule . . . . . . . . . . . . . . . . . . . 339 Recommended Fluids andLubricants . . . . . . . . . . . . . . . . . . . . . . . . . . . . 347
Malfunction Indicator Lamp . . . . . . . . . . . . . . 103
Manual Mode . . . . . . . . . . . . . . . . . . . . . . . . . . . . 213
Map Data Updates . . . . . . . . . . . . . . . . . . . . . . . . 155
Maps . . . . . . . . . . . . . . . . . . . . . . . . . . . . . . . . . . . . .147
Media Avoiding Untrusted Devices . . . . . . . . . . . . 140
Memory Seats . . . . . . . . . . . . . . . . . . . . . . . . . . . . 38
Messages Engine Power . . . . . . . . . . . . . . . . . . . . . . . . . . . 116
Vehicle . . . . . . . . . . . . . . . . . . . . . . . . . . . . . . . . . 116
Vehicle Speed . . . . . . . . . . . . . . . . . . . . . . . . . . . 117
Mirror Rear Camera . . . . . . . . . . . . . . . . . . . . . . . . . . . . 27 Mirrors
Automatic Dimming . . . . . . . . . . . . . . . . . . . . 26
Automatic Dimming Rearview . . . . . . . . . . 26
Convex . . . . . . . . . . . . . . . . . . . . . . . . . . . . . . . . . 25
Folding . . . . . . . . . . . . . . . . . . . . . . . . . . . . . . . . . 26
Heated . . . . . . . . . . . . . . . . . . . . . . . . . . . . . . . . . 26
Manual Rearview . . . . . . . . . . . . . . . . . . . . . . . 26
Power . . . . . . . . . . . . . . . . . . . . . . . . . . . . . . . . . . 25
Tilt in Reverse . . . . . . . . . . . . . . . . . . . . . . . . . . 26
Mirrors, Interior Rearview . . . . . . . . . . . . . . . . . 26
Mode . . . . . . . . . . . . . . . . . . . . . . . . . . . . . . . . . . . . 219 Driver Control . . . . . . . . . . . . . . . . . . . . . . . . . 219
Monitor System, Tire Pressure . . . . . . . . . . . 301
Multi-band Antenna . . . . . . . . . . . . . . . . . . . . . 140
N
Navigation Connected Services . . . . . . . . . . . . . . . . . . . . . 371
Destination . . . . . . . . . . . . . . . . . . . . . . . . . . . . 148
Using the System . . . . . . . . . . . . . . . . . . . . . . 144
Navigation Symbols . . . . . . . . . . . . . . . . . . . . . .147
New Vehicle Break-In . . . . . . . . . . . . . . . . . . . . 204
O
Odometer . . . . . . . . . . . . . . . . . . . . . . . . . . . . . . . . 98
Trip . . . . . . . . . . . . . . . . . . . . . . . . . . . . . . . . . . . . . 98
Off-Road . . . . . . . . . . . . . . . . . . . . . . . . . . . . . . . . . 195
Driving . . . . . . . . . . . . . . . . . . . . . . . . . . . . . . . . 195
Recovery . . . . . . . . . . . . . . . . . . . . . . . . . . . . . . . 195 Oil
Engine . . . . . . . . . . . . . . . . . . . . . . . . . . . . . . . . . 266
Engine Oil Life System . . . . . . . . . . . . . . . . . 268
Pressure Light . . . . . . . . . . . . . . . . . . . . . . . . . 109
Older Children, Restraints . . . . . . . . . . . . . . . . . 62
Online Owner Center . . . . . . . . . . . . . . . . . . . . 357
OnStar . . . . . . . . . . . . . . . . . . . . . . . . . . . . . . . . . . . 365
OnStar Additional Information . . . . . . . . . . . 368
OnStar Emergency . . . . . . . . . . . . . . . . . . . . . . . 367
OnStar Overview . . . . . . . . . . . . . . . . . . . . . . . . . 366
OnStar Security . . . . . . . . . . . . . . . . . . . . . . . . . . 367
Outlets Power . . . . . . . . . . . . . . . . . . . . . . . . . . . . . . . . . . 89
Overheating, Engine . . . . . . . . . . . . . . . . . . . . . 274
Overview . . . . . . . . . . . . . . . . . . . . . . . . . . . . . . . . . 132 Instrument Panel . . . . . . . . . . . . . . . . . . . . . . . . 4
P
Park
Shifting Into . . . . . . . . . . . . . . . . . . . . . . . . . . . 209
Shifting Out of . . . . . . . . . . . . . . . . . . . . . . . . 210
Park Assist . . . . . . . . . . . . . . . . . . . . . . . . . . . 231, 234
Parking Brake and P (Park) MechanismCheck . . . . . . . . . . . . . . . . . . . . . . . . . . . . . . . . 279
Extended . . . . . . . . . . . . . . . . . . . . . . . . . . . . . . . 211
Over Things That Burn . . . . . . . . . . . . . . . . . 210
Page 382 of 386
Chevrolet Blazer Owner Manual (GMNA-Localizing-U.S./Canada/Mexico-
15165663) - 2022 - CRC - 4/27/21
Index 381
Parking or BackingAssistance Systems . . . . . . . . . . . . . . . . . . . . 231
Passenger Airbag Status Indicator . . . . . . . . 102
Passenger Compartment Air Filter . . . . . . . 190
Passenger Sensing System . . . . . . . . . . . . . . . . .57
Pedestrian Ahead Indicator . . . . . . . . . . . . . . 106
Perchlorate Materials Requirements, California . . . . . . . . . . . . . . . . . . . . . . . . . . . . . . 260
Personalization Vehicle . . . . . . . . . . . . . . . . . . . . . . . . . . . . . . . . . 117
Phone
Apple CarPlay and Android Auto . . . . . . . 164
Bluetooth . . . . . . . . . . . . . . . . . . . . . . . . . . 160, 161
Port USB . . . . . . . . . . . . . . . . . . . . . . . . . . . . . . . . . . . . 140
Positioning
Vehicle . . . . . . . . . . . . . . . . . . . . . . . . . . . . . . . . 154
Power Door Locks . . . . . . . . . . . . . . . . . . . . . . . . . . . . . . 16
Mirrors . . . . . . . . . . . . . . . . . . . . . . . . . . . . . . . . . 25
Outlets . . . . . . . . . . . . . . . . . . . . . . . . . . . . . . . . . 89
Protection, Battery . . . . . . . . . . . . . . . . . . . . . 130
Retained Accessory (RAP) . . . . . . . . . . . . . . 209
Seat Adjustment . . . . . . . . . . . . . . . . . . . . . . . . 36
Windows . . . . . . . . . . . . . . . . . . . . . . . . . . . . . . . 29
Pregnancy, Using Seat Belts . . . . . . . . . . . . . . 50
Privacy Vehicle Data Recording . . . . . . . . . . . . . . . . 364 Problems with Route Guidance . . . . . . . . . . .154
Program
Courtesy Transportation . . . . . . . . . . . . . . . 360
Prohibited Fuels . . . . . . . . . . . . . . . . . . . . . . . . . 245
Proposition 65 Warning, California . . . . . . . . . . . . . . . . . . . . . . . . . .278, 323, Back Cover
Publication Ordering Information . . . . . . . . 362
R
Radio HD Radio Technology . . . . . . . . . . . . . . . . . . 138
Radio Data System (RDS) . . . . . . . . . . . . . . . . 139
Radio Frequency Statement . . . . . . . . . . . . . . 363
Radio Reception . . . . . . . . . . . . . . . . . . . . . . . . . 140
Radios AM-FM Radio . . . . . . . . . . . . . . . . . . . . . . . . . . . 137
Satellite . . . . . . . . . . . . . . . . . . . . . . . . . . . . . . . . 139
Reading Lamps . . . . . . . . . . . . . . . . . . . . . . . . . . .128
Rear Camera Mirror . . . . . . . . . . . . . . . . . . . . . . . .27
Rear Cross Traffic Alert System . . . . . . . . . . 235
Rear Seats . . . . . . . . . . . . . . . . . . . . . . . . . . . . . . . . 42 Heated . . . . . . . . . . . . . . . . . . . . . . . . . . . . . . . . . 44
Rear Storage . . . . . . . . . . . . . . . . . . . . . . . . . . . . . . 80
Rear Vision Camera (RVC) . . . . . . . . . . . . . . . . . 231
Rear Window Washer/Wiper . . . . . . . . . . . . . 88
Rearview Mirrors . . . . . . . . . . . . . . . . . . . . . . . . . 26 Automatic Dimming . . . . . . . . . . . . . . . . . . . . 26 Reclining Seatbacks . . . . . . . . . . . . . . . . . . . . . . . 36
Recognition
Voice . . . . . . . . . . . . . . . . . . . . . . . . . . . . . . . . . . 155
Recommended Fuel . . . . . . . . . . . . . . . . . . . . . . . . . . . . . . . . . . . . 244
Recommended Fluids and Lubricants . . . . . 347
Records Maintenance . . . . . . . . . . . . . . . . . . . . . . . . . . . 350
Recreational Vehicle Towing . . . . . . . . . . . . . 326
Reimbursement Program, GM Mobility . . . . . . . . . . . . . . . . . . . . . . . . . . . . . . . 358
Remote Keyless Entry (RKE) System . . . . . . . .7
Remote Vehicle Start . . . . . . . . . . . . . . . . . . . . . . 13
Replacement Parts Airbags . . . . . . . . . . . . . . . . . . . . . . . . . . . . . . . . . 61
Maintenance . . . . . . . . . . . . . . . . . . . . . . . . . . . 348
Replacing Airbag System . . . . . . . . . . . . . . . . . . .61
Replacing LATCH System Parts after a Crash . . . . . . . . . . . . . . . . . . . . . . . . . . . . . . . . . . . 74
Replacing Seat Belt System Parts after a Crash . . . . . . . . . . . . . . . . . . . . . . . . . . . . . . . . . . 51
Reporting Safety Defects Canadian Government . . . . . . . . . . . . . . . . . 363
General Motors . . . . . . . . . . . . . . . . . . . . . . . . 364
U.S. Government . . . . . . . . . . . . . . . . . . . . . . . 363
Restraints Where to Put . . . . . . . . . . . . . . . . . . . . . . . . . . . 67
Retained Accessory Power (RAP) . . . . . . . . . 209