Lift CHEVROLET BLAZER 2023 Owner's Guide
[x] Cancel search | Manufacturer: CHEVROLET, Model Year: 2023, Model line: BLAZER, Model: CHEVROLET BLAZER 2023Pages: 360, PDF Size: 17.34 MB
Page 277 of 360
Chevrolet Blazer Owner Manual (GMNA-Localizing-U.S./Canada/Mexico-
16401961) - 2023 - CRC - 5/17/22
276 Vehicle Care
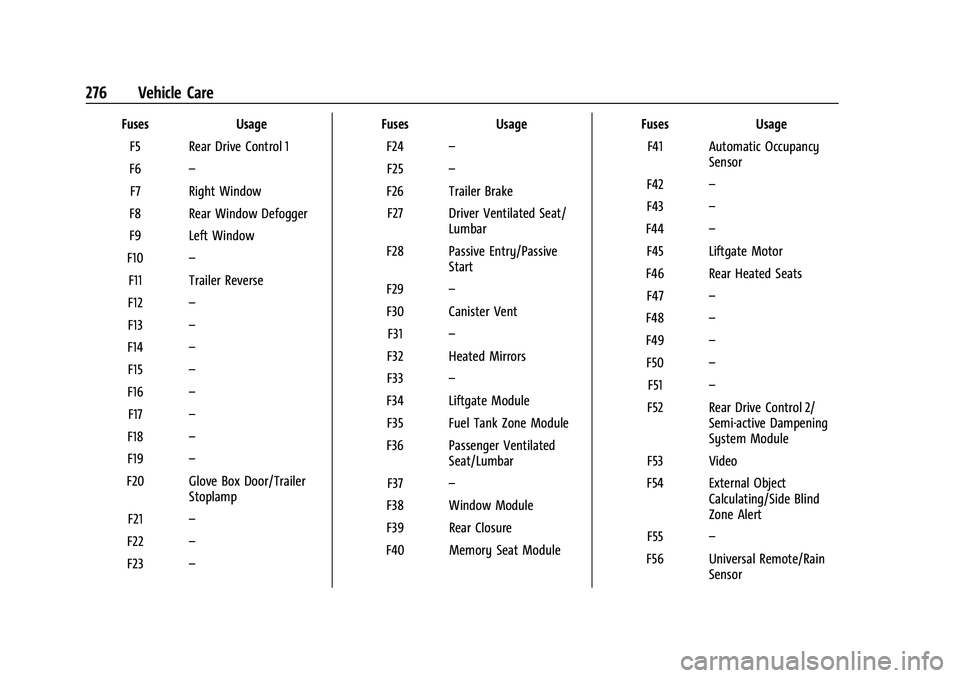
FusesUsage
F5 Rear Drive Control 1
F6 –
F7 Right Window
F8 Rear Window Defogger
F9 Left Window
F10 –
F11 Trailer Reverse
F12 –
F13 –
F14 –
F15 –
F16 –
F17 –
F18 –
F19 –
F20 Glove Box Door/Trailer Stoplamp
F21 –
F22 –
F23 – Fuses
Usage
F24 –
F25 –
F26 Trailer Brake F27 Driver Ventilated Seat/ Lumbar
F28 Passive Entry/Passive Start
F29 –
F30 Canister Vent F31 –
F32 Heated Mirrors
F33 –
F34 Liftgate Module F35 Fuel Tank Zone Module
F36 Passenger Ventilated Seat/Lumbar
F37 –
F38 Window Module
F39 Rear Closure
F40 Memory Seat Module Fuses
Usage
F41 Automatic Occupancy Sensor
F42 –
F43 –
F44 –
F45 Liftgate Motor
F46 Rear Heated Seats F47 –
F48 –
F49 –
F50 –
F51 –
F52 Rear Drive Control 2/ Semi-active Dampening
System Module
F53 Video
F54 External Object Calculating/Side Blind
Zone Alert
F55 –
F56 Universal Remote/Rain Sensor
Page 296 of 360
Chevrolet Blazer Owner Manual (GMNA-Localizing-U.S./Canada/Mexico-
16401961) - 2023 - CRC - 5/17/22
Vehicle Care 295
Caution (Continued)
when necessary. Use low profile chains
that add no more than 12 mm (0.5 in)
thickness to the tire tread and inner
sidewall. Use chains that are the proper
size for the tires. Install them on the tires
of the drive axle only. Tighten them as
tightly as possible with the ends securely
fastened. Drive slowly and follow the
chain manufacturer's instructions. If the
chains contact the vehicle, stop and
retighten them. If the contact continues,
slow down until it stops. Driving too fast
or spinning the wheels with chains on
will damage the vehicle.
If a Tire Goes Flat
It is unusual for a tire to blow out while
driving, especially if the tires are maintained
properly. SeeTires0277. If air goes out of a
tire, it is much more likely to leak out
slowly. But if there is ever a blowout, here
are a few tips about what to expect and
what to do:
If a front tire fails, the flat tire creates a
drag that pulls the vehicle toward that side.
Take your foot off the accelerator pedal and
grip the steering wheel firmly. Steer to maintain lane position, and then gently
brake to a stop, well off the road,
if possible.
A rear blowout, particularly on a curve, acts
much like a skid and may require the same
correction as used in a skid. Stop pressing
the accelerator pedal and steer to straighten
the vehicle. It may be very bumpy and
noisy. Gently brake to a stop, well off the
road, if possible.
{Warning
Driving on a flat tire will cause
permanent damage to the tire.
Re-inflating a tire after it has been driven
on while severely underinflated or flat
may cause a blowout and a serious crash.
Never attempt to re-inflate a tire that has
been driven on while severely
underinflated or flat. Have your dealer or
an authorized tire service center repair or
replace the flat tire as soon as possible.
{Warning
Lifting a vehicle and getting under it to
do maintenance or repairs is dangerous
without the appropriate safety equipment
and training. If a jack is provided with
the vehicle, it is designed only for
changing a flat tire. If it is used for
anything else, you or others could be
badly injured or killed if the vehicle slips
off the jack. If a jack is provided with the
vehicle, only use it for changing a
flat tire.
If a tire goes flat, avoid further tire and
wheel damage by driving slowly to a level
place, well off the road, if possible. Turn on
the hazard warning flashers. See Hazard
Warning Flashers 0121.
If your vehicle is loaded at or near
maximum cargo capacity, it may be difficult
to fit the jack under the vehicle due to the
environment (shoulder slope, road debris,
etc.). Removal of some weight may improve
the ability to fit the jack under the vehicle
at the correct jacking location.
Page 297 of 360
Chevrolet Blazer Owner Manual (GMNA-Localizing-U.S./Canada/Mexico-
16401961) - 2023 - CRC - 5/17/22
296 Vehicle Care
{Warning
Changing a tire can be dangerous. The
vehicle can slip off the jack and roll over
or fall causing injury or death. Find a
level place to change the tire. To help
prevent the vehicle from moving:1. Set the parking brake firmly.
2. Put the vehicle in P (Park).
3. Turn the vehicle off and do not restart the vehicle while it is raised.
4. Do not allow passengers to remain in the vehicle.
5. Place wheel blocks, if equipped, on both sides of the tire at the opposite
corner of the tire being changed.
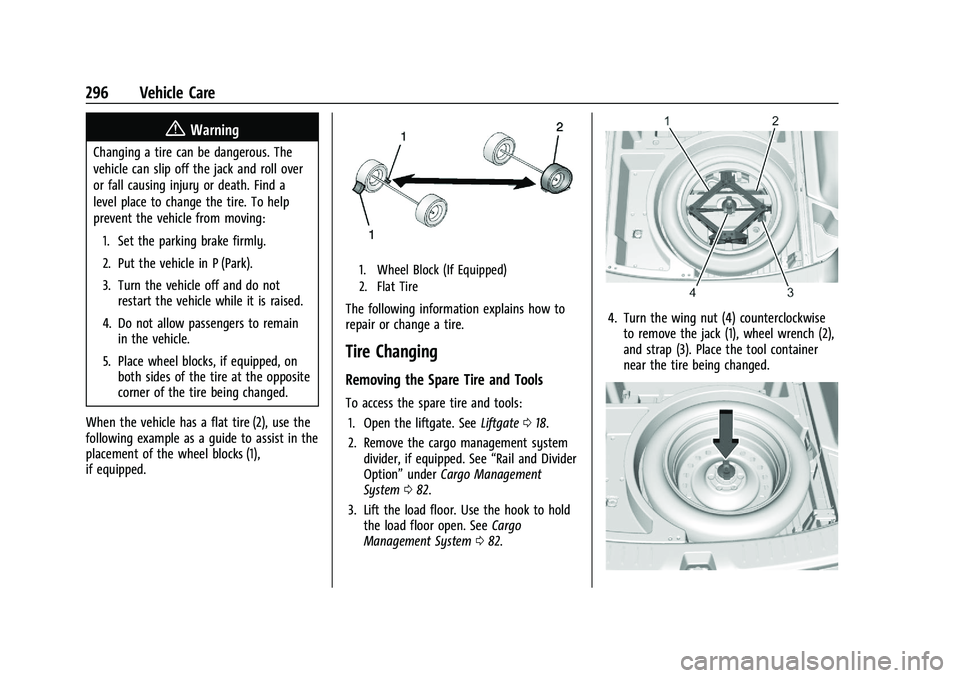
When the vehicle has a flat tire (2), use the
following example as a guide to assist in the
placement of the wheel blocks (1),
if equipped.
1. Wheel Block (If Equipped)
2. Flat Tire
The following information explains how to
repair or change a tire.
Tire Changing
Removing the Spare Tire and Tools
To access the spare tire and tools: 1. Open the liftgate. See Liftgate018.
2. Remove the cargo management system divider, if equipped. See “Rail and Divider
Option” underCargo Management
System 082.
3. Lift the load floor. Use the hook to hold the load floor open. See Cargo
Management System 082.
4. Turn the wing nut (4) counterclockwise
to remove the jack (1), wheel wrench (2),
and strap (3). Place the tool container
near the tire being changed.
Page 298 of 360
Chevrolet Blazer Owner Manual (GMNA-Localizing-U.S./Canada/Mexico-
16401961) - 2023 - CRC - 5/17/22
Vehicle Care 297
5. Remove the nut retaining the spare tire.
6. Remove the spare tire and place it nextto the tire being changed.
Removing the Flat Tire and Installing the
Spare Tire
1. Do a safety check before proceeding. SeeIf a Tire Goes Flat 0295.
2. Turn the wheel wrench counterclockwise
to loosen all the wheel nuts, but do not
remove them yet.
3. Place the jack near the flat tire.
Caution
Make sure that the jack lift head is in the
correct position or you may damage your
vehicle. The repairs would not be covered
by your warranty.
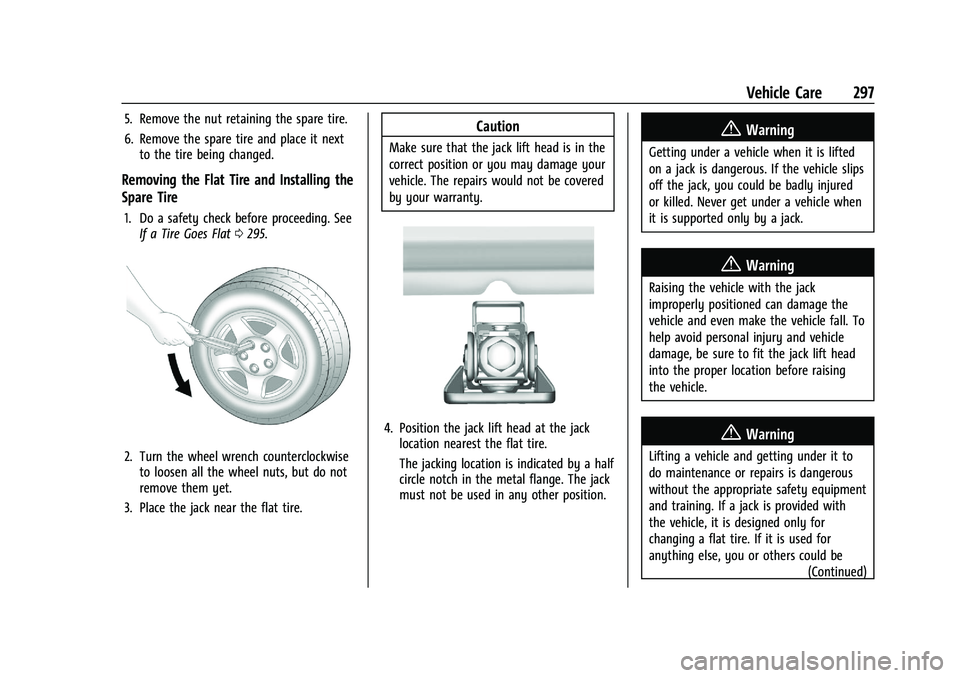
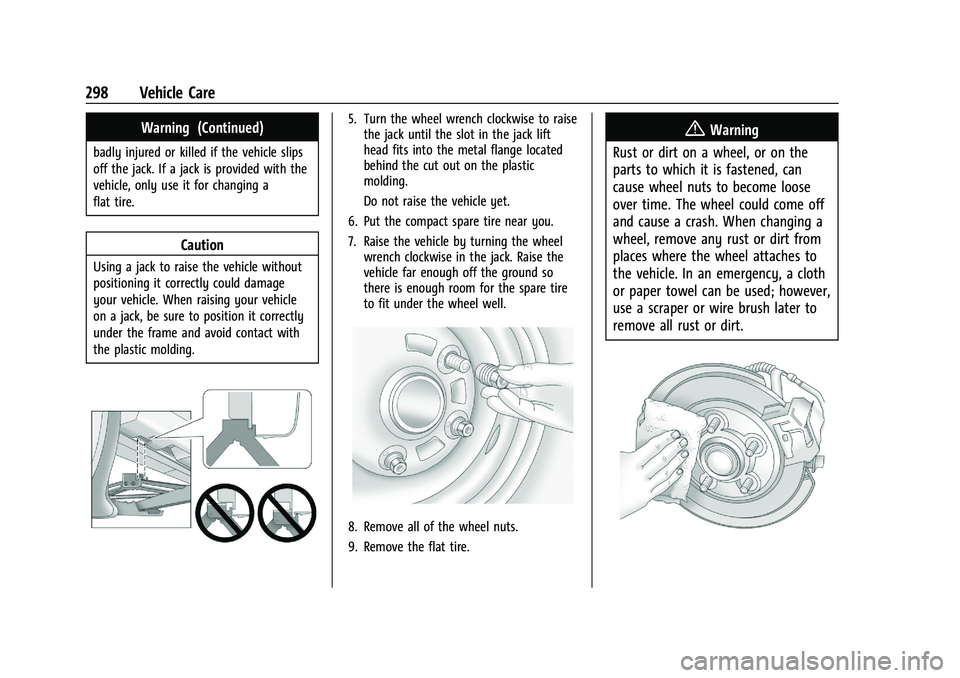
4. Position the jack lift head at the jack location nearest the flat tire.
The jacking location is indicated by a half
circle notch in the metal flange. The jack
must not be used in any other position.
{Warning
Getting under a vehicle when it is lifted
on a jack is dangerous. If the vehicle slips
off the jack, you could be badly injured
or killed. Never get under a vehicle when
it is supported only by a jack.
{Warning
Raising the vehicle with the jack
improperly positioned can damage the
vehicle and even make the vehicle fall. To
help avoid personal injury and vehicle
damage, be sure to fit the jack lift head
into the proper location before raising
the vehicle.
{Warning
Lifting a vehicle and getting under it to
do maintenance or repairs is dangerous
without the appropriate safety equipment
and training. If a jack is provided with
the vehicle, it is designed only for
changing a flat tire. If it is used for
anything else, you or others could be
(Continued)
Page 299 of 360
Chevrolet Blazer Owner Manual (GMNA-Localizing-U.S./Canada/Mexico-
16401961) - 2023 - CRC - 5/17/22
298 Vehicle Care
Warning (Continued)
badly injured or killed if the vehicle slips
off the jack. If a jack is provided with the
vehicle, only use it for changing a
flat tire.
Caution
Using a jack to raise the vehicle without
positioning it correctly could damage
your vehicle. When raising your vehicle
on a jack, be sure to position it correctly
under the frame and avoid contact with
the plastic molding.
5. Turn the wheel wrench clockwise to raisethe jack until the slot in the jack lift
head fits into the metal flange located
behind the cut out on the plastic
molding.
Do not raise the vehicle yet.
6. Put the compact spare tire near you.
7. Raise the vehicle by turning the wheel wrench clockwise in the jack. Raise the
vehicle far enough off the ground so
there is enough room for the spare tire
to fit under the wheel well.
8. Remove all of the wheel nuts.
9. Remove the flat tire.
{Warning
Rust or dirt on a wheel, or on the
parts to which it is fastened, can
cause wheel nuts to become loose
over time. The wheel could come off
and cause a crash. When changing a
wheel, remove any rust or dirt from
places where the wheel attaches to
the vehicle. In an emergency, a cloth
or paper towel can be used; however,
use a scraper or wire brush later to
remove all rust or dirt.
Page 301 of 360
Chevrolet Blazer Owner Manual (GMNA-Localizing-U.S./Canada/Mexico-
16401961) - 2023 - CRC - 5/17/22
300 Vehicle Care
Caution
Wheel covers will not fit on the vehicle's
compact spare. If you try to put a wheel
cover on the compact spare, the cover or
the spare could be damaged.
Storing a Flat or Spare Tire and Tools
{Warning
Storing a jack, a tire, or other equipment
in the passenger compartment of the
vehicle could cause injury. In a sudden
stop or collision, loose equipment could
strike someone. Store all these in the
proper place.
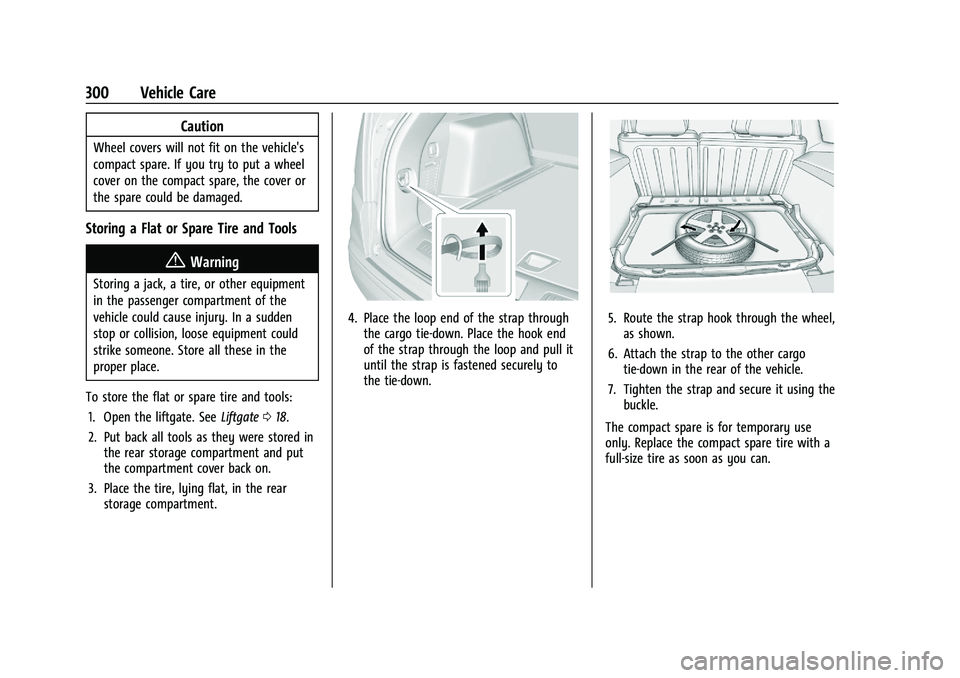
To store the flat or spare tire and tools: 1. Open the liftgate. See Liftgate018.
2. Put back all tools as they were stored in the rear storage compartment and put
the compartment cover back on.
3. Place the tire, lying flat, in the rear storage compartment.
4. Place the loop end of the strap throughthe cargo tie-down. Place the hook end
of the strap through the loop and pull it
until the strap is fastened securely to
the tie-down.5. Route the strap hook through the wheel,as shown.
6. Attach the strap to the other cargo tie-down in the rear of the vehicle.
7. Tighten the strap and secure it using the buckle.
The compact spare is for temporary use
only. Replace the compact spare tire with a
full-size tire as soon as you can.
Page 312 of 360
Chevrolet Blazer Owner Manual (GMNA-Localizing-U.S./Canada/Mexico-
16401961) - 2023 - CRC - 5/17/22
Vehicle Care 311
Visually check constant velocity joint boots
and axle seals for leaks.
Body Component Lubrication
Lubricate all key lock cylinders, hood hinges,
liftgate hinges, and the steel fuel door
hinges, unless the components are plastic.
Applying silicone grease on weatherstrips
with a clean cloth will make them last
longer, seal better, and not stick or squeak.
Underbody Maintenance
At least twice a year, spring and fall, use
plain water to flush any corrosive materials
from the underbody. Take care to
thoroughly clean any areas where mud and
other debris can collect.
Do not directly power wash the transfer
case and/or front/rear axle output seals.
High pressure water can overcome the seals
and contaminate the fluid. Contaminated
fluid will decrease the life of the transfer
case and/or axles and should be replaced.
Sheet Metal Damage
If the vehicle is damaged and requires sheet
metal repair or replacement, make sure the
body repair shop applies anti-corrosion
material to parts repaired or replaced to
restore corrosion protection.Original manufacturer replacement parts will
provide the corrosion protection while
maintaining the vehicle warranty.
Finish Damage
Quickly repair minor chips and scratches
with touch-up materials available from your
dealer to avoid corrosion. Larger areas of
finish damage can be corrected in your
dealer's body and paint shop.
Chemical Paint Spotting
Airborne pollutants can fall upon and attack
painted vehicle surfaces causing blotchy,
ring-shaped discolorations, and small,
irregular dark spots etched into the paint
surface. See
“Finish Care” previously in this
section.
Interior Care
To prevent dirt particle abrasions, regularly
clean the vehicle's interior. Before using
cleaners, read and follow all safety
instructions on the label. While cleaning the
interior, open the doors and windows to get
proper ventilation. Newspapers or dark
garments can transfer color to the vehicle’s
interior.
Caution
Immediately remove cleaners, hand
lotions, sunscreen, and insect repellent
from all interior surfaces or permanent
damage may result.
Caution
Use cleaners specifically designed for the
surfaces being cleaned to prevent
permanent damage to the vehicle. Apply
all cleaners directly to a cleaning cloth.
Do not spray cleaners on any switches or
controls.
When using liquid soap cleaners, follow the
directions on the specific cleaner or soap
solution for dilution instructions.
Caution
To prevent damage:
.Never use a razor or any other sharp
object to remove soil from any interior
surface
.Never use a brush with stiff bristles.(Continued)
Page 314 of 360
Chevrolet Blazer Owner Manual (GMNA-Localizing-U.S./Canada/Mexico-
16401961) - 2023 - CRC - 5/17/22
Vehicle Care 313
.For solid soils, remove as much as
possible prior to vacuuming.
To clean: 1. Saturate a clean, lint-free colorfast cloth with water. Microfiber cloth is
recommended to prevent lint transfer to
the fabric or carpet.
2. Remove excess moisture by gently wringing until water does not drip from
the cleaning cloth.
3. Start on the outside edge of the soil and gently rub toward the center. Fold the
cleaning cloth to a clean area frequently
to prevent forcing the soil into the
fabric.
4. Continue gently rubbing the soiled area until there is no longer any color
transfer from the soil to the cleaning
cloth.
5. If the soil is not completely removed, use a mild soap solution followed only
by plain water.
If the soil is not completely removed, it may
be necessary to use a commercial upholstery
cleaner or spot lifter. Test a small hidden
area for colorfastness before using a commercial upholstery cleaner or spot lifter.
If ring formation occurs, clean the entire
fabric or carpet.
After cleaning, use a paper towel to blot
excess moisture.
Cleaning High Gloss Surfaces and Vehicle
Information and Radio Displays
Use a microfiber cloth on high gloss surfaces
or vehicle displays. First, use a soft bristle
brush to remove dirt that can scratch the
surface. Then gently clean by rubbing with a
microfiber cloth. Never use window cleaners
or solvents. Periodically hand wash the
microfiber cloth separately, using mild soap.
Do not use bleach or fabric softener. Rinse
thoroughly and air dry before next use.
Caution
Do not attach a device with a suction cup
to the display. This may cause damage
and would not be covered by the vehicle
warranty.
Instrument Panel, Leather, Vinyl, Other
Plastic Surfaces, Low Gloss Paint
Surfaces, and Natural Open Pore Wood
Surfaces
Use a soft bristle brush to remove dust from
knobs and crevices on the instrument
cluster. Use a soft microfiber cloth
dampened with water to remove dust and
loose dirt. For a more thorough cleaning,
use a soft microfiber cloth dampened with a
mild soap and water solution.
Caution
Soaking or saturating leather, especially
perforated leather, as well as other
interior surfaces, may cause permanent
damage. Wipe excess moisture from
these surfaces after cleaning and allow
them to dry naturally. Never use heat,
steam, or spot removers. Do not use
liquids that contain alcohol or solvents on
leather seats. Do not use cleaners that
contain silicone or wax-based products.
Cleaners containing these solvents can
permanently change the appearance and
feel of leather or soft trim, and are not
recommended.
Page 319 of 360
Chevrolet Blazer Owner Manual (GMNA-Localizing-U.S./Canada/Mexico-
16401961) - 2023 - CRC - 5/17/22
318 Service and Maintenance
Reset the oil life system when the oil is
changed. SeeEngine Oil Life System
0 255.
.When the REPLACE AT NEXT OIL CHANGE
message displays, the engine air filter
should be replaced at the next engine oil
change. When the REPLACE ENGINE AIR
FILTER SOON message displays, the
engine air filter should be replaced at the
earliest convenience. Reset the engine air
filter life system after the engine air filter
is replaced. See Engine Air Filter Life
System 0256.
Every 36 000 km (22,500 mi)
.Replace the passenger compartment air
filter. Or every 24 months, whichever
comes first. More frequent passenger
compartment air filter replacement may
be needed if driving in areas with heavy
traffic, poor air quality, high dust levels,
or environmental allergens. Passenger
compartment air filter replacement may
also be needed if there is reduced airflow,
window fogging, or odors. Your GM
dealer can help determine when to
replace the filter.
Every 96 000 km (60,000 mi)
.Replace spark plugs. (2.0L L4 Engine Only.)
Inspect spark plug wires and/or boots. Every 156 000 km (97,500 mi)
.Replace spark plugs. (3.6L V6 Engine
Only.) Inspect spark plug wires and/or
boots.
Every 161 000 km (100,000 mi)
.Replace hood and/or body lift support gas
struts. Or every 10 years, whichever
comes first. See Gas Strut(s)0267.
Every 240 000 km (150,000 mi)
.Change rear axle fluid, if equipped with
AWD. Do not directly power wash the
transfer case and/or front/rear axle
output seals. High pressure water can
overcome the seals and contaminate the
transfer case fluid. Contaminated fluid will
decrease the life of the transfer case and/
or axles and should be replaced.
.Drain and fill engine cooling system. Or
every six years, whichever comes first.
See Cooling System 0258.
Severe Conditions Requiring More
Frequent Maintenance*
.Public service, military, or commercial use
vehicles to include the following:
‐ Ambulances, police cars, and
emergency rescue vehicles. ‐
Civilian vehicles such as light duty
pick-up trucks, SUVs, and passenger
cars that are used in military
applications.
‐ Recovery vehicles such as tow trucks
and flatbed single vehicle carriers or
any vehicle that is consistently used in
towing trailers or other loads.
‐ High use commercial vehicles such as
courier delivery vehicles, private
security patrol vehicles, or any vehicles
that operate on a 24–hour basis.
‐ Any vehicle consistently operated in a
high sand or dust environment such as
those used on oil pipelines and similar
applications.
.Vehicles that are regularly used for short
trips of 6 km (4 mi) or less.
The oil life indicator will show you when
to change the oil and filter. Under severe
conditions the indicator may come on
before 12 000 km (7,500 mi).
* Footnote: Under extreme driving
conditions listed above, it may be
necessary to replace your spark plugs at
more frequent intervals. For further
assistance in determining the most
Page 321 of 360
Chevrolet Blazer Owner Manual (GMNA-Localizing-U.S./Canada/Mexico-
16401961) - 2023 - CRC - 5/17/22
320 Service and Maintenance
Tire Inspection
.Tire pressure, tread depth, and wear
.Rotation, if applicable
.Alignment check, optional
.Reset tire pressure monitor
.Check tire sealant expiration date,
if equipped
.Check spare tire, if equipped
Brakes
.Check brake system
Visible and Functional Inspections
.Seat belt components
.Exhaust system
.Accelerator pedal
.Passenger compartment air filter,
if equipped
.Engine air filter
.Hoses
.Belts
.Shocks and struts
.Steering components
.Axle boots or driveshaft and u-joints
.Compartment lift struts, if equipped
.Floor mats secured, no interference with
pedals
.Horn
.Ignition lock, if equipped
.Starter switch
.Evaporative control system
Lubricate
.Chassis components
Special Application Services
.Severe Commercial Use Vehicles Only:
Lubricate chassis components every oil
change.
.Have underbody flushing service
performed. See "Underbody Maintenance"
in Exterior Care 0307.