start stop button CHEVROLET BLAZER 2023 Owners Manual
[x] Cancel search | Manufacturer: CHEVROLET, Model Year: 2023, Model line: BLAZER, Model: CHEVROLET BLAZER 2023Pages: 360, PDF Size: 17.34 MB
Page 6 of 360
Chevrolet Blazer Owner Manual (GMNA-Localizing-U.S./Canada/Mexico-
16401961) - 2023 - CRC - 5/17/22
Introduction 5
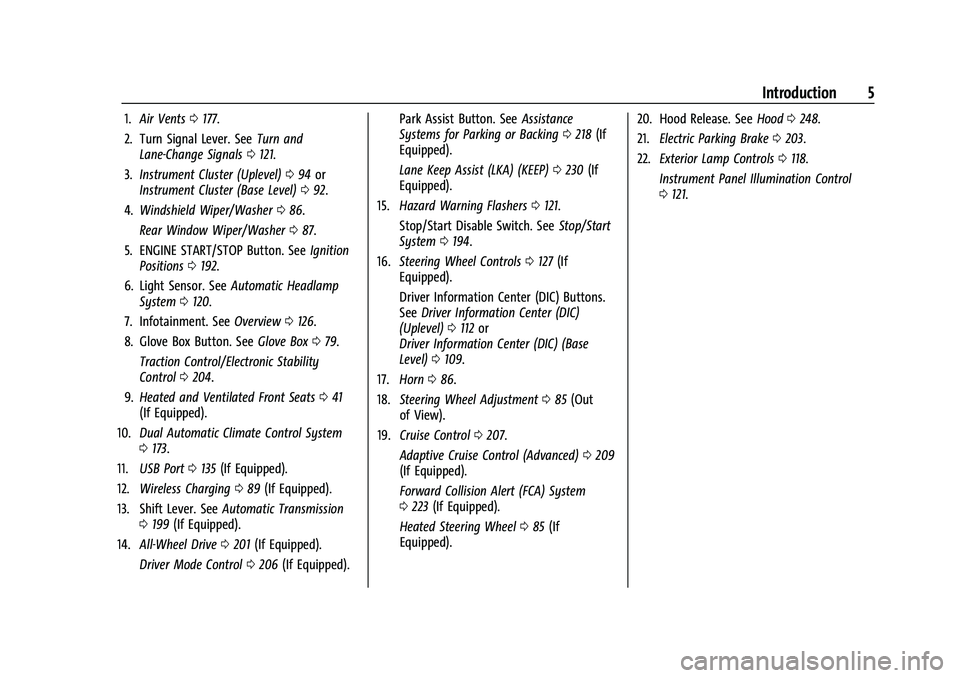
1.Air Vents 0177.
2. Turn Signal Lever. See Turn and
Lane-Change Signals 0121.
3. Instrument Cluster (Uplevel) 094 or
Instrument Cluster (Base Level) 092.
4. Windshield Wiper/Washer 086.
Rear Window Wiper/Washer 087.
5. ENGINE START/STOP Button. See Ignition
Positions 0192.
6. Light Sensor. See Automatic Headlamp
System 0120.
7. Infotainment. See Overview0126.
8. Glove Box Button. See Glove Box079.
Traction Control/Electronic Stability
Control 0204.
9. Heated and Ventilated Front Seats 041
(If Equipped).
10. Dual Automatic Climate Control System
0173.
11. USB Port 0135 (If Equipped).
12. Wireless Charging 089 (If Equipped).
13. Shift Lever. See Automatic Transmission
0 199 (If Equipped).
14. All-Wheel Drive 0201 (If Equipped).
Driver Mode Control 0206 (If Equipped). Park Assist Button. See
Assistance
Systems for Parking or Backing 0218 (If
Equipped).
Lane Keep Assist (LKA) (KEEP) 0230 (If
Equipped).
15. Hazard Warning Flashers 0121.
Stop/Start Disable Switch. See Stop/Start
System 0194.
16. Steering Wheel Controls 0127 (If
Equipped).
Driver Information Center (DIC) Buttons.
See Driver Information Center (DIC)
(Uplevel) 0112 or
Driver Information Center (DIC) (Base
Level) 0109.
17. Horn 086.
18. Steering Wheel Adjustment 085 (Out
of View).
19. Cruise Control 0207.
Adaptive Cruise Control (Advanced) 0209
(If Equipped).
Forward Collision Alert (FCA) System
0 223 (If Equipped).
Heated Steering Wheel 085 (If
Equipped). 20. Hood Release. See
Hood0248.
21. Electric Parking Brake 0203.
22. Exterior Lamp Controls 0118.
Instrument Panel Illumination Control
0 121.
Page 9 of 360
Chevrolet Blazer Owner Manual (GMNA-Localizing-U.S./Canada/Mexico-
16401961) - 2023 - CRC - 5/17/22
8 Keys, Doors, and Windows
icon on the infotainment home page. Select
“Vehicle”to display the list of available
options and select “Power Door Locks”. If a
passenger door is open when
Qis pressed,
all doors lock.
Pressing
Qmay also arm the theft-deterrent
system. See Vehicle Alarm System 024.
K:Press to unlock the driver door. Press
unlock again within five seconds to unlock
all doors. The remote key can be
programmed to unlock all doors on the first
button press. To view available settings for
this feature, touch the Settings icon on the
infotainment home page. Select “Vehicle”to
display the list of available options and
select “Remote Lock, Unlock, Start”. The turn
signal indicators may flash to indicate
unlocking has occurred. Pressing
Kmay
also disarm the theft-deterrent system. See
Vehicle Alarm System 024.
If equipped with remote windows, press and
hold
Kto remotely open the windows,
if enabled. To view available settings for this
feature, touch the Settings icon on the
infotainment home page. Select “Vehicle”to
display the list of available options and
select “Remote Lock, Unlock, Start”.
b:If equipped, press twice quickly to
open or close the liftgate. Press again to
stop the power liftgate.
7: Press and release one time to initiate
vehicle locator. The exterior lamps flash and
the horn chirps three times. Press and hold
7for at least three seconds to sound the
panic alarm. The horn sounds and the turn
signals flash for 30 seconds, or until
7is
pressed again or the vehicle is started.
/: If equipped, first press and releaseQ
then immediately press and hold/for at
least four seconds to start the engine from
outside the vehicle using the remote key.
See Remote Vehicle Start 014.
Keyless Access Operation
The Keyless Access system allows the doors
to be locked and unlocked and the liftgate
to be accessed without removing the remote
key from a pocket, purse, briefcase, etc. The
remote key should be within 1 m (3 ft) of
the liftgate or door being opened. There will
be buttons on the outside door handles. Keyless Access can be programmed to
unlock all doors on the first lock/unlock
press from the driver door. Keyless Access
can also be turned off. To view available
settings for this feature, touch the Settings
icon on the infotainment home page. Select
“Vehicle”
to display the list of available
options and select “Remote Lock, Unlock,
Start”.
If equipped with memory seats, remote keys
1 and 2 are linked to seating positions of
memory 1 or 2. See Memory Seats039.
Keyless Unlocking/Locking from the
Driver Door
When the doors are locked and the remote
key is within 1 m (3 ft) of the driver door
handle, pressing the lock/unlock button on
the driver door handle will unlock the driver
door. If the lock/unlock button is pressed
again within five seconds, all passenger
doors will unlock.
Page 12 of 360
Chevrolet Blazer Owner Manual (GMNA-Localizing-U.S./Canada/Mexico-
16401961) - 2023 - CRC - 5/17/22
Keys, Doors, and Windows 11
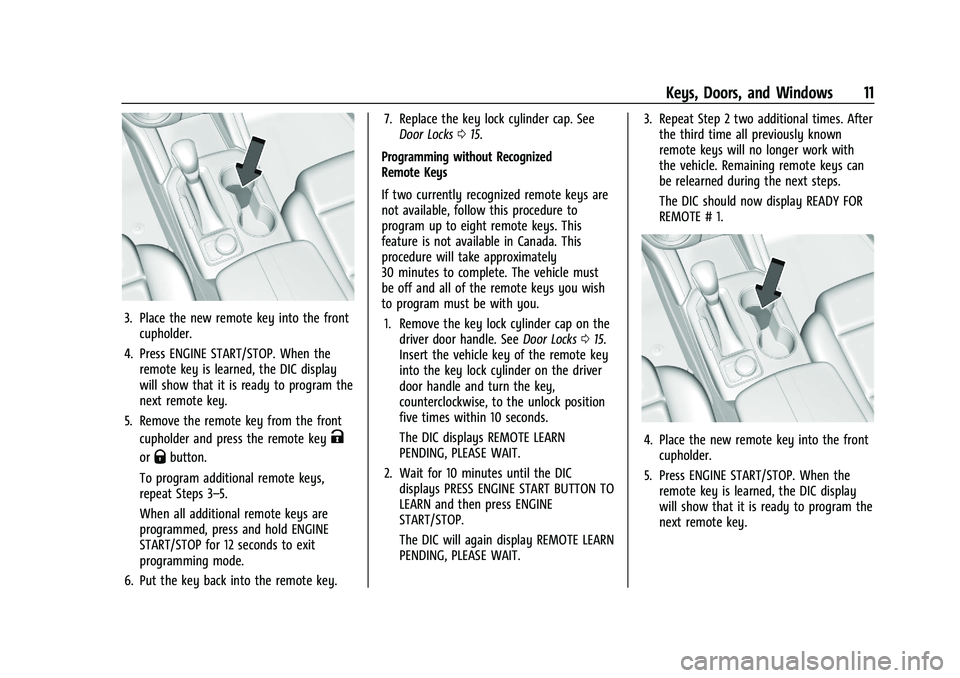
3. Place the new remote key into the frontcupholder.
4. Press ENGINE START/STOP. When the remote key is learned, the DIC display
will show that it is ready to program the
next remote key.
5. Remove the remote key from the front cupholder and press the remote key
K
orQbutton.
To program additional remote keys,
repeat Steps 3–5.
When all additional remote keys are
programmed, press and hold ENGINE
START/STOP for 12 seconds to exit
programming mode.
6. Put the key back into the remote key. 7. Replace the key lock cylinder cap. See
Door Locks 015.
Programming without Recognized
Remote Keys
If two currently recognized remote keys are
not available, follow this procedure to
program up to eight remote keys. This
feature is not available in Canada. This
procedure will take approximately
30 minutes to complete. The vehicle must
be off and all of the remote keys you wish
to program must be with you. 1. Remove the key lock cylinder cap on the driver door handle. See Door Locks015.
Insert the vehicle key of the remote key
into the key lock cylinder on the driver
door handle and turn the key,
counterclockwise, to the unlock position
five times within 10 seconds.
The DIC displays REMOTE LEARN
PENDING, PLEASE WAIT.
2. Wait for 10 minutes until the DIC displays PRESS ENGINE START BUTTON TO
LEARN and then press ENGINE
START/STOP.
The DIC will again display REMOTE LEARN
PENDING, PLEASE WAIT. 3. Repeat Step 2 two additional times. After
the third time all previously known
remote keys will no longer work with
the vehicle. Remaining remote keys can
be relearned during the next steps.
The DIC should now display READY FOR
REMOTE # 1.
4. Place the new remote key into the frontcupholder.
5. Press ENGINE START/STOP. When the remote key is learned, the DIC display
will show that it is ready to program the
next remote key.
Page 13 of 360
Chevrolet Blazer Owner Manual (GMNA-Localizing-U.S./Canada/Mexico-
16401961) - 2023 - CRC - 5/17/22
12 Keys, Doors, and Windows
6. Remove the remote key from the frontcupholder and press the remote key
K
orQbutton.
To program additional remote keys,
repeat Steps 4–6.
When all additional remote keys are
programmed, press and hold ENGINE
START/STOP for 12 seconds to exit
programming mode.
7. Put the key back into the remote key.
8. Replace the key lock cylinder cap. See Door Locks 015.
Starting the Vehicle with a Low Remote
Key Battery
When the vehicle is started, if the
transmitter battery is weak, the DIC may
display NO REMOTE DETECTED or NO
REMOTE KEY WAS DETECTED PLACE KEY IN
TRANSMITTER POCKET THEN START YOUR
VEHICLE. The DIC may then display REPLACE
BATTERY IN REMOTE KEY. To start the vehicle:
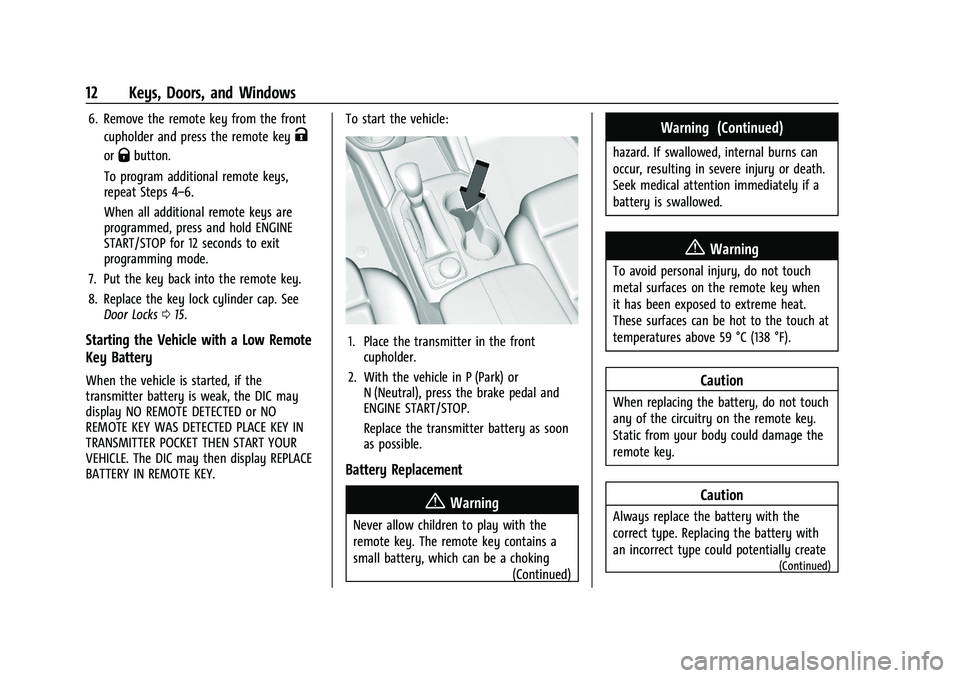
1. Place the transmitter in the front
cupholder.
2. With the vehicle in P (Park) or N (Neutral), press the brake pedal and
ENGINE START/STOP.
Replace the transmitter battery as soon
as possible.
Battery Replacement
{Warning
Never allow children to play with the
remote key. The remote key contains a
small battery, which can be a choking
(Continued)
Warning (Continued)
hazard. If swallowed, internal burns can
occur, resulting in severe injury or death.
Seek medical attention immediately if a
battery is swallowed.
{Warning
To avoid personal injury, do not touch
metal surfaces on the remote key when
it has been exposed to extreme heat.
These surfaces can be hot to the touch at
temperatures above 59 °C (138 °F).
Caution
When replacing the battery, do not touch
any of the circuitry on the remote key.
Static from your body could damage the
remote key.
Caution
Always replace the battery with the
correct type. Replacing the battery with
an incorrect type could potentially create
(Continued)
Page 16 of 360
Chevrolet Blazer Owner Manual (GMNA-Localizing-U.S./Canada/Mexico-
16401961) - 2023 - CRC - 5/17/22
Keys, Doors, and Windows 15
Conditions in Which Remote Start Will
Not Work
The remote start will not operate if any of
the following occur:
.An remote key is in the vehicle.
.The hood is not closed.
.The ignition is in any mode other
than off.
.The hazard warning flashers are on.
.There is an emission control system
malfunction.
.The engine coolant temperature is
too high.
.The oil pressure is low.
.Two remote vehicle starts or a start with
an extension have already been used.
.The vehicle is not in P (Park).
Door Locks
{Warning
Unlocked doors can be dangerous.
.Passengers, especially children, can
easily open the doors and fall out of a
moving vehicle. The doors can be
unlocked and opened while the vehicle(Continued)
Warning (Continued)
is moving. The chance of being thrown
out of the vehicle in a crash is
increased if the doors are not locked.
So, all passengers should wear seat
belts properly and the doors should be
locked whenever the vehicle is driven.
.Young children who get into unlocked
vehicles may be unable to get out.
A child can be overcome by extreme
heat and can suffer permanent injuries
or even death from heat stroke.
Always lock the vehicle whenever
leaving it.
.Outsiders can easily enter through an
unlocked door when you slow down
or stop the vehicle. Locking the doors
can help prevent this from happening.
To lock or unlock the doors from the
outside:
.PressQorKon the remote key. See
Remote Key Operation 07.
.In the case of a dead battery, use the key
in the driver door. The key lock cylinder is
covered with a cap. To lock or unlock the doors from the inside:
.PressQorKon the power door lock
switch.
.Push down on a door lock knob to lock
a door.
.Pull the door handle once to unlock the
door. Pull the handle again to unlatch it.
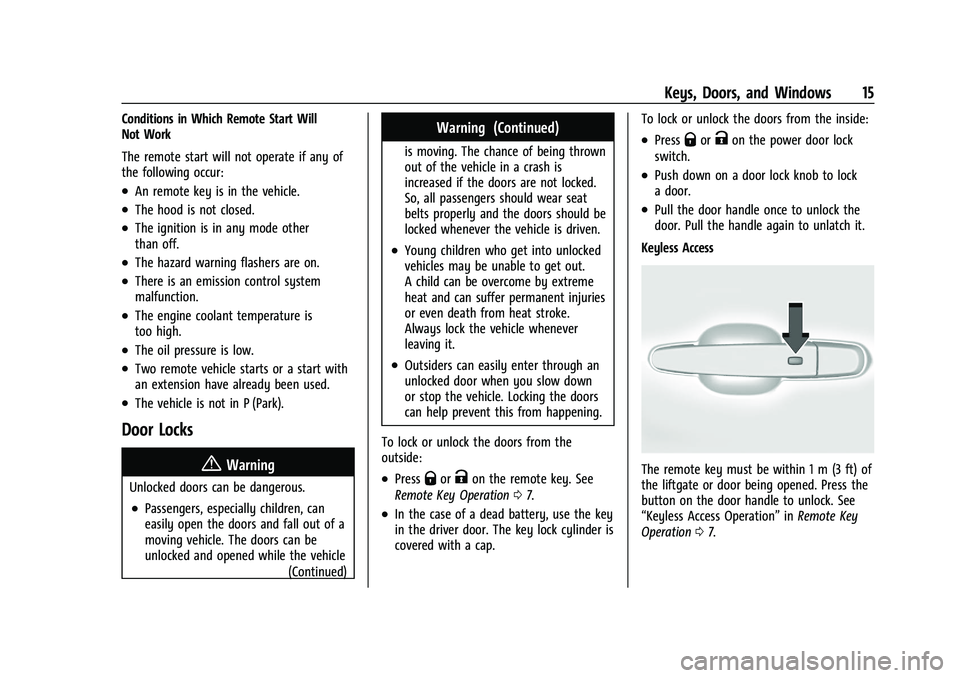
Keyless Access
The remote key must be within 1 m (3 ft) of
the liftgate or door being opened. Press the
button on the door handle to unlock. See
“Keyless Access Operation” inRemote Key
Operation 07.
Page 21 of 360
Chevrolet Blazer Owner Manual (GMNA-Localizing-U.S./Canada/Mexico-
16401961) - 2023 - CRC - 5/17/22
20 Keys, Doors, and Windows
If equipped with a power liftgate, the switch
is on the driver door. The vehicle must be in
P (Park).
The modes are:
.MAX: Opens to maximum height.
.3/4: Opens to a reduced height that can
be set from 3/4 to fully open. Use to
prevent the liftgate from opening into
overhead obstructions such as a garage
door or roof-mounted cargo. The liftgate
can be manually opened all the way.
.OFF: Opens manually only.
To power open or close the liftgate, select
MAX or 3/4 mode.
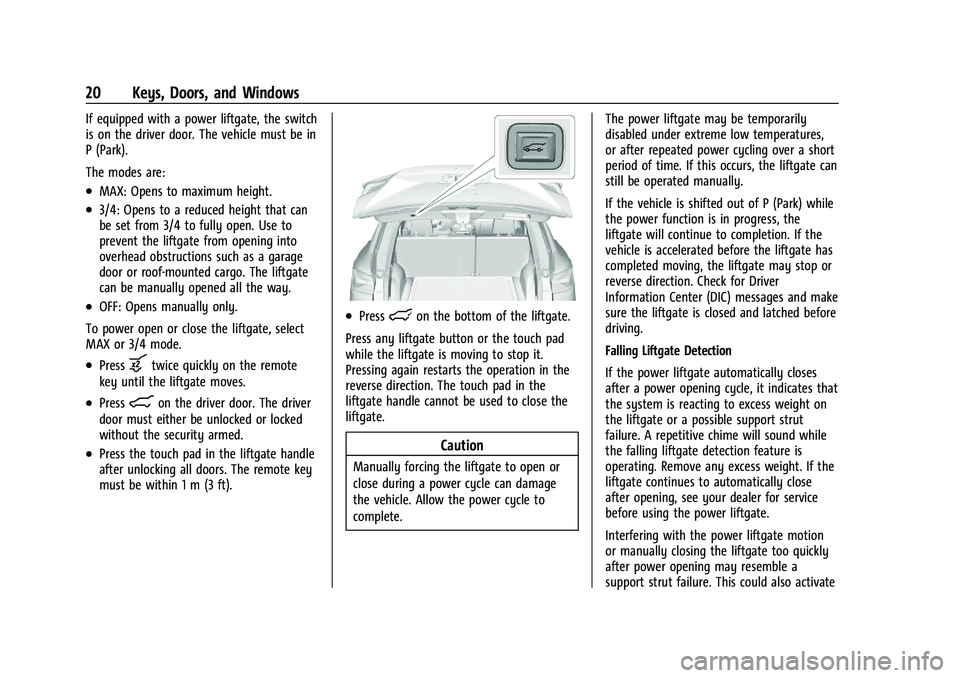
.Pressbtwice quickly on the remote
key until the liftgate moves.
.Press8on the driver door. The driver
door must either be unlocked or locked
without the security armed.
.Press the touch pad in the liftgate handle
after unlocking all doors. The remote key
must be within 1 m (3 ft).
.Presslon the bottom of the liftgate.
Press any liftgate button or the touch pad
while the liftgate is moving to stop it.
Pressing again restarts the operation in the
reverse direction. The touch pad in the
liftgate handle cannot be used to close the
liftgate.
Caution
Manually forcing the liftgate to open or
close during a power cycle can damage
the vehicle. Allow the power cycle to
complete. The power liftgate may be temporarily
disabled under extreme low temperatures,
or after repeated power cycling over a short
period of time. If this occurs, the liftgate can
still be operated manually.
If the vehicle is shifted out of P (Park) while
the power function is in progress, the
liftgate will continue to completion. If the
vehicle is accelerated before the liftgate has
completed moving, the liftgate may stop or
reverse direction. Check for Driver
Information Center (DIC) messages and make
sure the liftgate is closed and latched before
driving.
Falling Liftgate Detection
If the power liftgate automatically closes
after a power opening cycle, it indicates that
the system is reacting to excess weight on
the liftgate or a possible support strut
failure. A repetitive chime will sound while
the falling liftgate detection feature is
operating. Remove any excess weight. If the
liftgate continues to automatically close
after opening, see your dealer for service
before using the power liftgate.
Interfering with the power liftgate motion
or manually closing the liftgate too quickly
after power opening may resemble a
support strut failure. This could also activate
Page 116 of 360
Chevrolet Blazer Owner Manual (GMNA-Localizing-U.S./Canada/Mexico-
16401961) - 2023 - CRC - 5/17/22
Instruments and Controls 115
Under certain operating conditions,
propulsion will be disabled. Try restarting
after the ignition has been off for
30 seconds.
Vehicle Speed Messages
SPEED LIMITED TO XXX KM/H (MPH)
This message shows that the vehicle speed
has been limited to the speed displayed. The
limited speed is a protection for various
propulsion and vehicle systems, such as
lubrication, thermal, brakes, suspension,
Teen Driver if equipped, or tires.
Universal Remote System
SeeRadio Frequency Statement 0337.
Universal Remote System
Programming
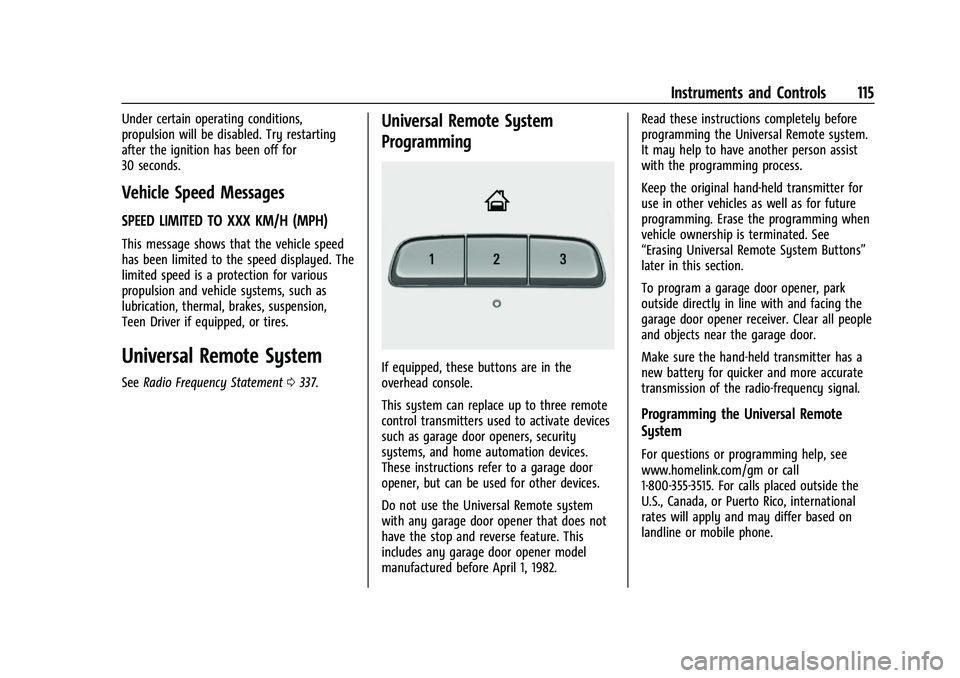
If equipped, these buttons are in the
overhead console.
This system can replace up to three remote
control transmitters used to activate devices
such as garage door openers, security
systems, and home automation devices.
These instructions refer to a garage door
opener, but can be used for other devices.
Do not use the Universal Remote system
with any garage door opener that does not
have the stop and reverse feature. This
includes any garage door opener model
manufactured before April 1, 1982. Read these instructions completely before
programming the Universal Remote system.
It may help to have another person assist
with the programming process.
Keep the original hand-held transmitter for
use in other vehicles as well as for future
programming. Erase the programming when
vehicle ownership is terminated. See
“Erasing Universal Remote System Buttons”
later in this section.
To program a garage door opener, park
outside directly in line with and facing the
garage door opener receiver. Clear all people
and objects near the garage door.
Make sure the hand-held transmitter has a
new battery for quicker and more accurate
transmission of the radio-frequency signal.
Programming the Universal Remote
System
For questions or programming help, see
www.homelink.com/gm or call
1-800-355-3515. For calls placed outside the
U.S., Canada, or Puerto Rico, international
rates will apply and may differ based on
landline or mobile phone.
Page 165 of 360
Chevrolet Blazer Owner Manual (GMNA-Localizing-U.S./Canada/Mexico-
16401961) - 2023 - CRC - 5/17/22
164 Infotainment System
2. For automatic transmissions, the vehiclemust be in P (Park). For manual
transmissions, the vehicle must be
stopped with the parking brake set.
3. From the Settings menu, touch Vehicle and then Teen Driver.
4. Enter the PIN.
5. Place the remote key you wish to register in the transmitter pocket. The
key does not need to be the one that
started the vehicle. See Remote Key
Operation 07for transmitter pocket
location.
6. From the Teen Driver menu, touch Setup Keys or Add/Remove Teen Driver Keys.
.If the remote key has not previously
been registered, the option to add
the key displays. Touch Add and a
confirmation message displays. Teen
Driver restrictions will be applied
whenever this remote key is used to
operate the vehicle.
.If the remote key has already been
registered, the option to remove the
key displays. If Remove is touched,
the remote key is no longer
registered. A confirmation message displays, and Teen Driver restrictions
will not be applied if this remote key
is used to operate the vehicle.
In vehicles with a pushbutton start system,
if a Teen Driver and a non-Teen Driver key
are both present at start up, the vehicle will
recognize the non-Teen Driver key to start
the vehicle. The Teen Driver settings will not
be active.
For a keyed ignition system: 1. Start the vehicle.
2. For automatic transmissions, the vehicle must be in P (Park). For manual
transmissions, the vehicle must be
stopped with the parking brake set.
3. From the Settings menu, touch Vehicle and then Teen Driver.
4. Enter the PIN.
5. Touch Setup Keys or Add/Remove Teen Driver Keys. The system displays
instructions for registering or
unregistering a key. A confirmation
message displays.
Manage Settings or Teen Driver Settings
Depending on the options of your vehicle,
the following menu items may be displayed: Buckle to Drive :
When turned ON, Buckle to
Drive prevents the driver from shifting out
of P (Park) for a period of time after the
brake pedal is pressed if the driver, or on
some vehicles the detected passenger, has
not buckled their seat belt. On some
vehicles, Buckle to Drive is always ON when
Teen Driver is active and is not configurable.
See Buckle To Drive 046.
Audio Volume Limit : Allows a maximum
audio volume to be set. Turn the audio
volume limit on or off. Use the arrows to
choose the maximum allowable level for the
audio volume. On some infotainment
systems, touch Set Audio Volume Limit to
choose the maximum allowable audio
volume level.
Set Audio Volume Limit : Use the arrows to
choose the maximum allowable level for the
audio volume.
Teen Driver Speed Limiter : Limits the
maximum speed of the vehicle. When the
speed limiter is turned on and the vehicle is
started with a Teen Driver key, the DIC
displays a message that the top speed is
limited.
Page 193 of 360
Chevrolet Blazer Owner Manual (GMNA-Localizing-U.S./Canada/Mexico-
16401961) - 2023 - CRC - 5/17/22
192 Driving and Operating
Caution (Continued)
.Avoid making hard stops for the first
300 km (200 mi) or so. During this
time the new brake linings are not yet
broken in. Hard stops with new linings
can mean premature wear and earlier
replacement. Follow this breaking-in
guideline every time you get new
brake linings.
.Do not tow a trailer during break-in.
SeeTrailer Towing 0238 for the trailer
towing capabilities of the vehicle and
more information.
Following break-in, engine speed and load
can be gradually increased.
On new vehicles, the various mechanical and
electrical systems experience a “break-in”
period during the first 6 400 km (4,000 mi)
of routine driving. As the vehicle is driven,
the mechanical systems adjust to provide
optimal fuel economy and transmission shift
performance.
Electrical systems will adapt and calibrate
during the break-in period. A one-time
occurrence of clicks and similar vehicle
noises is normal during this process. Normal driving charges the vehicle’s battery
to achieve the best operation of the vehicle,
including fuel economy and the Stop/Start
System. See
Stop/Start System 0194.
Ignition Positions
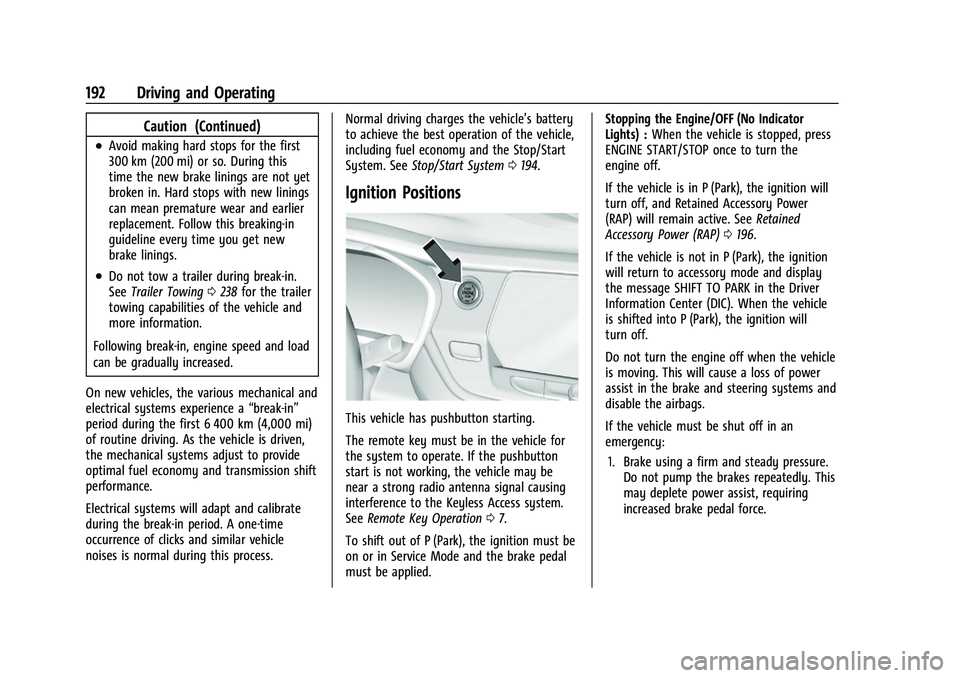
This vehicle has pushbutton starting.
The remote key must be in the vehicle for
the system to operate. If the pushbutton
start is not working, the vehicle may be
near a strong radio antenna signal causing
interference to the Keyless Access system.
See Remote Key Operation 07.
To shift out of P (Park), the ignition must be
on or in Service Mode and the brake pedal
must be applied. Stopping the Engine/OFF (No Indicator
Lights) :
When the vehicle is stopped, press
ENGINE START/STOP once to turn the
engine off.
If the vehicle is in P (Park), the ignition will
turn off, and Retained Accessory Power
(RAP) will remain active. See Retained
Accessory Power (RAP) 0196.
If the vehicle is not in P (Park), the ignition
will return to accessory mode and display
the message SHIFT TO PARK in the Driver
Information Center (DIC). When the vehicle
is shifted into P (Park), the ignition will
turn off.
Do not turn the engine off when the vehicle
is moving. This will cause a loss of power
assist in the brake and steering systems and
disable the airbags.
If the vehicle must be shut off in an
emergency: 1. Brake using a firm and steady pressure. Do not pump the brakes repeatedly. This
may deplete power assist, requiring
increased brake pedal force.
Page 194 of 360
Chevrolet Blazer Owner Manual (GMNA-Localizing-U.S./Canada/Mexico-
16401961) - 2023 - CRC - 5/17/22
Driving and Operating 193
2. Shift the vehicle to N (Neutral). This canbe done while the vehicle is moving.
After shifting to N (Neutral), firmly apply
the brakes and steer the vehicle to a
safe location.
3. Come to a complete stop, shift to P (Park), and turn the ignition off. The
shift lever must be in P (Park) to turn the
ignition off.
4. Set the parking brake. See Electric
Parking Brake 0203.
{Warning
Turning off the vehicle while moving may
cause loss of power assist in the brake
and steering systems and disable the
airbags. While driving, only shut the
vehicle off in an emergency.
If the vehicle cannot be pulled over, and
must be shut off while driving, press and
hold ENGINE START/STOP for longer than
two seconds, or press twice in five seconds.
Accessory Mode (Amber Indicator Light) :
This mode allows some electrical accessories
to be used when the engine is off. With the ignition off, pressing the button
one time without the brake pedal applied
will place the ignition system in
accessory mode.
The ignition will switch from accessory
mode to OFF after five minutes to prevent
battery rundown.
ON/RUN/START (Green Indicator Light) :
This
mode is for driving and starting. With the
ignition off, and the brake pedal applied,
pressing the button once will place the
ignition system in ON/RUN/START. Once
engine cranking begins, release the button.
Engine cranking will continue until the
engine starts. See Starting the Engine 0193.
The ignition will then remain in ON/RUN.
Service Mode
This power mode is available for service and
diagnostics, and to verify the proper
operation of the malfunction indicator lamp
as may be required for emission inspection
purposes. With the vehicle off, and the
brake pedal not applied, pressing and
holding ENGINE START/STOP for more than
five seconds will place the vehicle in Service
Mode. The instruments and audio systems
will operate as they do in ON/RUN, but the vehicle will not be able to be driven. The
engine will not start in Service Mode. Press
the button again to turn the vehicle off.
Starting the Engine
Move the shift lever to P (Park) or
N (Neutral). The engine will not start in any
other position. To restart the engine when
the vehicle is already moving, use
N (Neutral) only.
Caution
Do not try to shift to P (Park) if the
vehicle is moving. If you do, you could
damage the transmission. Shift to P (Park)
only when the vehicle is stopped.
Caution
If you add electrical parts or accessories,
you could change the way the engine
operates. Any resulting damage would
not be covered by the vehicle warranty.
See
Add-On Electrical Equipment 0245.