parking brake CHEVROLET BOLT EV 2017 Owner's Manual
[x] Cancel search | Manufacturer: CHEVROLET, Model Year: 2017, Model line: BOLT EV, Model: CHEVROLET BOLT EV 2017Pages: 16, PDF Size: 2.5 MB
Page 2 of 16
2
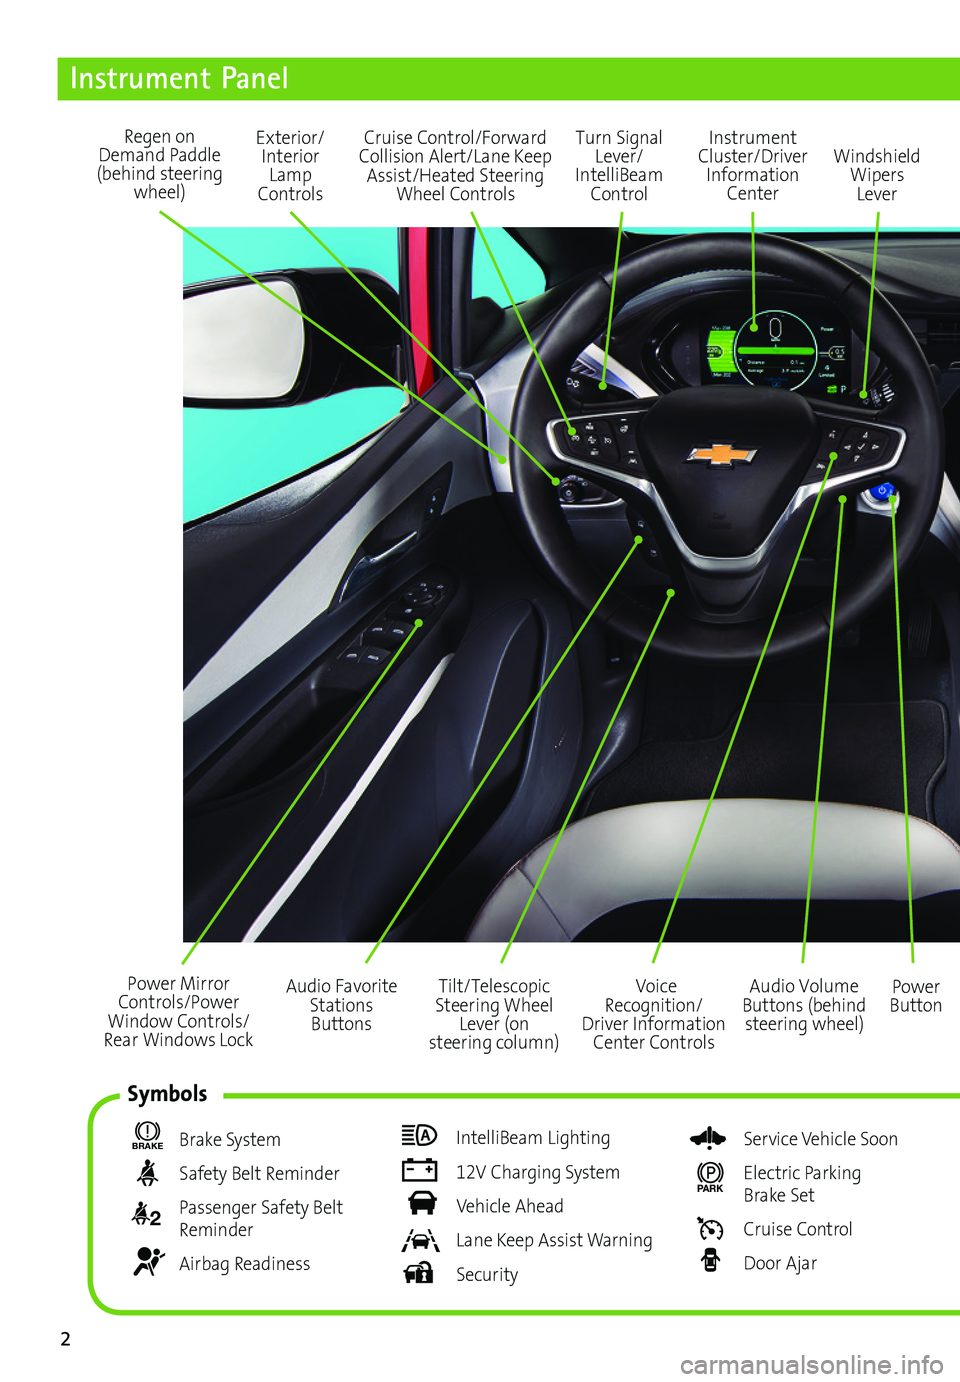
Power Mirror Controls/Power Window Controls/Rear Windows Lock
Exterior/Interior Lamp Controls
Turn Signal Lever/ IntelliBeam Control
Regen on Demand Paddle (behind steering wheel)
Audio Volume Buttons (behind steering wheel)
Voice Recognition/Driver Information Center Controls
Power Button
Cruise Control/Forward Collision Alert/Lane Keep Assist/Heated Steering Wheel Controls
Instrument Panel
BRAKE Brake System
Safety Belt Reminder
2 Passenger Safety Belt Reminder
Airbag Readiness
IntelliBeam Lighting
12V Charging System
Vehicle Ahead
Lane Keep Assist Warning
Security
Service Vehicle Soon
PARK Electric Parking Brake Set
Cruise Control
Door Ajar
Instrument Cluster/Driver Information Center
Windshield Wipers Lever
Tilt/Telescopic Steering Wheel Lever (on steering column)
Audio Favorite Stations Buttons
Symbols
Page 3 of 16
3
Refer to your Owner Manual to learn about the information being relayed by the lights, gauges and indicators of the instrument cluster.
See In Brief in your Owner Manual.
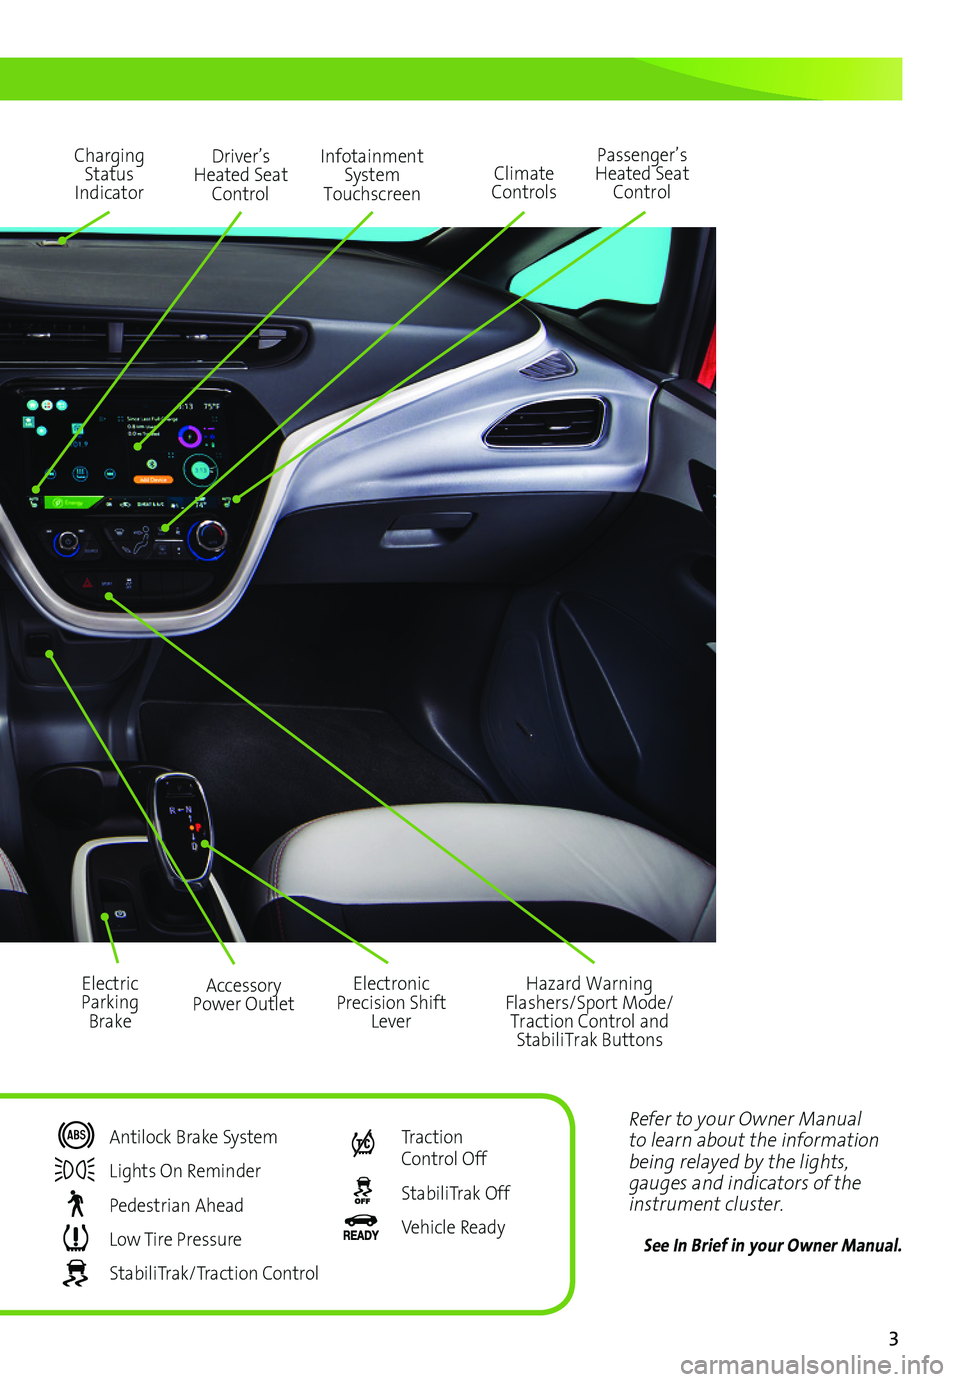
Driver’s Heated Seat Control
Infotainment System Touchscreen
Passenger’s Heated Seat ControlClimate Controls
Hazard Warning Flashers/Sport Mode/Traction Control and StabiliTrak Buttons
Accessory Power Outlet
Charging Status Indicator
Electric Parking Brake
Electronic Precision Shift Lever
Antilock Brake System
Lights On Reminder
Pedestrian Ahead
Low Tire Pressure
StabiliTrak/Traction Control
Traction Control Off
StabiliTrak Off
Vehicle Ready
Page 4 of 16
4
Getting Started
Remote Keyless Entry (RKE)
The RKE transmitter (key fob) performs several remote functions and must be in the vehicle to start the Bolt EV.
Keyless Access
With the RKE transmitter within 3 ft. (1 m) of the door, press the button on the driver’s door handle to unlock the door. Press it again within 5 seconds to unlock all doors and the liftgate.
Press the button on a passen-ger’s door handle to unlock all doors and the liftgate.
When unlocked, press the button on any door handle to lock all doors and the liftgate.
Key Release
Press the side button on the transmitter to remove the key, which can be used to unlock the driver’s door.
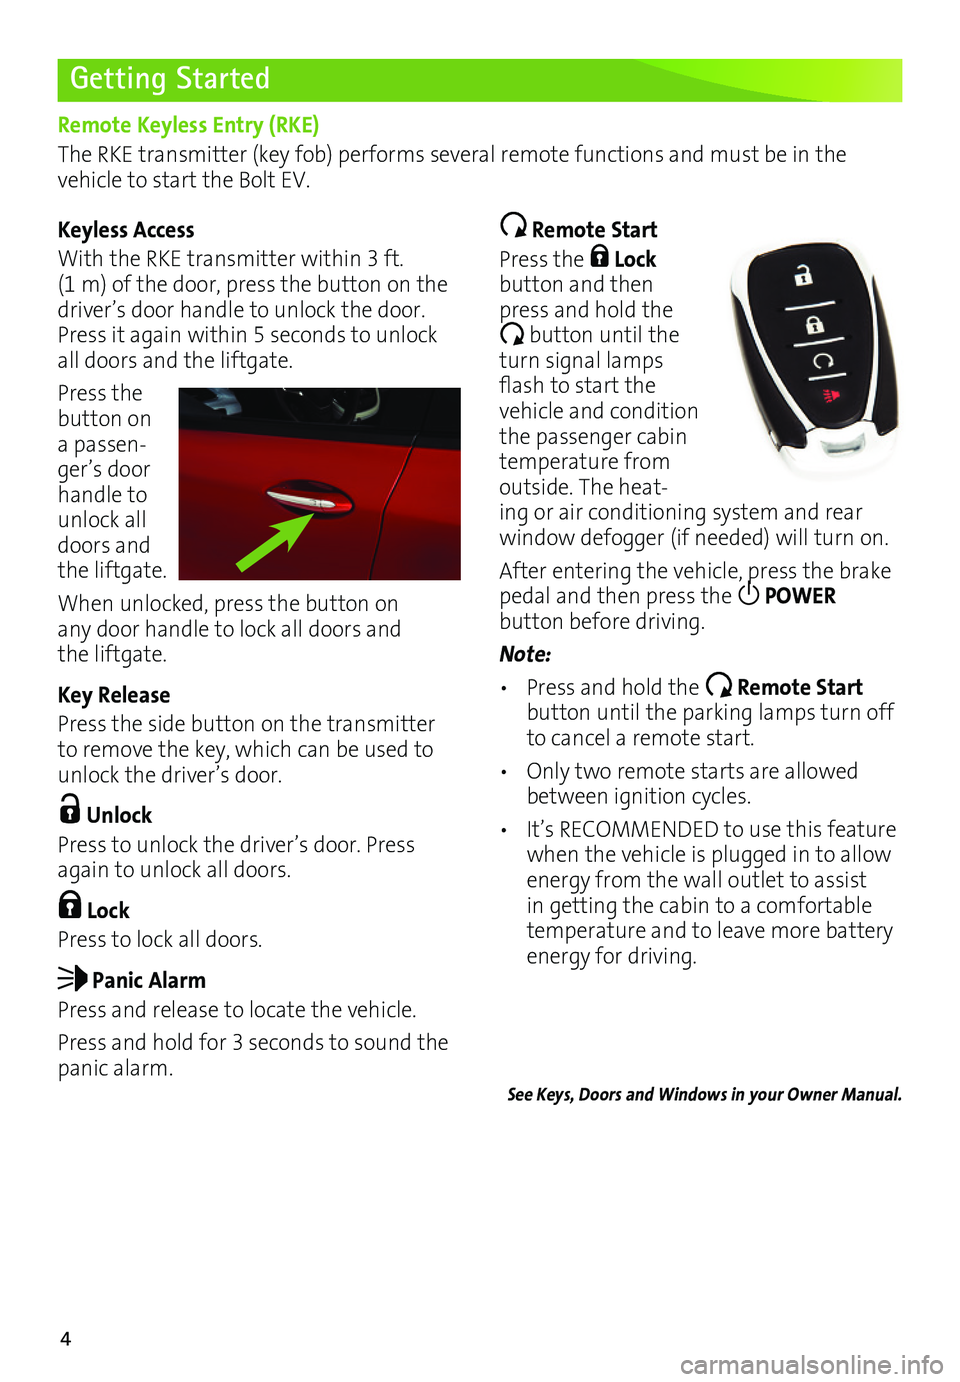
Unlock
Press to unlock the driver’s door. Press again to unlock all doors.
Lock
Press to lock all doors.
Panic Alarm
Press and release to locate the vehicle.
Press and hold for 3 seconds to sound the panic alarm.
Remote Start
Press the Lock button and then press and hold the
button until the turn signal lamps flash to start the vehicle and condition the passenger cabin temperature from outside. The heat-ing or air conditioning system and rear
window defogger (if needed) will turn on.
After entering the vehicle, press the brake pedal and then press the POWER
button before driving.
Note:
• Press and hold the Remote Start button until the parking lamps turn off to cancel a remote start.
• Only two remote starts are allowed between ignition cycles.
• It’s RECOMMENDED to use this feature when the vehicle is plugged in to allow energy from the wall outlet to assist in getting the cabin to a comfortable temperature and to leave more battery energy for driving.
See Keys, Doors and Windows in your Owner Manual.
Page 6 of 16
6
Electronic Precision Shift
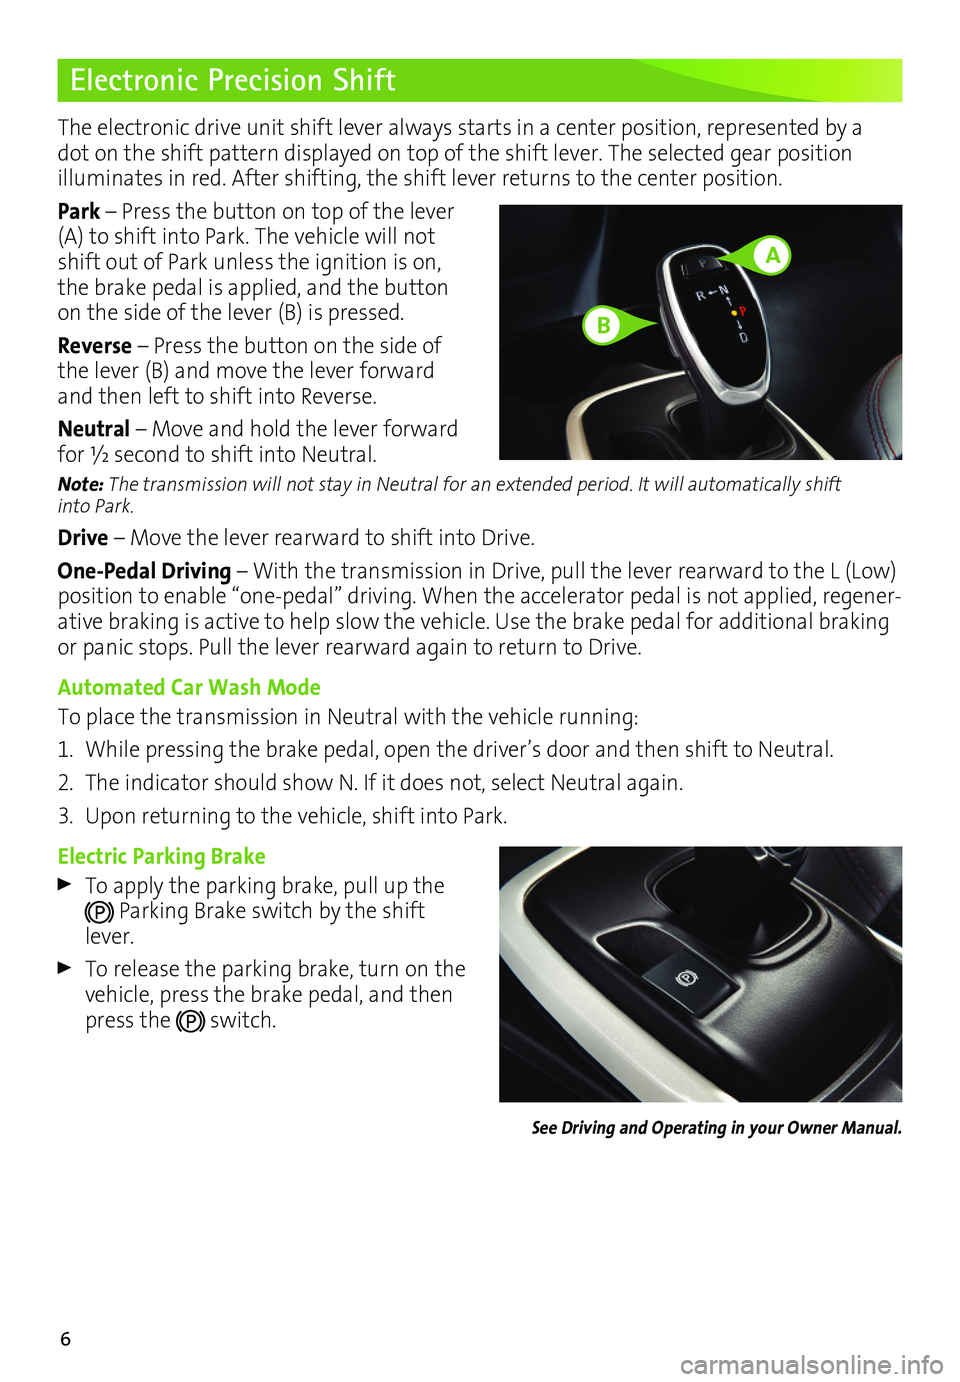
The electronic drive unit shift lever always starts in a center position, represented by a dot on the shift pattern displayed on top of the shift lever. The selected gear position
illuminates in red. After shifting, the shift lever returns to the center position.
Park – Press the button on top of the lever (A) to shift into Park. The vehicle will not shift out of Park unless the ignition is on, the brake pedal is applied, and the button on the side of the lever (B) is pressed.
Reverse – Press the button on the side of the lever (B) and move the lever forward and then left to shift into Reverse.
Neutral – Move and hold the lever forward for ½ second to shift into Neutral.
Note: The transmission will not stay in Neutral for an extended period. It will automatically shift into Park.
Drive – Move the lever rearward to shift into Drive.
One-Pedal Driving – With the transmission in Drive, pull the lever rearward to the L (Low) position to enable “one-pedal” driving. When the accelerator pedal is not applied, regener-ative braking is active to help slow the vehicle. Use the brake pedal for additional braking or panic stops. Pull the lever rearward again to return to Drive.
Automated Car Wash Mode
To place the transmission in Neutral with the vehicle running:
1. While pressing the brake pedal, open the driver’s door and then shift to Neutral.
2. The indicator should show N. If it does not, select Neutral again.
3. Upon returning to the vehicle, shift into Park.
Electric Parking Brake
To apply the parking brake, pull up the
Parking Brake switch by the shift lever.
To release the parking brake, turn on the vehicle, press the brake pedal, and then press the switch.
See Driving and Operating in your Owner Manual.
A
B
Page 15 of 16
15
DC Charging (if equipped)
DC charging stations are typically found in public locations.
Charging Time
Using a DC charging station, it will take approximately 30 minutes to recharge a deplet-ed battery to 90 miles of EV range. Charge times will vary with outside temperature. Charging will continue to 100%, but at a slower rate. At 100% state of charge, the vehicle may continue to draw power to condition the battery if needed. Once battery condition-ing is complete, the vehicle will stop the charge session.
Start DC Charging
1. With the vehicle parked and turned off, push and release the rear edge of the charge port door, located just in front of the driver’s door, to open the door.
2. Unlatch and lower the DC charging dust cover on the charge port.
3. Plug the charge cord into the vehicle’s charge port.
4. Follow the steps on the charging station to start charging. The electric parking brake will automatically apply and the DC plug will be locked and cannot be disconnected while charging is active.
5. The Charge Status Indicator on top of the instrument panel will illuminate green and the horn will chirp when properly connected.
Note: To change the horn chirp setting, go to Charging Alerts in the Vehicle Settings menu.
If the vehicle is locked with the RKE transmitter, the charge cord theft alert is armed
automatically after 30 seconds.
End DC Charging
1. Unlock the vehicle with the RKE transmitter to disarm the charge cord theft alert.
2. When the vehicle is fully charged, it will stop charging and the plug will be unlocked. To stop charging at any time, use the controls on the charging station or touch the Stop button on the Battery Information screen on the vehicle touchscreen.
3. When the Charge Status Indicator is solid green or off, unplug the charge cord from the vehicle.
4. Close the DC charging dust cover and close the charge port door.
5. Disengage the electric parking brake before driving the vehicle.
See Driving and Operating in your Owner Manual.