hood release CHEVROLET BOLT EV 2017 Owner's Manual
[x] Cancel search | Manufacturer: CHEVROLET, Model Year: 2017, Model line: BOLT EV, Model: CHEVROLET BOLT EV 2017Pages: 361, PDF Size: 4.89 MB
Page 41 of 361
Chevrolet Bolt EV Owner Manual (GMNA-Localizing-U.S./Canada/Mexico-
10122739) - 2017 - CRC - 10/3/16
40 Keys, Doors, and Windows
to have the vehicle in view. Check
local regulations for any
requirements.
If the vehicle is low on energy, do
not use the remote start feature.
The vehicle may run out of energy.
The RKE transmitter range may be
less while the vehicle is running.
Other conditions can affect the
performance of the transmitter. See
Remote Keyless Entry (RKE)
System033.
Starting the Vehicle
Use remote start to heat or cool the
interior when the vehicle is plugged
in to maximize electric range by
utilizing electricity from the electrical
outlet. Normal operation of the
system will return after the vehicle
has been turned on.
1. Press and release
Qon the
RKE transmitter.
2. Immediately press and hold
/
for at least four seconds or until
the turn signal lamps flash. 3. After entering the vehicle
during a remote start, press
POWER
Owith the brake
pedal applied to start the
vehicle and operate as normal.
Remote start will automatically shut
off after 20 minutes unless a time
extension is done.
When the vehicle starts, the parking
lamps will turn on. Remote start run
time can be extended.
Extending Vehicle Run Time
The vehicle run time can also be
extended by another 20 minutes,
if after 30 seconds and during the
first 20 minutes Steps 1 and 2 are
repeated while the vehicle is
running. This provides a total of
40 minutes.
The remote start can only be
extended once.
A maximum of two remote starts,
or a single start with an extension,
are allowed between ignition cycles
using POWER
O. For additional remote starts press
POWER
Ofirst.
Canceling Remote Start
To cancel a remote start, do any of
the following:
.
Press and hold
/until the
parking lamps turn off.
. Turn on the hazard warning
flashers.
. Press POWER
Owith the brake
pedal applied, then press
POWER
Oagain to turn the
vehicle off.
Conditions in Which Remote
Start Will Not Work
The remote vehicle start feature will
not operate if:
. The RKE transmitter is in the
vehicle.
. The hood is not closed.
. The hazard warning flashers
are on.
. The malfunction indicator lamp
is on.
Page 153 of 361
Chevrolet Bolt EV Owner Manual (GMNA-Localizing-U.S./Canada/Mexico-
10122739) - 2017 - CRC - 10/3/16
152 Lighting
Raise or lower the lever until the
arrow starts to flash to signal a lane
change. Hold it there until the lane
change is completed.
If the lever is briefly pressed and
released, the turn signal flashes
three times.
The turn and lane-change signal
can be turned off manually by
moving the lever back to its original
position.
If after signaling a turn or lane
change, the arrow flashes rapidly or
does not come on, a signal bulb
may be burned out.
Replace any burned out bulbs. If a
bulb is not burned out, check the
fuse. SeeUnderhood Compartment
Fuse Block 0264.Interior Lighting
Instrument Panel
Illumination Control
The brightness of the instrument
cluster display, infotainment display
and controls, steering wheel
controls, and all other illuminated
controls, as well as feature status
indicators can be adjusted.
The knob for this feature is on the
instrument panel beside the steering
column.
Courtesy Lamps
The courtesy lamps come on when
any door is opened and the dome
lamp is in the
1position.
Dome Lamps
The dome lamp controls are in the
headliner above the front seats.
ROFF : Press to turn the lamps
off, even when a door is open.
1: When the button is returned to
the middle position, the lamps turn
on automatically when a door is
opened.
+ON : Press to turn on the dome
lamps.
Page 198 of 361
Chevrolet Bolt EV Owner Manual (GMNA-Localizing-U.S./Canada/Mexico-
10122739) - 2017 - CRC - 10/3/16
Driving and Operating 197
.Tie a red cloth to an outside
mirror.
To save energy, run the vehicle for
only short periods as needed to
warm the vehicle and then shut the
vehicle off and partially close the
window. Moving about to keep warm
also helps.
If it takes some time for help to
arrive, when running the vehicle,
push the accelerator pedal slightly
so the vehicle runs faster than the
idle speed. This keeps the battery
charged to restart the vehicle and to
signal for help with the headlamps.
Do this as little as possible to save
electricity.
If the Vehicle Is Stuck
Slowly and cautiously spin the
wheels to free the vehicle when
stuck in sand, mud, ice, or snow.
The Traction Control System (TCS)
must be turned off by pressing the
TCS/ESC button. Traction control is
not completely off, but will only
engage if the maneuver can cause
damage to the electric drive unit.
{Warning
If the vehicle's tires spin at high
speed, they can explode, and you
or others could be injured. The
vehicle can overheat, causing an
underhood compartment fire or
other damage. Spin the wheels as
little as possible and avoid going
above 56 km/h (35 mph).
Rocking the Vehicle to Get
it Out
Turn the steering wheel left and
right to clear the area around the
front wheels. Turn off TCS. Shift
back and forth between R (Reverse)
and a low forward gear, spinning the
wheels as little as possible. To
prevent electric drive unit wear, wait
until the wheels stop spinning
before shifting gears. Release the
accelerator pedal while shifting, and
press lightly on the accelerator
pedal when the electric drive unit is
in gear. Slowly spinning the wheels
in the forward and reverse
directions causes a rocking motion that could free the vehicle. If that
does not get the vehicle out after a
few tries, it might need to be towed
out. See
Towing the Vehicle 0299.
Vehicle Load Limits
It is very important to know how
much weight the vehicle can
carry. This weight is called the
vehicle capacity weight and
includes the weight of all
occupants, cargo, and all
nonfactory-installed options.
Two labels on the vehicle may
show how much weight it may
properly carry: the Tire and
Loading Information label and
the Certification label.
{Warning
Do not load the vehicle any
heavier than the Gross
Vehicle Weight Rating
(GVWR), or either the
maximum front or rear Gross
(Continued)
Page 252 of 361
Chevrolet Bolt EV Owner Manual (GMNA-Localizing-U.S./Canada/Mexico-
10122739) - 2017 - CRC - 10/3/16
Vehicle Care 251
Warning (Continued)
or modify these components.
High voltage cable or wiring has
orange covering. Do not probe,
tamper with, cut, or modify high
voltage cable or wiring.
{Warning
It can be dangerous to work on
your vehicle if you do not have
the proper knowledge, service
manual, tools, or parts. Always
follow owner’s manual procedures
and consult the service manual
for your vehicle before doing any
service work. If doing some of your own service
work, use the proper service
manual. It tells you much more
about how to service the vehicle
than this manual can. To order the
proper service manual, see
Service
Publications Ordering Information
0 335.
This vehicle has an airbag system.
Before attempting to do your own
service work, see Servicing the
Airbag-Equipped Vehicle 079.
Keep a record with all parts receipts
and list the mileage and the date of
any service work performed. See
Maintenance Records 0318.
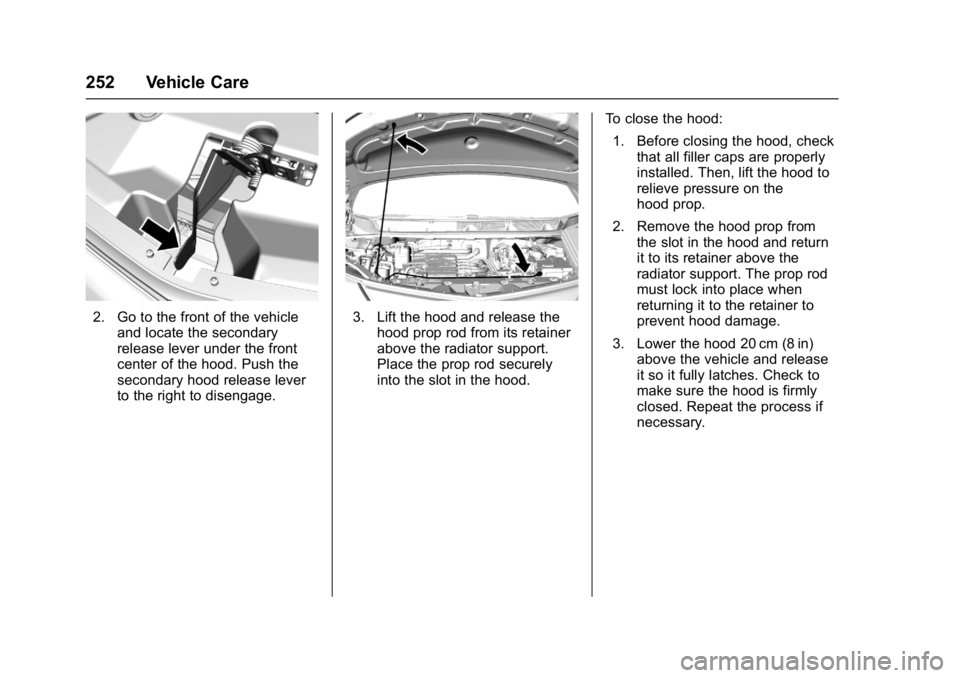
Hood
To open the hood:
1. Pull the release handle with
this symbol. It is below the
instrument panel outboard of
the steering wheel.
Page 253 of 361
Chevrolet Bolt EV Owner Manual (GMNA-Localizing-U.S./Canada/Mexico-
10122739) - 2017 - CRC - 10/3/16
252 Vehicle Care
2. Go to the front of the vehicleand locate the secondary
release lever under the front
center of the hood. Push the
secondary hood release lever
to the right to disengage.3. Lift the hood and release thehood prop rod from its retainer
above the radiator support.
Place the prop rod securely
into the slot in the hood. To close the hood:
1. Before closing the hood, check that all filler caps are properly
installed. Then, lift the hood to
relieve pressure on the
hood prop.
2. Remove the hood prop from the slot in the hood and return
it to its retainer above the
radiator support. The prop rod
must lock into place when
returning it to the retainer to
prevent hood damage.
3. Lower the hood 20 cm (8 in) above the vehicle and release
it so it fully latches. Check to
make sure the hood is firmly
closed. Repeat the process if
necessary.