remote start CHEVROLET BOLT EV 2018 Get To Know Guide
[x] Cancel search | Manufacturer: CHEVROLET, Model Year: 2018, Model line: BOLT EV, Model: CHEVROLET BOLT EV 2018Pages: 16, PDF Size: 2.21 MB
Page 4 of 16
4
GETTING STARTED
REMOTE KEYLESS ENTRY (RKE)
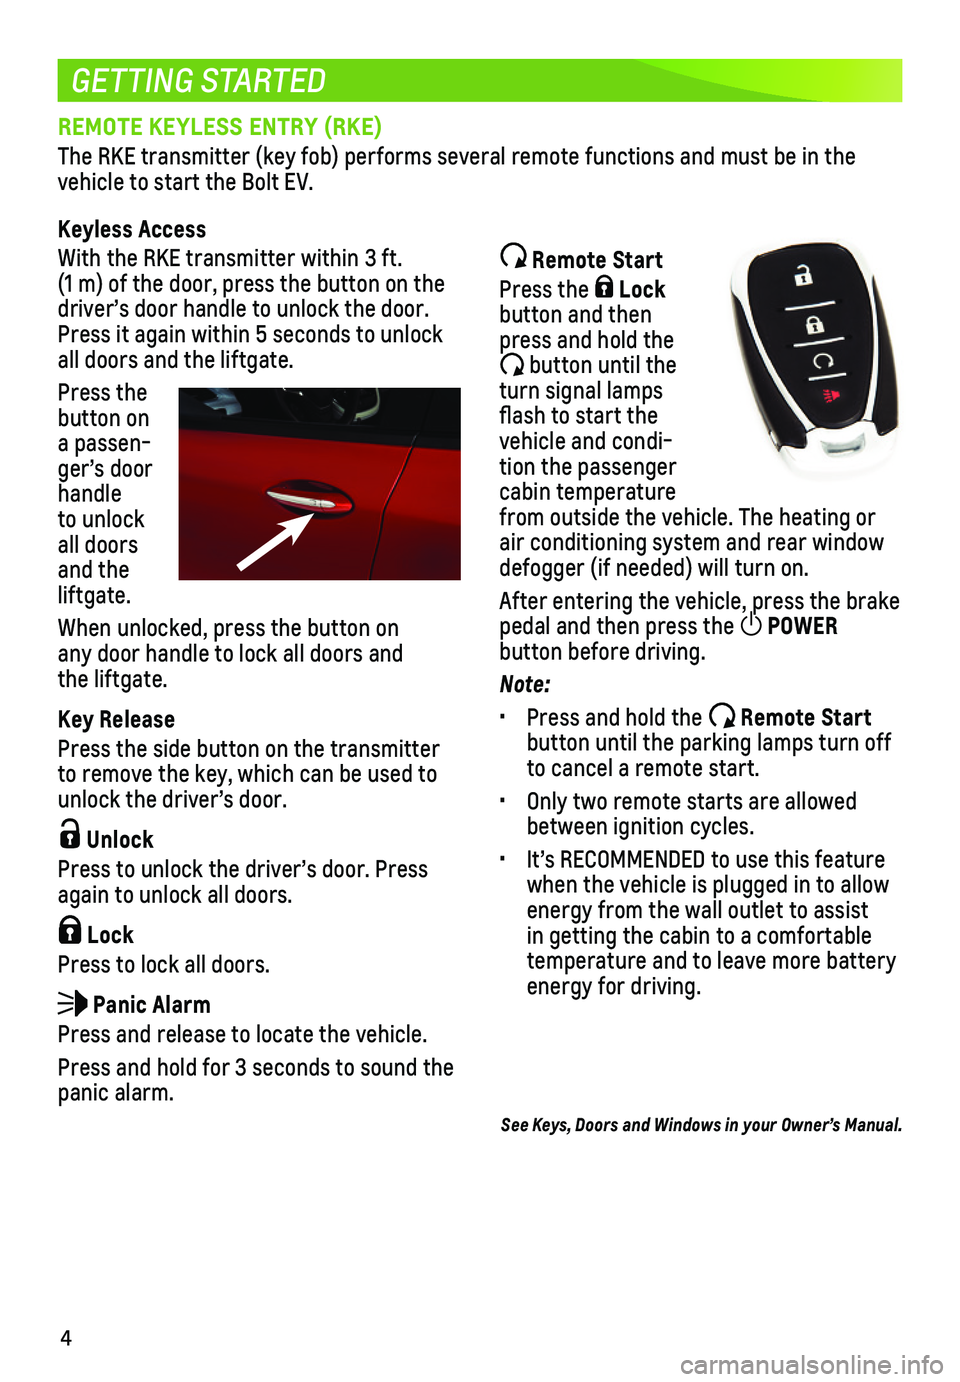
The RKE transmitter (key fob) performs several remote functions and mu\
st be in the vehicle to start the Bolt EV.
Keyless Access
With the RKE transmitter within 3 ft. (1 m) of the door, press the button on the driver’s door handle to unlock the door. Press it again within 5 seconds to unlock all doors and the liftgate.
Press the button on a passen-ger’s door handle to unlock all doors and the liftgate.
When unlocked, press the button on any door handle to lock all doors and the liftgate.
Key Release
Press the side button on the transmitter to remove the key, which can be used to unlock the driver’s door.
Unlock
Press to unlock the driver’s door. Press again to unlock all doors.
Lock
Press to lock all doors.
Panic Alarm
Press and release to locate the vehicle.
Press and hold for 3 seconds to sound the panic alarm.
Remote Start
Press the Lock button and then press and hold the
button until the turn signal lamps flash to start the vehicle and condi-tion the passenger cabin temperature from outside the vehicle. The heating or air conditioning system and rear window defogger (if needed) will turn on.
After entering the vehicle, press the brake pedal and then press the POWER
button before driving.
Note:
• Press and hold the Remote Start button until the parking lamps turn off to cancel a remote start.
• Only two remote starts are allowed between ignition cycles.
• It’s RECOMMENDED to use this feature when the vehicle is plugged in to allow energy from the wall outlet to assist in getting the cabin to a comfortable temperature and to leave more battery energy for driving.
See Keys, Doors and Windows in your Owner’s Manual.
Page 9 of 16
9
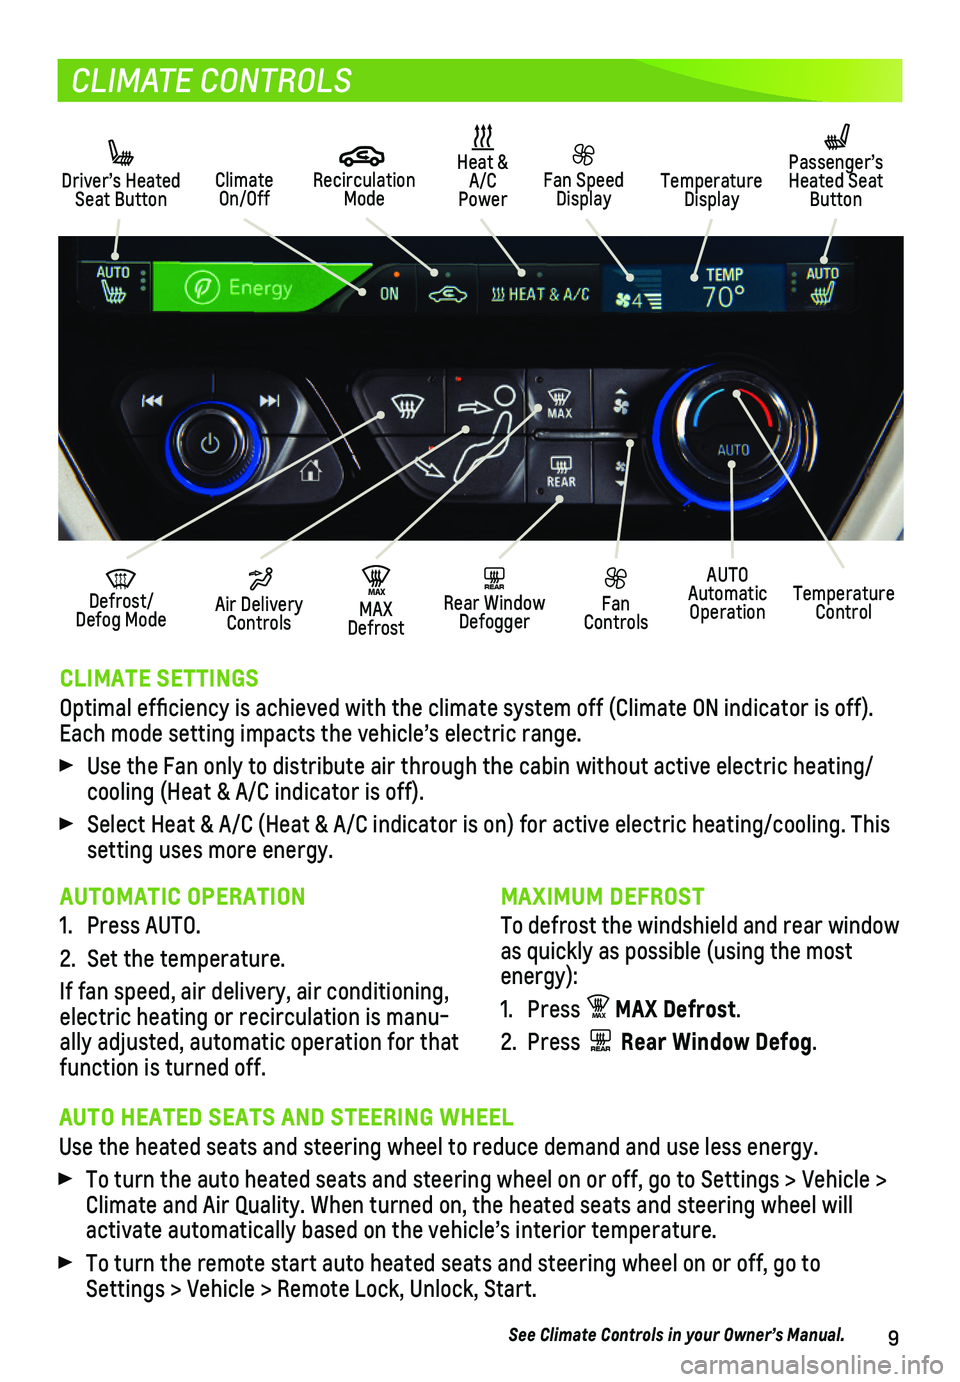
CLIMATE CONTROLS
CLIMATE SETTINGS
Optimal efficiency is achieved with the climate system off (Climate O\
N indicator is off). Each mode setting impacts the vehicle’s electric range.
Use the Fan only to distribute air through the cabin without active elec\
tric heating/cooling (Heat & A/C indicator is off).
Select Heat & A/C (Heat & A/C indicator is on) for active electric hea\
ting/cooling. This setting uses more energy.
Driver’s Heated Seat ButtonClimate On/Off
MAX Defrost
MA X
Heat & A/C Power
Defrost/Defog Mode
Fan Speed DisplayTemperature Display
Recirculation Mode
Passenger’s Heated Seat Button
REAR Rear Window Defogger
Air Delivery Controls
Fan Controls
AUTO Automatic OperationTemperature Control
MAXIMUM DEFROST
To defrost the windshield and rear window as quickly as possible (using the most energy):
1. Press MAX MAX Defrost.
2. Press REAR Rear Window Defog.
AUTOMATIC OPERATION
1. Press AUTO.
2. Set the temperature.
If fan speed, air delivery, air conditioning, electric heating or recirculation is manu-ally adjusted, automatic operation for that function is turned off.
AUTO HEATED SEATS AND STEERING WHEEL
Use the heated seats and steering wheel to reduce demand and use less en\
ergy.
To turn the auto heated seats and steering wheel on or off, go to Settin\
gs > Vehicle > Climate and Air Quality. When turned on, the heated seats and steering w\
heel will
activate automatically based on the vehicle’s interior temperature.
To turn the remote start auto heated seats and steering wheel on or off,\
go to Settings > Vehicle > Remote Lock, Unlock, Start.
See Climate Controls in your Owner’s Manual.
Page 13 of 16
13
CHARGING
START CHARGING
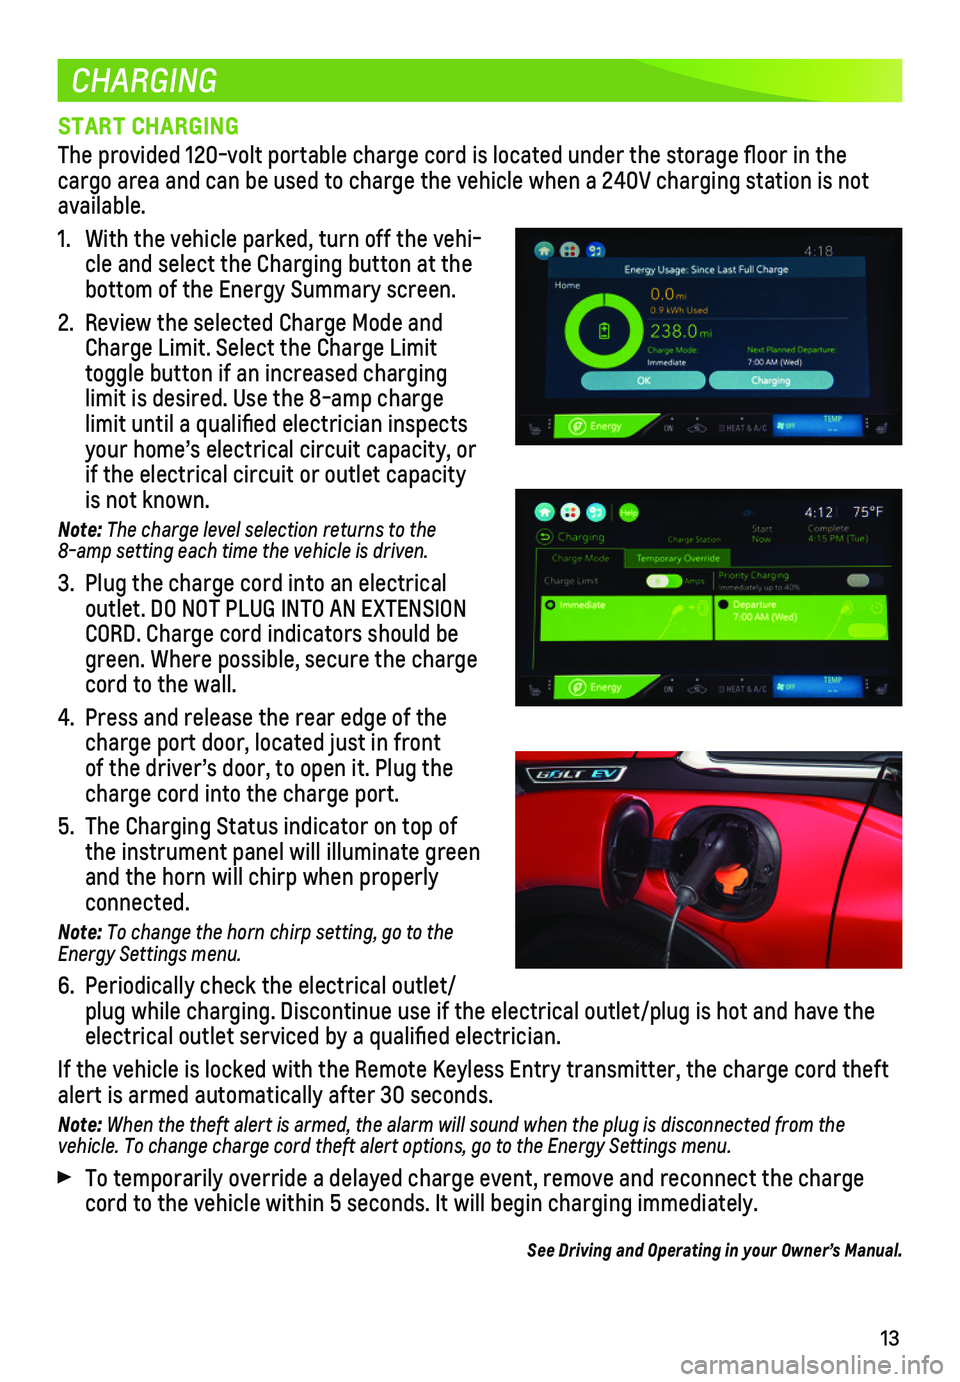
The provided 120-volt portable charge cord is located under the storage \
floor in the cargo area and can be used to charge the vehicle when a 240V charging st\
ation is not available.
1. With the vehicle parked, turn off the vehi-cle and select the Charging button at the
bottom of the Energy Summary screen.
2. Review the selected Charge Mode and Charge Limit. Select the Charge Limit
toggle button if an increased charging limit is desired. Use the 8-amp charge limit until a qualified electrician inspects your home’s electrical circuit capacity, or if the electrical circuit or outlet capacity is not known.
Note: The charge level selection returns to the 8-amp setting each time the vehicle is driven.
3. Plug the charge cord into an electrical
outlet. DO NOT PLUG INTO AN EXTENSION CORD. Charge cord indicators should be green. Where possible, secure the charge cord to the wall.
4. Press and release the rear edge of the charge port door, located just in front of the driver’s door, to open it. Plug the charge cord into the charge port.
5. The Charging Status indicator on top of the instrument panel will illuminate green and the horn will chirp when properly connected.
Note: To change the horn chirp setting, go to the Energy Settings menu.
6. Periodically check the electrical outlet/plug while charging. Discontinue use if the electrical outlet/plug is hot and have the electrical outlet serviced by a qualified electrician.
If the vehicle is locked with the Remote Keyless Entry transmitter, the \
charge cord theft alert is armed automatically after 30 seconds.
Note: When the theft alert is armed, the alarm will sound when the plug is disconnected from the vehicle. To change charge cord theft alert options, go to the Energy Settings menu.
To temporarily override a delayed charge event, remove and reconnect the\
charge cord to the vehicle within 5 seconds. It will begin charging immediately\
.
See Driving and Operating in your Owner’s Manual.
Page 15 of 16
15
DC CHARGING (IF EQUIPPED)
DC charging stations are typically found in public locations.
CHARGING TIME
Using a DC charging station with at least 80 kW of available power, it w\
ill take approxi-mately 30 minutes to recharge a depleted battery to an estimated 90 mile\
s of EV range. Charge times will vary with outside temperature. Charging will continue \
to 100%, but at a slower rate. At 100% state of charge, the vehicle may continue to draw p\
ower to condition the battery if needed. Once battery conditioning is complete, the vehicl\
e will stop the charging session.
START DC CHARGING
1. With the vehicle parked and turned off, push and release the rear edge o\
f the charge port door, located just in front of the driver’s door, to open the do\
or.
2. Unlatch and lower the DC charging dust cover on the charge port.
3. Plug the charge cord into the vehicle’s charge port.
4. Follow the steps on the charging station to start charging. The electric\
parking brake will automatically apply and the DC plug will be locked and cannot be di\
sconnected while charging is active.
5. The Charging Status Indicator on top of the instrument panel will illumi\
nate green and the horn will chirp when properly connected.
Note: To change the horn chirp setting, go to the Energy Settings menu.
If the vehicle is locked with the Remote Keyless Entry (RKE) transmitt\
er, the charge cord theft alert is armed automatically after 30 seconds.
END DC CHARGING
1. Unlock the vehicle with the RKE transmitter to disarm the charge cord th\
eft alert.
2. When the vehicle is fully charged, it will stop charging and the plug wi\
ll be unlocked. To stop charging at any time, use the controls on the charging station o\
r touch the Stop button on the Battery Information screen on the vehicle touchscreen\
.
3. When the Charging Status Indicator is solid green or off, unplug the cha\
rge cord from the vehicle.
4. Close the DC charging dust cover and close the charge port door.
5. Disengage the electric parking brake before driving the vehicle.
See Driving and Operating in your Owner’s Manual.
Page 16 of 16
16
ROADSIDE ASSISTANCE
MYCHEVROLET MOBILE APP
CHEVROLET OWNER CENTER
1-888-811-1926 \
TTY Users: 1-888-889-2438
As the owner of a new Chevrolet, you are automatically enrolled in the C\
hevrolet Roadside Assistance program for 5 years/60,000 miles, whichever occurs fi\
rst, at no expense to you. Chevrolet’s Roadside Assistance toll-free number is s\
taffed by a team of trained advisors who are available 24 hours a day, 365 days a year, to c\
ontact a service provider for light services (jump-starts, flat tire and lock-outs) or make arrangements\
to tow your vehicle to the nearest Bolt EV Authorized Chevrolet dealer.
Roadside Assistance and OnStar®
If you require roadside service and have a current OnStar service plan, \
press the OnStar
button and the vehicle will send your current GPS location to an OnStar \
Advisor who will speak to you, assess your problem, contact Roadside Assistance and relay\
your exact
location so you will get the help you need.
To learn more about OnStar services, press the blue OnStar button, visit onstar.com, call 1-888-4-ONSTAR (1-888-466-7827), or refer to your Owner’s Manual.
!84094038=A!
Certain restrictions, precautions and safety procedures apply to your ve\
hicle. Please read your Owner’s Manual for complete instructions. All information contained in this guide is ba\
sed on the latest information available at the time of printing and is subject to change without notice. Copyright \
2017 General Motors. All rights reserved.
We recommend always using ACDelco or genuine GM service parts.
The myChevrolet mobile app connects owners with a compatible mobile devi\
ce to a
variety of vehicle information and services, such as a searchable Owner’\
s Manual, OnStar Vehicle Diagnostic information and Roadside Assistance.
The myChevrolet mobile app also enables users to search for charging sta\
tions, send remote commands, check the current battery charge level and initiate cha\
rging of your Bolt EV.
Download the mobile app from your compatible mobile device’s app stor\
e.
Get to know your vehicle inside and out with the Chevrolet Owner Center.\
Check out
personalized information, including an online Owner’s Manual and help\
ful how-to videos, track your service history and warranty status, review your current OnSt\
ar Vehicle Diagnostics report (active OnStar account required) and more. Create a\
n account today at my.chevrolet.com.
84094038 A