stop start CHEVROLET CAMARO 1967 1.G Chassis Owner's Manual
[x] Cancel search | Manufacturer: CHEVROLET, Model Year: 1967, Model line: CAMARO, Model: CHEVROLET CAMARO 1967 1.GPages: 659, PDF Size: 114.24 MB
Page 570 of 659

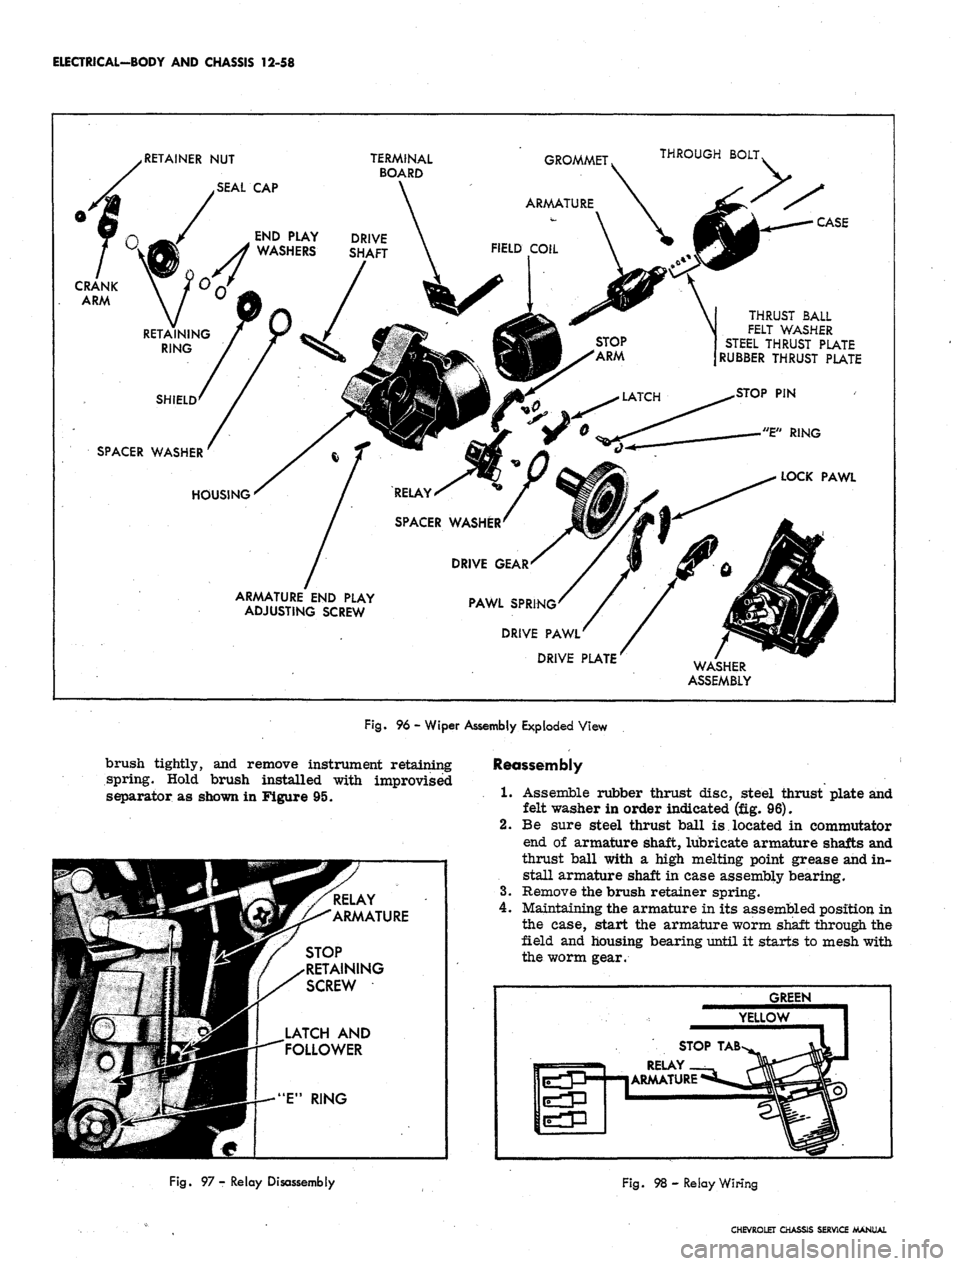
ELECTRICAL-BODY AND CHASSIS 12-58
RETAINER NUT
.SEAL CAP
THROUGH
BOLT,
CASE
CRANK
ARM
THRUST
BALL
FELT
WASHER
STEEL THRUST PLATE
RUBBER THRUST PLATE
SPACER WASHER
HOUSING
ARMATURE END PLAY
ADJUSTING SCREW
PAWL SPRING'
DRIVE
PAWL'
DRIVE PLATE
WASHER
ASSEMBLY
Fig.
96 - Wiper Assembly Exploded View
brush tightly, and remove instrument retaining
spring. Hold brush installed with improvised
separator as shown in Figure 95.
STOP
RETAINING
SCREW
LATCH AND
FOLLOWER
Reassembly
1.
Assemble rubber thrust disc, steel thrust plate and
felt washer in order indicated (fig. 96).
2.
Be sure steel thrust ball is located in commutator
end of armature shaft, lubricate armature shafts and
thrust ball with a high melting point grease and in-
stall armature shaft in case assembly bearing.
3.
Remove the brush retainer spring.
4.
Maintaining the armature in its assembled position in
the case, start the armature worm shaft through the
field and housing bearing until it starts to mesh with
the worm gear.
GREEN
YELLOW
STOP
TAB
RELAY
ARMATURE
Fig.
97 - Relay Disassembly
Fig. 98 - Relay Wiring
CHEVROLET CHASSIS SERVICE MANUAL
Page 618 of 659

ACCESSORIES 15-9
Adjustment- Adjust the bead chain so that it is as tight
as possible without holding the throttle open when the
carburetor is set at its lowest idle throttle position.
When connecting the bead chain (engine stopped) manually
set the fast idle cam at its lowest step and connect the
chain so that it does not hold the idle screw off the cam.
If the chain needs to be cut, cut it three beads beyond the
bead which pulls the linkage.
REGULATOR
Service - A defective regulator, that is one which is not
simply out of adjustment, must be replaced. During re-
placement, check the hoses which connect to the regulator
and replace any which are cracked or deteriorated.
Air Filter
The air filter located in the solenoid cover should be
cleaned and re-oiled at engine oil change intervals.
1.
Snap the solenoid cover off.
2.
Remove the filter and wash it in kerosene or mineral
spirits. Squeeze it dry and wet with SAE 10 engine
oil.
Squeeze out excess oil and reinstall into the
cover.
3.
Attach the cover with neoprene seal to the solenoid
housing. Be certain that the cover fits tightly to the
housing.
One regulator adjustment is possible: Engagement-
Cruising Speed Zeroing (to remove any difference be-
tween engagement and cruising speed).
NOTE:
No regulator adjustment should be
made, however, until the following items have
been checked or serviced:
1.
Bead chain properly adjusted.
2.
All hoses in good condition, properly attached, not
leaking, not pinched or kinked.
3.
Regulator air filter clean and properly oiled.
4.
Electric and vacuum release switches properly
adjusted.
Engagement—Cruising Speed Zeroing
If the cruising speed is lower than the engagement
speed, loosen the orifice tube locknut and turn the tube
outward; if higher, turn the tube inward. Each 1/8 turn
will alter the engagement-cruising speed difference one
mph. Tighten the locknut after adjustment and check the
system operation at 50 mph.
ELECTRICAL SYSTEM CHECK OUT
1.
Check fuse and connector.
2.
Check electric brake switch as follows: Unplug con-
nector at brake switch. Connect ohmmeter at points
A and B on brake switch. The ohmmeter must indi-
cate infinity when the brake pedal is depressed and
continuity when pedal is released. The cruise re-
lease brake switch (electric) is adjusted as is the
standard stop light brake switch. Replace electric
brake switch if needed.
3.
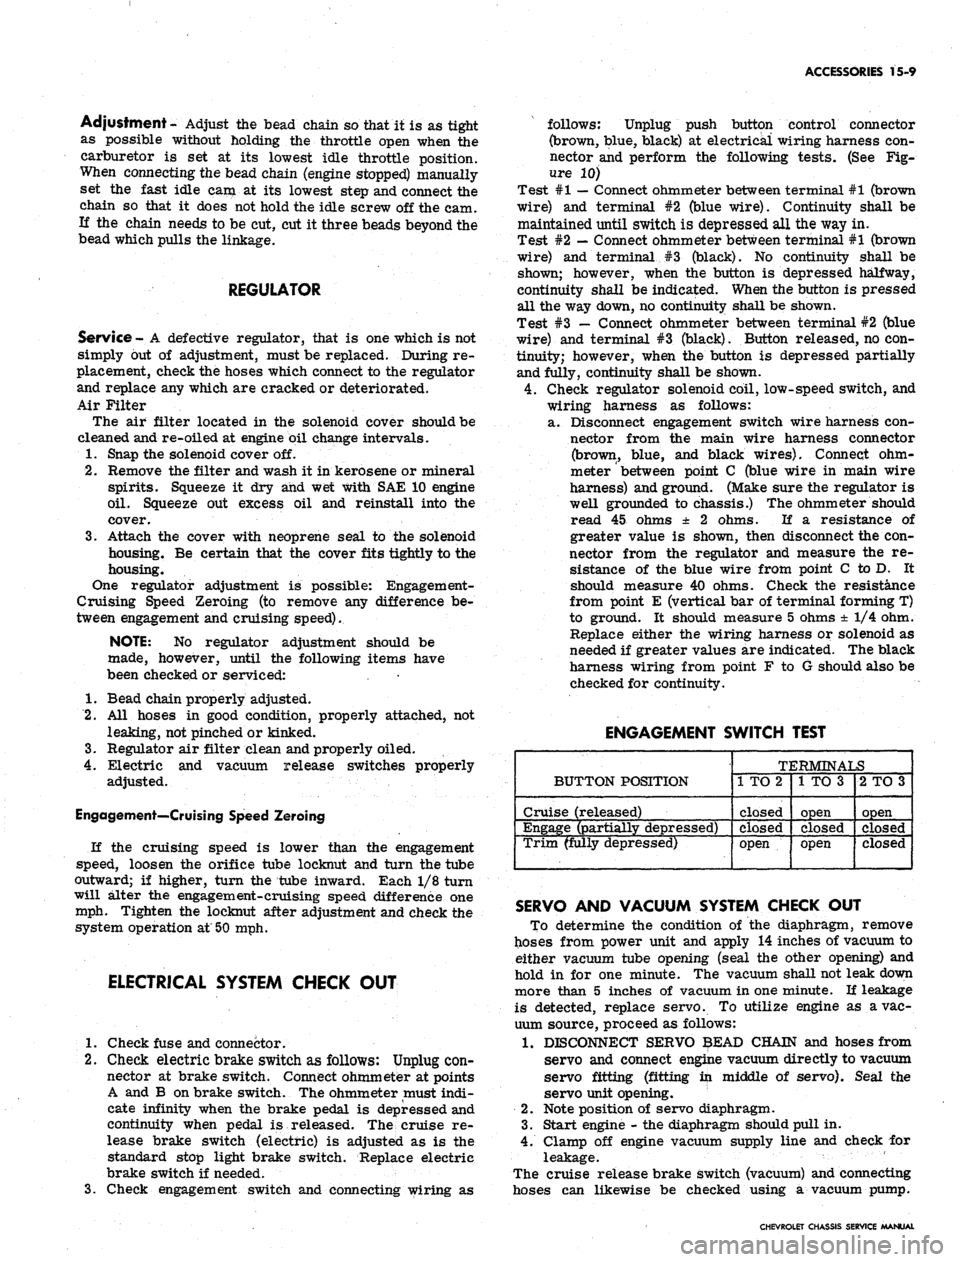
Check engagement switch and connecting wiring as
follows: Unplug push button control connector
(brown, blue, black) at electrical wiring harness con-
nector and perform the following tests. (See Fig-
ure 10)
Test #1
—
Connect ohmmeter between terminal #1 (brown
wire) and terminal #2 (blue wire). Continuity shall be
maintained until switch is depressed all the way in.
Test #2
—
Connect ohmmeter between terminal #1 (brown
wire) and terminal #3 (black). No continuity shall be
shown; however, when the button is depressed halfway,
continuity shall be indicated. When the button is pressed
all the way down, no continuity shall be shown.
Test #3 — Connect ohmmeter between terminal #2 (blue
wire) and terminal #3 (black). Button released, no con-
tinuity; however, when the button is depressed partially
and fully, continuity shall be shown.
4.
Check regulator solenoid coil, low-speed switch, and
wiring harness as follows:
a. Disconnect engagement switch wire harness con-
nector from the main wire harness connector
(brown, blue, and black wires). Connect ohm-
meter
'
between point C (blue wire in main wire
harness) and ground. (Make sure the regulator is
well grounded to chassis.) The ohmmeter should
read 45 ohms ± 2 ohms. If a resistance of
greater value is shown, then disconnect the con-
nector from the regulator and measure the re-
sistance of the blue wire from point C to D. It
should measure 40 ohms. Check the resistance
from point E (vertical bar of terminal forming T)
to ground. It should measure 5 ohms ± 1/4 ohm.
Replace either the wiring harness or solenoid as
needed if greater values are indicated. The black
harness wiring from point F to G should also be
checked for continuity.
ENGAGEMENT SWITCH TEST
BUTTON POSITION
Cruise (released)
Engage (partially depressed)
Trim (fully depressed)
TERMINALS
1 TO 2
closed
Closed
open
1 TO 3
open
closed
open
2 TO 3
open
closed
closed
SERVO AND VACUUM SYSTEM CHECK OUT
To determine the condition of the diaphragm, remove
hoses from power unit and apply 14 inches of vacuum to
either vacuum tube opening (seal the other opening) and
hold in for one minute. The vacuum shall not leak down
more than 5 inches of vacuum in one minute. If leakage
is detected, replace servo. To utilize engine as a vac-
uum source, proceed as follows:
1.
DISCONNECT SERVO $EAD CHAIN and hoses from
servo and connect engine vacuum directly to vacuum
servo fitting (fitting in middle of servo). Seal the
servo unit opening.
2.
Note position of servo diaphragm.
3.
Start engine - the diaphragm should pull in.
4.
Clamp off engine vacuum supply line and check for
leakage. '
The cruise release brake switch (vacuum) and connecting
hoses can likewise be checked using a vacuum pump.
CHEVROLET CHASSIS SERVICE MANUAL
Page 623 of 659

ACCESSORIES 15-14
Deflate system through service valve and disconnect
line at pressure regulator valve. Install test gauge on
regulator valve high pressure fitting.
Inflate system through service valve to maximum
available pressure.
NOTE: If available pressure is less than 140
psi,
start engine to build-up reservoir to this
pressure.
Regulated pressure should build-up to and hold
steady at 100-130 psi on test gauge.
Check regulated pressure by momentarily (not more
than one second) depressing valve core on test gauge
arid observe gauge reading.
If regulated pressure now reads less than 100 psi,
replace regulator assembly.
If regulated pressure exceeds 130 psi, replace regu-
lator assembly.
Control Valve Test
Exhaust (Superlifts Inflated)
1.
Disconnect control valve lever from link.
2.
Hold lever down in exhaust position until Superlifts
deflate or for a minimum of 18 seconds.
3.
If Superlifts deflate, perform Intake Check.
4.
If Superlifts do not deflate, remove exhaust adapter
from control valve and hold lever down as in Step 2.
Replace adapter, O-ring and filter if this deflates
Superlifts.
5.
Replace control valve if none of the above steps solve
problem.
Intake (Reservoir Pressure 125 psi Minimum)
1.
Disconnect overtravel lever from link.
2.
Hold lever up in intake position until Superlifts in-
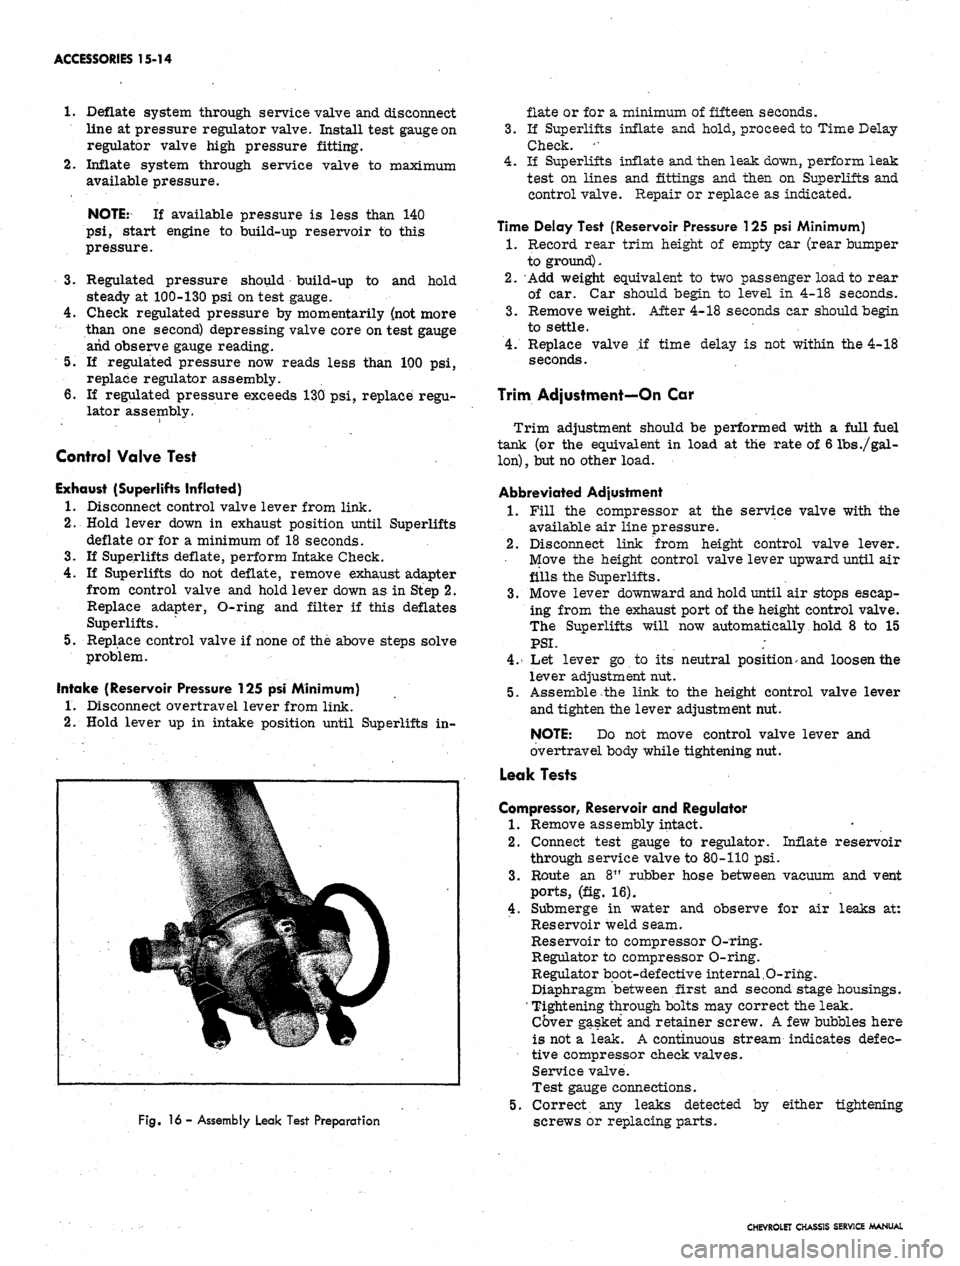
Fig.
16 - Assembly Leak Test Preparation
flate or for a minimum of fifteen seconds.
3.
If Superlifts inflate and hold, proceed to Time Delay
Check. '•
4.
If Superlifts inflate and then leak down, perform leak
test on lines and fittings and then on Superlifts and
control valve. Repair or replace as indicated.
Time Delay Test (Reservoir Pressure 125 psi Minimum)
1.
Record rear trim height of empty car (rear bumper
to ground).
2.
Add weight equivalent to two passenger load to rear
of car. Car should begin to level in 4-18 seconds.
3.
Remove weight. After 4-18 seconds car should begin
to settle.
4.
Replace valve if time delay is not within the 4-18
seconds.
Trim Adjustment—On Car
Trim adjustment should be performed with a full fuel
tank (or the equivalent in load at the rate of 6 lbs
./gal-
lon)
,
but no other load.
Abbreviated Adjustment
1.
Fill the compressor at the service valve with the
available air line pressure.
2.
Disconnect link from height control valve lever.
Move the height control valve lever upward until air
fills the Superlifts.
3.
Move lever downward and hold until air stops escap-
ing from the exhaust port of the height control valve.
The Superlifts will now automatically hold 8 to 15
PSI.
;
4.
Let lever go to its neutral position> and loosen the
lever adjustment nut.
5.
Assemble the link to the height control valve lever
and tighten the lever adjustment nut.
NOTE: Do not move control valve lever and
overtravel body while tightening nut.
Leak Tests
Compressor, Reservoir and Regulator
1.
Remove assembly intact.
2.
Connect test gauge to regulator. Inflate reservoir
through service valve to 80-110 psi.
3.
Route an 8" rubber hose between vacuum and vent
ports,
(fig. 16).
4.
Submerge in water and observe for air leaks at:
Reservoir weld seam.
Reservoir to compressor O-ring.
Regulator to compressor O-ring.
Regulator boot-defective internal.O-rihg.
Diaphragm between first and second stage housings.
' Tightening through bolts may correct the leak.
Cover gasket and retainer screw. A few bubbles here
is not a leak. A continuous stream indicates defec-
tive compressor check valves.
Service valve.
Test gauge connections.
5.
Correct any leaks detected by either tightening
screws or replacing parts.
CHEVROLET CHASSIS SERVICE MANUAL