jack points CHEVROLET CAMARO 1967 1.G Chassis Workshop Manual
[x] Cancel search | Manufacturer: CHEVROLET, Model Year: 1967, Model line: CAMARO, Model: CHEVROLET CAMARO 1967 1.GPages: 659, PDF Size: 114.24 MB
Page 10 of 659
GENERAL INFORMATION 0-8
nun
Illllfl Q
i,,,,,,,,
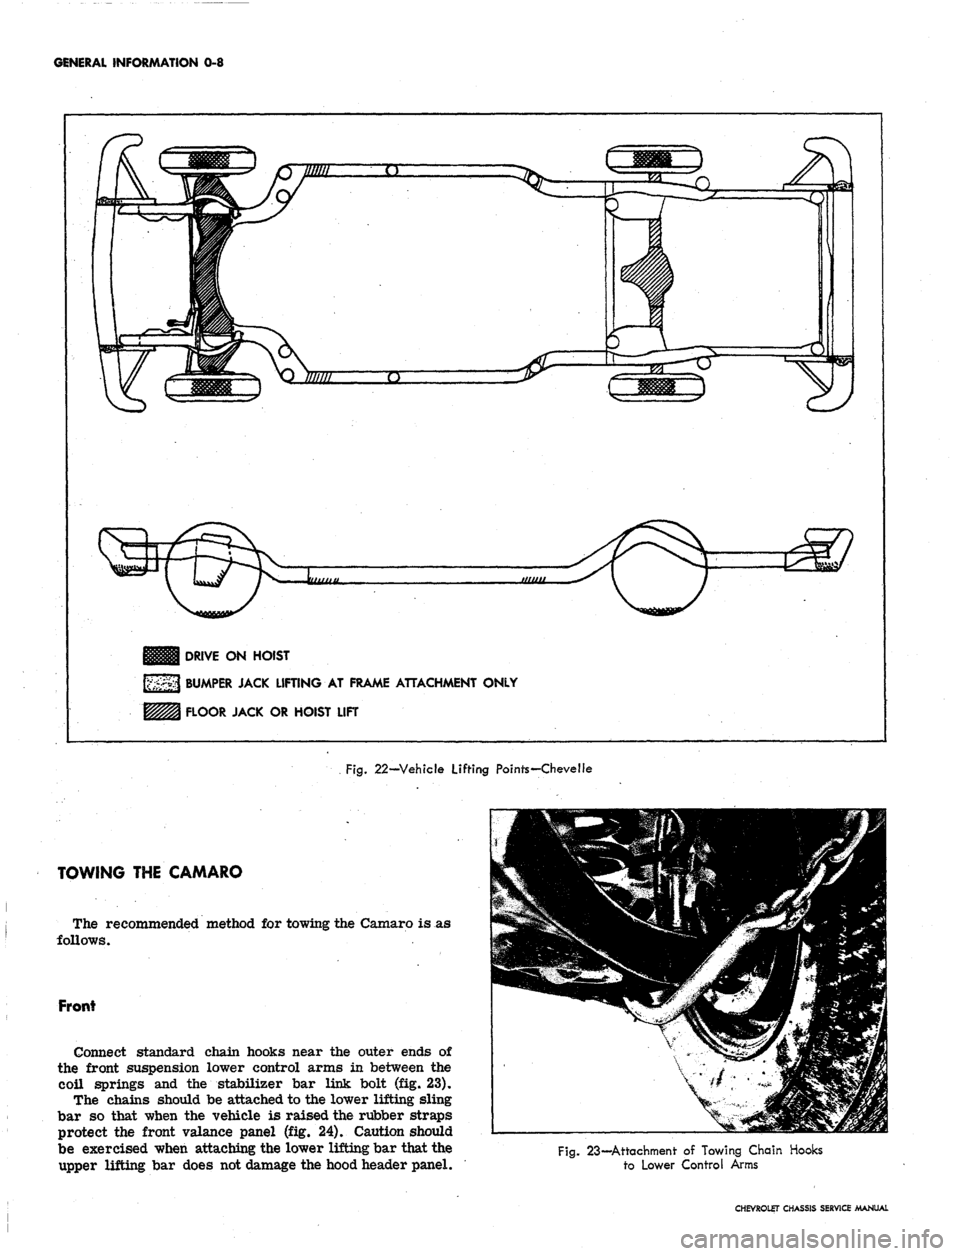
DRIVE ON HOIST
BUMPER JACK LIFTING AT FRAME ATTACHMENT ONLY
FLOOR JACK OR HOIST LIFT
Fig.
22—Vehicle Lifting Points—Chevelle
TOWING THE CAMARO
The recommended method for towing the Camaro is
follows.
Front
Connect standard chain hooks near the outer ends of
the front suspension lower control arms in between the
coil springs and the stabilizer bar link bolt (fig. 23).
The chains should be attached to the lower lifting sling
bar so that when the vehicle is raised the rubber straps
protect the front valance panel (fig. 24). Caution should
be exercised when attaching the lower lifting bar that the
upper lifting bar does not damage the hood header panel.
Fig. 23—Attachment of Towing Chain Hooks
to Lower Control Arms
CHEVROLET CHASSIS SERVICE MANUAL
Page 12 of 659
GENERAL INFORMATION 0-10
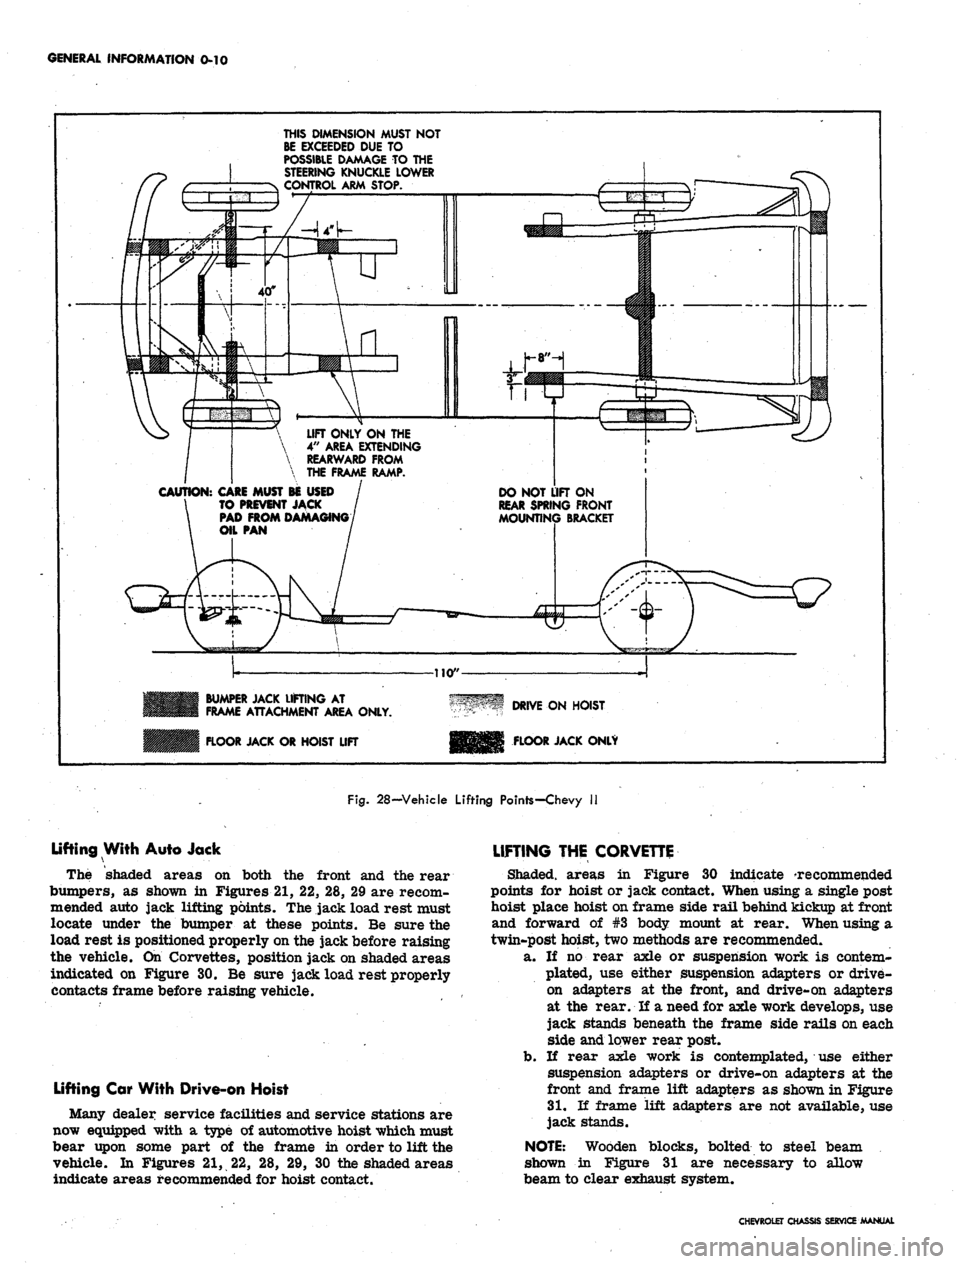
THIS DIMENSION MUST NOT
BE EXCEEDED DUE TO
POSSIBLE DAMAGE TO THE
STEERING KNUCKLE LOWER
CONTROL ARM STOP.
LIFT ONLY ON THE
4"
AREA EXTENDING
REARWARD FROM
THE FRAME RAMP.
CAUTION:
CARE MUST BE USED
TO PREVENT JACK
PAD FROM DAMAGING
DO NOT LIFT ON
REAR SPRING FRONT
MOUNTING BRACKET
BUMPER JACK LIFTING AT
FRAME ATTACHMENT AREA ONLY.
FLOOR JACK OR HOIST LIFT
DRIVE ON HOIST
FLOOR JACK ONLY
Fig.
28-Vehicle Lifting Points-Chevy II
Lifting With Auto Jack
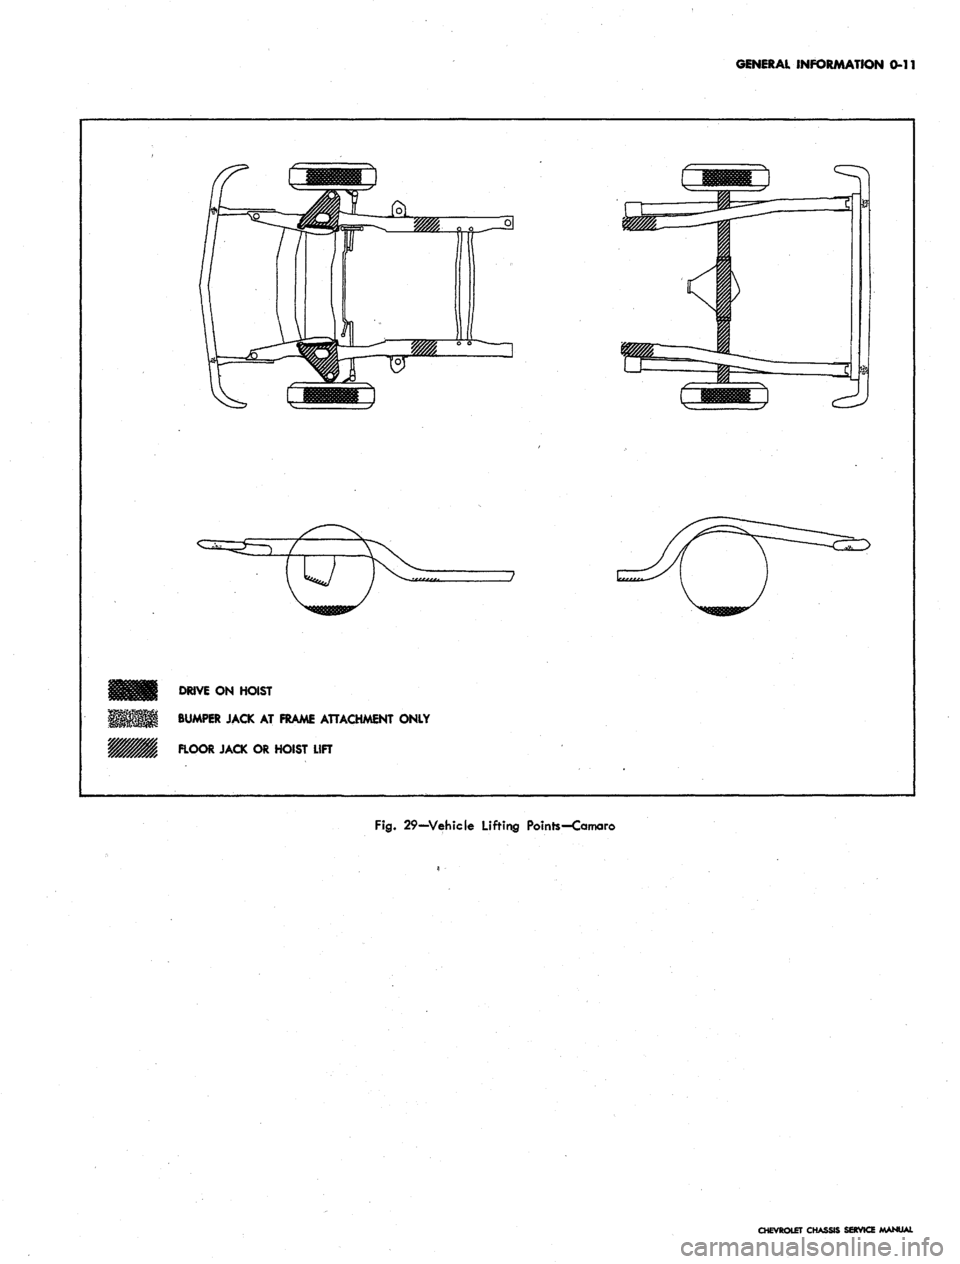
The shaded areas on both the front and the rear
bumpers, as shown in Figures 21, 22, 28, 29 are recom-
mended auto jack lifting points. The jack load rest must
locate under the bumper at these points. Be sure the
load rest is positioned properly on the jack before raising
the vehicle. On Corvettes, position jack on shaded areas
indicated on Figure 30. Be sure jack load rest properly
contacts frame before raising vehicle.
Lifting Car With Drive-on Hoist
Many dealer service facilities and service stations are
now equipped with a type of automotive hoist which must
bear upon some part of the frame in order to lift the
vehicle. In Figures 21, 22, 28, 29, 30 the shaded areas
indicate areas recommended for hoist contact.
LIFTING THE CORVETTE
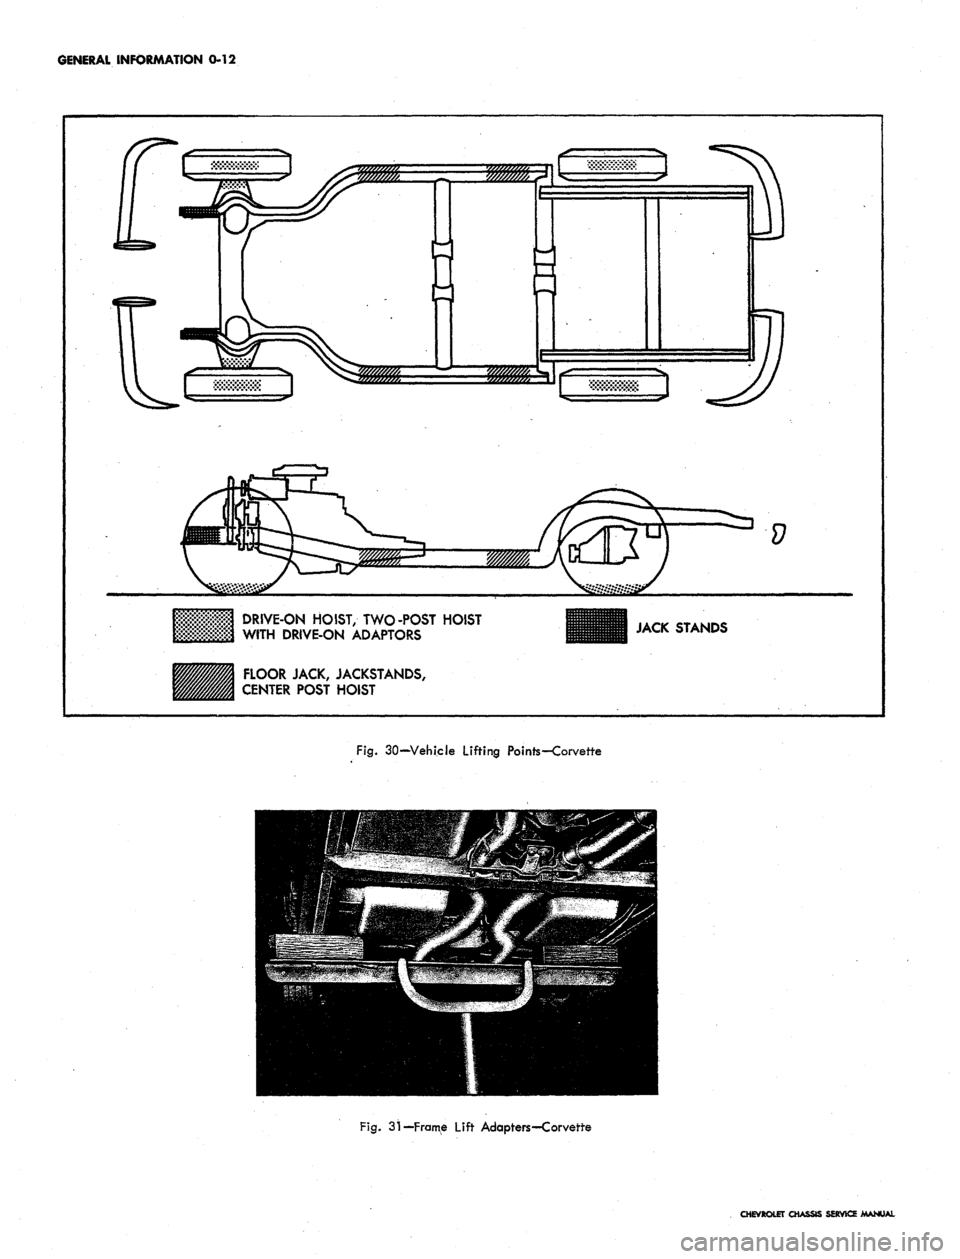
Shaded, areas in Figure 30 indicate 'recommended
points for hoist or jack contact. When using a single post
hoist place hoist on frame side rail behind kickup at front
and forward of #3 body mount at rear. When using a
twin-post hoist, two methods are recommended.
a. If no rear axle or suspension work is contem-
plated, use either suspension adapters or drive-
on adapters at the front, and drive-on adapters
at the rear. If a need for axle work develops, use
jack stands beneath the frame side rails on each
side and lower rear post.
b.
If rear axle work is contemplated, use either
suspension adapters or drive-on adapters at the
front and frame lift adapters as shown in Figure
31.
If frame lift adapters are not available, use
jack stands.
NOTE:
Wooden blocks, bolted to steel beam
shown in Figure 31 are necessary to allow
beam to clear exhaust system.
CHEVROLET CHASSIS SERVICE MANUAL
Page 13 of 659
GENERAL INFORMATION 0-11
DRIVE
ON
HOIST
BUMPER JACK
AT
FRAME ATTACHMENT ONLY
FLOOR JACK
OR
HOIST LIFT
Fig.
29-Vehicle Lifting Points-Camaro
CHEVROLET CHASSIS SERVICE MANUAL
Page 14 of 659
GENERAL INFORMATION 0-12
2232.
j
Lj
V
DRIVE-ON HOIST, TWO-POST HOIST
WITH DRIVE-ON ADAPTORS
FLOOR JACK, JACKSTANDS,
CENTER POST HOIST
JACK STANDS
Fig.
30—Vehicle Lifting Points—Corvette
Fig.
31-Frame Lift Adapters-Corvette
CHEVROLET CHASSIS SERVICE MANUAL
Page 222 of 659
REAR SUSPENSION AND DRIVE LINE 4-32
HP?
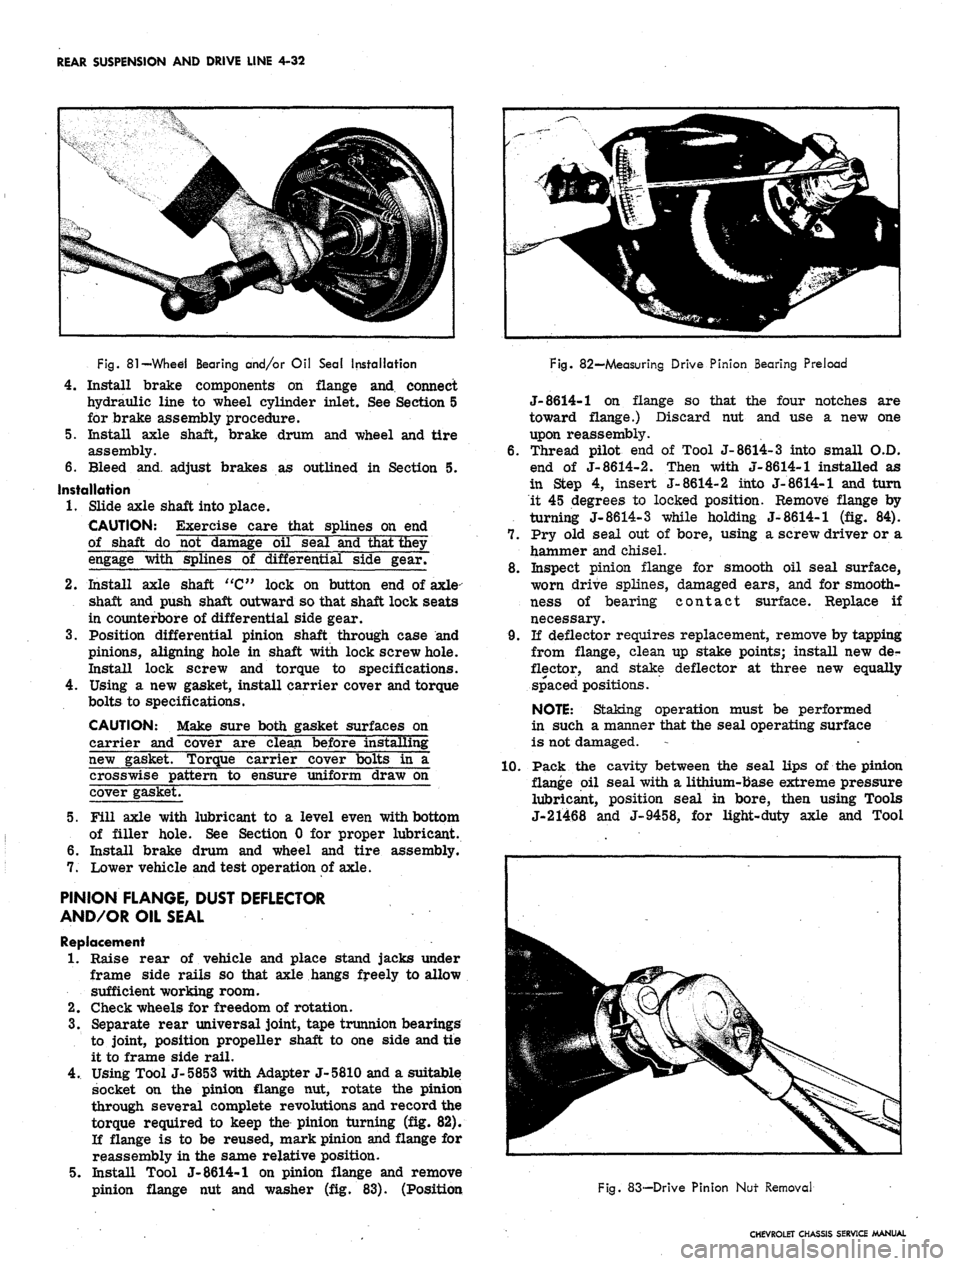
Fig.
81
—Whed Bearing and/or Oil Seal Installation
4.
Install brake components on flange and connect
hydraulic line to wheel cylinder inlet. See Section 5
for brake assembly procedure.
5. Install axle shaft, brake drum and wheel and tire
assembly.
6. Bleed and. adjust brakes as outlined in Section 5.
Installation
1.
Slide axle shaft into place.
CAUTION: Exercise care that splines on end
of shaft do not damage oil seal and that they
engage with splines of differential side gear/
2.
Install axle shaft "C" lock on button end of axle-
shaft and push shaft outward so that shaft lock seats
in counterbore of differential side gear.
3.
Position differential pinion shaft through case and
pinions, aligning hole in shaft with lock screw hole.
Install lock screw and torque to specifications.
4.
Using a new gasket, install carrier cover and torque
bolts to specifications.
CAUTION: Make sure both gasket surfaces on
carrier and cover are clean before installing
new gasket. Torque carrier cover bolts in a
crosswise pattern to ensure uniform draw on
cover gasket.
5. Fill axle with lubricant to a level even with bottom
of filler hole. See Section 0 for proper lubricant.
6. Install brake drum and wheel and tire assembly.
7. Lower vehicle and test operation of axle.
PINION FLANGE, DUST DEFLECTOR
AND/OR OIL SEAL
Replacement
1.
Raise rear of vehicle and place stand jacks under
frame side rails so that axle hangs freely to allow
sufficient working room.
2.
Check wheels for freedom of rotation.
3.
Separate rear universal joint, tape trunnion bearings
to joint, position propeller shaft to one side and tie
it to frame side rail.
4.
Using Tool J-5853 with Adapter J-5810 and a suitable
socket on the pinion flange nut, rotate the pinion
through several complete revolutions and record the
torque required to keep the pinion turning (fig. 82).
If flange is to be reused, mark pinion and flange for
reassembly in the same relative position.
5. Install Tool J-8614-1 on pinion flange and remove
pinion flange nut and washer (fig. 83). (Position
Fig. 82—Measuring Drive Pinion Bearing Preload
J-8614-1 on flange so that the four notches are
toward flange.) Discard nut and use a new one
upon reassembly.
6. Thread pilot end of Tool J-8614-3 into small O.D.
end of J-8614-2. Then with J-8614-1 installed as
in Step 4, insert J-8614-2 into J-8614-1 and turn
it 45 degrees to locked position. Remove flange by
turning J-8614-3 while holding J-8614-1 (fig. 84).
7. Pry old seal out of bore, using a screw driver or a
hammer and chisel.
8. Inspect pinion flange for smooth oil seal surface,
worn drive splines, damaged ears, and for smooth-
ness of bearing contact surface. Replace if
necessary.
9. If deflector requires replacement, remove by tapping
from flange, clean up stake points; install new de-
flector, and stake deflector at three new equally
spaced positions.
NOTE:
Staking operation must be performed
in such a manner that the seal operating surface
is not damaged.
1.0. Pack the cavity between the seal lips of the pinion
flange oil seal with a lithium-base extreme pressure
lubricant, position seal in bore, then using Tools
J-21468 and J-9458, for light-duty axle and Tool
Fig. 83-—Drive Pinion Nut Removal
CHEVROLET CHASSIS SERVICE MANUAL
Page 370 of 659
CLUTCH AND TRANSMISSIONS 7-11
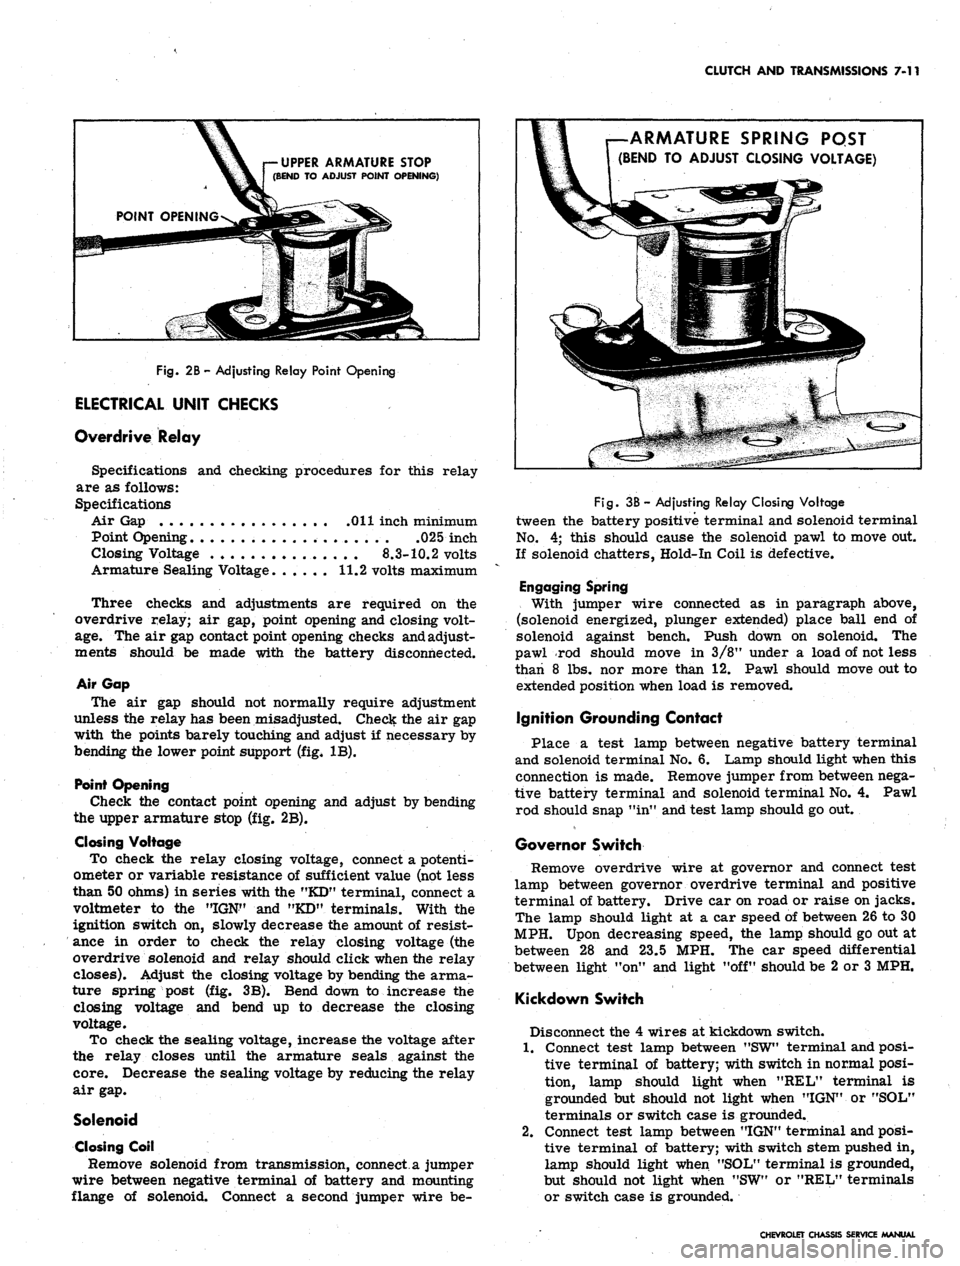
UPPER ARMATURE STOP
(BEND TO ADJUST POINT OPENING)
Fig.
2B-Adjusting Relay Point Opening
ELECTRICAL UNIT CHECKS
Overdrive Relay
Specifications and checking procedures for this relay
are as follows:
Specifications
Air Gap Oil inch minimum
Point Opening .025 inch
Closing Voltage
8.3-10.2
volts
Armature Sealing Voltage. ..... 11.2 volts maximum
Three checks and adjustments are required on the
overdrive relay; air gap, point opening and closing volt-
age.
The air gap contact point opening checks and adjust-
ments should be made with the battery disconnected.
Air Gap
The air gap should not normally require adjustment
unless the relay has been misadjusted. Check the air gap
with the points barely touching and adjust if necessary by
bending the lower point support (fig, IB).
Point Opening
Check the contact point opening and adjust by bending
the upper armature stop (fig. 2B).
Closing Voltage
To check the relay closing voltage, connect a potenti-
ometer or variable resistance of sufficient value (not less
than 50 ohms) in series with the "KD" terminal, connect a
voltmeter to the "IGN" and "KD" terminals. With the
ignition switch on, slowly decrease the amount of resist-
ance in order to check the relay closing voltage (the
overdrive solenoid and relay should click when the relay
closes). Adjust the closing voltage by bending the arma-
ture spring post (fig. 3B). Bend down to increase the
closing voltage and bend up to decrease the closing
voltage.
To check the sealing voltage, increase the voltage after
the relay closes until the armature seals against the
core.
Decrease the sealing voltage by reducing the relay
air gap.
Solenoid
Closing Coil
Remove solenoid from transmission, connect a jumper
wire between negative terminal of battery and mounting
flange of solenoid. Connect a second jumper wire be-
ARMATURE SPRING PQST
(BEND TO ADJUST CLOSING VOLTAGE)
Fig.
3B - Adjusting Relay Closing Voltage
tween the battery positive terminal and solenoid terminal
No.
4; this should cause the solenoid pawl to move out.
If solenoid chatters, Hold-In Coil is defective.
Engaging Spring
With jumper wire connected as in paragraph above,
(solenoid energized, plunger extended) place ball end of
solenoid against bench. Push down on solenoid. The
pawl rod should move in 3/8M under a load of not less
than 8 lbs. nor more than 12. Pawl should move out to
extended position when load is removed.
Ignition Grounding Contact
Place a test lamp between negative battery terminal
and solenoid terminal No. 6. Lamp should light when this
connection is made. Remove jumper from between nega-
tive battery terminal and solenoid terminal No. 4. Pawl
rod should snap "in" and test lamp should go out.
Governor Switch
Remove overdrive wire at governor and connect test
lamp between governor overdrive terminal and positive
terminal of battery. Drive car on road or raise on jacks.
The lamp should light at a car speed of between 26 to 30
MPH. Upon decreasing speed, the lamp should go out at
between 28 and 23.5 MPH. The car speed differential
between light "on" and light "off" should be 2 or 3 MPH.
Kickdown Switch
Disconnect the 4 wires at kickdown switch.
1.
Connect test lamp between "SW" terminal and posi-
tive terminal of battery; with switch in normal posi-
tion, lamp should light when "REL" terminal is
grounded but should not light when "IGN" or "SOL"
terminals or switch case is grounded.
2.
Connect test lamp between "IGN" terminal and posi-
tive terminal of battery; with switch stem pushed in,
lamp should light when "SOL" terminal is grounded,
but should not light when "SW" or "REL" terminals
or switch case is grounded.
CHEVROLET CHASSIS SERVICE MANUAL
Page 392 of 659
CLUTCH AND TRANSMISSIONS 7-33
from rolling. The pointer on the indicator quadrant
should line up properly with the range indicators in all
ranges.
OIL LEAKS
Before attempting to correct an oil leak, the actual
source of the leak must be determined. In many cases
the source of the leak can be deceiving due to "wind flow1 f
around the engine and transmission.
The suspected area should be wiped clean of all oil
before inspecting for the source of the leak. Red dye is
used in the transmission oil at the assembly plant and
will indicate if the oil leak is from the transmission.
The use of a "black light"* to identify the oil at the
source of leak is also helpful. Comparing the oil from
the leak to that on the engine or transmission dip stick
(when viewed by black light) will determine the source
of the leak.
Oil leaks around the engine and transmission are gen-
erally carried toward the rear of the car by the air
stream. For example, a transmission "oil filter tube
to case leak" will sometimes appear as a leak at the
rear of the transmission. In determining the source of
an oil leak it is most helpful to keep the engine running.
The mating surfaces of servo cover, converter housing,
transmission case and transmission case extension
should be carefully examined for signs of leakage. The
vacuum modulator must also be checked to insure that
the diaphragm has not ruptured as this would allow trans-
mission oil to be drawn into the intake manifold. Us-
ually, the exhaust will be excessively smoky if the
diaphragm ruptures due to the transmission oil added to
the combustion. The transmission case extension rear
oil seal should also be checked. All test plugs should be
checked to make sure that they are tight and that there
is no sign of leakage at these points. The converter
underpan should also be removed. Any appreciable quan-
tity of oil in this area would indicate leakage at the pump
square seal ring, pump seal assembly, or pump bolt
sealing washers.
BASIC PRESSURE CHECKS
Four basic pressure checks are used for diagnosis and
operational checks for the Aluminum Powerglide trans-
mission. All checks should be made only after thoroughly
warming up the transmission.
• Wide Open Throttle Upshift Pressure.
• Idle Pressure in "Drive" Range.
• Manual "Low" Range Pressure.
• "Drive" Range Overrun (Coast) Pressure.
It is not recommended that stall tests be conducted
which would result in engine vacuum falling below 10" Hg.
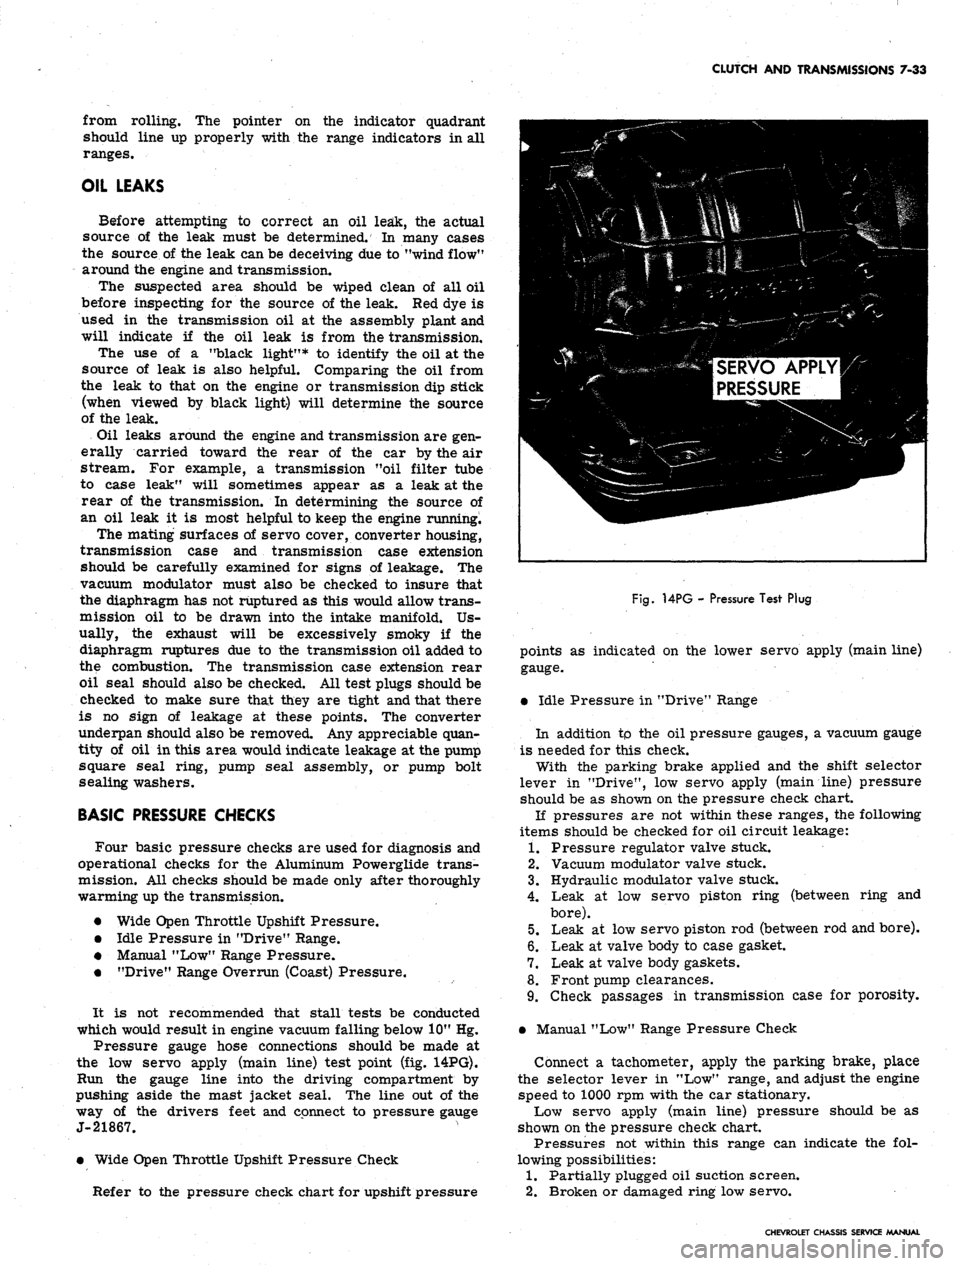
Pressure gauge hose connections should be made at
the low servo apply (main line) test point (fig. 14PG).
Run the gauge line into the driving compartment by
pushing aside the mast jacket seal. The line out of the
way of the drivers feet and connect to pressure gauge
J-21867.
• Wide Open Throttle Upshift Pressure Check
Refer to the pressure check chart for upshift pressure
SERVO APPLY
PRESSURE
Fig.
14PG - Pressure Test Plug
points as indicated on the lower servo apply (main line)
gauge.
• Idle Pressure in "Drive" Range
In addition tp the oil pressure gauges, a vacuum gauge
is needed for this check.
With the parking brake applied and the shift selector
lever in "Drive", low servo apply (main line) pressure
should be as shown on the pressure check chart.
If pressures are not within these ranges, the following
items should be checked for oil circuit leakage:
1.
Pressure regulator valve stuck.
2.
Vacuum modulator valve stuck.
3.
Hydraulic modulator valve stuck.
4.
Leak at low servo piston ring (between ring and
bore).
5.
Leak at low servo piston rod (between rod and bore).
6. Leak at valve body to case gasket.
7.
Leak at valve body gaskets.
8. Front pump clearances.
9. Check passages in transmission case for porosity.
• Manual "Low" Range Pressure Check
Connect a tachometer, apply the parking brake, place
the selector lever in "Low" range, and adjust the engine
speed to 1000 rpm with the car stationary.
Low servo apply (main line) pressure should be as
shown on the pressure check chart.
Pressures not within this range can indicate the fol-
lowing possibilities:
1.
Partially plugged oil suction screen.
2.
Broken or damaged ring low servo.
CHEVROLET CHASSIS SERVICE MANUAL
Page 441 of 659
SECTION
9
STEERING
CONTENTS
OF
THIS SECTION
Standard Steering
9-1
Power Steering
9-33
Special Tools
9-40
STANDARD STEERING
INDEX
Page
General Description 9.x
Maintenance and Adjustments 9.1
Adjustments
........................
9-2
Steering Gear 9-2
Steering Wheel Alignment and Higji
Point Centering. . . . 9-4
Toe-in Adjustment 9-4
Corvette Steering Ratio . . . . 9-4
Component Replacement and Repairs . . . . 9-4
Steering Wheel . . . 9-4
Regular Production 9-4
Simulated Wood . . . . 9-5
Corvette Telescoping 9-5
Steering Coupling . 9-6
Steering Gear . 9-9
Sector Shaft Seal Replacement 9-10
Steering Column 9-10
Removal 9-10
Disassembly—Syncromesh Column 9-12
Page
Assembly—Syncromesh Column . . 9-14
Disassembly—Column Mounted Powerglide
Lever or Floor Shift Column 9-16
Assembly-^Column Mounted Powerglide
Lever or Floor Shift Column g_x7
Disassembly—Tilt Column 9-19
Assembly—Tilt Column 9-21
Disassembly—Standard Corvette Column 9-23
Assembly—Standard Corvette Column 9-25
Disassembly—Corvette Telescoping Column .... 9.26
Assembly—Corvette Telescoping Column 9-27
Installation 9.27
Steering Linkage 9.29
Tie
Rods.
. 9-29
Relay Rod . . 9-31
Idler Arm . . . . 9-31
Pitman Arm. . 9-32
Steering Arms • • • • 9-32
Steering Damper 9-32
GENERAL DESCRIPTION
The regular production steering gear
is the
recirculat-
ing ball type. This gear provides
for
ease
of
handling
by
transmitting forces from worm
to
sector gear through
ball bearings.
The
steering linkage
is of
the relay type,
and extended interval lubrication design, with the pitman
arm connected
to one end of
the relay
rod. The
other
end
of
the
relay
rod is
connected
to an
idler
arm
which
is
connected
to the
frame side rail opposite
the
steering
gear.
Two
adjustable
tie
rods connect
the
relay
rod to
the steering arms.
All passenger
car
models
for 1967 are
equipped with
new energy absorbing steering columns.
The
mast jacket,
shift tube,
and
steering shaft
are
designed
to
collapse
under various front impact conditions.
All new
columns
are
of
this design, including
the
tilt option and telescope
option.
MAINTENANCE
AND
ADJUSTMENTS
The manual steering gear
is
filled
at the
factory with
a
water resistant grease. Seasonal change
of
this lubrica-
tion
is
unnecessary and
the
housing should
not be
drained.
The steering gear lubricant level should
be
checked every
36,000 miles. Whenever required, additions should
be
made using
a
water resistant
EP
chassis lubricant.
Check and fill steering gear
as
follows:
1.
Remove lower
and
outboard cover retaining screws
(fig.
1).
2.
Insert filling device
in
lower screw hole.
3.
Inject lubricant until
it
appears
in
outboard screw
hole; gear
is now
filled
to
correct level.
The steering linkage should
be
lubricated with water
resistant
EP
chassis lubricant every 6,000 miles
or six
months, whichever occurs first. Lubrication points
and
additional information
on the
chassis lubricant
to be
used
can
be
found
in
Section
0 --
General Information
and
Lubrication.
CHEVROLET CHASSIS SERVICE MANUAL