fuse chart CHEVROLET CAMARO 1967 1.G Chassis Workshop Manual
[x] Cancel search | Manufacturer: CHEVROLET, Model Year: 1967, Model line: CAMARO, Model: CHEVROLET CAMARO 1967 1.GPages: 659, PDF Size: 114.24 MB
Page 63 of 659

HEATER AND AIR CONDITIONING 1A-40
THERAAAL VACUUM
VALVE
TO ENGINE
VACUUM
SOURCE
VACUUM STORAGE
TANK
OUTSIDE AIR
DIAPHRAGM
MODE
DIAPHRAGM
VACUUM
RELAY
BLACK
DEFOG-DEICE
DIAPHRAGM
GREEN
BLACKj ||
|
BROWN
CONTROL
VALVE
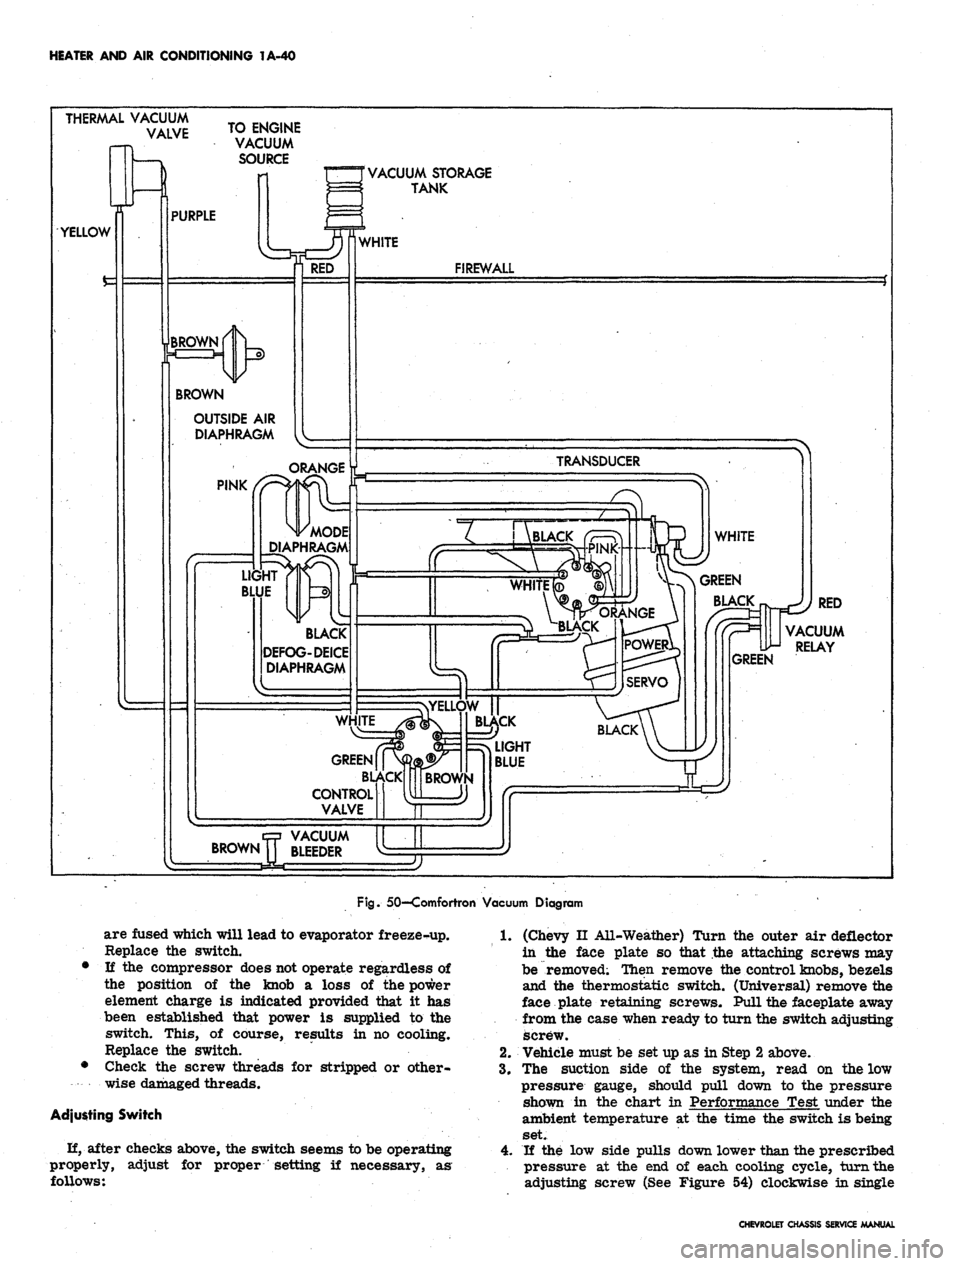
Fig.
50—Comfortron Vacuum Diagram
are fused which will lead to evaporator freeze-up.
Replace the switch.
• If the compressor does not operate regardless of
the position of the knob a loss of the power
element charge is indicated provided that it has
been established that power is supplied to the
switch. This, of course, results in no cooling.
Replace the switch.
• Check the screw threads for stripped or other-
wise damaged threads.
Adjusting Switch
H, after checks above, the switch seems to be operating
properly,
follows:
adjust for proper setting if necessary, as
1.
(Chevy II All-Weather) Turn the outer air deflector
in the face plate so that the attaching screws may
be removed; Then remove the control knobs, bezels
and the thermostatic switch. (Universal) remove the
face plate retaining screws. Pull the faceplate away
from the case when ready to turn the switch adjusting
screw.
2.
Vehicle must be set up as in Step 2 above.
3.
The suction side of the system, read on the low
pressure gauge, should pull down to the pressure
shown in the chart in Performance Test under the
ambient temperature at the time the switch is being
set.
4.
If the low side pulls down lower than the prescribed
pressure at the end of each cooling cycle, turn the
adjusting screw (See Figure 54) clockwise in single
CHEVROLET CHASSIS SERVICE MANUAL
Page 103 of 659

HEATER
AND AIR
CONDITIONING
1A-80
EVAPORATOR ASM.
Blower
Motor
INSIDE VALVE
(Normally closed
-spring held)
PLENUM VALVE
(Normally open
-spring held)
Actuator
(Vacuum
operated)
Inside car air (Recirc*
CONTROL ASM
TEMP CONTROL LEVER
•(Operates temp valve
cable
&
equipment in
hart shown below)
Temp valve
begins to
16DG
Fuse (In-line^
COMPRESSOR
Clutch Coil DASH-
PANEL
•Fan Speed Selector Switch
Switch
lever
position
Off
Low
"HeST
High
Contacts
B to
None
BtoL
B to L b U
BtoL&H
Fan
speed
Low
Low
Med
High
Resistance
in series with
Bio Motor
Rl
Rl
RlR2)/(Rl+R2)
None
•Blower switch contacts must be closed
before fan switch will be operable.
-To battery positive
(-0 terminal
•
Horn relay
terminal"
"Batf
To vacuum
tank
EXTENSION
WIRE
ASM
(Normally closed
contacts-*vac
operated)
7
*- Fan speed switch
(See chart at left)
•/-Wire is
\ part of
I inst panel
harness
Legend:
— Production wiring
————
Wire Is part of equip.
•mmmmmmmmmmmmmm*
AIT
Conditioning
WTg*
Temp
Control
Lever
Position
OFF
VENT
COLD
a.A.)
COLD
(O.A.)
HOT
Blower
(Master)
switch
contacts
Open
Closed
Closed
Closed
Closed
Vac switch
connects
vac source
to hose #
#2
&
#3
#2
#3
None
#2
Compressor
switch
contacts^
Open
Open
Closed
Closed
Open
Blower
intake air
Outside car air
intake used
Inside car air
recir culated
Outside car air
intake used
Outside car air
intake used
Fig.
116—Camaro—Four-Season Wiring Diagram
CHEVROLET CHASSIS SERVICE
Page 628 of 659

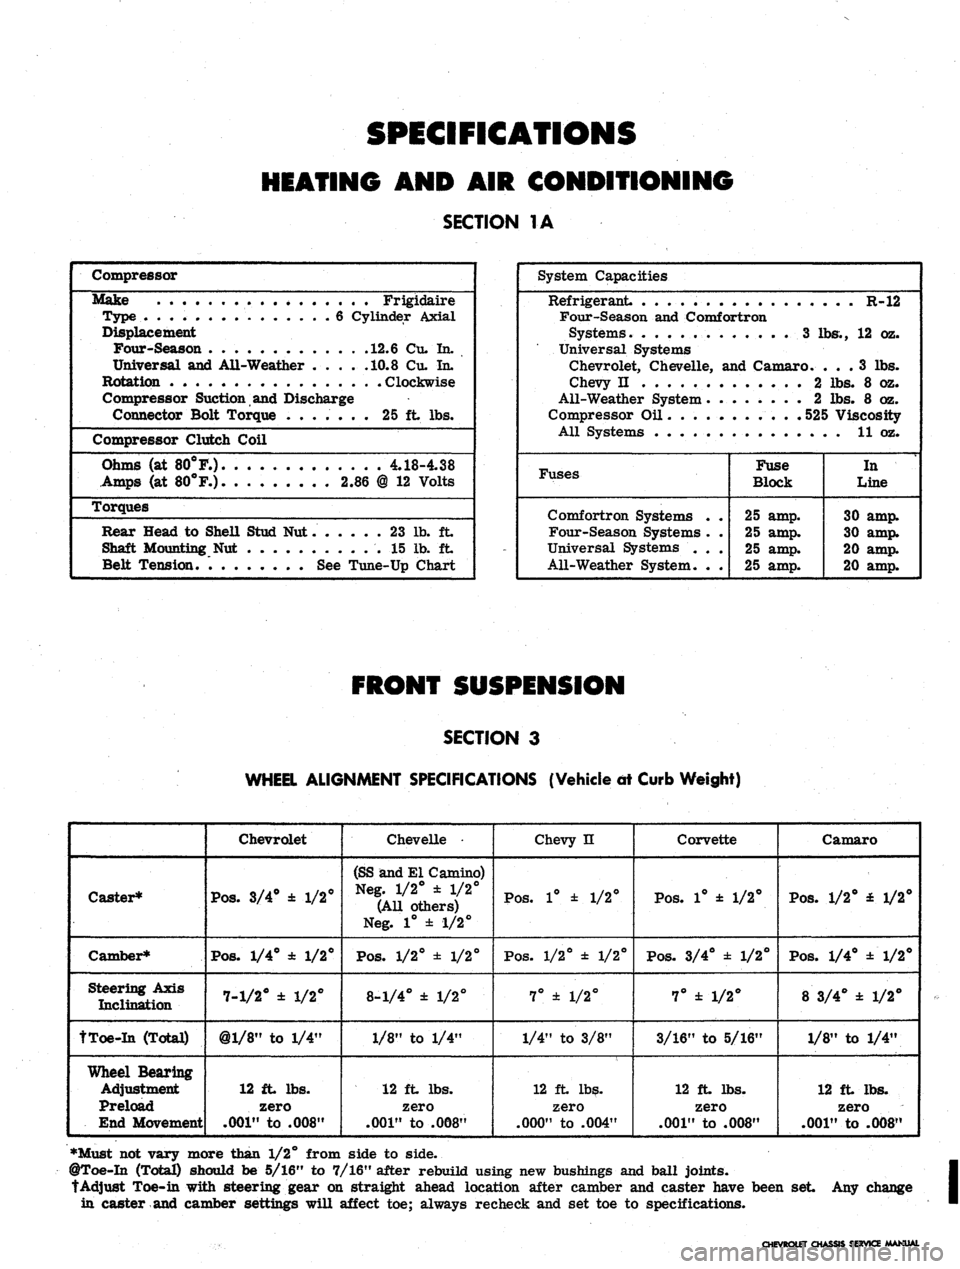
SPECIFICATIONS
HEATING
AND AIR
CONDITIONING
SECTION
1A
Compressor
Make Frigidaire
Type
. 6
Cylinder Axial
Displacement
Four-Season
12.6
Cu.
In.
Universal
and
Ail-Weather
.... .10.8 Cu. In.
Rotation Clockwise
Compressor Suction
and
Discharge
Connector Bolt Torque
.......
25 ft lbs.
Compressor Clutch Coil
Ohms
(at
80°F.).
4.18-4.38
Amps
(at
80°F.)
2.86 @ 12
Volts
Torques
Rear Head
to
SheU Stud
Nut 23 lb. ft
Shaft Mounting
Nut 15 lb. ft
Belt Tension.
See
Tune-Up Chart
System Capacities
Refrigerant
R-12
Four-Season
and
Comfortron
Systems.
............
3 lbs., 12 oz.
Universal Systems
Chevrolet, Chevelle,
and
Camaro.
... 3 lbs.
Chevy
n 2 lbs. 8 oz.
All-Weather System
2 lbs. 8 oz.
Compressor
Oil 525
Viscosity
All Systems
11 oz.
Fuses
Comfortron Systems
.
Four-Season Systems
.
Universal Systems
. .
All-Weather System.
.
Fuse
Block
25
amp.
25
amp.
25
amp.
25
amp.
In
Line
30
amp.
30
amp.
20
amp.
20
amp.
SECTION
3
WHEEL ALIGNMENT SPECIFICATIONS (Vehicle
dt
Curb Weight)
Caster*
Camber*
Steering Axis
Inclination
tToe-In (Total)
Wheel Bearing
Adjustment
Preload
End Movement
Chevrolet
Pos.
3/4° ± 1/2°
Pos.
1/4° ± 1/2°
7-1/2° ± 1/2°
@l/8"
to 1/4"
12 ft lbs.
zero
.001"
to .008"
Chevelle •
(SS and El Camino)
Neg. 1/2° ± 1/2°
(All others)
Neg. 1° ± 1/2°
Pos.
1/2° ± 1/2°
8-1/4° ± 1/2°
1/8" to 1/4"
12 ft lbs.
zero
.001"
to .008"
Chevy n
Pos.
1° ± 1/2°
Pos.
1/2° ± 1/2°
7° ± 1/2°
1/4" to 3/8"
12 ft lbs.
zero
.000"
to .004"
Corvette
Pos.
1° ± 1/2°
Pos.
3/4° ± 1/2°
7° ± 1/2°
3/16" to 5/16"
12 ft lbs.
zero
.001"
to .008"
Camaro
Pos.
1/2° £ 1/2°
Pos.
1/4° ±1/2°
8 3/4° ± 1/2°
1/8" to 1/4"
12 ft lbs.
zero
.001"
to .008"
•Must not vary more than 1/2° from side to side.
@Toe-In (Total) should be 5/16" to 7/16" after rebuild using new bushings and ball joints.
tAdjust Toe-in with steering gear on straight ahead location after camber and caster have been set Any change
in caster and camber settings will affect toe; always recheck and set toe to specifications.
LET CHASSIS SERVICE MANUAL