washer fluid CHEVROLET CAMARO 1967 1.G Chassis Workshop Manual
[x] Cancel search | Manufacturer: CHEVROLET, Model Year: 1967, Model line: CAMARO, Model: CHEVROLET CAMARO 1967 1.GPages: 659, PDF Size: 114.24 MB
Page 15 of 659
LUBRICATION 0-13
LUBRICATION
INDEX
Page
Engine Crankcase Oil . 0-13
Crankcase Capacities. . 0-13
Lubrication . ,
•
o-13
SAE Viscosity Oils 0-13
Types of Oils 0-14
Maintaining Oil Level 0-14
Oil and Filter Change Intervals 0-14
Oil.
. . ...:.. 0-14
Filter o-14
Crankcase Dilution . 0-14
Automatic Control Devices to Minimize
Crankcase Dilution 0-14
Crankcase Breather Cap 0-14
Crankcase Ventilation System 0-15
Valve Type 0-15
Fuel Filter 0-15
Air Cleaner . 0-15
Polyurethane Type 0-15
Oil Wetted Paper Element Type 0-15
Battery Terminal Washers 0-15
Page
Distributor 0-15
Rear Axle and 3-Speed and Overdrive
4-Speed Transmission 0-15
Recommended Lubricants 0-15
Multi-Purpose Gear Lubricants 0-15
Lubricant Additions 0-15
Lubricant Changes 0-15
Powerglide Transmission 0-15
Turbo Hydra-Matic 0-16
Front Wheel Bearings 0-16
Manual Steering Gear . . . . 0-16
Power Steering 0-16
Air Conditioning 0-16
Brake Master Cylinder. 0-16
Parking Brake 0-16
Clutch Cross-Shaft , 0-16
Chassis Lubrication 0-16
Lubrication Diagrams . . 0-19
Body Lubrication (Chevrolet, Chevelle, Chevy n, Camaro). 0-20
Body Lubrication Points (Corvette) . 0-21
The selection of the proper lubricant and its correct
application at regular intervals does much to increase the
life and operation of all moving parts of the vehicle.
Consequently, it is important that the correct grade of
oil or grease, as noted in the following pages, be used.
ENGINE CRANKCASE OIL
Crankcase Capacity
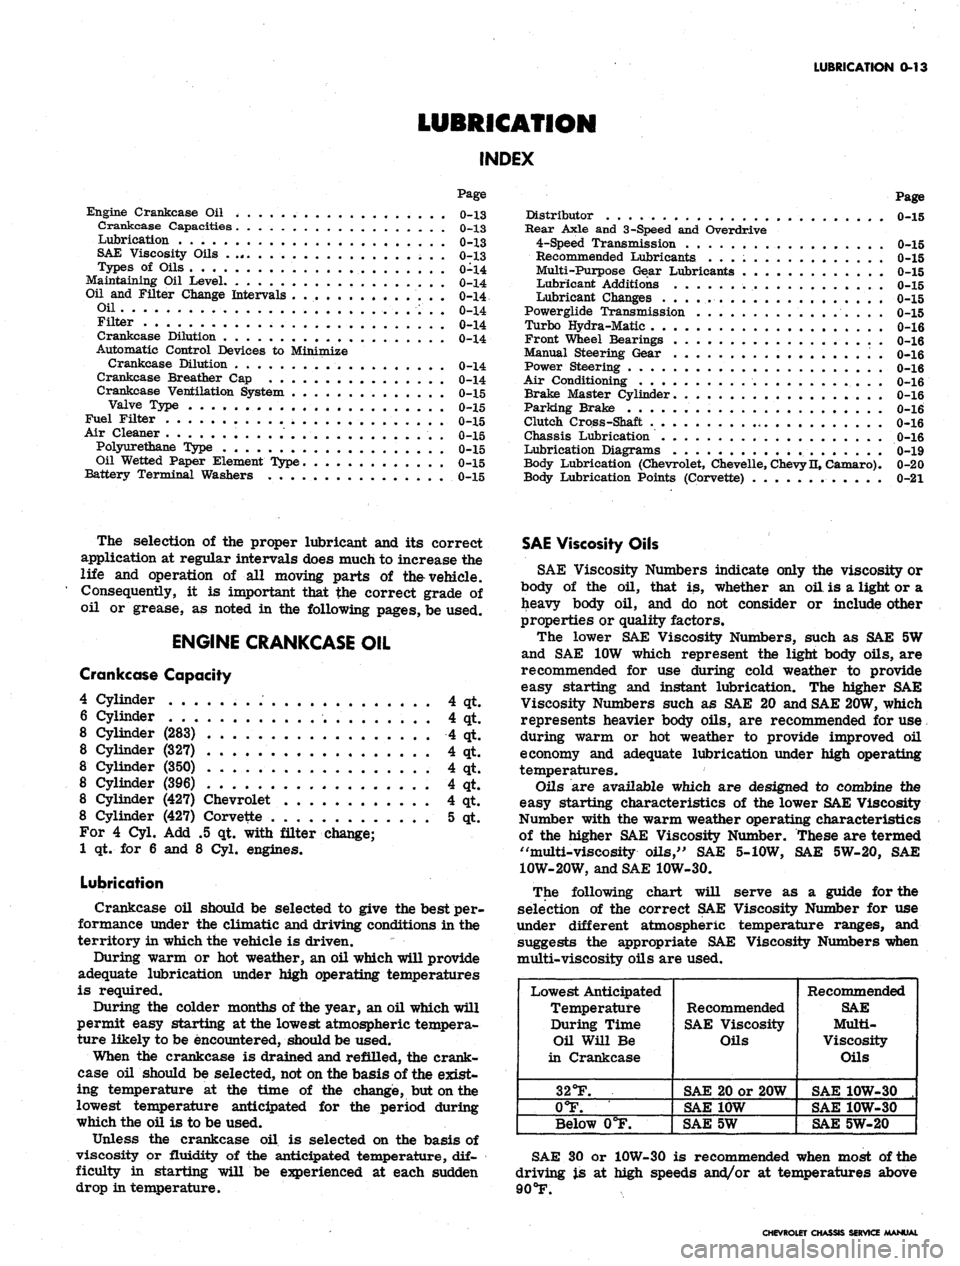
4 Cylinder 4 qt.
6 Cylinder 4 qt.
8 Cylinder (283) 4 qt.
8 Cylinder (327) 4 qt.
8 Cylinder (350) 4 qt.
8 Cylinder (396) 4 qt.
8 Cylinder (427) Chevrolet 4 qt.
8 Cylinder (427) Corvette 5 qt.
For 4 Cyl. Add .5 qt. with filter change;
1 qt. for 6 and 8 Cyl. engines.
Lubrication
Crankcase oil should be selected to give the best per-
formance under the climatic and driving conditions in the
territory in which the vehicle is driven.
During warm or hot weather, an oil which will provide
adequate lubrication under high operating temperatures
is required.
During the colder months of the year* an oil which will
permit easy starting at the lowest atmospheric tempera-
ture likely to be encountered, should be used.
When the crankcase is drained and refilled, the crank-
case oil should be selected, not on the basis of the exist-
ing temperature at the time of the change, but on the
lowest temperature anticipated for the period during
which the oil is to be used.
Unless the crankcase oil is selected on the basis of
viscosity or fluidity of the anticipated temperature, dif-
ficulty in starting will be experienced at each sudden
drop in temperature.
SAE Viscosity Oils
SAE Viscosity Numbers indicate only the viscosity or
body of the oil, that is, whether an oil is a light or a
heavy body oil, and do not consider or include other
properties or quality factors.
The lower SAE Viscosity Numbers, such as SAE 5W
and SAE 10W which represent the light body oils, are
recommended for use during cold weather to provide
easy starting and instant lubrication. The higher SAE
Viscosity Numbers such as SAE 20 and SAE 20W, which
represents heavier body oils, are recommended for use
during warm or hot weather to provide improved oil
economy and adequate lubrication under high operating
temperatures.
Oils are available which are designed to combine the
easy starting characteristics of the lower SAE Viscosity
Number with the warm weather operating characteristics
of the higher SAE Viscosity Number. These are termed
"multi-viscosity oils," SAE 5-10W, SAE 5W-20, SAE
10W-20W, and SAE 10W-30.
The following chart will serve as a guide for the
selection of the correct SAE Viscosity Number for use
under different atmospheric temperature ranges, and
suggests the appropriate SAE Viscosity Numbers when
multi-viscosity oils are used.
Lowest Anticipated
Temperature
During Time
Oil Will Be
in Crankcase
32°F.
0°F.
Below 0°F.
Recommended
SAE Viscosity
Oils
SAE 20 or 20W
SAE 10W
SAE 5W
Recommended
SAE
Multi-
Viscosity
Oils
SAE 10W-30 .
SAE 10W-30
SAE 5W-20
SAE 30 or 10W-30 is recommended when most of the
driving is at high speeds and/or at temperatures above
90
°F.
CHEVROLET CHASSIS SERVICE MANUAL
Page 17 of 659
LUBRICATION 0-15
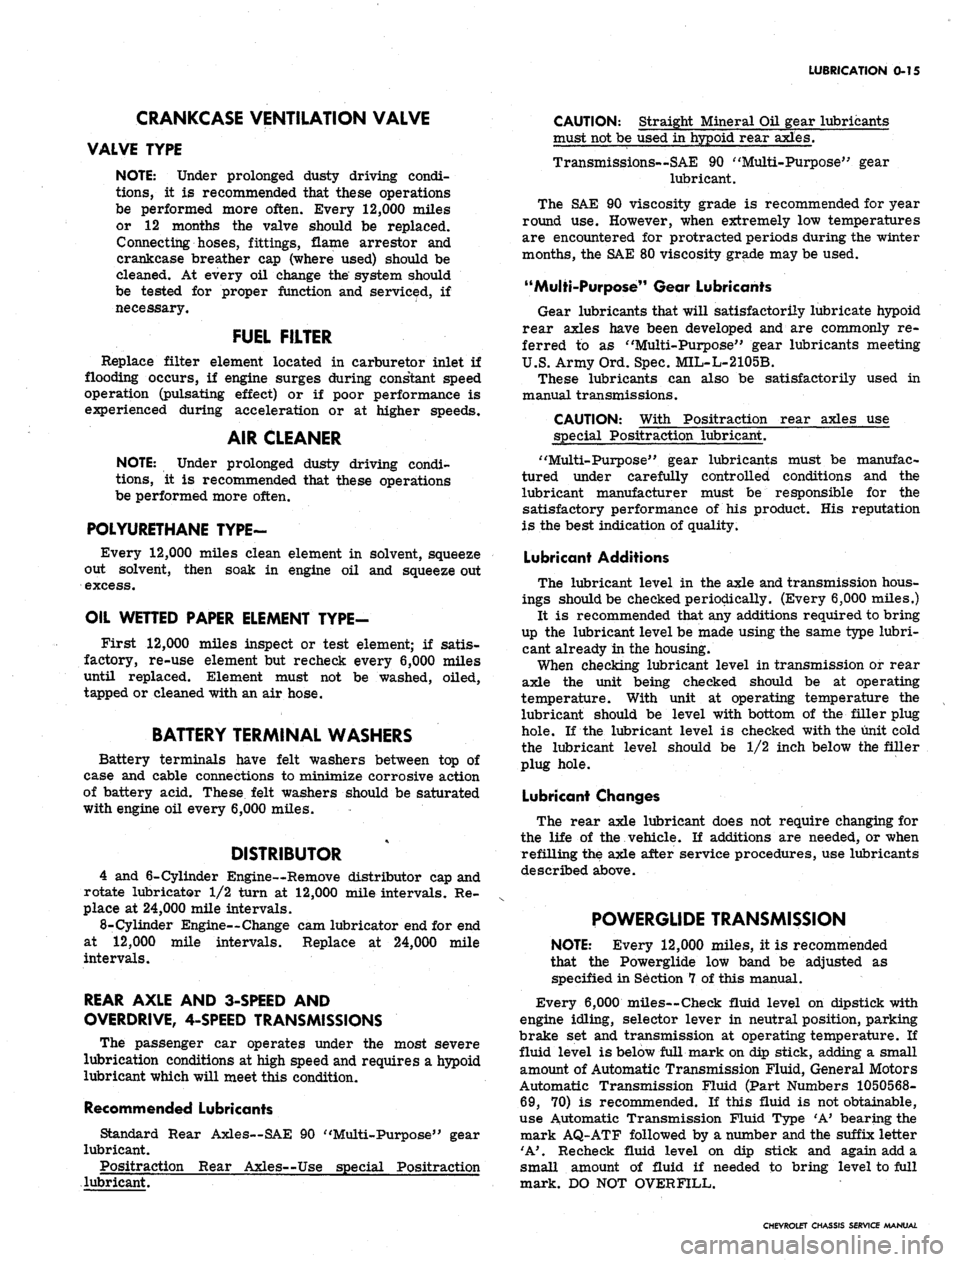
CRANKCASE VENTILATION VALVE
VALVE TYPE
NOTE: Under prolonged dusty driving condi-
tions,
it is recommended that these operations
be performed more often. Every 12,000 miles
or 12 months the valve should be replaced.
Connecting hoses, fittings, flame arrestor and
crankcase breather cap (where used) should be
cleaned. At every oil change the system should
be tested for proper function and serviced, if
necessary.
FUEL FILTER
Replace filter element located in carburetor inlet if
flooding occurs, if engine surges during constant speed
operation (pulsating effect) or if poor performance is
experienced during acceleration or at higher speeds.
AIR CLEANER
NOTE: Under prolonged dusty driving condi-
tions,
it is recommended that these operations
be performed more often.
POLYURETHANE TYPE-
Every 12,000 miles clean element in solvent, squeeze
out solvent, then soak in engine oil and squeeze out
excess.
OIL WETTED PAPER ELEMENT TYPE-
First 12,000 miles inspect or test element; if satis-
factory, re-use element but recheck every 6,000 miles
until replaced. Element must not be washed, oiled,
tapped or cleaned with an air hose.
BATTERY TERMINAL WASHERS
Battery terminals have felt washers between top of
case and cable connections to minimize corrosive action
of battery acid. These felt washers should be saturated
with engine oil every 6,000 miles.
DISTRIBUTOR
4 and 6-Cylinder Engine—Remove distributor cap and
rotate lubricator 1/2 turn at 12,000 mile intervals. Re-
place at 24,000 mile intervals.
8-Cylinder Engine—Change cam lubricator end for end
at 12,000 mile intervals. Replace at 24,000 mile
intervals.
REAR AXLE AND 3-SPEED AND
OVERDRIVE, 4-SPEED TRANSMISSIONS
The passenger car operates under the most severe
lubrication conditions at high speed and requires a hypoid
lubricant which will meet this condition.
Recommended Lubricants
Standard Rear Axles—SAE 90 "Multi-Purpose" gear
lubricant.
Positraction Rear Axles—Use special Positraction
lubricant.
CAUTION: Straight Mineral Oil gear lubricants
must not be used in hypoid rear axles.
Transmissions—SAE 90 "Multi-Purpose" gear
lubricant.
The SAE 90 viscosity grade is recommended for year
round use. However, when extremely low temperatures
are encountered for protracted periods during the winter
months, the SAE 80 viscosity grade may be used.
"Multi-Purpose" Gear Lubricants
Gear lubricants that will satisfactorily lubricate hypoid
rear axles have been developed and are commonly re-
ferred to as ' 'Multi-Purpose" gear lubricants meeting
U.S.
Army Ord. Spec. MIL-L-2105B.
These lubricants can also be satisfactorily used in
manual transmissions.
CAUTION: With Positraction rear axles use
special Positraction lubricant.
"Multi-Purpose" gear lubricants must be manufac-
tured under carefully controlled conditions and the
lubricant manufacturer must be responsible for the
satisfactory performance of his product. His reputation
is the best indication of quality.
Lubricant Additions
The lubricant level in the axle and transmission hous-
ings should be checked periodically. (Every 6,000 miles.)
It is recommended that any additions required to bring
up the lubricant level be made using the same type lubri-
cant already in the housing.
When checking lubricant level in transmission or rear
axle the unit being cheeked should be at operating
temperature. With unit at operating temperature the
lubricant should be level with bottom of the filler plug
hole.
If the lubricant level is checked with the unit cold
the lubricant level should be 1/2 inch below the filler
plug hole.
Lubricant Changes
The rear axle lubricant does not require changing for
the life of the vehicle. If additions are needed, or when
refilling the axle after service procedures, use lubricants
described above.
POWERGLIDE TRANSMISSION
NOTE: Every 12,000 miles, it is recommended
that the Powerglide low band be adjusted as
specified in Section 7 of this manual.
Every 6,000 miles--Check fluid level on dipstick with
engine idling, selector lever in neutral position, parking
brake set and transmission at operating temperature. If
fluid level is below full mark on dip stick, adding a small
amount of Automatic Transmission Fluid, General Motors
Automatic Transmission Fluid (Part Numbers 1050568-
69,
70) is recommended. If this fluid is not obtainable,
use Automatic Transmission Fluid Type 'A' bearing the
mark AQ-ATF followed by a number and the suffix letter
'A'.
Recheck fluid level on dip stick and again add a
small amount of fluid if needed to bring level to full
mark. DO NOT OVERFILL.
CHEVROLET CHASSIS SERVICE MANUAL
Page 76 of 659
HEATER AND AIR CONDITIONING 1A-53
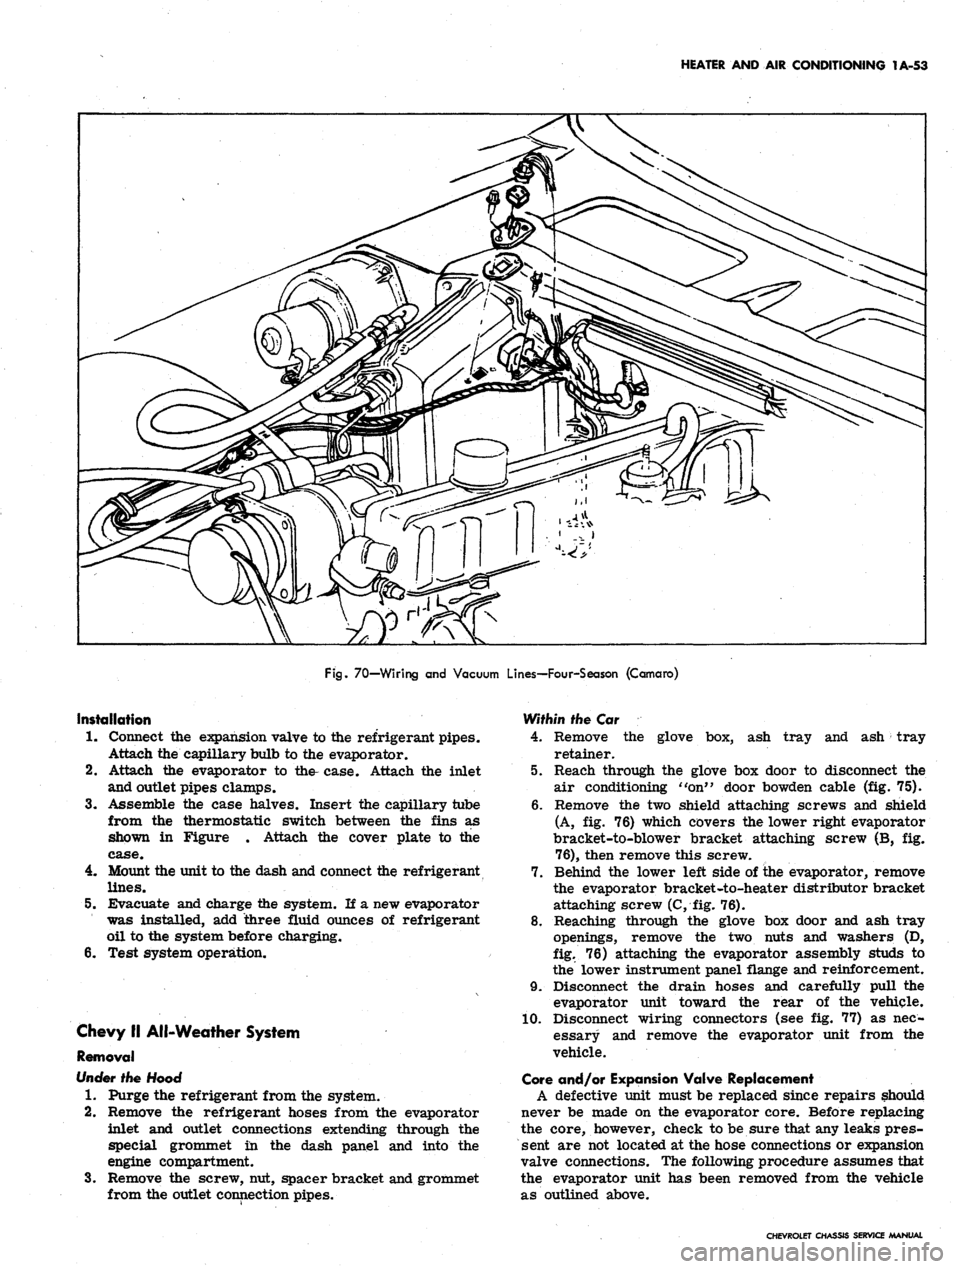
Fig.
70—Wiring and Vacuum Lines—Four-Season (Camaro)
Installation
1.
Connect the expansion valve to the refrigerant pipes.
Attach the capillary bulb to the evaporator.
2.
Attach the evaporator to the- case. Attach the inlet
and outlet pipes clamps.
3.
Assemble the case halves. Insert the capillary tube
from the thermostatic switch between the fins as
shown in Figure . Attach the cover plate to the
case.
4.
Mount the unit to the dash and connect the refrigerant
lines.
5.
Evacuate and charge the system. If a new evaporator
was installed, add three fluid ounces of refrigerant
oil to the system before charging.
6. Test system operation.
Chevy II All-Weather System
Removal
Under
the Hood
1.
Purge the refrigerant from the system.
2.
Remove the refrigerant hoses from the evaporator
inlet and outlet connections extending through the
special grommet in the dash panel and into the
engine compartment.
3.
Remove the screw, nut, spacer bracket and grommet
from the outlet connection pipes.
Within the Car
4.
Remove the glove box, ash tray and ash tray
retainer.
5.
Reach through the glove box door to disconnect the
air conditioning "on" door bowden cable (fig. 75).
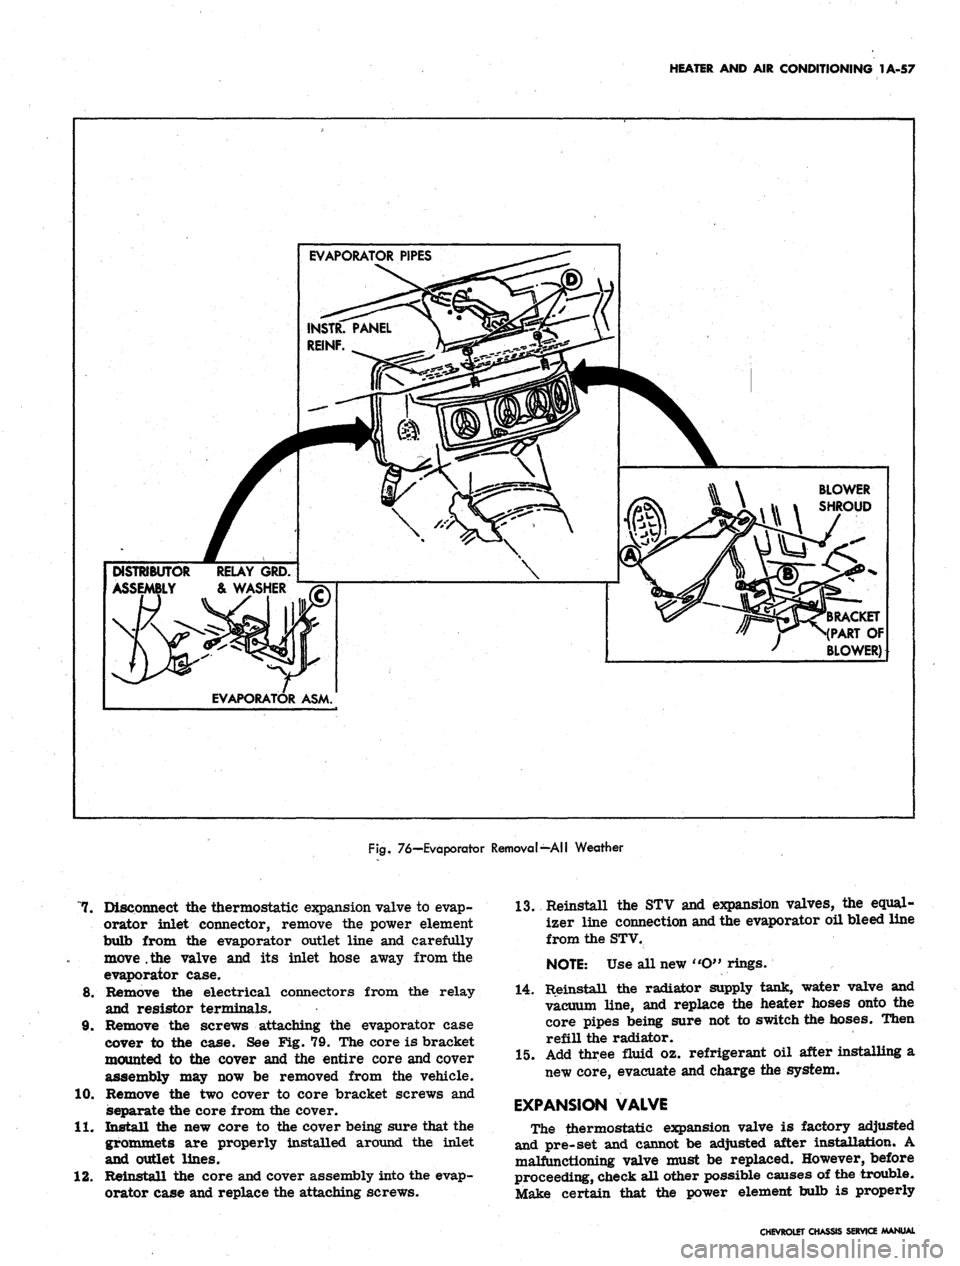
6. Remove the two shield attaching screws and shield
(A, fig. 76) which covers the lower right evaporator
bracket-to-blower bracket attaching screw (B, fig.
76),
then remove this screw.
7.
Behind the lower left side of ihe evaporator, remove
the evaporator bracket-to-heater distributor bracket
attaching screw (C, fig. 76).
8. Reaching through the glove box door and ash tray
openings, remove the two nuts and washers (D,
fig.
76) attaching the evaporator assembly studs to
the lower instrument panel flange and reinforcement.
9. Disconnect the drain hoses and carefully pull the
evaporator unit toward the rear of the vehicle.
10.
Disconnect wiring connectors (see fig. 77) as nec-
essary and remove the evaporator unit from the
vehicle.
Gore and/or Expansion Valve Replacement
A defective unit must be replaced since repairs should
never be made on the evaporator core. Before replacing
the core, however, check to be sure that any leaks pres-
sent are not located at the hose connections or expansion
valve connections. The following procedure assumes that
the evaporator unit has been removed from the vehicle
as outlined above.
CHEVROLET CHASSIS SERVICE MANUAL
Page 80 of 659
HEATER AND AIR CONDITIONING 1A-57
EVAPORATOR PIPES
DISTRIBUTOR RELAY GRD.
ASSEMBLY & WASHER
EVAPORATOR ASM.
BLOWER
SHROUD
(RACKET
(PART OF
BLOWER)
Fig.
76—Evaporator Removal—All Weather
7. Disconnect the thermostatic expansion valve to evap-
orator inlet connector, remove the power element
bulb from the evaporator outlet line and carefully
move .the valve and its inlet hose away from the
evaporator case.
8. Remove the electrical connectors from the relay
and resistor terminals.
9. Remove the screws attaching the evaporator case
cover to the case. See Fig. 79. The core is bracket
mounted to the cover and the entire core and cover
assembly may now be removed from the vehicle.
10.
Remove the two cover to core bracket screws and
separate the core from the cover.
11.
Install the new core to the cover being sure that the
grommets are properly installed around the inlet
and outlet lines.
12.
Reinstall the core and cover assembly into the evap-
orator case and replace the attaching screws.
13.
Reinstall the STV and expansion valves, the equal-
izer line connection and the evaporator oil bleed line
from the STV.
NOTE:
Use all new «O" rings.
14.
Reinstall the radiator supply tank, water valve and
vacuum line, and replace the heater hoses onto the
core pipes being sure not to switch the hoses. Then
refill the radiator.
15.
Add three fluid oz. refrigerant oil after installing a
new core, evacuate and charge the system.
EXPANSION VALVE
The thermostatic expansion valve is factory adjusted
and pre-set and cannot be adjusted after installation. A
malfunctioning valve must be replaced. However, before
proceeding, check all other possible causes of the trouble.
Make certain that the power element bulb is properly
CHEVROLET CHASSIS SERVICE MANUAL
Page 253 of 659
BRAKES 5-20
boss to the front brakes will not contain a check
valve and spring. .
Removal
1.
Wipe main cylinder and lines clean with a clean
cloth. Place dry cloths below main cylinder area to
absorb any fluid spillage.
2.
Disconnect hydraulic lines at main cylinder. Cover
line ends with clean lint-free material to prevent
foreign matter from entering the system.
3.
Disconnect the push rod from the brake pedal.
4.
Unbolt and remove the main cylinder from the
firewall.
5.
Remove the main cylinder mounting gasket and boot.
6. Remove the main cylinder cover and dump out the
fluid. Pump the remaining fluid from the cylinder
by depressing the push rod.
Disassembly (Fig. 32)
1.
Clamp main cylinder in a bench vice.
2.
Remove push rod retainer.
3.
Remove secondary piston stop bolt from bottom of
front fluid reservoir.
4.
Remove the snap ring retainer and primary piston
assembly. Remove the secondary piston, piston
spring, and retainer by blowing air through the stop
bolt hole. (If no air is available, a piece of wire
may be used. Bend approximately 1/4 inch of one
end into -a right angle, hook the secondary piston
and pull it out.)
5.
Position main cylinder in vice with outlet holes
facing up.
6. Drill a 13/64 inch hole through both check valve
seats.
7 Tap out both seats using a 1/4 - 20 tap.
8. Install a spare brake line tube nut in the outlet
hole.
Place a flat washer on a one inch screw
(threaded to screw into tapped hole), and thread
screw into threaded hole in tube seat. Hold the
screw to keep it from turning and back out the
tube nut. This will remove the tube seat.
9. Repeat Step 8 above on second tube seat.
10.
Remove the check valves and springs from the cavi-
ties beneath the tube seats.
11.
Remove the primary seal, primary seal protector,
and secondary seals from the secondary piston.
Remove the piston extension screw securing the
primary piston spring to the primary piston. Re-
move the spring retainer, primary seal, primary
seal protector, and secondary seal from the pri-
mary piston.
Cleaning and Inspection
1.
Remove main cylinder casting from vice and inspect
the bore for corrosion, pits, and foreign matter.
Be sure that the outlet ports are clean and free of
brass cuttings from the tube seat removal operation.
2.
Inspect the fluid reservoirs for foreign matter.
Check the bypass and compensating ports to the
cylinder bore to insure that they are not restricted.
Do not use wire to check ports.
NOTE: Before washing parts, hands must be
clean. Do not wash hands in gasoline or oil
before cleaning parts. Use soap and water only.
3.
Use Declene or equivalent to clean all metal parts
thoroughly. Immerse parts in the cleaning fluid and
brush with hair brush to remove foreign matter.
Blow out all passages, orifices, and valve holes. Air
dry the parts and place on clean paper or lint-free
clean cloth.
NOTE: Be sure to keep parts clean until re-
assembly. Rewash parts, if there is any occa-
sion to doubt cleanliness.
4.
Check pistons for scratches or other visual damage;
replace if necessary.
Assembly (Fig. 32)
Use care when reassembling the main cylinder check
valves. Improper assembly of the check valve seats
will result in distortion of the seats. If this occurs,
there will be no check valve action and a loss of brake
pedal travel will result; the pedal will have to be pumped
one or more times before actual car braking occurs.
1.
Place the main cylinder in a vice with the outlet
holes facing up. Place the check valve springs, in
the outlet holes. Be sure the springs are seated
in the bottom of the holes. Place new rubber check
valves over the springs, being careful not to dis-
place the springs from the spring seats.
2.
Place new brass tube seats in the outlet holes. Be
sure seats are not cocked as this would cause burrs
to be turned up as the tube seats are pressed in.
. Thread a spare brake line tube nut into the outlet
hole and turn the nut down until the tube seat bot-
toms.
Remove the tube nut and check the outlet hole
for loose burrs, which might have been turned up
when the tube seat was pressed down. Repeat this
process to bottom the second seat.
3.
Put new secondary seals in the two grooves in the
end of the secondary piston assembly. The seal
which is nearest the end will have its lips facing
toward that end. The seal in the second groove
should have its lips facing toward the portion of
the secondary piston which contains the small com-
pensating holes.
4.
Assemble a new primary seal protector and primary
seal over the end of the secondary piston with the
flat side of the seal seats against the seal protector,
and the protector against the flange of the piston
which contains the small compensating holes.
5.
Assemble the new secondary seal into the groove on
the push rod end of the primary piston. The lips of
this seal should face toward the small compensating
holes in the opposite end of the primary piston.
6. Assemble the new primary seal protector and pri-
mary seal on the end of-the primary piston with the
flat side of the. seal seated against the seal protector,
and the protector against the flange on the piston
which contains the compensating holes.
7.
Assemble the spring retainer in one end of the
primary piston spring and the secondary piston
stop in the other end. Place the end of the spring
over the end of the primary piston with the spring
retainer seats inside of the lips of the primary
seal.
8. Remove all cleaning liquid from the threaded hole
in the primary piston. Place the piston extension
screw down through the secondary piston stop and
the primary spring retainer and screw it into the
primary piston until it bottoms out.
9. Coat the bore of the master cylinder with clean
CHEVROLET CHASSIS SERVICE MANUAL
Page 254 of 659
BRAKES 5-21
brake fluid. Coat the primary and secondary seals
on the secondary piston with clean brake fluid. Insert
the secondary piston spring retainer into the sec-
ondary piston spring. Place the retainer and spring
down over the end of the secondary piston until the
retainer locates inside of the lips of the primary
cup.
10.
Hold the master cylinder with the open end of the
bore down. Push the secondary piston into the bore
until the spring seats against the closed end of the
bore.
11.
Position the master cylinder in a vise with the
open end of the bore up. Coat the primary and
secondary seal on the primary piston with clean
brake fluid. Push the primary piston assembly,
spring end first, into the bore of the master cylinder*
Hold the piston down and snap the lock ring into
position in the small groove in the I.D. of the bore.
12.
Push the primary piston down to move the secondary
piston forward far enough to clear the stop screw
hole in the bottom of the front fluid reservoir. Install
the stop screw.
13.
Install reservoir diaphragm in the reservoir cover
and install the cover on the main cylinder. Push
bail wire into position to secure the reservoir cover.
Installation
1.
Assemble the push rod through the push rod retainer,
if it has been disassembled.
2.
Push the retainer over the end of the main cylinder.
Assemble new boot over push rod and press it down
over the push rod retainer. Slide new mounting
gasket into position.
3.
Secure .the main cylinder to the firewall with mount-
ing bolts.
4.
Connect the push rod clevis to the brake pedal with
pin and retainer.
5. Connect the brake lines to the main cylinder.
6. Fill the main cylinder reservoirs to the levels
shown in Figure 8. Bleed the brake system as out-
lined in this section.
7. K necessary, adjust the brake pedal free play as
outlined in this section.
WHEEL CYLINDER (Fig. 33)
The wheel cylinder boots should be removed from a
cylinder body only when they are visibly damaged or
leaking fluid. Wheel cylinders having torn, cut, or heat-
cracked boots should be completely overhauled.
Removal
1.
Raise vehicle and place on jack stands.
Fig.
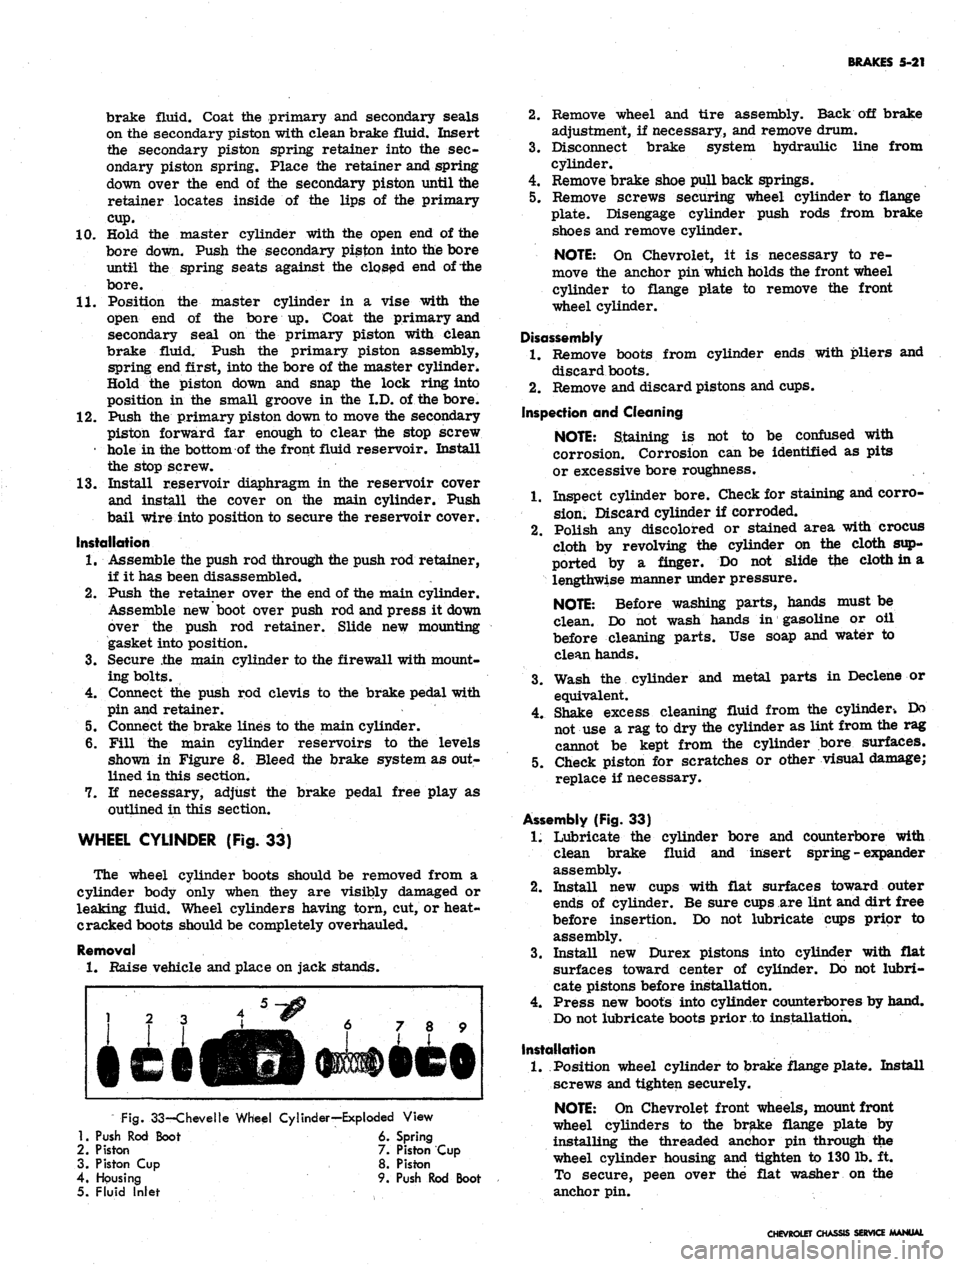
33-Chevelle Wheel Cylinder—Exploded View
1.
Push Rod Boot 6. Spring
2.
Piston 7. Piston Cup
3. Piston Cup 8. Piston
4.
Housing 9. Push Rod Boot
5. Fluid Inlet
2.
Remove wheel and tire assembly. Back off brake
adjustment, if necessary, and remove drum.
3.
Disconnect brake system hydraulic line from
cylinder.
4.
Remove brake shoe pull back springs.
5. Remove screws securing wheel cylinder to flange
plate. Disengage cylinder push rods from brake
shoes and remove cylinder.
NOTE:
On Chevrolet, it is necessary to re-
move the anchor pin which holds the front wheel
cylinder to flange plate to remove the front
wheel cylinder.
Disassembly
1.
Remove boots from cylinder ends with pliers and
discard boots.
2.
Remove and discard pistons and cups.
Inspection and Cleaning
NOTE:
Staining is not to be confused with
corrosion. Corrosion can be identified as pits
or excessive bore roughness.
1.
Inspect cylinder bore. Check for staining and corro-
sion.
Discard cylinder if corroded.
2.
Polish any discolored or stained area with crocus
cloth by revolving the cylinder on the cloth sup-
ported by a finger. Do not slide tfce cloth in a
lengthwise manner under pressure.
NOTE:
Before washing parts, hands must be
clean. Do not wash hands in gasoline or oil
before cleaning parts. Use soap and water to
clean hands.
3.
Wash the cylinder and metal parts in Declene or
equivalent.
4.
Shake excess cleaning fluid from the cylinder-. Do
not use a rag to dry the cylinder as lint from the rag
cannot be kept from the cylinder bore surfaces.
5. Check piston for scratches or other visual damage;
replace if necessary.
Assembly (Fig. 33)
1.
Lubricate the cylinder bore and counterbore with
clean brake fluid and insert spring - expander
assembly.
2.
Install new cups with flat surfaces toward outer
ends of cylinder. Be sure cups are lint and dirt free
before insertion. Do not lubricate cups prior to
assembly.
3.
Install new Durex pistons into cylinder with flat
surfaces toward center of cylinder. Do not lubri-
cate pistons before installation.
4.
Press new boots into cylinder counterbores by hand.
Do not lubricate boots prior to installation.
Installation
1.
Position wheel cylinder to brake flange plate. Install
screws and tighten securely.
NOTE:
On Chevrolet front wheels, mount front
wheel cylinders to the brake flange plate by
installing the threaded anchor pin through the
wheel cylinder housing and tighten to 130 lb. ft.
To secure, peen over the flat washer on the
anchor pin.
CHEVROLET CHASSIS SERVICE MANUAL
Page 264 of 659
BRAKES
5-31
POWER BRAKES
INDEX
General Description 5-31
Maintenance
and"
Adjustments 5-31
Inspection . ... 5_31
Lubrication 5-31
Bleeding Instructions . . . 5.31
Air Cleaner Service . . . , 5.31
Page
Component Replacement 5-31
Power Brake Cylinder ......* 5-31
Removal . . 5-31
Disassembly and Assembly See Overhaul Manual
Installation . . . . 5-31
GENERAL DESCRIPTION
The Power Brake Unit is a self-contained hydraulic
and vacuum unit, utilizing manifold vacuum and atmos-
phere pressure for its power.
This unit permits the use of a low brake pedal as well
as less pedal effort than is required with the conventional
(nonpower) hydraulic brake system. Only two external
line connections are necessary -
one
a vacuum connection
from manifold to check valve located on front shell; the
other, a hydraulic connection from the main cylinder
outlet directly into the hydraulic system. The unit is
mounted on the engine side of the fire wall and directly
connected to the brake pedal.
MAINTENANCE AND ADJUSTMENTS
INSPECTIONS
1.
Check vacuum line and vacuum line connections as
well as vacuum check valve in front shell of power
unit for possible vacuum loss.
2.
Inspect all hydraulic lines and connections at the
wheel cylinders and main cylinder for possible
hydraulic leaks.
3.
Check brake assemblies for scored drums, grease
or brake fluid on linings, worn or glazed linings,
and make necessary adjustments.
4.
Check brake fluid level in the hydraulic reser-
voirs.
The reservoirs should be filled to the levels
shown in Figure 8.
5. Check for loose mounting bolts at main cylinder and
at power section.
6. Check air cleaner filter in power piston extension
and replace filter if necessary.
7. Check brake pedal for binding and misalignment
between pedal
-and
push rod.
LUBRICATION
The power brake unit is lubricated at assembly and
needs no further lubrication other than maintaining
normal reservoir fluid level. The reservoir should be
filled as described in this section.
BLEEDING INSTRUCTIONS
The power system may be bled manually or with a
pressure bleeder as outlined in this section. Use only
GM
Supreme 11 Brake Fluid or equivalent. Do not use the
power assist while bleeding. The engine should not be
running and the vacuum reserve should be reduced to
zero by applying the brake several times before starting
the bleeding procedure.
AIR CLEANER SERVICE
Servicing of the air cleaner is recommended and the
element replaced when restriction becomes severe
enough to affect power brake response. At any other
time, if cleaning of the filter is felt necessary, it should
be shaken free of dirt or washed in soap and water and
thoroughly dried.
COMPONENT REPLACEMENT
POWER BRAKE CYLINDER
Removal
1.
Remove vacuum hose from vacuum check valve.
2.
Disconnect hydraulic lines at main cylinder.
Disconnect push rod at brake pedal assembly.
Remove nuts and lock washers securing power unit
to fire wall, and remove power unit from engine
compartment.
3.
4.
NOTE:
Chevy
to fire wall.
has a three stud attachment
Repair procedures for the power cylinder are outlined
in the Brake Section of the Overhaul Manual-for service
of the main cylinder refer to applicable portion of
"Standard Brakes" in this manual.
Installation
1.
Mount the power brake assembly in place and install
the attaching nuts and lock washers.
2.
Attach vacuum line to check valve.
3.
Secure hydraulic lines to main cylinder.
4.
Attach push rod to brake pedal assembly, and check
operation of stop light.
5. Bleed brakes as outlined in this section.
CAUTION: After replacing the unit on the vehi-
cle,
start the engine and allow vacuum to build
up before applying the brake.
CHEVROLET CHASSIS SERVICE
Page 382 of 659
CLUTCH
AND
TRANSMISSIONS
7-23
Assembly (Fig.
4X)
1.
With detent spring tang projecting
up
over
the 3rd
and
4th
shifter shaft cover opening install
the
first
and second detent
cam
onto
the
detent
cam
pivot
pin.
With
the
detent spring tang projecting
up
over
the
first
and
second shifter shaft cover hole install
the
3rd
and 4th
detent
cam,
NOTE:
The 1-2
detent
cam has a
.090" greater
contour
on the
inside detent notch.
2.
3.
Install detent
cam
retaining
"C"
ring
to
pivot shaft,
and hook spring into detent
cam
notches.
Install
1-2 and 3-4
shifter shaft assemblies
in
cover
being careful
not to
damage seals. Install both shift
forks
to
shifter shaft assemblies, lifting
up on
detent
cam
to
allow forks
to
fully seat into position.
4.
Install reverse detent ball
and
spring
to
cover, then
install reverse shifter shaft assembly
to
cover.
5.
Install outer shifter levers, flat washers, lock wash-
ers
and
bolts.
Installation
1.
Shift shifter levers into neutral detent (center) posi-
tion. Position cover gasket
on
case.
2.
Carefully position side cover into place making sure
the shift forks
are
aligned with their respective
mainshaft clutch sliding sleeves.
Install cover attaching bolts
and
tighten evenly
to
specified torque.
Remove filler plug
and add
lubricant specified
in
Section
0, to
level
of
filler plug hole.
3.
4.
ALUMINUM POWERGLIDE
INDEX
Page
General
Description
7-23
Maintenance
and
Adjustments .............. 7—23
Oil
Level Check
7-23
Periodic
Oil
Change
7-24
Periodic
Low
Band Adjustment
7-24
Manual
Shift Linkage Check
and
Adjust
7-24
Floor
Shift Linkage
7-25
Floor
Mounted Control Lever
and
Bracket
Assembly
7-29
Throttle
Valve Linkage
.... 7-29
Neutral
Safety Switch
.. . 7-30
Throttle
Return Check Valve (Dashpot)
7-30
Component
Parts Replacement
7-30
Transmission
Replacement .............. 7—30
Page
Other
Service Operations
7-32
Diagnosis
7-32
Warming
Up
Transmission
7-32
Shop
Warm
Up , 7-32
Road
Warm
Up 7-32
Checking
Fluid Level
and
Condition
7-32
Manual
Linkage
7-32
Oil
Leaks
7-33
Basic
Pressure Checks
7-33
Wide
Open Throttle Upshift Pressure Check
.... 7-33
Idle
Pressure
in
Drive Range
7-33
Manual
"Low"
Range Pressure Check .......
7-33
Drive
Range Overrun (Coast) Pressure
.
.......
7-33
Powerglide
Shift Points
. . 7-35
GENERAL DESCRIPTION
The case
and
converter housing
of the two
speed alumi-
num Powerglide Transmission
is a
single case aluminum
unit. When
the
manual control
is
placed
in the
drive
po-
sition,
the
transmission automatically shifts
to low
gear
for initial vehicle movement.
As the car
gains speed
and
depending
on
load
and
throttle position,
an
automatic shift
is made
to
high gear.
A
forced downshift feature
pro-
vides
a
passing gear
by
returning
the
transmission
to low
range.
The
oil
pump assembly
is a
conventional gear type
and
the
oil
pump housing
is of the
large diameter type acting
as
the
front bulkhead
of the
transmission.
The
torque
converter
is a
conventional three element welded design
bolted
to the
engine flywheel which drives through
a
two-
speed planetary gearset.
The
high clutch assembly
is
typical
of the
designs used
in
this type transmission.
The
aluminum Powerglide uses
an
output shaft mounted
gov-
ernor which requires
a
hole through
the
output shaft.
The
reverse clutch assembly
is a
multiple disc type clutch.
The steel plates
are
splined directly
to the
case while
the
face plates
are
splined
to the
internal
or
ring gear.
The
clutch piston operates within
the
rear portion
of the
case.
The internal diameter
of the
pistoh
is
sealed to
an
integral
hub portion
of the
case rear bulkhead.
The
outside
dia-
meter
is
sealed
to a
machined portion
of the
case.
The
piston
is
hydraulically applied
and is
released
by
separate
coil springs.
The
valve body assembly
is
bolted
to the
bottom
of the
transmission case
and is
accessible
for
service
by
removing
the oil pan
assembly.
The
valve
body consists
of an
upper
and
lower body located
on
either
side
of a
transfer plate.
The
vacuum modulator
is lo-
cated
on the
left rear face
of the
transmission case.
The
modulator valve bore
is
located
in the
upper valve body.
MAINTENANCE
AND
ADJUSTMENTS
OIL LEVEL CHECK
The transmission
oil
level should
be
checked period-
ically
as
recommended
in
Section
0. Oil
should
be
added
only when level
is on or
below
the
"ADD" mark
on the dip
stick with
oil hot or at
operating temperature.
The oil
level
dip
stick
is
located
at the
right rear
of the
engine
compartment. Fill with
oil
specified
in
Section
0.
In order
to
check
oil
level accurately,
the
engine should
be idled with
the
transmission
oil hot and the
control
lever
in
neutral (N) position.
It
is
important that
the oil
level
be
maintained
no
higher than
the
"FULL" mark
on the
transmission
oil
level gauge.
DO NOT
OVERFILL,
for
when
the oil
level
CHEVROLET CHASSIS SERVICE MANUAL
Page 477 of 659
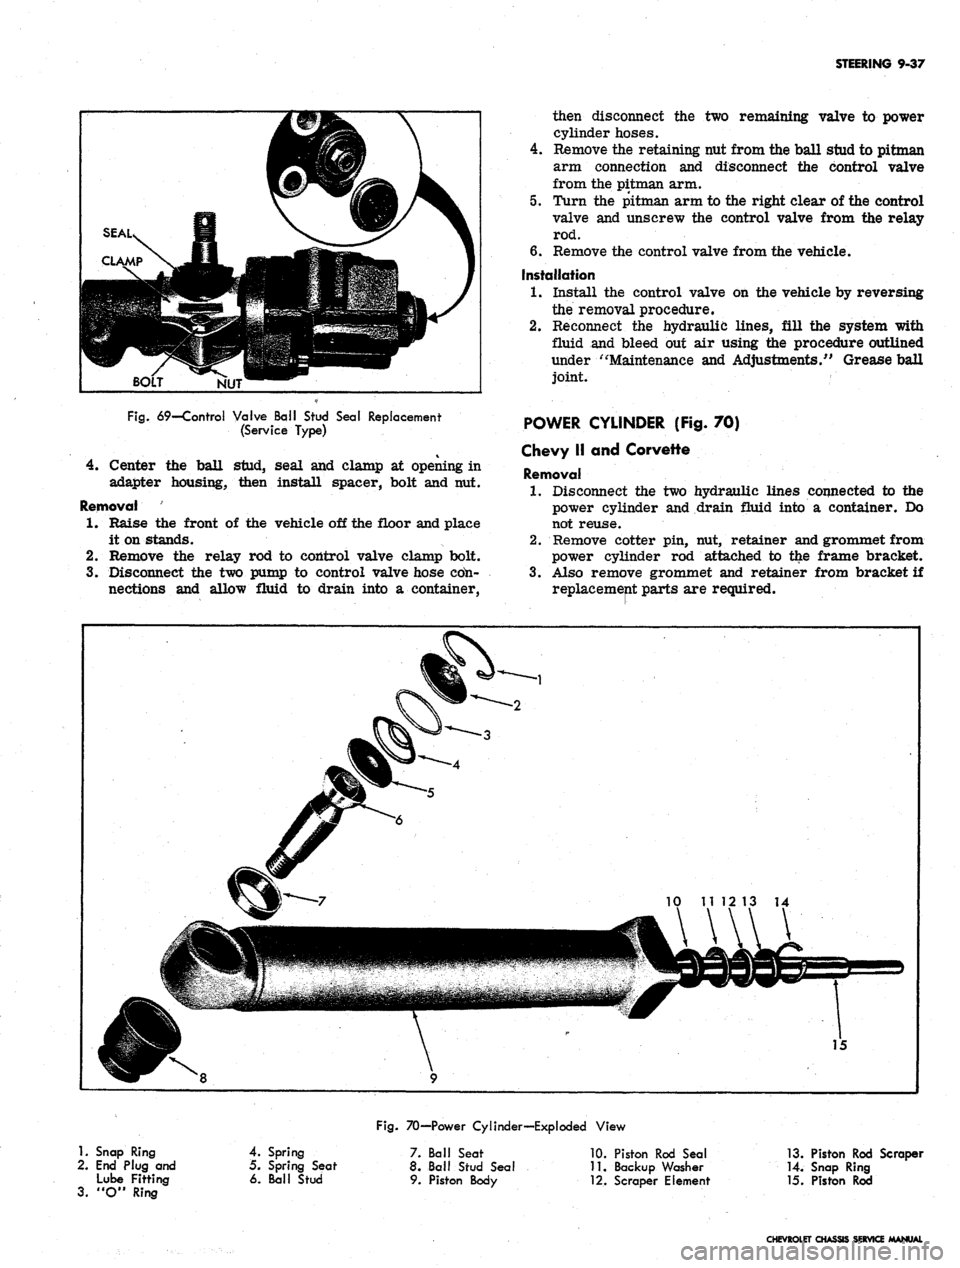
STEERING 9-37
NUT
Fig.
69—Control Valve Ball Stud Seal Replacement
(Service Type)
4.
Center the ball stud, seal and clamp at opening in
adapter housing, then install spacer, bolt and nut.
Removal
1.
Raise the front of the vehicle off the floor and place
it on stands.
2.
Remove the relay rod to control valve clamp bolt.
3.
Disconnect the two pump to control valve hose cdn-
nections and allow fluid to drain into a container,
then disconnect the two remaining valve to power
cylinder hoses.
4.
Remove the retaining nut from the ball stud to pitman
arm connection and disconnect the control valve
from the pitman arm.
5. Turn the pitman arm to the right clear of the control
valve and unscrew the control valve from the relay
rod.
6. Remove the control valve from the vehicle.
Installation
1.
Install the control valve on the vehicle by reversing
the removal procedure.
2.
Reconnect the hydraulic lines, fill the system with
fluid and bleed out air using the procedure outlined
under "Maintenance and Adjustments/' Grease ball
joint.
POWER CYLINDER (Fig. 70)
Chevy II and Corvette
Removal
1.
Disconnect the two hydraulic lines connected to the
power cylinder and drain fluid into a container. Do
not reuse.
2.
Remove cotter pin, nut, retainer and grommet from
power cylinder rod attached to the frame bracket.
3.
Also remove grommet and retainer from bracket if
replacement parts are required.
1.
Snap Ring
2.
End Plug and
Lube Fitting
3.
"O" Ring
Fig.
70—Power Cylinder—Exploded View
4.
Spring
5. Spring Seat
6. Ball Stud
7. Ball Seat
8. Ball Stud Seal
9. Piston Body
10.
Piston Rod Seal
11.
Backup Washer
•12.
Scraper Element
13.
Piston Rod Scraper
14.
Snap Ring
15.
Piston Rod
CHEVROLET CHASSIS SERVICE MANUAL
Page 479 of 659
STEERING 9-39
4.
Remove cotter pin, nut and ball stud at relay rod.
5. Remove the power cylinder from the vehicle.
Inspection
1.
Inspect the seals for leaks; if leaks are present,
replace the seals using the procedure outlined under
"Disassembly."
2.
Examine the brass fitted hose connection seats for
cracks or damage and replace if necessary.
3.
For service other than ball seat or seal replacement
and ball stud removal, replace the power cylinder.
4.
Check the frame bracket parts for wear.
Disassembly
1.
To remove the piston rod seal remove the snap ring;
then pull out on the rod, being careful not to spray
oil.
2.
Remove the piston rod scraper and scraper element,
back up washer and piston rod seal from the rod.
3.
At the ball stud end of the cylinder, remove the ball
stud seal.
4.
Remove the snap ring retaining the end plug with the
lube fitting.
5. Push on the end of the ball stud and remove the end
plug, spring, spring seat and ball stud.
6. Remove the "O" ring seal from the top lip of the
power cylinder ball stud opening.
7. If the ball seat is to be replaced, it must be pressed
out using Tool J-8937.
Assembly
1.
Reassemble the piston rod seal components by re-
versing the disassembly procedure. Apply a thin
coat of Lubriplate or equivalent on the inner sur-
faces of the seal and scraper before assembly.
2.
Reverse the disassembly procedure when reassem-
bling the ball stud.
3.
In each case be sure that the snap ring is securely,
seated in the ring groove.
Installation
1.
Install the power cylinder on the vehicle by reversing
the removal procedure.
2.
Reconnect the two hydraulic lines, fill the system
with fluid and bleed out air using the procedure out-
lined under "Maintenance and Adjustments." Grease
ball joint.
POWER STEERING HOSES
When servicing the power steering hoses be sure to
align the hoses in their correct position as shown in
Figure 71. On Chevelle models with 396 engine, install
the upper hose so that there is at least .6 inch clearance
between the hose and the Delcotron or the inner fender
skirt.
It is important that the power steering hoses be in-
stalled correctly. Hoses installed out of position may be
subjected to chafing or other abuses during sharp turns.
Always make hose installations with front wheels in
straight ahead position. Do not twist hoses unneces-
sarily during installation.
CAUTION: Do not start engine with any power
steering hose disconnected.
CHEVROLET CHASSIS SERVICE MANUAL