ESP CHEVROLET CAMARO 1971 2.G Owners Manual
[x] Cancel search | Manufacturer: CHEVROLET, Model Year: 1971, Model line: CAMARO, Model: CHEVROLET CAMARO 1971 2.GPages: 88, PDF Size: 34.8 MB
Page 5 of 88
Downloaded from www.Manualslib.com manuals search engine YOUR CAR'S FIRST
FEW HUNDRED MILES OF DRIVING
Sound design and precision manu
facturing methods will permit you
to operate your new car from its
very first mile without adhering to
a formal
"break-in" schedule. How
ever, during the first
few hundred
miles of driving you can, by observ
ing a
few simple precautions, add
to the future performance and
economy of your car.
It is recommended that your speed
during the first
500 miles
be confined to a maximum of
60
M.P.H., but do not drive for ex
tended periods
at anyone constant
speed, either fast or slow. Dur
ing this period, avoid full throttle
starts and, if possible, abrupt stops.
Gentle braking during the first
few
hundred miles of operation will re
sult in longer brake life and better
future performance. A void hard
2
stops especially during the first 200
miles of operation since brake mis
use during this period will destroy
much future brake efficiency.
Always drive at moderate speed
until the engine has completely
warmed up.
If you plan to use your neW car
for trailer hauling see additional
information on page 9.
Page 16 of 88
Downloaded from www.Manualslib.com manuals search engine Starting Engine
Automatic Transmission
Models
1. Apply the foot brake.
2. Place transmission selector
in "P" or "N" (UP" preferred).
A starter safety switch prevents
starter operation while the trans
mission selector
is in any drive
position.
(If it is necessary to
re-start the engine with the car
moving, place the selector lever
in
"N".)
3. Depress accelerator pedal and
activate starter
as outlined be
low for different conditions.
• Cold Engine -Fully de
press
accelerator pedal and
slowly release.
With foot off
the pedal,
crank the engine
by turning the ignition key
to the Start position-release
when engine starts.
If engine starts, but fails to
run, repeat this procedure.
When engine is running
smoothly, the idle speed may
be reduced by slightly de
pressing the accelerator pedal
and then slowly releasing.
• Warm Engine -Depress ac
celerator
pedal about halfway
and hold while cranking the
engine.
• Extremely Cold Weather
(Below
0° F.) Or After Car
Has Been Standing Idle
Several
Days-
Fully depress and release
accelerator pedal two
or three
times before cranking the
engine.
With foot off the ac
celerator pedal,
crank the
engine by turning the key to
the Start position and release
when engine starts.
13
Manual Transmission Models
1. Apply parking brake and shift
transmission to neutral.
2.
Hold clutch pedal to floor
throughout the starting proce
dure. A starter interlock pre
vents starter operation when
clutch
is not fully depressed.
3.
Operate accelerator pedal and
starter
as outlined in step 3
(under Automatic Transmission
Models).
Engine Flooded
Depress accelerator pedal and
hold to floor while starting until
engine
is cleared of excess fuel
and
is running smoothly. Never
"pump" the accelerator pedal.
Warm-Up
Always let the engine idle for
20 to 30 seconds after starting
and drive at moderate speeds for
several miles, especially during
cold weather.
Page 21 of 88
Downloaded from www.Manualslib.com manuals search engine Parking Your Car
Always engage the parking brake
.and place the automatic transmis
sion selector lever in
"Park" posi
tion when leaving your car unat
tended. Also with automatic trans
missions, never park for prolonged
periods with engine idling and
transmission in gear, especially if
your car
is equipped with air con
ditioning. This practice
is detri
mental to the transmission, due to
overheating.
Tilt Steering Wheel
The optional tilt steering wheel
can be tilted up above normal posi
tion to provide additional room for
entrance and exit
as well as selected
driving positions below normal
height. This permits individual
se
lection of the most natural position
for all driving conditions.
On long
trips the steering wheel position can
be changed
to minimize tension and
fatigue.
The
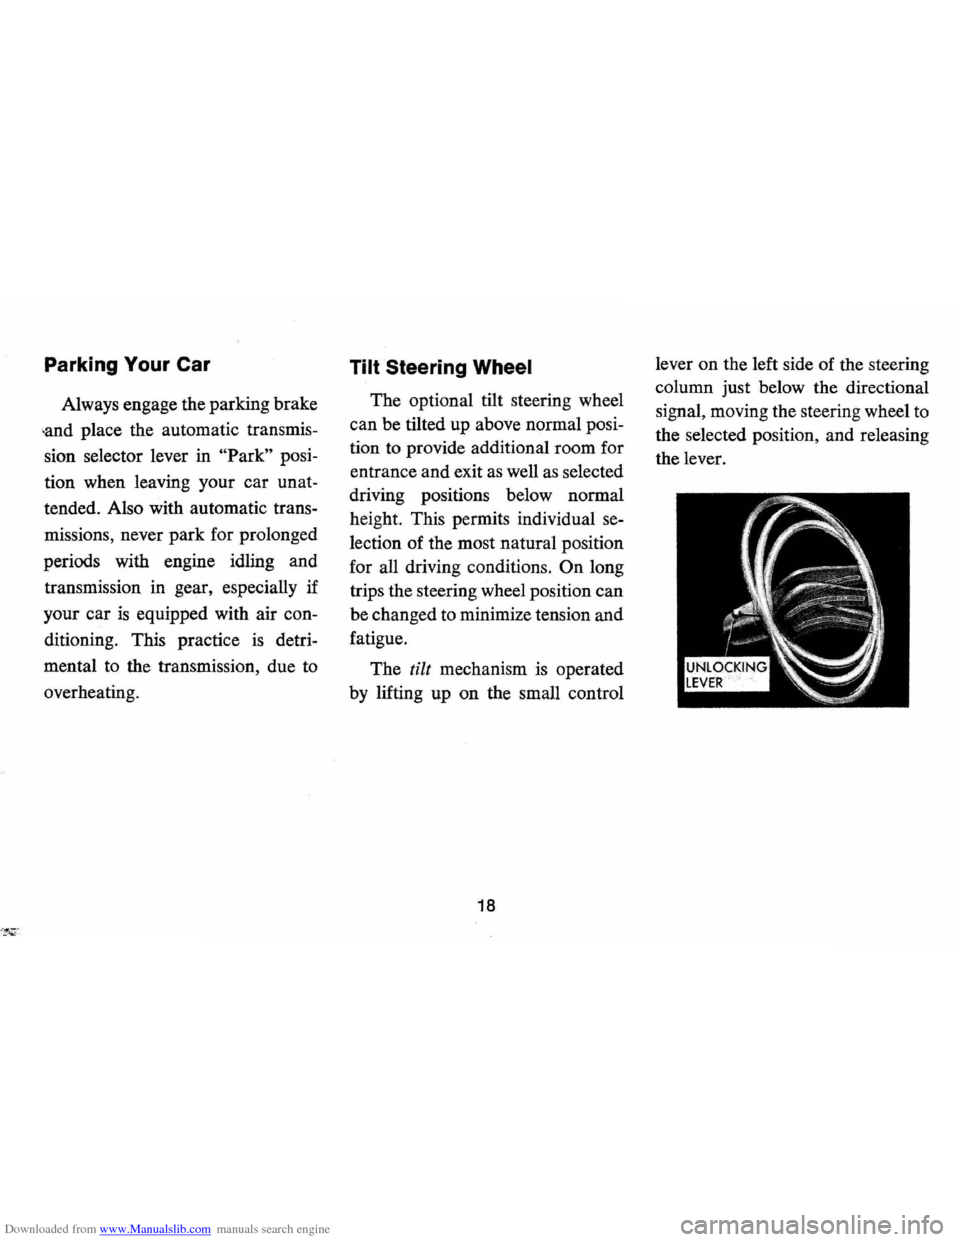
tilt mechanism is operated
by lifting up on the small control
18
lever on the left side of the steering
column just below the directional
signal, moving the steering wheel
to
the selected position, and releasing
the lever.
Page 25 of 88
Downloaded from www.Manualslib.com manuals search engine • Stopping distances may be
greater.
• Greater pedal et!ort may be re
quired.
• Pedal travel may be greater.
3. Try out
brak~ operation by
starting and stopping on road
shoulder-then:
• If you judge such operation to be
safe, proceed cautiously at re
duced speed to nearest dealer for
repair.
• Have car towed to dealer for re
pair.
• Continued operation of the car
in this condition
is dangerous.
Headlight Beam Indicator
Light
The headlights of your car have
high and low beams to provide you with
proper night-time visibility
during all driving conditions.
The
"low" beams are used during most
city driving. The
"high" beams are
especially useful when driving on
dark roads since they provide ex
cellent long range illumination.
The headlight beam indicator will
be on whenever the
high beams or
"brights" are in use. The Headlight
Beam Switch controls the headlight
beams (see
Page 32).
Light Switch
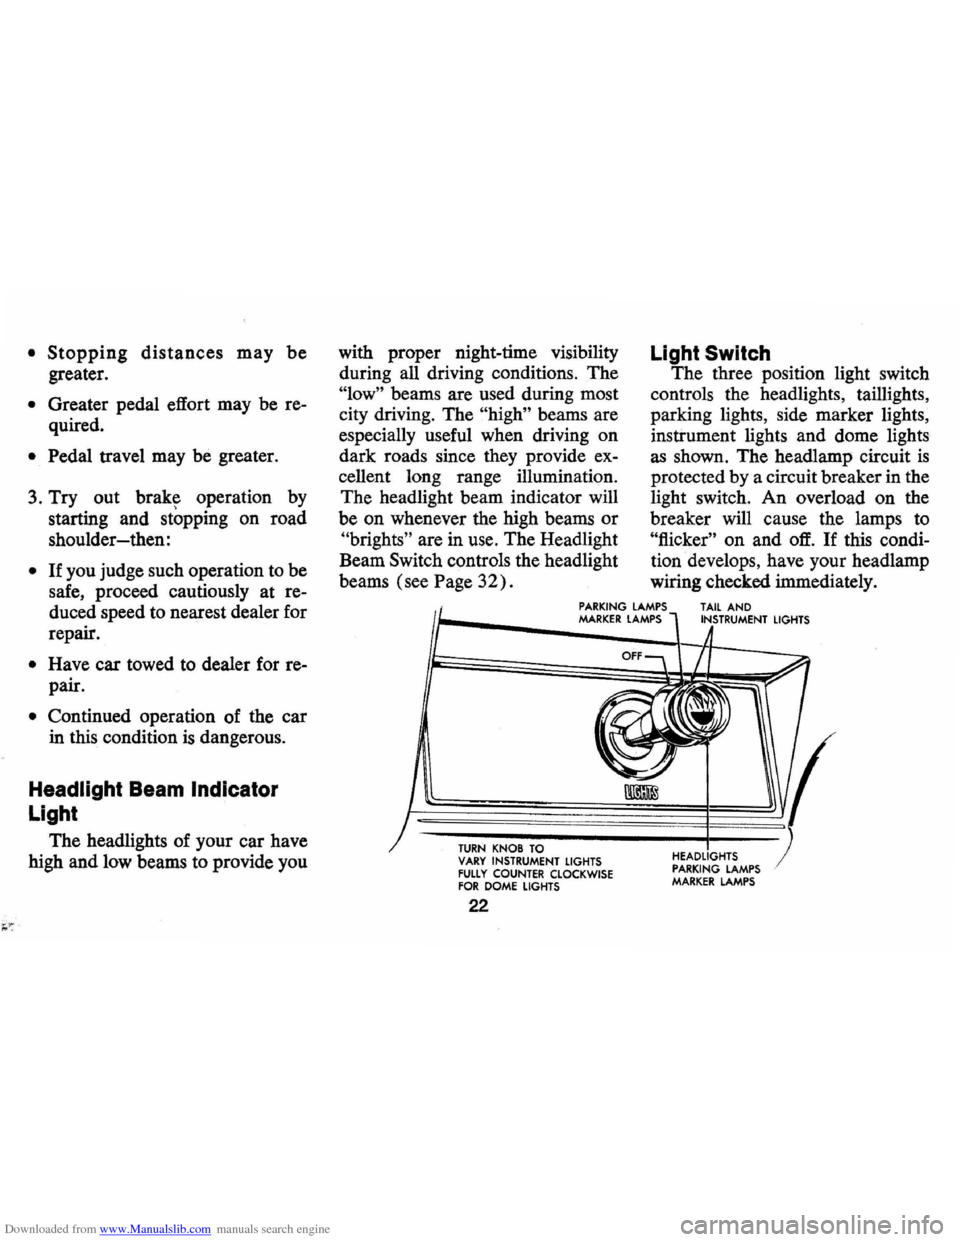
The three position light switch
controls the headlights, taillights,
parking lights, side marker lights,
instrument lights and dome lights
as shown. The headlamp circuit is
protected by a circuit breaker in the
light switch.
An overload on the
breaker will cause the lamps to
"flicker" on and ot!. If this condi
tion develops, have your headlamp
wiring checked immediately.
PARKING LAMPS MARKER LAMPS TAIL AND INSTRUMENT
LIGHTS
TURN KNOB TO
VARY INSTRUMENT LIGHTS fULLY COUNTER CLOCKWISE FOR DOME LIGHTS
22
HEADLIGHTS PARKING LAMPS MARKER LAMPS
Page 41 of 88
Downloaded from www.Manualslib.com manuals search engine I n Case of Emergency
Four Way Hazard
Warning
Flasher
• Use the warning flasher to warn
other drivers any time your
ve
hicle becomes a traffic hazard,
day or night.
• Avoid stopping on the roadway
if possible.
• Turn on the hazard warning
flasher, with engine ignition off
or on, by pushing in on the but
ton located just below the steer
ing wheel.
• If the brake pedal is depressed,
the lights will not flash
but will
glow continuously instead.
• To cancel the flasher, pull the
button outward.
"Rocking" Car
If it becomes necessary to rock
the car to free it from sand, mud or
snow, move the selector lever
from
"D" to "R" in a repeat pattern
while simultaneously applying
moderate pressure to the accelera
tor. Do not race engine. A void
spinning wheels when trying to free
car.
Towing
Proper lifting or towing equip
ment
is necessary to prevent dam
age to the vehicle during any tow
ing operation. Detailed towing in
formation is available at your
dealer and has been provided to
tow truck operators responsible for
movement of disabled or locked
ve
hicles. State and local laws appli
cable to vehicles in tow must also
be followed.
Your Camaro may be towed on
all four wheels, at speeds of less
than 35 MPH, for distances up to
38
50 miles, provided driveIine, axle
and transmission are otherwise nor
mally operable.
For such towing,
parking brake must be released,
and transmission must be in neu
tral (ignition lock turned to
OFF
position). Attachments must be to
main structural members of the car,
not to bumpers or bracketing,
Safety chains or cables should be
used. Remember that power steer
ing assist will not be available when
engine
is inoperative.
Emergency Starting
• Never tow the car to start
because the surge forward when
the engine starts could cause a
collision with the tow vehicle.
• Engines in vehicles with auto
matic transmissions cannot be
started by pushing the car.
Page 54 of 88
Downloaded from www.Manualslib.com manuals search engine SERVICE AND MAINTENANCE
The time or mileage intervals on
the following pages are intended
as
a guide for establishing regular
maintenance and lubrication
periods for your car. Sustained
Fuel
Requirements
Your Camaro is designed to
operate efficiently on fuel of
ap
proximately 91 Research Octane
Number or higher, commonly sold
in the United
States and Canada.
Use of a fuel which is too low in
anti-knock quality will result in
"spark knock" and/or "after-run."
Since
the anti-knock quality of all
gasoline
is not the same and factors
such
as altitude, terrain, and air
temperature affect operating
effi-
heavy duty or high speed operations
or operation under adverse condi
tions may necessitate more frequent
servicing. To determine specific
recommendations for conditions
ciency, knocking
and/or after-run
may result even though you are
using the fuel recommended.
If
these conditions persist consult
your authorized Chevrolet Dealer.
In any case, continuous or
ex
cessive knocking may result in en
gine damage and constitutes mis
use of the engine for which Chev
rolet Division is not responsible
under the terms of the New Vehicle
Warranty.
NOTE: Read page 42 regarding
the importance
of using unleaded
or
low lead gasolines.
51
under which you use your car, con
sult your Authorized Chevrolet
Dealer.
Gas Cap-The fuel tank filler cap
has a new two-step removal and
installation procedure plus a
pres
sure-vacuum safety relief valve. It
is equipped with a double set of
locking tangs.
To remove:
• Rotate cap one-half turn coun
terclockwise to clear the first set
of tangs from the slots inside the
filler neck. This will allow any
residual pressure to escape.
• Pull the cap outward and rotate
one-quarter turn counterclock
wise to clear second set of tangs
and remove the cap.
• To install, reverse this procedure.
Page 59 of 88
Downloaded from www.Manualslib.com manuals search engine Distributor Cam Lubricator
6 Cylinder Engine -Rotate cam
lubricator
1800 at 12,000 mile in
tervals -Replace at
24,000 mile
intervals.
8 Cylinder Engine-Change cam
lubricator end for end at
12,000
mile intervals-Replace at 24,000
mile intervals.
Rear Axle
Standard -Every 4 months or
6,000 miles, whichever occurs
first, check lubricant level and add
lubricant, if necessary, to
fill to
level of filler plug hole.
Use SAE
80 or SAE 90 GL-5 Gear Lubri
cant.
Positraction -Same as standard
axle
but use only the special posi
traction lubricant available from
your Chevrolet Dealer.
Manual Transmissions
3-Speed and 4-Speed -Every
6,000 miles or 4 months-Check
at operating temperature and fill
as necessary to level of filler plug
hole with SAE
80 or SAE 90 GL-
5 Gear Lubricant.
Clutch Cross-Shaft -Every
36,000 miles or sooner if neces
sary -Remove the plug, install a
lubrication fitting
and lubricate
with water resistant
EP Chassis
Lubricant which meets
GM Speci
fication 6031M.
Automatic Transmission
Fluid Recommendations
General Motors DEXRON®
Automatic Transmission Fluid,
part no. 1050568 and United
Delco DEXRON® Automatic
Transmission Fluid, part no. 301-
RD, which have been especially
formulated and tested for use in
your automatic transmission are
recommended.
Other automatic
transmission fluids identified with
the
mark DEXRON@ are also
recommended.
56
Check the fluid level at each
engine oil change period.
To make
an accurate fluid level check:
1. Drive car several miles, making
frequent starts and stops, to
bring transmission up to normal
operating temperature (ap
proximately 180-190 OF) .
2.
Park car on a level surface.
3. Place selector lever
in "Park"
and leave engine running.
4. Remove dipstick and
WIpe
clean.
5. Reinsert dipstick until cap seats.
6. Remove dipstick and note read
ing.
If oil level is at or below the
"ADD" mark on the dipstick, oil
should be added as necessary.
One pint raises the level from ADD
to FULL.
Do not overfill.
Under normal driving condi
tions, the transmission fluid should
Page 60 of 88
Downloaded from www.Manualslib.com manuals search engine be changed every 24,000 miles. If
your car is driven extensively in
heavy city traffic during hot
weather,
or is used to pull a trailer,
change fluid every
12,000 miles.
Changing
Fluid -Remove fluid
from the transmission sump and
add approximately 1
Yz quarts U.S.
Measure ( 1 Y4 quarts Imperial
Measure) of new fluid.
(Power
glide). For Turbo Hydra-matic 350
this fluid amount is 2.5 quarts U.S.
Measure (2.0 quarts Imperial
Measure) . Operate transmission
through all shift ranges and re
check fluid level as described
above.
It is not necessary to remove
the pan because a drain plug
is
provided.
Powerglide Low Band Adjust
ment-At the first transmission
fluid change, have your Chevrolet
Dealer adjust the low band. Turbo
Hydra-Matic
400-Lubri
cation of your Turbo Hydra-matic
400 will, except for fluid capacity
and filter change listed below, fol
low previously stated automatic
transmission recommendations.
After checking transmission fluid
level it is important that the dip
stick be pushed all the way into
the filler tube.
Every
24,000 miles -After re
moving fluid from the transmission
sump, approximately
7Yz pints
U.S. measure (6 pints Imperial
measure) of fresh fluid will be re
quired to return level to proper
mark on the dipstick.
Every
24,000 miles the transmis
sion sump filter should be re
placed.
Transmission
Shift and Back
drive Linkage (Manual and
57
Automatic) -Every 6,000 miles
or 4 months lubricate shift link
age
and on manual transmission
floor controls lever contacting
faces with water resistant
EP chas
sis lubricant which meets GM
Specification 6031M.
If vehicle is equipped with a 6
cylinder engine and
Powerglide
transmission, lubricate the throttle
valve inner lever, outer lever
and
sleeve (linkage) (at inlet mani
fold attachment) on their respec
tive contacting surfaces with water
resistant
EP chassis lubricant
which meets
GM Specification
GM 6031 M. Operate linkage to
evenly distribute lubricant.
Transmission Shift Linkage
(Manual and Automatic)
Every 6,000 miles or 4 months
lubricate shift linkage and
on man
ual transmission floor controls
Page 63 of 88
Downloaded from www.Manualslib.com manuals search engine Cooling System Care
Checking the coolant level at
each engine oil change. Level
should be
3" below bottom of filler
neck when cold.
Coolant Recommendations
The inhibited year-around cool
ant, used to
fill the cooling system
at the factory,
is a high quality so
lution that meets General Motors
Specifications 1899-M. This fac
tory-fill coolant solution
is formu
lated to withstand two full calendar
years of normal operation without
draining, provided the same con
centration of coolant
is added if the
system needs additional fluid be
tween drain periods. The original
factory-fill coolant provides freez
ing protection to
-20°F (-32°F
in Canada).
Every two years, the cooling sys
tem should be serviced as follows:
1. Drain coolant, when hot,
through the radiator drain valve.
2. Close valve and add sufficient
plain· water to
fill system.
3. Run engine until normal operat
ing temperature
is reached.
4. Drain and refill the system as
described in steps 1, 2, and 3 a
sufficient number of times until
the drained liquid
is colorless.
5. Allow system to drain com
pletely and then close radiator
drain valve tightly.
6.
Add the necessary amount of
high quality inhibited glycol
base coolant meeting GM
Speci
fication 1899-M to provide the
required freezing and corrosion
protection
(at least to O°F.)
7. Run engine until normal oper
ating temperature
is reached.
8. Check and adjust level of cool
ant after system has cooled
suffi
ciently to remove radiator cap.
60
NOTE: Addition of supplemental
additives and other available ma
terials which have not been specifi
cally approved by GM are not nor
mally required in your car. Use of
these materials will result in un
warranted operating expense.
It is the owner's responsibility to
keep the freeze protection at a level
commensurate with the tempera
tures which may occur in the area
in which the vehicle will be oper
ated. Regardless of whether freez
ing temperatures are
or are not ex
pected, cooling system protection
should be maintained at least to
OaF to provide adequate corrosion
protection. When coolant addi
tions are required because of cool
ant loss or to provide additional
protection against freezing at tem
peratures lower than
-20°F,
(-32°F in Canada), a sufficient
amount of an ethylene glycol base
Page 68 of 88
Downloaded from www.Manualslib.com manuals search engine Operation in Foreign Countries
If you plan to operate your Camaro
outside the continental limits of
the United States or Canada, there
is a possibility
that the best fuels
available
are so low in anti-knock
quality
that excessive knocking and
serious engine damage may result
from their use.
To minimize this
possibility, write to Chevrolet
Motor Division, Service Depart
ment, Detroit, Michigan 48202,
giving:
• The compression ratio and cubic inch
displacement of the engine
(See page 74 or obtain from
your
Dealer.)
• The vehicle identification num
ber (on plate on instrument
panel
ahead of the steering
wheel
and visible through the
windshield ,
or from the regis
tration slip
or title) .
• The country or countries in
which you
plan to travel.
You will be furnished details of
65 adjustments
or modifi
cations which
should be
made to your engine at
your Chevrolet Dealership prior to
your departure.
Failure to make
the necessary changes to your car
and subsequent operation under
conditions of continuous
or exces
s ive knocking constitutes misuse of
the engine for which the Chevrolet
Division is
not responsible under
the terms of the Chevrolet New
Vehicle Warranty.
After arriving
in a foreign country, determine
and use the best fuels available.