alternator belt CHEVROLET CAMARO 1982 Repair Guide
[x] Cancel search | Manufacturer: CHEVROLET, Model Year: 1982, Model line: CAMARO, Model: CHEVROLET CAMARO 1982Pages: 875, PDF Size: 88.64 MB
Page 351 of 875
GM – CAMARO 1982-1992 – Repair Guide (Checked by WxMax) 351
alternating current developed
within the stator windings to a direct (DC) current
at the output (BAT) terminal. Three of these diodes are negative and are
mounted flush with the end frame while t he other three are positive and are
mounted into a strip called a heat sink. The positive diodes are easily identified
as the ones within small cavities or depressions.
The alternator charging system is a negative (-) ground system which consists
of an alternator, a regulat or, a charge indicator, a storage battery and wiring
connecting the components, and fuse link wire.
The alternator is belt-driven from t he engine. Energy is supplied from the
alternator/regulator system to the rotati ng field through two brushes to two slip-
rings. The slip-rings are mounted on the rotor shaft and are connected t\
o the
field coil. This energy supplied to the ro tating field from the battery is called
excitation current and is used to init ially energize the field to begin the
generation of electricity. Once the alter nator starts to generate electricity, the
excitation current comes from its ow n output rather than the battery.
The alternator produces power in the form of alternating current. The alternating
current is rectified by 6 diodes into dire ct current. The direct current is used to
charge the battery and power the rest of the electrical system.
When the ignition key is turned ON, current flows from the battery, through the
charging system indicator light on the in strument panel, to the voltage regulator,
and to the alternator. Since the alternat or is not producing any current, the
alternator warning light comes on. When the engine is started, the alternator
begins to produce current and turns the alte rnator light off. As the alternator
turns and produces current, the current is divided in two ways: part to the
battery(to charge the battery and power the electrical components of the
vehicle), and part is returned to the alte rnator (to enable it to increase its
output). In this situation, the alternator is receiving current from the battery and
from itself. A voltage regulat or is wired into the current supply to the alternator
to prevent it from receiving too much cu rrent which would cause it to put out too
much current. Conversely, if the voltage regulator does not allow the alternator
to receive enough current, the battery will not be fully charged and will
eventually go dead.
The battery is connected to the alternator at all times, whether the ignition key is
turned ON or not. If the battery were shorted to ground, the alternator would
also be shorted. This woul d damage the alternator. To prevent this, a fuse link
is installed in the wiring between the battery and the alternator. If the battery is
shorted, the fuse link melts, protecting the alternator.
An alternator is better that a convent ional, DC shunt generator because it is
lighter and more compact, because it is designed to supply the battery and
accessory circuits through a wide range of engine speeds, and because it
eliminates the necessary maintenance of replacing brushes and servicing
commutators.
PRECAUTIONS
Page 352 of 875
GM – CAMARO 1982-1992 – Repair Guide (Checked by WxMax) 352
To prevent serious damage to the alte
rnator and the rest of the charging
system, the following precauti ons must be observed:
• Never reverse the battery connections.
• Booster batteries for starting must be connected properly: positive-to-
positive and negative-to-ground.
• Disconnect the battery cables before using a fast charger; the charger
has a tendency to force current through the diodes in the opposite
direction for which they were designed. This burns out the diodes.
• Never use a fast charger as a booster for starting the vehicle.
• Never disconnect the voltage regulator while the engine is running.
• Avoid long soldering times when replacing diodes or transistors.
Prolonged heat is damaging to AC alternators.
• Do not use test lamps of more t han 12 volts (V) for checking diode
continuity.
• Do not short across or ground any of the terminals on the AC alternator.
• The polarity of the battery, alter nator, and regulator must be matched
and considered before making any elec trical connections within the
system.
• Never operate the alternator on an open circuit. make sure that all
connections within the circ uit are clean and tight.
• Disconnect the battery terminals when performing any service on the
electrical system. This wil l eliminate the possibility of accidental reversal
of polarity.
• Disconnect the battery ground cable if arc welding is to be done on any
part of the car.
CHARGING SYSTEM TROUBLESHOOTING
There are many possible ways in whic h the charging system can malfunction.
Often the source of a problem is diffi cult to diagnose, requiring special
equipment and a good deal of experience. However, when the charging system
fails completely and causes the dash boar d warning light to come on or the
battery to become dead the following items may be checked:
1. The battery is known to be good and fully charged.
2. The alternator belt is in good condition and adjusted to the proper
tension.
3. All connections in t he system are clean and tight.
REMOVAL & INSTALLATION
Page 354 of 875
GM – CAMARO 1982-1992 – Repair Guide (Checked by WxMax) 354
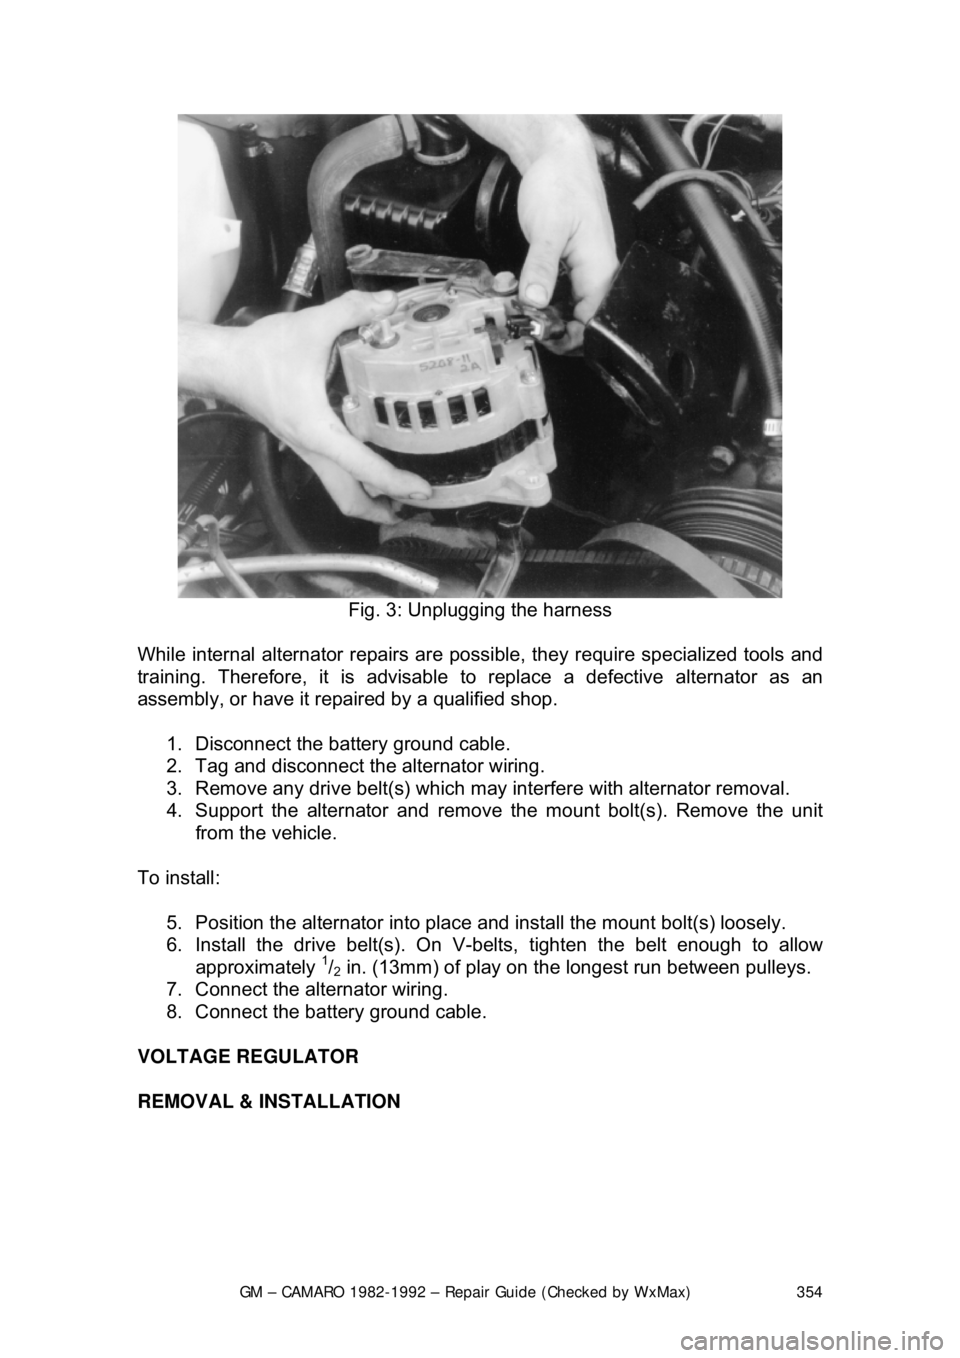
Fig. 3: Unplugging the harness
While internal alternator repairs are possi ble, they require specialized tools and
training. Therefore, it is advisable to replace a defective alternator as an
assembly, or have it repai red by a qualified shop.
1. Disconnect the battery ground cable.
2. Tag and disconnect the alternator wiring.
3. Remove any drive belt(s) which may interfere with alternator removal.
4. Support the alternator and remove the mount bolt(s). Remove the unit
from the vehicle.
To install: 5. Position the alternator into place and install the mount bolt(s) loosely.
6. Install the drive belt(s). On V- belts, tighten the belt enough to allow
approximately
1/2 in. (13mm) of play on the longest run between pulleys.
7. Connect the alternator wiring.
8. Connect the battery ground cable.
VOLTAGE REGULATOR
REMOVAL & INSTALLATION
Page 386 of 875
GM – CAMARO 1982-1992 – Repair Guide (Checked by WxMax) 386
FUEL INJECTION
1. Remove the air cleaner.
2. Drain the radiator.
3. Disconnect: a. Battery cables at the battery.
b. Upper radiator and heater hoses at the manifold.
c. Crankcase ventilation hoses as required.
d. Fuel line at the carburetor.
e. Accelerator linkage.
f. Vacuum hose at the distributor, if equipped.
g. Power brake hose at the car buretor base or manifold, if
applicable.
h. Temperature sending switch wires.
4. Remove the distributor cap and scribe the rotor position relative to the
distributor body, and engine.
5. Remove the distributor.
6. If applicable, remove the alternator upper bracket. As required, remove
the air cleaner bracket, and accelerator bellcrank.
7. Remove the manifold-to-head attachi ng bolts, then remove the manifold
and carburetor as an assembly.
8. Mark and disconnect all emission re lated items (e.g.: wiring, vacuum
hoses, etc.) which are connected to manifold mounted items.
9. If the manifold is to be replaced , transfer the carburetor (and mounting
studs), water outlet and thermostat (use a new gasket) heater hose
adapter, EGR valve (use new gasket) and, if applicable, TVS switch(s)
and the choke coil.
To install: 10. Before installing the manifold, thoroughly clean the gasket and sealing
surfaces of the cylinder heads and manifold.
11. Install the manifold end seals, folding the tabs if applicable, and the
manifold/head gaskets, using a s ealing compound around the water
passages.
Make sure that the new manifold gaskets match the old ones EXACTLY.
12. When installing the manifold, care should be taken not to dislocate the
end seals. It is helpful to use a pilo t in the distributor opening. Tighten the
manifold bolts to 30 ft. lbs. (40 Nm) for 5.0L or 20-25 ft. lbs. (27-34 Nm)
for 2.8L in the sequence illustrated.
13. Install the distributor with the rotor in its original location as indicated by
the scribe line. If the engi ne has been disturbed, refer to the previous
Distributor Removal and Installation procedure.
14. If applicable, install the alter nator upper bracket and adjust the belt
tension.
15. Connect all disconnected components at their original locations.
16. Fill the cooling system, start the engine, check for leaks and adjust the
ignition timing and carburetor idle speed and mixture.
Page 411 of 875
GM – CAMARO 1982-1992 – Repair Guide (Checked by WxMax) 411
1. Disconnect the negative battery cable.
2. Relieve the fuel system pressure
and drain the engine coolant from the
radiator into a suitable container.
3. Remove the intake manifold and the spark plugs.
4. Remove the dipstick tube and bra cket. Raise and support the vehicle
safely. Drain the oil and remove the oil filter. Lower the vehicle.
5. Remove the exhaust manifolds.
6. Remove the drive belt(s).
7. Remove the air conditioning compresso r and bracket, reposition it aside.
Do not disconnect the lines.
8. Remove the power steering pump and bracket, reposition it aside.
9. Remove the alternator and br acket, reposition it aside.
10. Remove the ground cable from the rear of the cylinder head and remove
the engine lift bracket.
11. Remove the rocker arm covers.
12. Loosen the rocker arms until the pushrods can be removed.
13. Remove the cylinder head bolts and remove the cylinder heads.
To install: 14. Clean the gasket mating surfaces of all components. Be careful not to
nick or scratch any surfaces as this will allow leak paths. Clean the bolt
threads in the cylinder bl ock and on the head bolts. Dirt will affect bolt
torque.
15. Place the head gaskets in pos ition over the dowel pins.
16. Install the cylinder heads.
17. Coat the cylinder head bolts th reads with GM sealer 1052080 or
equivalent, and install the bolts. Tight en the bolts in the proper sequence
to:
• 1982-1987 engines: 70 ft lbs. (90 Nm)
• 1988-1992 engines: 1st step: 40 ft lbs. (55 Nm); 2nd step: tighten
an additional 1/4 (90 degree) turn
18. Install the pushrods a nd loosely retain them wit h the rocker arms. Make
sure the lower ends of the pushrods ar e in the lifter seats. Refer to the
rocker arm procedures outlined ea rlier in this section.
19. Install the power steering pump br acket and pump. Do the same for the
air conditioning compressor bracket and compressor.
20. Install the ground cable to t he rear of the cylinder head.
21. Install the exhaust manifolds.
22. Install the dipstick tube and bracket.
23. Install the intake manifold.
24. Install the alternator bracket and alternator.
25. Install the drive belt(s).
26. Install the spark plugs.
27. Fill the cooling system with the proper type and quantity of coolant. Install
a new oil filter and fill the crankca se with the proper type and quantity of
oil.
28. Connect the negative battery cable, star t the vehicle and check for leaks.
Page 416 of 875
GM – CAMARO 1982-1992 – Repair Guide (Checked by WxMax) 416
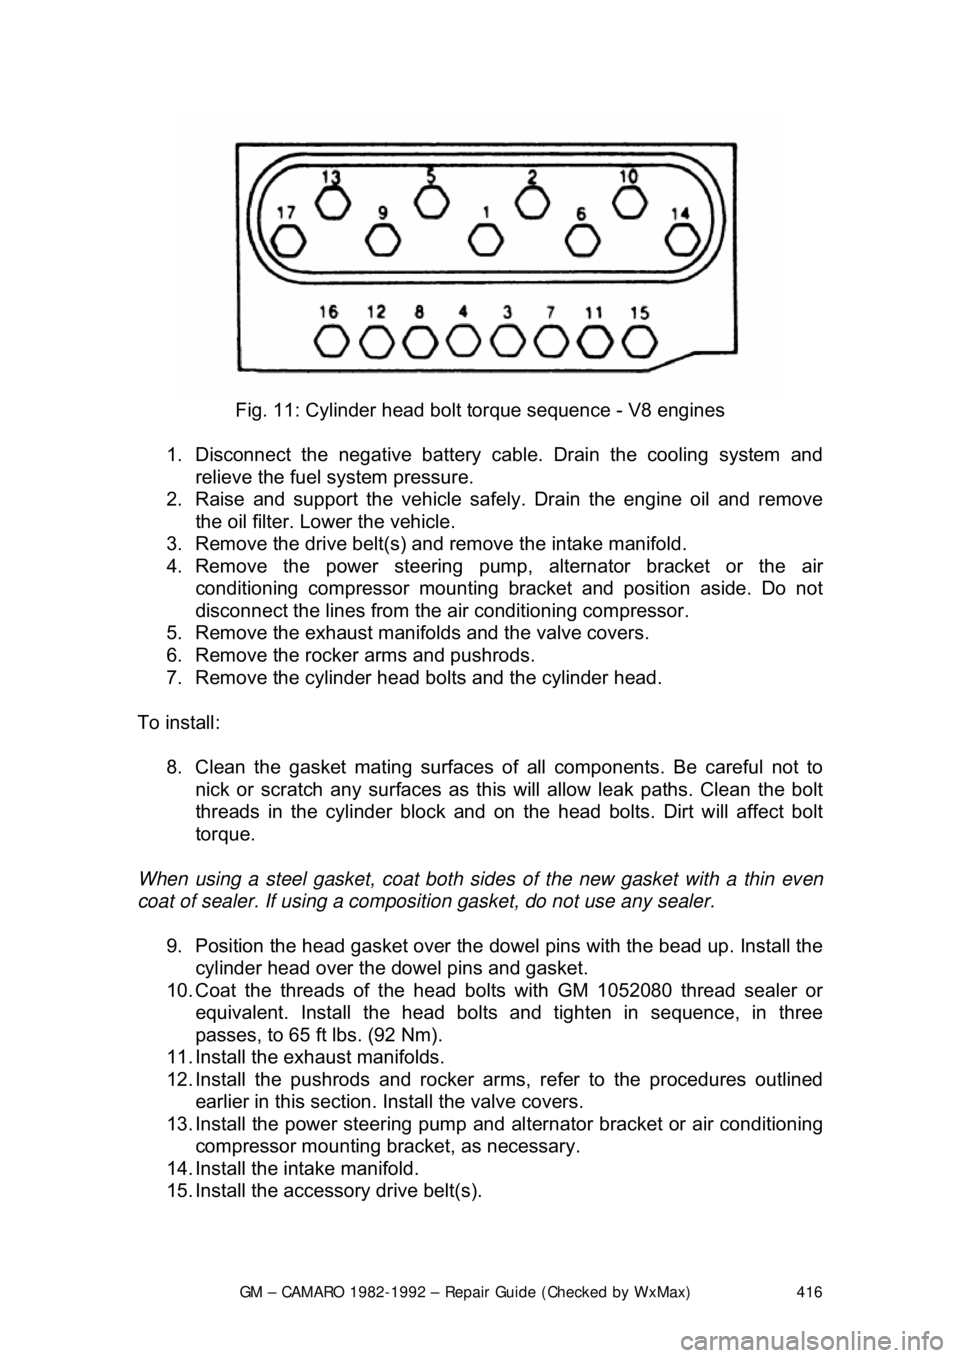
Fig. 11: Cylinder head bolt torque sequence - V8 engines
1. Disconnect the negative battery c able. Drain the cooling system and
relieve the fuel system pressure.
2. Raise and support the vehicle safe ly. Drain the engine oil and remove
the oil filter. Lower the vehicle.
3. Remove the drive belt(s) and remove the intake manifold.
4. Remove the power steering pump, alternator bracket or the air
conditioning compressor mounting br acket and position aside. Do not
disconnect the lines from the air conditioning compressor.
5. Remove the exhaust manifolds and the valve covers.
6. Remove the rocker arms and pushrods.
7. Remove the cylinder head bolts and the cylinder head.
To install: 8. Clean the gasket mating surfaces of all components. Be careful not to
nick or scratch any surfaces as this will allow leak paths. Clean the bolt
threads in the cylinder bl ock and on the head bolts. Dirt will affect bolt
torque.
When using a steel gasket, coat both sides of the new gasket with a thin even
coat of sealer. If using a compos ition gasket, do not use any sealer.
9. Position the head gasket over the dow el pins with the bead up. Install the
cylinder head over the dowel pins and gasket.
10. Coat the threads of the head bo lts with GM 1052080 thread sealer or
equivalent. Install the head bolts and tighten in sequence, in three
passes, to 65 ft lbs. (92 Nm).
11. Install the exhaust manifolds.
12. Install the pushrods and rocker arms, refer to the procedures outlined earlier in this section. Install the valve covers.
13. Install the power steering pump and al ternator bracket or air conditioning
compressor mounting bra cket, as necessary.
14. Install the intake manifold.
15. Install the accessory drive belt(s).
Page 428 of 875
GM – CAMARO 1982-1992 – Repair Guide (Checked by WxMax) 428
1. Disconnect the battery ground c
able. Drain the cooling system.
2. Remove the fan shroud or the upper radiator support and drive belts.
Remove the fan and pulley from the water pump.
3. Remove the alternator upper and lower brackets, air brace with brackets,
and power steering lower bra cket (move it aside).
4. Remove the radiator lower hose and the heater hose from the water
pump. Remove the water pump bolts and the water pump.
5. If A/C equipped, remove the comp ressor and move aside. Remove the
compressor mounting bracket.
6. Remove the damper pulley retain ing bolt and the damper pulley.
7. Remove the timing gear cover bolts and the timing gear cover.
With the timing gear cover removed, use a large screwdriver to pry the oil seal
from the cover. To install the new oil se al, lubricate it with engine oil and drive it
into place.
To install: 8. Prepare the mating surfaces for reinst allation of the timing gear cover.
Coat the new gasket with RTV sealer.
9. Install the timing gear cover and timing gear cover bolts. Torque the
cover bolts to specifications:
• V6 engines (M8 x 1.25 bolts): 13-22 ft. lbs. (18-30 Nm)
• V6 engines (M10 x 1.5 bolts): 20-35 ft. lbs. (27-48 Nm)
• V8 engines (all bolts): 69-130 inch lbs. (8-14 Nm)
10. Install the damper pulley by pulli ng the damper onto the crankshaft. Use
tool J-23523 or equivalent. Install t he damper pulley retaining bolt and
torque bolts to 67-85 ft lbs. (90-110 Nm).
11. If A/C equipped, install the compressor mounting bracket and
compressor.
12. Install the water pump and the water pump bolts.
13. Install the radiator lower hose and the heater hose to the water pump.
14. Install the alternator upper and lower brackets, air brace with brackets
and the power steering lower bracket.
15. Install the fan and pull ey to the water pump. Inst all the fan shroud or the
upper radiator support and drive belts and adjust.
16. Connect the battery ground cable.
17. Fill the cooling syst em, start the engine and check for leaks.
Page 812 of 875
GM – CAMARO 1982-1992 – Repair Guide (Checked by WxMax) 812
9. Connect one end of the other jumper
cable to the negative (-) terminal on
the booster battery and the final cable clamp to an engine bolt head,
alternator bracket or ot her solid, metallic point on the engine with the
dead battery. Try to pick a ground on the engine that is positioned away
from the battery in order to minimi ze the possibility of the 2 clamps
touching should one l oosen during the procedure. DO NOT connect this
clamp to the negative (-) term inal of the bad battery.
CAUTION - Be very careful to keep the jum per cables away from moving parts
(cooling fan, belts, etc.) on both engines.
10. Check to make sure that the c ables are routed away from any moving
parts, then start the d onor vehicle's engine. Run the engine at moderate
speed for several minutes to allow the dead battery a chance to receive
some initial charge.
11. With the donor vehicle's engine still r unning slightly above idle, try to start
the vehicle with the dead battery. Crank the engine for no more than 10 \
seconds at a time and let the starter cool for at least 20 seconds between
tries. If the vehicl e does not start in 3 tries, it is likely that something else
is also wrong or that the battery needs additional time to charge.
12. Once the vehicle is star ted, allow it to run at idle for a few seconds to
make sure that it is operating properly.
13. Turn ON the headlight s, heater blower and, if equipped, the rear
defroster of both vehicles in order to reduce the severity of voltage spikes
and subsequent risk of dam age to the vehicles' electrical systems when
the cables are disconnected. This st ep is especially important to any
vehicle equipped with computer control modules.
14. Carefully disconnect the cables in the reverse order of connection. Star\
t with the negative cable that is attached to the engine ground, then the
negative cable on the donor battery. Di sconnect the positive cable from
the donor battery and finally, disconnect the positive cable from the
formerly dead battery. Be careful when disconnecting the cables from the
positive terminals not to allow the alli gator clips to touch any metal on
either vehicle or a short and sparks will occur.
JACKING
Your vehicle was supplied with a jack for emergency road repairs. This jack is
fine for changing a flat tire or other s hort term procedures not requiring you to
go beneath the vehicle. If it is used in an emergency situation, carefully follow
the instructions provided eit her with the jack or in your owner's manual. Do not
attempt to use the jack on any portions of the vehicle other than specified by the
vehicle manufacturer. Always block the diagonally opposite wheel when using a
jack.
A more convenient way of jacking is the use of a garage or floor jack. You may
use the floor jack to raise the vehicle in the areas shown in the illustration .