height CHEVROLET CAMARO 2017 6.G Owners Manual
[x] Cancel search | Manufacturer: CHEVROLET, Model Year: 2017, Model line: CAMARO, Model: CHEVROLET CAMARO 2017 6.GPages: 391, PDF Size: 6.65 MB
Page 12 of 391
Chevrolet Camaro Owner Manual (GMNA-Localizing-U.S./Canada/Mexico-
9804281) - 2017 - crc - 4/25/16
In Brief 11
Memory Features
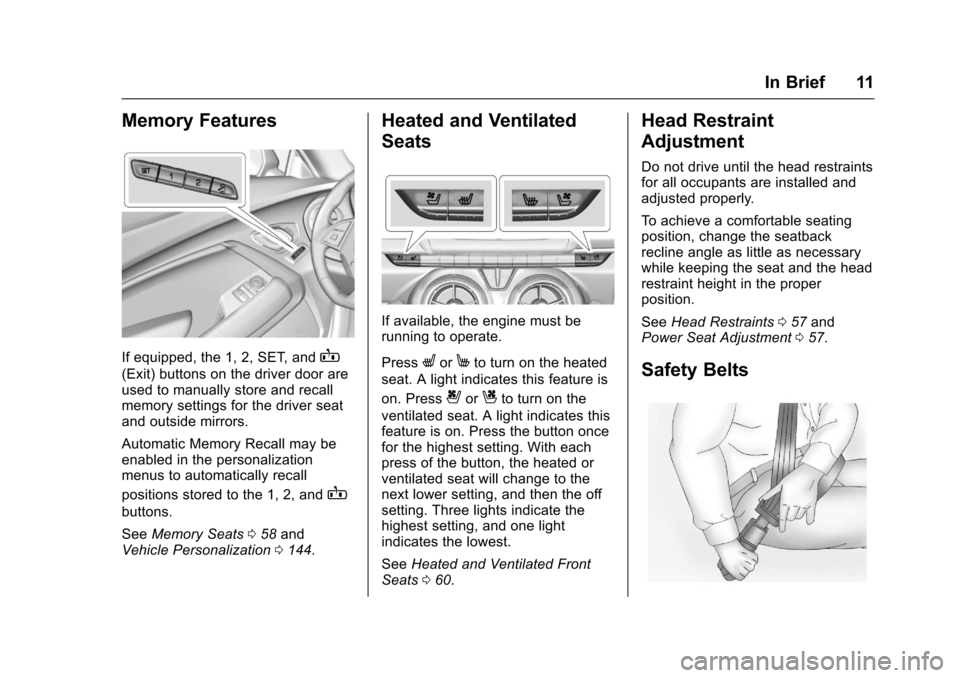
If equipped, the 1, 2, SET, andB
(Exit) buttons on the driver door are
used to manually store and recall
memory settings for the driver seat
and outside mirrors.
Automatic Memory Recall may be
enabled in the personalization
menus to automatically recall
positions stored to the 1, 2, and
B
buttons.
SeeMemory Seats 058 and
Vehicle Personalization 0144.
Heated and Ventilated
Seats
If available, the engine must be
running to operate.
Press
LorMto turn on the heated
seat. A light indicates this feature is
on. Press
{orCto turn on the
ventilated seat. A light indicates this
feature is on. Press the button once
for the highest setting. With each
press of the button, the heated or
ventilated seat will change to the
next lower setting, and then the off
setting. Three lights indicate the
highest setting, and one light
indicates the lowest.
See Heated and Ventilated Front
Seats 060.
Head Restraint
Adjustment
Do not drive until the head restraints
for all occupants are installed and
adjusted properly.
To achieve a comfortable seating
position, change the seatback
recline angle as little as necessary
while keeping the seat and the head
restraint height in the proper
position.
See Head Restraints 057 and
Power Seat Adjustment 057.
Safety Belts
Page 58 of 391
Chevrolet Camaro Owner Manual (GMNA-Localizing-U.S./Canada/Mexico-
9804281) - 2017 - crc - 4/25/16
Seats and Restraints 57
Head Restraints
The vehicle’s front seats have
adjustable head restraints in the
outboard seating positions.
{Warning
With head restraints that are not
installed and adjusted properly,
there is a greater chance that
occupants will suffer a neck/
spinal injury in a crash. Do not
drive until the head restraints for
all occupants are installed and
adjusted properly.
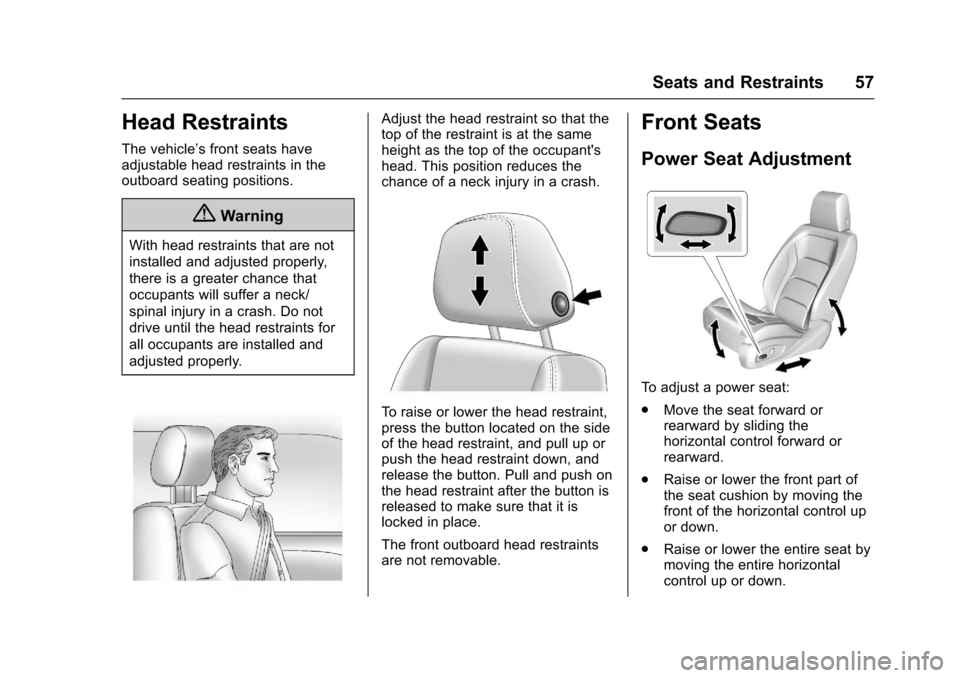
Adjust the head restraint so that the
top of the restraint is at the same
height as the top of the occupant's
head. This position reduces the
chance of a neck injury in a crash.
To raise or lower the head restraint,
press the button located on the side
of the head restraint, and pull up or
push the head restraint down, and
release the button. Pull and push on
the head restraint after the button is
released to make sure that it is
locked in place.
The front outboard head restraints
are not removable.
Front Seats
Power Seat Adjustment
To adjust a power seat:
.Move the seat forward or
rearward by sliding the
horizontal control forward or
rearward.
. Raise or lower the front part of
the seat cushion by moving the
front of the horizontal control up
or down.
. Raise or lower the entire seat by
moving the entire horizontal
control up or down.
Page 80 of 391
Chevrolet Camaro Owner Manual (GMNA-Localizing-U.S./Canada/Mexico-
9804281) - 2017 - crc - 4/25/16
Seats and Restraints 79
A thick layer of additional material,
such as a blanket or cushion,
or aftermarket equipment such as
seat covers, seat heaters, and seat
massagers can affect how well the
passenger sensing system
operates. We recommend that you
not use seat covers or other
aftermarket equipment except when
approved by GM for your specific
vehicle. SeeAdding Equipment to
the Airbag-Equipped Vehicle 079
for more information about
modifications that can affect how
the system operates.
The on indicator may be lit if an
object, such as a briefcase,
handbag, grocery bag, laptop,
or other electronic device, is put on
an unoccupied seat. If this is not
desired, remove the object from
the seat.
{Warning
Stowing of articles under the
passenger seat or between the
passenger seat cushion and
(Continued)
Warning (Continued)
seatback may interfere with the
proper operation of the passenger
sensing system.
Servicing the
Airbag-Equipped Vehicle
Airbags affect how the vehicle
should be serviced. There are parts
of the airbag system in several
places around the vehicle. Your
dealer and the service manual have
information about servicing the
vehicle and the airbag system. To
purchase a service manual, see
Service Publications Ordering
Information0363.
{Warning
For up to 10 seconds after the
vehicle is turned off and the
battery is disconnected, an airbag
can still inflate during improper
service. You can be injured if you
(Continued)
Warning (Continued)
are close to an airbag when it
inflates. Avoid yellow connectors.
They are probably part of the
airbag system. Be sure to follow
proper service procedures, and
make sure the person performing
work for you is qualified to do so.
Adding Equipment to the
Airbag-Equipped Vehicle
Adding accessories that change the
vehicle's frame, bumper system,
height, front end, or side sheet
metal, may keep the airbag system
from working properly. The
operation of the airbag system can
also be affected by changing any
parts of the front seats, safety belts,
airbag sensing and diagnostic
module, steering wheel, instrument
panel, any of the airbag modules,
ceiling or pillar garnish trim,
overhead console, front sensors,
side impact sensors, or airbag
wiring.
Page 82 of 391
Chevrolet Camaro Owner Manual (GMNA-Localizing-U.S./Canada/Mexico-
9804281) - 2017 - crc - 4/25/16
Seats and Restraints 81
Warning (Continued)
inspected and any necessary
replacements made as soon as
possible.
If an airbag inflates, you will need to
replace airbag system parts. See
your dealer for service.
If the airbag readiness light stays on
after the vehicle is started or comes
on when you are driving, the airbag
system may not work properly. Have
the vehicle serviced right away. See
Airbag Readiness Light 0119.
Child Restraints
Older Children
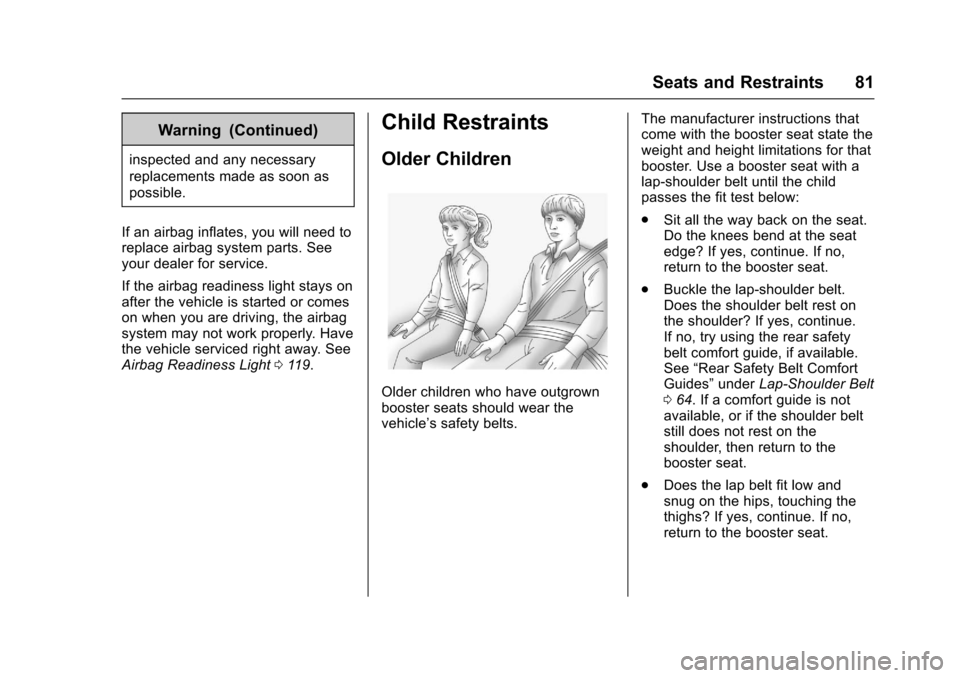
Older children who have outgrown
booster seats should wear the
vehicle’s safety belts. The manufacturer instructions that
come with the booster seat state the
weight and height limitations for that
booster. Use a booster seat with a
lap-shoulder belt until the child
passes the fit test below:
.
Sit all the way back on the seat.
Do the knees bend at the seat
edge? If yes, continue. If no,
return to the booster seat.
. Buckle the lap-shoulder belt.
Does the shoulder belt rest on
the shoulder? If yes, continue.
If no, try using the rear safety
belt comfort guide, if available.
See “Rear Safety Belt Comfort
Guides” underLap-Shoulder Belt
0 64. If a comfort guide is not
available, or if the shoulder belt
still does not rest on the
shoulder, then return to the
booster seat.
. Does the lap belt fit low and
snug on the hips, touching the
thighs? If yes, continue. If no,
return to the booster seat.
Page 85 of 391
Chevrolet Camaro Owner Manual (GMNA-Localizing-U.S./Canada/Mexico-
9804281) - 2017 - crc - 4/25/16
84 Seats and Restraints
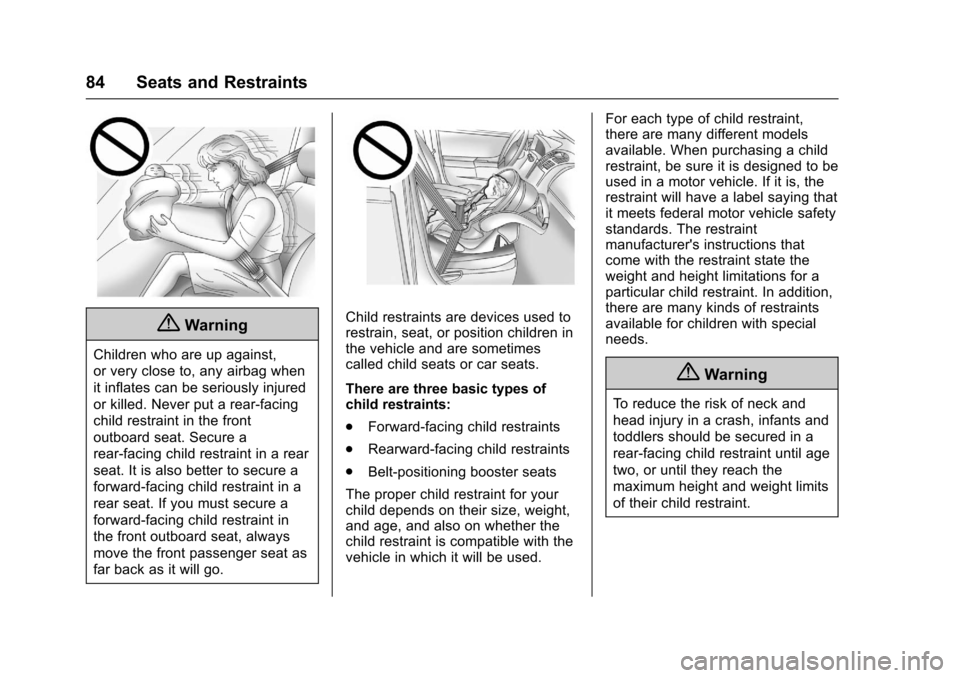
{Warning
Children who are up against,
or very close to, any airbag when
it inflates can be seriously injured
or killed. Never put a rear-facing
child restraint in the front
outboard seat. Secure a
rear-facing child restraint in a rear
seat. It is also better to secure a
forward-facing child restraint in a
rear seat. If you must secure a
forward-facing child restraint in
the front outboard seat, always
move the front passenger seat as
far back as it will go.
Child restraints are devices used to
restrain, seat, or position children in
the vehicle and are sometimes
called child seats or car seats.
There are three basic types of
child restraints:
.Forward-facing child restraints
. Rearward-facing child restraints
. Belt-positioning booster seats
The proper child restraint for your
child depends on their size, weight,
and age, and also on whether the
child restraint is compatible with the
vehicle in which it will be used. For each type of child restraint,
there are many different models
available. When purchasing a child
restraint, be sure it is designed to be
used in a motor vehicle. If it is, the
restraint will have a label saying that
it meets federal motor vehicle safety
standards. The restraint
manufacturer's instructions that
come with the restraint state the
weight and height limitations for a
particular child restraint. In addition,
there are many kinds of restraints
available for children with special
needs.
{Warning
To reduce the risk of neck and
head injury in a crash, infants and
toddlers should be secured in a
rear-facing child restraint until age
two, or until they reach the
maximum height and weight limits
of their child restraint.
Page 135 of 391
Chevrolet Camaro Owner Manual (GMNA-Localizing-U.S./Canada/Mexico-
9804281) - 2017 - crc - 4/25/16
134 Instruments and Controls
All formats, except the Performance
View, will show Turn-by-Turn
Navigation information and provide
details about the next driving
maneuver to be made.
Care of the HUD
Clean the inside of the windshield
as needed to remove any dirt or film
that could reduce the sharpness or
clarity of the HUD image.
Clean the HUD lens with a soft cloth
sprayed with glass cleaner. Wipe
the lens gently, then dry it.
HUD Troubleshooting
Check that:
.Nothing Is covering the
HUD lens.
. HUD brightness is not too dim or
too bright.
. HUD is adjusted to the proper
height.
. Polarized sunglasses are
not worn.
. Windshield and HUD lens are
clean.
If the HUD image is not correct,
contact your dealer.
The windshield is part of the HUD
system. See Windshield
Replacement 0282.
Vehicle Messages
Messages displayed on the DIC
indicate the status of the vehicle or
some action that may be needed to
correct a condition. Multiple
messages may display one after the
other.
The messages that do not require
immediate action can be
acknowledged and cleared by
pressing SEL. The messages that
require immediate action cannot be
cleared until that action is
performed. All messages should be
taken seriously and clearing the
messages does not correct the
problem.
The following are some of the
vehicle messages that may be
displayed depending on the vehicle
content.
See the High Performance
supplement for more information.
Page 249 of 391
Chevrolet Camaro Owner Manual (GMNA-Localizing-U.S./Canada/Mexico-
9804281) - 2017 - crc - 4/25/16
248 Driving and Operating
Side Blind Zone
Alert (SBZA)
If equipped, the SBZA system is a
lane-changing aid that assists
drivers with avoiding crashes that
occur with moving vehicles in the
side blind zone (or spot) areas.
When the vehicle is in a forward
gear, the left or right side mirror
display will light up if a moving
vehicle is detected in that blind
zone. If the turn signal is activated
and a vehicle is also detected on
the same side, the display will flash
as an extra warning not to change
lanes. Since this system is part of
the Lane Change Alert (LCA)
system, read the entire LCA section
before using this feature.
Lane Change Alert (LCA)
If equipped, the LCA system is a
lane-changing aid that assists
drivers with avoiding lane change
crashes that occur with moving
vehicles in the side blind zone (or
spot) areas or with vehicles rapidly
approaching these areas from
behind. The LCA warning displaywill light up in the corresponding
outside side mirror and will flash if
the turn signal is on.
{Warning
LCA does not alert the driver to
vehicles outside of the system
detection zones, pedestrians,
bicyclists, or animals. It may not
provide alerts when changing
lanes under all driving conditions.
Failure to use proper care when
changing lanes may result in
injury, death, or vehicle damage.
Before making a lane change,
always check mirrors, glance over
your shoulder, and use the turn
signals.
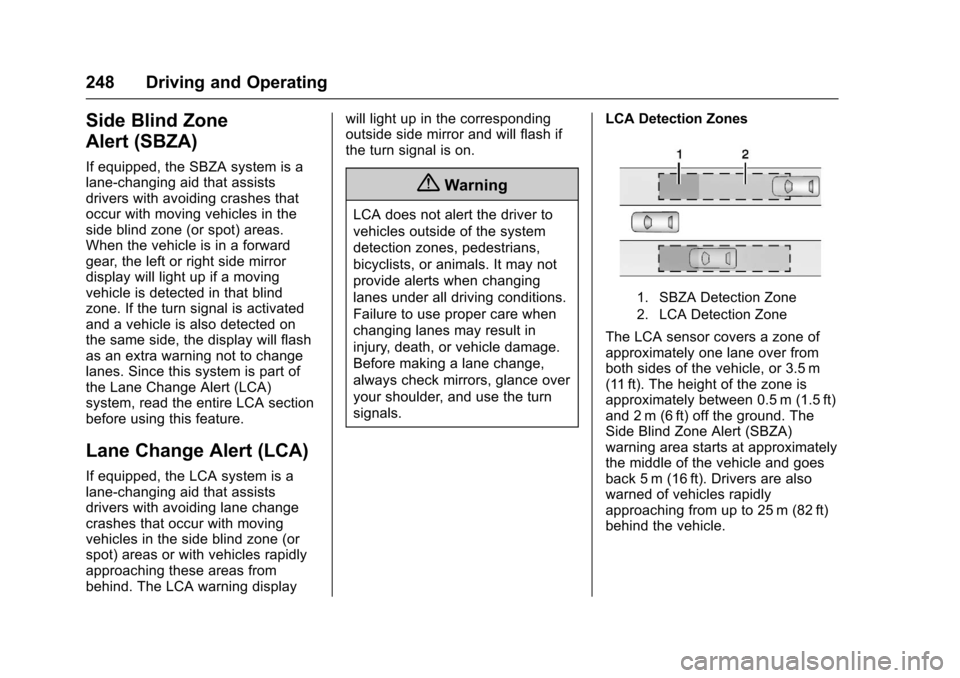
LCA Detection Zones
1. SBZA Detection Zone
2. LCA Detection Zone
The LCA sensor covers a zone of
approximately one lane over from
both sides of the vehicle, or 3.5 m
(11 ft). The height of the zone is
approximately between 0.5 m (1.5 ft)
and 2 m (6 ft) off the ground. The
Side Blind Zone Alert (SBZA)
warning area starts at approximately
the middle of the vehicle and goes
back 5 m (16 ft). Drivers are also
warned of vehicles rapidly
approaching from up to 25 m (82 ft)
behind the vehicle.
Page 258 of 391
Chevrolet Camaro Owner Manual (GMNA-Localizing-U.S./Canada/Mexico-
9804281) - 2017 - crc - 4/25/16
Vehicle Care 257
safety, including such things as
airbags, braking, stability, ride and
handling, emissions systems,
aerodynamics, durability, and
electronic systems like antilock
brakes, traction control, and stability
control. These accessories or
modifications could even cause
malfunction or damage not covered
by the vehicle warranty.
Damage to suspension components
caused by modifying vehicle height
outside of factory settings will not be
covered by the vehicle warranty.Damage to vehicle components
resulting from modifications or the
installation or use of non-GM
certified parts, including control
module or software modifications, is
not covered under the terms of the
vehicle warranty and may affect
remaining warranty coverage for
affected parts.
GM Accessories are designed to
complement and function with other
systems on the vehicle. See your
dealer to accessorize the vehicle
using genuine GM Accessories
installed by a dealer technician.
Also, see
Adding Equipment to the
Airbag-Equipped Vehicle 079.Vehicle Checks
Doing Your Own
Service Work
{Warning
It can be dangerous to work on
your vehicle if you do not have
the proper knowledge, service
manual, tools, or parts. Always
follow owner manual procedures
and consult the service manual
for your vehicle before doing any
service work.
If doing some of your own service
work, use the proper service
manual. It tells you much more
about how to service the vehicle
than this manual can. To order the
proper service manual, see Service
Publications Ordering
Information 0363.
This vehicle has an airbag system.
Before attempting to do your own
service work, see Servicing the
Airbag-Equipped Vehicle 079.
Page 278 of 391
Chevrolet Camaro Owner Manual (GMNA-Localizing-U.S./Canada/Mexico-
9804281) - 2017 - crc - 4/25/16
Vehicle Care 277
Caution (Continued)
freezing occurs, which could
damage the tank if it is
completely full.
Brakes
Disc brake pads have built-in wear
indicators that make a high-pitched
warning sound when the brake pads
are worn and new pads are needed.
The sound can come and go or can
be heard all the time when the
vehicle is moving, except when
applying the brake pedal firmly.
{Warning
The brake wear warning sound
means that soon the brakes will
not work well. That could lead to
a crash. When the brake wear
warning sound is heard, have the
vehicle serviced.
Caution
Continuing to drive with worn-out
brake pads could result in costly
brake repair.
Some driving conditions or climates
can cause a brake squeal when the
brakes are first applied or lightly
applied. This does not mean
something is wrong with the brakes.
If equipped with high performance
brake linings, there could be an
increased build-up of brake dust as
well as minor noises as compared
to standard brake linings.
Properly torqued wheel nuts are
necessary to help prevent brake
pulsation. When tires are rotated,
inspect brake pads for wear and
evenly tighten wheel nuts in the
proper sequence to torque
specifications. See Capacities and
Specifications 0351.
Brake pads should be replaced as
complete sets.
Brake Pedal Travel
See your dealer if the brake pedal
does not return to normal height,
or if there is a rapid increase in
pedal travel. This could be a sign
that brake service may be required.
Replacing Brake System Parts
Always replace brake system parts
with new, approved replacement
parts. If this is not done, the brakes
may not work properly. The braking
performance expected can change
in many other ways if the wrong
replacement brake parts are
installed or if parts are improperly
installed.
Cold Weather Brake Operation
(SS Model)
High performance brake
components may bind and clunk
when moving the vehicle. This may
be noticeable after parking when the
brakes have been wet, such as
when driving in the rain or after a
car wash. This is normal for brakes
with high friction pads and does not
affect the operation of the brakes.
Apply the brakes several times until
Page 296 of 391
Chevrolet Camaro Owner Manual (GMNA-Localizing-U.S./Canada/Mexico-
9804281) - 2017 - crc - 4/25/16
Vehicle Care 295
Summer Tires
High Performance Summer Tires
See the HP Supplement.
This vehicle may come with 245/
40ZR20 and 275/35ZR20 high
performance summer tires. These
tires have a special tread and
compound that are optimized for
maximum dry and wet road
performance. This special tread and
compound will have decreased
performance in cold climates, and
on ice and snow. It is recommended
that winter tires be installed on the
vehicle if frequent driving at
temperatures below approximately
5 °C (40 °F) or on ice or snow
covered roads is expected. See
Winter Tires0293.
Caution
High performance summer tires
have rubber compounds that lose
flexibility and may develop
surface cracks in the tread area
at temperatures below −7 °C
(Continued)
Caution (Continued)
(20 °F). Always store high
performance summer tires
indoors and at temperatures
above −7 °C (20 °F) when not in
use. If the tires have been
subjected to −7 °C (20 °F) or less,
let them warm up in a heated
space to at least 5 °C (40 °F) for
24 hours or more before being
installed or driving a vehicle on
which they are installed. Do not
apply heat or blow heated air
directly on the tires. Always
inspect tires before use. See Tire
Inspection 0305.
Tire Sidewall Labeling
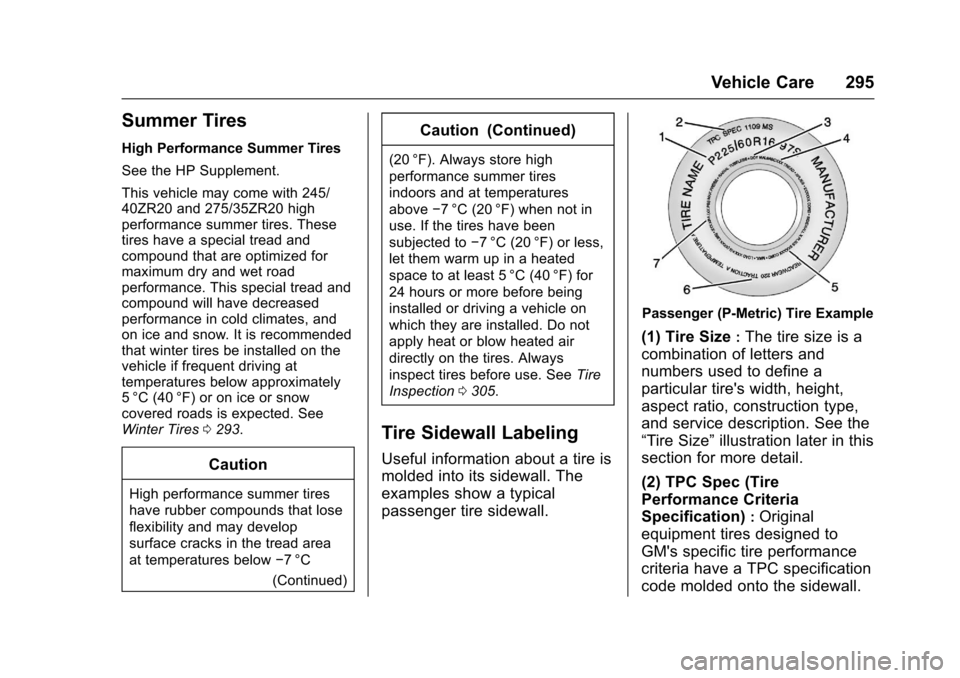
Useful information about a tire is
molded into its sidewall. The
examples show a typical
passenger tire sidewall.
Passenger (P-Metric) Tire Example
(1) Tire Size:The tire size is a
combination of letters and
numbers used to define a
particular tire's width, height,
aspect ratio, construction type,
and service description. See the
“Tire Size” illustration later in this
section for more detail.
(2) TPC Spec (Tire
Performance Criteria
Specification)
:Original
equipment tires designed to
GM's specific tire performance
criteria have a TPC specification
code molded onto the sidewall.