window CHEVROLET CAMARO 2018 Workshop Manual
[x] Cancel search | Manufacturer: CHEVROLET, Model Year: 2018, Model line: CAMARO, Model: CHEVROLET CAMARO 2018Pages: 393, PDF Size: 5.77 MB
Page 208 of 393
Chevrolet Camaro Owner Manual (GMNA-Localizing-U.S./Canada/Mexico-
11348325) - 2018 - CRC - 10/23/17
Driving and Operating 207
Assistance Program0359. To get
help and keep everyone in the
vehicle safe:
. Turn on the hazard warning
flashers.
. Tie a red cloth to an outside
mirror.
{Warning
Snow can trap engine exhaust
under the vehicle. This may
cause exhaust gases to get
inside. Engine exhaust contains
carbon monoxide (CO), which
cannot be seen or smelled. It can
cause unconsciousness and even
death.
If the vehicle is stuck in snow:
. Clear snow from the base of
the vehicle, especially any
blocking the exhaust pipe.
. Open a window about 5 cm
(2 in) on the vehicle side
that is away from the wind,
to bring in fresh air.
(Continued)
Warning (Continued)
.Fully open the air outlets on
or under the instrument
panel.
. Adjust the climate control
system to circulate the air
inside the vehicle and set
the fan speed to the highest
setting. See “Climate
Control Systems.”
For more information about CO,
see Engine Exhaust 0220.
To save fuel, run the engine for
short periods to warm the vehicle
and then shut the engine off and
partially close the window. Moving
about to keep warm also helps.
If it takes time for help to arrive,
when running the engine, push the
accelerator pedal slightly so the
engine runs faster than the idle
speed. This keeps the battery
charged to restart the vehicle and to
signal for help with the headlamps.
Do this as little as possible, to
save fuel.
If the Vehicle Is Stuck
Slowly and cautiously spin the
wheels to free the vehicle when
stuck in sand, mud, ice, or snow.
If stuck too severely for the traction
system to free the vehicle, turn the
traction system off and use the
rocking method. See Traction
Control/Electronic Stability Control
0 232.
{Warning
If the vehicle's tires spin at high
speed, they can explode, and you
or others could be injured. The
vehicle can overheat, causing an
engine compartment fire or other
damage. Spin the wheels as little
as possible and avoid going
above 56 km/h (35 mph).
Rocking the Vehicle to Get
it Out
Turn the steering wheel left and
right to clear the area around the
front wheels. Turn off any traction
Page 219 of 393
Chevrolet Camaro Owner Manual (GMNA-Localizing-U.S./Canada/Mexico-
11348325) - 2018 - CRC - 10/23/17
218 Driving and Operating
Retained Accessory
Power (RAP)
Some vehicle accessories may be
used after the ignition is turned off.
The power windows and sunroof,
if equipped, will continue to work for
up to 10 minutes or until any door is
opened.
The infotainment system will
continue to work for 10 minutes,
until the driver door is opened,
or until the ignition is turned on or
placed in ACC/ACCESSORY.
Shifting Into Park
To shift into P (Park):1. Hold the brake pedal down and set the parking brake.
See Electric Parking Brake
0 229.
2. Hold the button on the shift lever and push the shift lever
toward the front of the vehicle
into P (Park).
3. Turn the ignition off.
Leaving the Vehicle with the
Engine Running
{Warning
It can be dangerous to leave the
vehicle with the engine running.
It could overheat and catch fire.
It is dangerous to get out of the
vehicle if the shift lever is not fully
in P (Park) with the parking brake
firmly set. The vehicle can roll.
Do not leave the vehicle when the
engine is running. If you have left
the engine running, the vehicle
can move suddenly. You or others
could be injured. To be sure the
vehicle will not move, even when
you are on fairly level ground,
always set the parking brake and
move the shift lever to P (Park).
See Shifting Into Park 0218. If you have to leave the vehicle with
the engine running, the vehicle must
be in P (Park) and the parking
brake set.
Release the button and check that
the shift lever cannot be moved out
of P (Park).
Torque Lock
Torque lock is when the weight of
the vehicle puts too much force on
the parking pawl in the
transmission. This happens when
parking on a hill and shifting the
transmission into P (Park) is not
done properly and then it is difficult
to shift out of P (Park). To prevent
torque lock, set the parking brake
and then shift into P (Park). To find
out how, see
“Shifting Into Park”
previously in this section.
If torque lock does occur, the
vehicle may need to be pushed
uphill by another vehicle to relieve
the parking pawl pressure, so you
can shift out of P (Park).
Page 222 of 393

Chevrolet Camaro Owner Manual (GMNA-Localizing-U.S./Canada/Mexico-
11348325) - 2018 - CRC - 10/23/17
Driving and Operating 221
Warning (Continued)
.There are holes or openings
in the vehicle body from
damage or aftermarket
modifications that are not
completely sealed.
If unusual fumes are detected or
if it is suspected that exhaust is
coming into the vehicle: . Drive it only with the
windows completely down.
. Have the vehicle repaired
immediately.
Never park the vehicle with the
engine running in an enclosed
area such as a garage or a
building that has no fresh air
ventilation.
Running the Vehicle
While Parked
It is better not to park with the
engine running.
If the vehicle is left with the engine
running, follow the proper steps to
be sure the vehicle will not move.
See Shifting Into Park 0218 and
Engine Exhaust 0220. If the vehicle
has a manual transmission, see
Parking 0219.
Automatic
Transmission
If equipped with a 10-speed
automatic transmission, see the
Camaro High Performance
supplement.
The Driver Information Center (DIC)
displays the current gear selected in
the lower right corner. When Sport
Mode is active, an S is displayed.
If Manual Mode is active, an M and
the current gear selected is
displayed next to the M.
Page 274 of 393
Chevrolet Camaro Owner Manual (GMNA-Localizing-U.S./Canada/Mexico-
11348325) - 2018 - CRC - 10/23/17
Vehicle Care 273
2. Turn the heater on to thehighest temperature and to the
highest fan speed. Open the
windows as necessary.
3. When it is safe to do so, pull off the road, shift to P (Park) or
N (Neutral) for an automatic
transmission or Neutral for a
manual transmission, and let
the engine idle.
If the engine coolant temperature
gauge is no longer in the
overheated area, the vehicle can be
driven. Continue to drive the vehicle
slowly for about 10 minutes. Keep a
safe vehicle distance from the
vehicle in front. If the warning does
not come back on, continue to drive
normally and have the cooling
system checked for proper fill and
function.
If the warning continues, pull over,
stop, and park the vehicle
right away. If there is no sign of steam, idle the
engine for three minutes while
parked. If the warning is still
displayed, turn off the engine until it
cools down.
Washer Fluid
What to Use
When windshield washer fluid is
needed, be sure to read the
manufacturer's instructions before
use. If operating the vehicle in an
area where the temperature can fall
below freezing, use a fluid that has
sufficient protection against
freezing.
Adding Washer Fluid
Open the cap with the washer
symbol on it. Add washer fluid until
the reservoir is full. See
Engine
Compartment Overview 0256 for
reservoir location.
Caution
. Do not use washer fluid that
contains any type of water
repellent coating. This can
cause the wiper blades to
chatter or skip.
. Do not use engine coolant
(antifreeze) in the
windshield washer. It can
damage the windshield
washer system and paint.
. Do not mix water with
ready-to-use washer fluid.
Water can cause the
solution to freeze and
damage the washer fluid
tank and other parts of the
washer system.
(Continued)
Page 288 of 393
Chevrolet Camaro Owner Manual (GMNA-Localizing-U.S./Canada/Mexico-
11348325) - 2018 - CRC - 10/23/17
Vehicle Care 287
FusesUsage
F3 Driver power seat
F4 Cooling fan
F5 Passenger power seat
F6 –
F7 –
F8 –
F9 –
F10 –
F11 –
F12 Front wiper
F13 Starter
F14 Brake vacuum pump
F15 –
F16 Heated seat
F17 Passenger window
F18 Body control module 4
F19 Airbag module/AOS
F20 OnStar/Navigation (if equipped) Fuses
Usage
F21 Body control module 6
F22 ABS valve
F23 –
F24 –
F25 Steering column lock
F26 Body control module 2
F27 –
F28 Body control module 3
F29 Body control module 8
F30 Windshield wiper
F31 Right HID headlamp
F32 Left HID headlamp
F33 –
F34 Horn
F35 –
F36 Left high-beam headlamp Fuses
Usage
F37 Right high-beam headlamp
F38 Headlamp leveling
F39 –
F40 Rear electrical center/Ignition
F41 Malfunction indicator lamp/Ignition
F42 Instrument panel body/Ignition
F43 Exhaust valve/Active fuel management
F44 AOS display/Ignition
F45 Sunroof
F46 Body control module 7
F47 CGM
F48 A/C clutch
F49 Heated steering wheel
F50 Fuel system control module/Ignition
Page 291 of 393
Chevrolet Camaro Owner Manual (GMNA-Localizing-U.S./Canada/Mexico-
11348325) - 2018 - CRC - 10/23/17
290 Vehicle Care
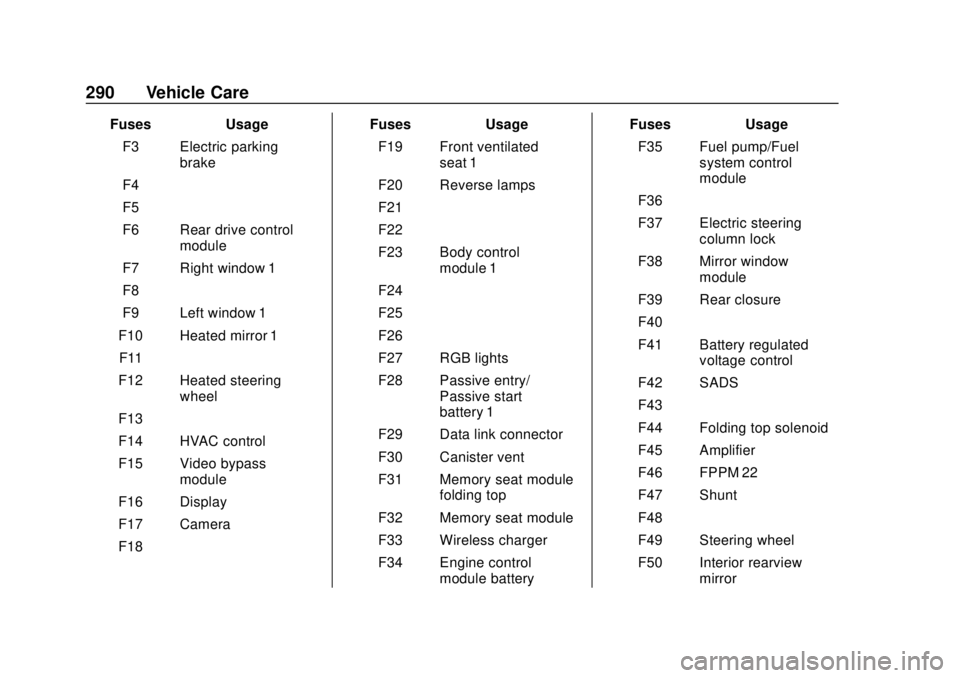
FusesUsage
F3 Electric parking brake
F4 –
F5 –
F6 Rear drive control module
F7 Right window 1
F8 –
F9 Left window 1
F10 Heated mirror 1 F11 –
F12 Heated steering wheel
F13 –
F14 HVAC control
F15 Video bypass module
F16 Display
F17 Camera
F18 – Fuses
Usage
F19 Front ventilated seat 1
F20 Reverse lamps
F21 –
F22 –
F23 Body control module 1
F24 –
F25 –
F26 –
F27 RGB lights
F28 Passive entry/ Passive start
battery 1
F29 Data link connector
F30 Canister vent
F31 Memory seat module folding top
F32 Memory seat module
F33 Wireless charger
F34 Engine control module battery Fuses
Usage
F35 Fuel pump/Fuel system control
module
F36 –
F37 Electric steering column lock
F38 Mirror window module
F39 Rear closure
F40 –
F41 Battery regulated voltage control
F42 SADS
F43 –
F44 Folding top solenoid
F45 Amplifier
F46 FPPM 22
F47 Shunt
F48 –
F49 Steering wheel
F50 Interior rearview mirror
Page 298 of 393
Chevrolet Camaro Owner Manual (GMNA-Localizing-U.S./Canada/Mexico-
11348325) - 2018 - CRC - 10/23/17
Vehicle Care 297
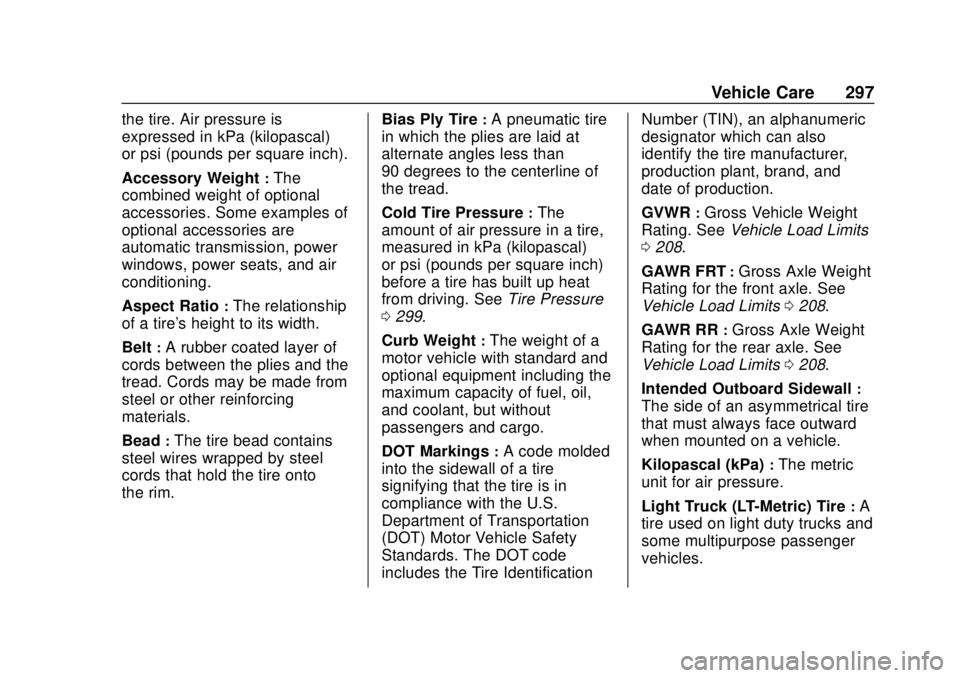
the tire. Air pressure is
expressed in kPa (kilopascal)
or psi (pounds per square inch).
Accessory Weight
:The
combined weight of optional
accessories. Some examples of
optional accessories are
automatic transmission, power
windows, power seats, and air
conditioning.
Aspect Ratio
:The relationship
of a tire's height to its width.
Belt
:A rubber coated layer of
cords between the plies and the
tread. Cords may be made from
steel or other reinforcing
materials.
Bead
:The tire bead contains
steel wires wrapped by steel
cords that hold the tire onto
the rim. Bias Ply Tire
:A pneumatic tire
in which the plies are laid at
alternate angles less than
90 degrees to the centerline of
the tread.
Cold Tire Pressure
:The
amount of air pressure in a tire,
measured in kPa (kilopascal)
or psi (pounds per square inch)
before a tire has built up heat
from driving. See Tire Pressure
0 299.
Curb Weight
:The weight of a
motor vehicle with standard and
optional equipment including the
maximum capacity of fuel, oil,
and coolant, but without
passengers and cargo.
DOT Markings
:A code molded
into the sidewall of a tire
signifying that the tire is in
compliance with the U.S.
Department of Transportation
(DOT) Motor Vehicle Safety
Standards. The DOT code
includes the Tire Identification Number (TIN), an alphanumeric
designator which can also
identify the tire manufacturer,
production plant, brand, and
date of production.
GVWR
:Gross Vehicle Weight
Rating. See Vehicle Load Limits
0 208.
GAWR FRT
:Gross Axle Weight
Rating for the front axle. See
Vehicle Load Limits 0208.
GAWR RR
:Gross Axle Weight
Rating for the rear axle. See
Vehicle Load Limits 0208.
Intended Outboard Sidewall
:
The side of an asymmetrical tire
that must always face outward
when mounted on a vehicle.
Kilopascal (kPa)
:The metric
unit for air pressure.
Light Truck (LT-Metric) Tire
:A
tire used on light duty trucks and
some multipurpose passenger
vehicles.
Page 317 of 393
Chevrolet Camaro Owner Manual (GMNA-Localizing-U.S./Canada/Mexico-
11348325) - 2018 - CRC - 10/23/17
316 Vehicle Care
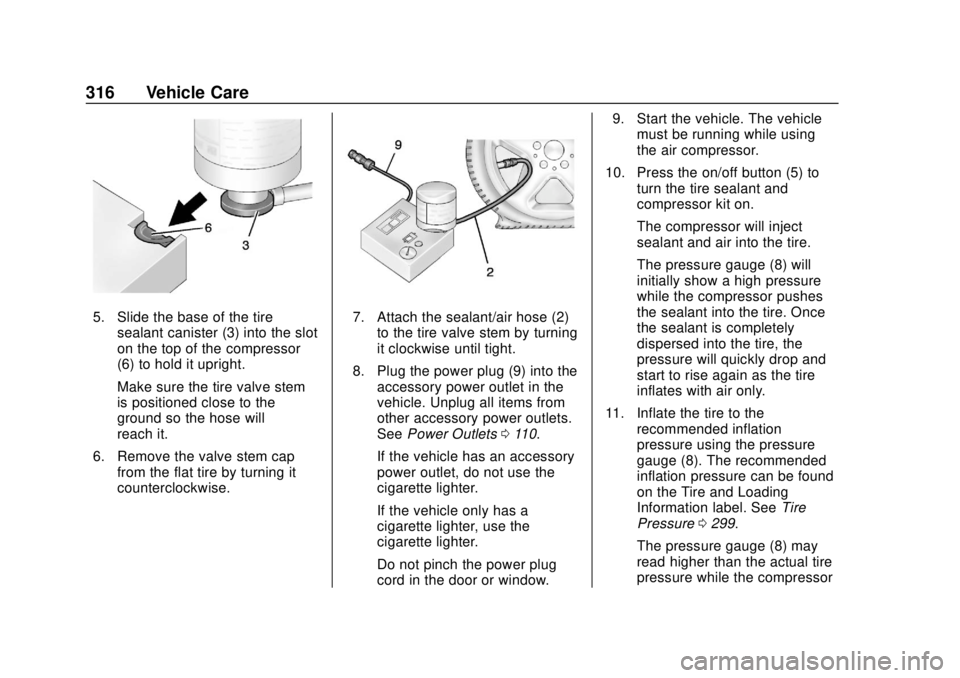
5. Slide the base of the tiresealant canister (3) into the slot
on the top of the compressor
(6) to hold it upright.
Make sure the tire valve stem
is positioned close to the
ground so the hose will
reach it.
6. Remove the valve stem cap from the flat tire by turning it
counterclockwise.7. Attach the sealant/air hose (2)
to the tire valve stem by turning
it clockwise until tight.
8. Plug the power plug (9) into the accessory power outlet in the
vehicle. Unplug all items from
other accessory power outlets.
See Power Outlets 0110.
If the vehicle has an accessory
power outlet, do not use the
cigarette lighter.
If the vehicle only has a
cigarette lighter, use the
cigarette lighter.
Do not pinch the power plug
cord in the door or window. 9. Start the vehicle. The vehicle
must be running while using
the air compressor.
10. Press the on/off button (5) to turn the tire sealant and
compressor kit on.
The compressor will inject
sealant and air into the tire.
The pressure gauge (8) will
initially show a high pressure
while the compressor pushes
the sealant into the tire. Once
the sealant is completely
dispersed into the tire, the
pressure will quickly drop and
start to rise again as the tire
inflates with air only.
11. Inflate the tire to the recommended inflation
pressure using the pressure
gauge (8). The recommended
inflation pressure can be found
on the Tire and Loading
Information label. See Tire
Pressure 0299.
The pressure gauge (8) may
read higher than the actual tire
pressure while the compressor
Page 320 of 393
Chevrolet Camaro Owner Manual (GMNA-Localizing-U.S./Canada/Mexico-
11348325) - 2018 - CRC - 10/23/17
Vehicle Care 319
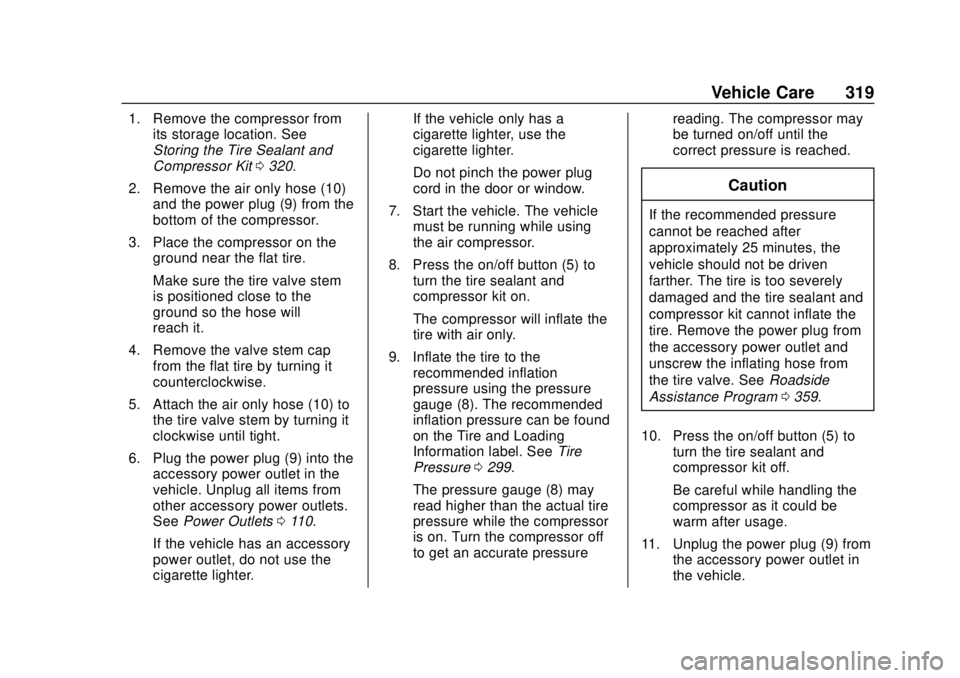
1. Remove the compressor fromits storage location. See
Storing the Tire Sealant and
Compressor Kit 0320.
2. Remove the air only hose (10) and the power plug (9) from the
bottom of the compressor.
3. Place the compressor on the ground near the flat tire.
Make sure the tire valve stem
is positioned close to the
ground so the hose will
reach it.
4. Remove the valve stem cap from the flat tire by turning it
counterclockwise.
5. Attach the air only hose (10) to the tire valve stem by turning it
clockwise until tight.
6. Plug the power plug (9) into the accessory power outlet in the
vehicle. Unplug all items from
other accessory power outlets.
See Power Outlets 0110.
If the vehicle has an accessory
power outlet, do not use the
cigarette lighter. If the vehicle only has a
cigarette lighter, use the
cigarette lighter.
Do not pinch the power plug
cord in the door or window.
7. Start the vehicle. The vehicle must be running while using
the air compressor.
8. Press the on/off button (5) to turn the tire sealant and
compressor kit on.
The compressor will inflate the
tire with air only.
9. Inflate the tire to the recommended inflation
pressure using the pressure
gauge (8). The recommended
inflation pressure can be found
on the Tire and Loading
Information label. See Tire
Pressure 0299.
The pressure gauge (8) may
read higher than the actual tire
pressure while the compressor
is on. Turn the compressor off
to get an accurate pressure reading. The compressor may
be turned on/off until the
correct pressure is reached.
Caution
If the recommended pressure
cannot be reached after
approximately 25 minutes, the
vehicle should not be driven
farther. The tire is too severely
damaged and the tire sealant and
compressor kit cannot inflate the
tire. Remove the power plug from
the accessory power outlet and
unscrew the inflating hose from
the tire valve. See
Roadside
Assistance Program 0359.
10. Press the on/off button (5) to turn the tire sealant and
compressor kit off.
Be careful while handling the
compressor as it could be
warm after usage.
11. Unplug the power plug (9) from the accessory power outlet in
the vehicle.
Page 327 of 393

Chevrolet Camaro Owner Manual (GMNA-Localizing-U.S./Canada/Mexico-
11348325) - 2018 - CRC - 10/23/17
326 Vehicle Care
Caution
Do not power wash any
component under the hood that
has this
esymbol.
This could cause damage that
would not be covered by the
vehicle warranty.
Caution
Vehicles equipped with an
accessory ground effects
package have reduced ground
clearance. Damage can occur in
automatic car washes, when
approaching curbs, or on steep
inclines. Do not use automatic car
washes. Approach curbs and
inclines with caution.
If using an automatic car wash,
comply with the car wash
instructions. The windshield wiper
and rear window wiper, if equipped,
must be off. Remove any accessories that may be damaged
or interfere with the car wash
equipment.
Rinse the vehicle well, before
washing and after, to remove all
cleaning agents completely. If they
are allowed to dry on the surface,
they could stain.
Dry the finish with a soft, clean
chamois or an all-cotton towel to
avoid surface scratches and water
spotting.Finish Care
Application of aftermarket clearcoat
sealant/wax materials is not
recommended. If painted surfaces
are damaged, see your dealer to
have the damage assessed and
repaired. Foreign materials such as
calcium chloride and other salts, ice
melting agents, road oil and tar, tree
sap, bird droppings, chemicals from
industrial chimneys, etc., can
damage the vehicle's finish if they
remain on painted surfaces. Wash
the vehicle as soon as possible.
If necessary, use non-abrasive
cleaners that are marked safe for
painted surfaces to remove foreign
matter.
Occasional hand waxing or mild
polishing should be done to remove
residue from the paint finish. See
your dealer for approved cleaning
products.
Do not apply waxes or polishes to
uncoated plastic, vinyl, rubber,
decals, simulated wood, or flat paint
as damage can occur.Caution
Machine compounding or
aggressive polishing on a
basecoat/clearcoat paint finish
may damage it. Use only
non-abrasive waxes and polishes
that are made for a basecoat/
clearcoat paint finish on the
vehicle.
To keep the paint finish looking new,
keep the vehicle garaged or
covered whenever possible.