steering wheel CHEVROLET CAMARO 2020 Get To Know Guide
[x] Cancel search | Manufacturer: CHEVROLET, Model Year: 2020, Model line: CAMARO, Model: CHEVROLET CAMARO 2020Pages: 361, PDF Size: 3.27 MB
Page 93 of 361
Chevrolet Camaro Owner Manual (GMNA-Localizing-U.S./Canada/Mexico-
13556304) - 2020 - CRC - 9/3/19
92 Instruments and Controls
Controls
Steering Wheel
Adjustment
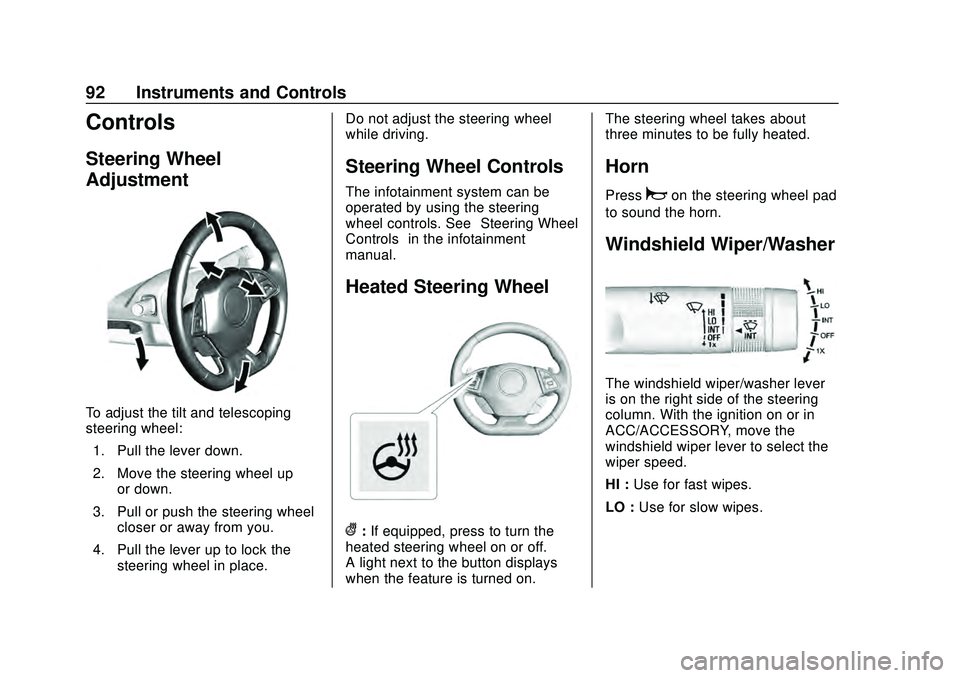
To adjust the tilt and telescoping
steering wheel:1. Pull the lever down.
2. Move the steering wheel up or down.
3. Pull or push the steering wheel closer or away from you.
4. Pull the lever up to lock the steering wheel in place. Do not adjust the steering wheel
while driving.
Steering Wheel Controls
The infotainment system can be
operated by using the steering
wheel controls. See
“Steering Wheel
Controls” in the infotainment
manual.
Heated Steering Wheel
(: If equipped, press to turn the
heated steering wheel on or off.
A light next to the button displays
when the feature is turned on. The steering wheel takes about
three minutes to be fully heated.
Horn
Pressaon the steering wheel pad
to sound the horn.
Windshield Wiper/Washer
The windshield wiper/washer lever
is on the right side of the steering
column. With the ignition on or in
ACC/ACCESSORY, move the
windshield wiper lever to select the
wiper speed.
HI : Use for fast wipes.
LO : Use for slow wipes.
Page 101 of 361
Chevrolet Camaro Owner Manual (GMNA-Localizing-U.S./Canada/Mexico-
13556304) - 2020 - CRC - 9/3/19
100 Instruments and Controls
See the Camaro High Performance
supplement for more information.
Reconfigurable Instrument
Cluster
To change the theme for the uplevel
cluster:1. Find the Options page in one of the interactive display zones on
the cluster.
2. Press SEL to enter the Options menu.
3. Scroll down to highlight Display Theme, then press
pto enter
the Display Theme menu.
4. Press SEL to select the desired cluster configuration.
5. Exit the Display Theme menu by pressing
o.
Cluster Menu
There is an interactive display area
in the center of the instrument
cluster.
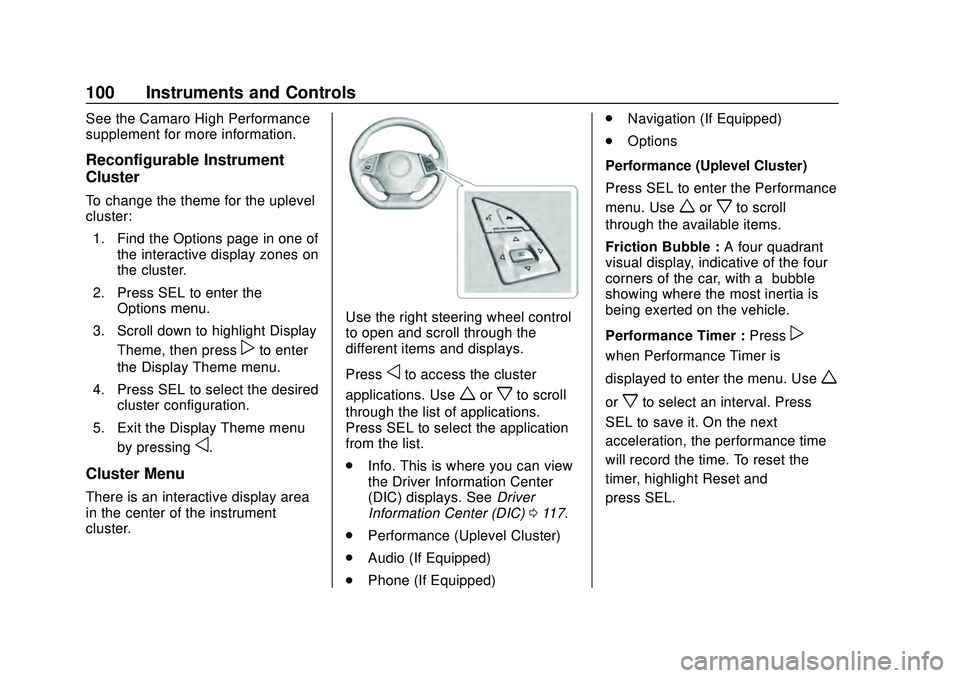
Use the right steering wheel control
to open and scroll through the
different items and displays.
Press
oto access the cluster
applications. Use
worxto scroll
through the list of applications.
Press SEL to select the application
from the list.
. Info. This is where you can view
the Driver Information Center
(DIC) displays. See Driver
Information Center (DIC) 0117.
. Performance (Uplevel Cluster)
. Audio (If Equipped)
. Phone (If Equipped) .
Navigation (If Equipped)
. Options
Performance (Uplevel Cluster)
Press SEL to enter the Performance
menu. Use
worxto scroll
through the available items.
Friction Bubble : A four quadrant
visual display, indicative of the four
corners of the car, with a “bubble”
showing where the most inertia is
being exerted on the vehicle.
Performance Timer : Press
p
when Performance Timer is
displayed to enter the menu. Use
w
orxto select an interval. Press
SEL to save it. On the next
acceleration, the performance time
will record the time. To reset the
timer, highlight Reset and
press SEL.
Page 103 of 361
Chevrolet Camaro Owner Manual (GMNA-Localizing-U.S./Canada/Mexico-
13556304) - 2020 - CRC - 9/3/19
102 Instruments and Controls
Units :Presspwhile Units is
displayed to enter the Units menu.
Choose US or Metric units by
pressing SEL while the desired item
is highlighted.
Speed Warning : The Speed
Warning display allows the driver to
set a speed that they do not want to
exceed. To set the Speed Warning,
press
pwhen Speed Warning is
displayed. Enable the speed
warning and then use
worxto
adjust the value. Press SEL to set
the speed. Once the speed is set,
this feature can be turned off by
pressing SEL while viewing this
page. If the selected speed limit is
exceeded, a pop-up warning is
displayed with a chime.
Display Theme (Uplevel) : Press
SEL while Display Theme is
highlighted to change the
configuration of the uplevel cluster.
See “Reconfigurable Instrument
Cluster” earlier in this section. Launch Control :
If equipped, the
Launch Control display allows the
driver to adjust the parameters of
the Launch Control System. See
Track Events and Competitive
Driving 0157.
Head-Up Display (HUD)
Rotation : If equipped, this feature
allows for adjusting the angle of the
HUD image. Press SEL on the
steering wheel controls while
Head-Up Display Rotation is
highlighted to enter Adjust Mode.
Pressworxto highlight OK, then
press SEL to save the setting.
Cancel can also be selected to
cancel the setting. The vehicle must
be on P (Park).
Info Pages : Press
pwhile Info
Pages is highlighted to select the
items to be displayed in the DIC info
displays. See Driver Information
Center (DIC) 0117.
Software Info : Displays open
source software information.
Speedometer
The speedometer shows the
vehicle's speed in either kilometers
per hour (km/h) or miles per
hour (mph).
Odometer
The odometer shows how far the
vehicle has been driven, in either
kilometers or miles.
Trip Odometer
The trip odometer shows how far
the vehicle has been driven since
the trip odometer was last reset.
The trip odometer is accessed and
reset through the Driver Information
Center (DIC). See Driver
Information Center (DIC) 0117.
Tachometer
The tachometer displays the engine
speed in revolutions per
minute (rpm).
Page 112 of 361
Chevrolet Camaro Owner Manual (GMNA-Localizing-U.S./Canada/Mexico-
13556304) - 2020 - CRC - 9/3/19
Instruments and Controls 111
If the light continues to flash, find a
safe place to park. Turn the vehicle
off and wait at least 10 seconds
before restarting the engine. If the
light is still flashing, follow the
previous guidelines and see your
dealer for service as soon as
possible.
If the light is on steady :A
malfunction has been detected.
Diagnosis and service may be
required.
Check the following:
. If fuel has been added to the
vehicle using the capless funnel
adapter, make sure that it has
been removed. See “Filling the
Tank with a Portable Gas Can”
under Filling the Tank 0215.
The diagnostic system can
detect if the adapter has been
left installed in the vehicle,
allowing fuel to evaporate into
the atmosphere. A few driving
trips with the adapter removed
may turn off the light. .
Poor fuel quality can cause
inefficient engine operation and
poor driveability, which may go
away once the engine is warmed
up. If this occurs, change the
fuel brand. It may require at
least one full tank of the proper
fuel to turn the light off. See
Recommended Fuel (3.6L
V6 Engine) 0213 or
Recommended Fuel (2.0L L4
Turbo Engine and 6.2L
V8 Engine) 0213 or
Recommended Fuel (6.2L V8
Supercharged Engine) 0214.
If the light remains on, see your
dealer.
Emissions Inspection and
Maintenance Programs
If the vehicle requires an Emissions
Inspection/Maintenance test, the
test equipment will likely connect to
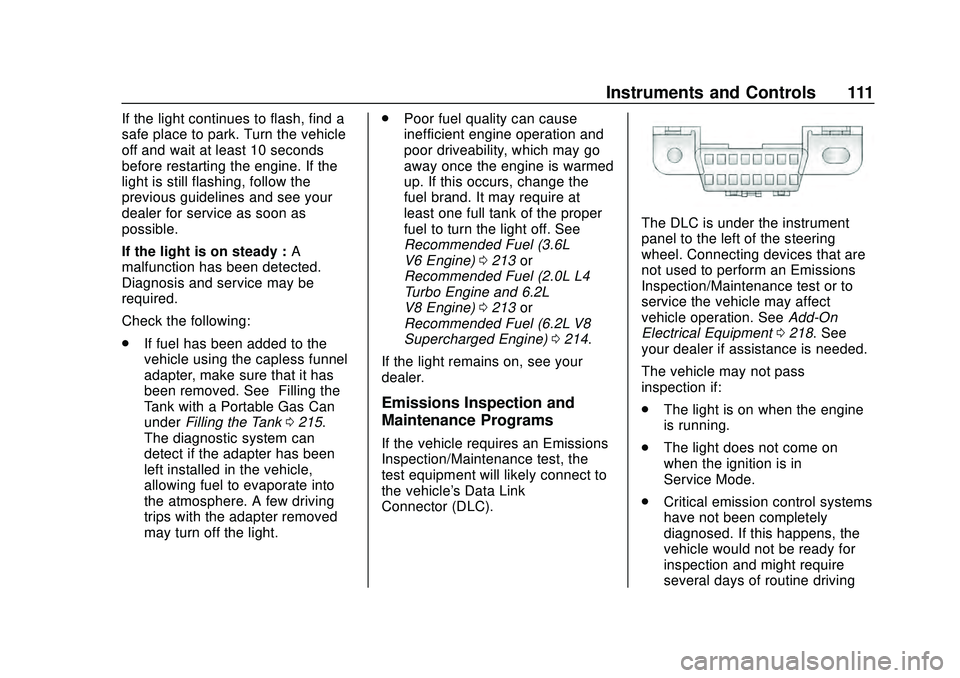
the vehicle's Data Link
Connector (DLC).
The DLC is under the instrument
panel to the left of the steering
wheel. Connecting devices that are
not used to perform an Emissions
Inspection/Maintenance test or to
service the vehicle may affect
vehicle operation. See Add-On
Electrical Equipment 0218. See
your dealer if assistance is needed.
The vehicle may not pass
inspection if:
. The light is on when the engine
is running.
. The light does not come on
when the ignition is in
Service Mode.
. Critical emission control systems
have not been completely
diagnosed. If this happens, the
vehicle would not be ready for
inspection and might require
several days of routine driving
Page 118 of 361
Chevrolet Camaro Owner Manual (GMNA-Localizing-U.S./Canada/Mexico-
13556304) - 2020 - CRC - 9/3/19
Instruments and Controls 117
Information Displays
Driver Information
Center (DIC)
The DIC displays are shown in the
center of the instrument cluster in
the Info application. SeeInstrument
Cluster 098. The Info application is
only available when the ignition is
on. The displays show the status of
many vehicle systems. The controls
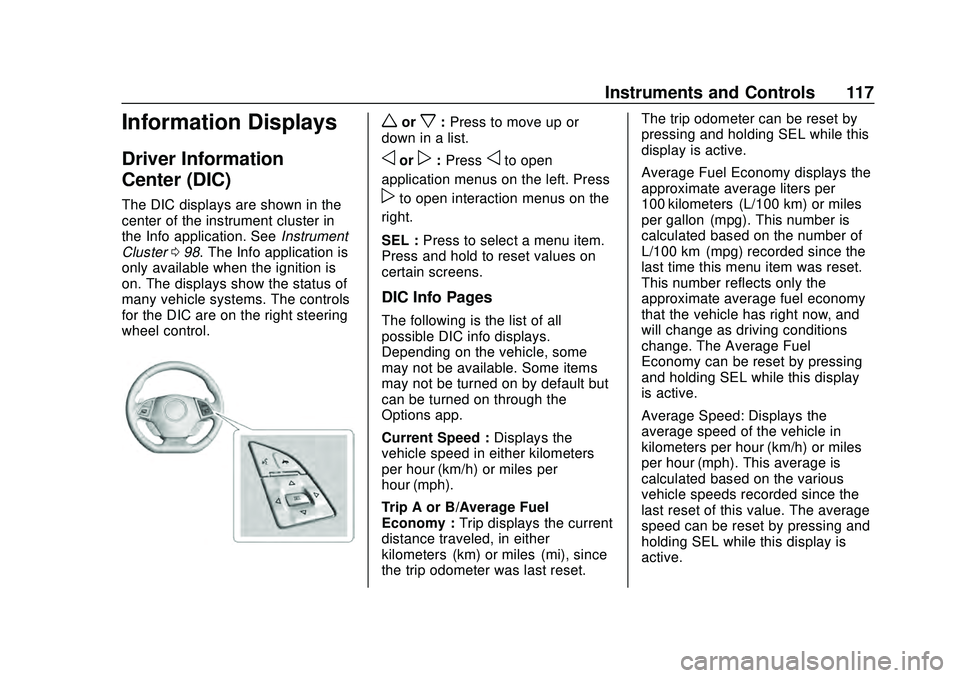
for the DIC are on the right steering
wheel control.
worx: Press to move up or
down in a list.
oorp: Pressoto open
application menus on the left. Press
pto open interaction menus on the
right.
SEL : Press to select a menu item.
Press and hold to reset values on
certain screens.
DIC Info Pages
The following is the list of all
possible DIC info displays.
Depending on the vehicle, some
may not be available. Some items
may not be turned on by default but
can be turned on through the
Options app.
Current Speed : Displays the
vehicle speed in either kilometers
per hour (km/h) or miles per
hour (mph).
Trip A or B/Average Fuel
Economy : Trip displays the current
distance traveled, in either
kilometers (km) or miles (mi), since
the trip odometer was last reset. The trip odometer can be reset by
pressing and holding SEL while this
display is active.
Average Fuel Economy displays the
approximate average liters per
100 kilometers (L/100 km) or miles
per gallon (mpg). This number is
calculated based on the number of
L/100 km (mpg) recorded since the
last time this menu item was reset.
This number reflects only the
approximate average fuel economy
that the vehicle has right now, and
will change as driving conditions
change. The Average Fuel
Economy can be reset by pressing
and holding SEL while this display
is active.
Average Speed: Displays the
average speed of the vehicle in
kilometers per hour (km/h) or miles
per hour (mph). This average is
calculated based on the various
vehicle speeds recorded since the
last reset of this value. The average
speed can be reset by pressing and
holding SEL while this display is
active.
Page 122 of 361
Chevrolet Camaro Owner Manual (GMNA-Localizing-U.S./Canada/Mexico-
13556304) - 2020 - CRC - 9/3/19
Instruments and Controls 121
“Settings”in the Infotainment
Manual and “Options”under
Instrument Cluster 098.
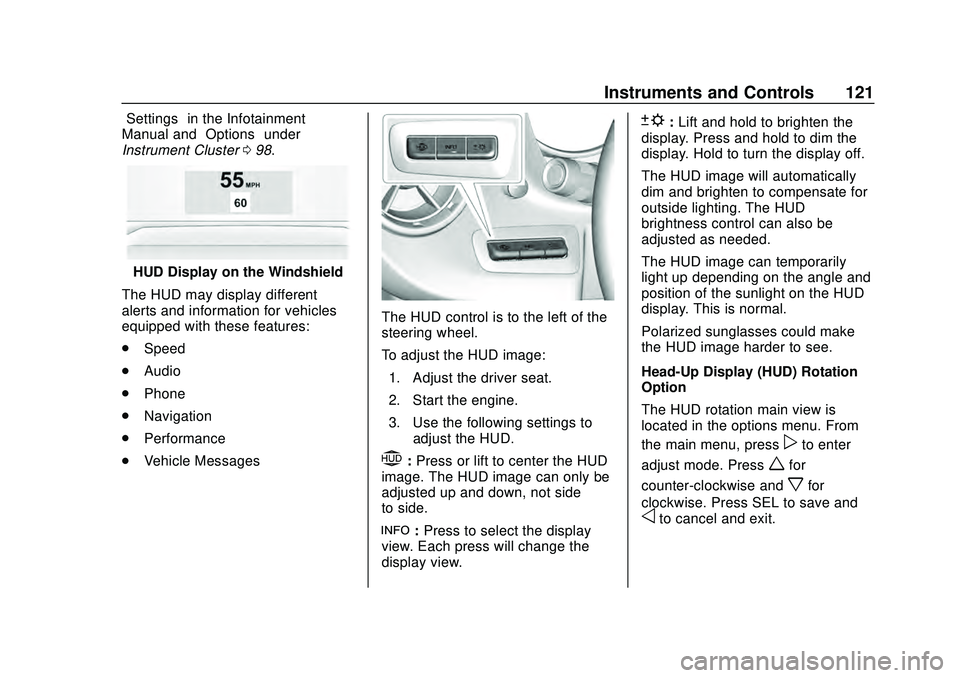
HUD Display on the Windshield
The HUD may display different
alerts and information for vehicles
equipped with these features:
. Speed
. Audio
. Phone
. Navigation
. Performance
. Vehicle Messages
The HUD control is to the left of the
steering wheel.
To adjust the HUD image:
1. Adjust the driver seat.
2. Start the engine.
3. Use the following settings to adjust the HUD.
$:Press or lift to center the HUD
image. The HUD image can only be
adjusted up and down, not side
to side.
!: Press to select the display
view. Each press will change the
display view.
D: Lift and hold to brighten the
display. Press and hold to dim the
display. Hold to turn the display off.
The HUD image will automatically
dim and brighten to compensate for
outside lighting. The HUD
brightness control can also be
adjusted as needed.
The HUD image can temporarily
light up depending on the angle and
position of the sunlight on the HUD
display. This is normal.
Polarized sunglasses could make
the HUD image harder to see.
Head-Up Display (HUD) Rotation
Option
The HUD rotation main view is
located in the options menu. From
the main menu, press
pto enter
adjust mode. Press
wfor
counter-clockwise and
xfor
clockwise. Press SEL to save and
oto cancel and exit.
Page 123 of 361
Chevrolet Camaro Owner Manual (GMNA-Localizing-U.S./Canada/Mexico-
13556304) - 2020 - CRC - 9/3/19
122 Instruments and Controls
HUD Views
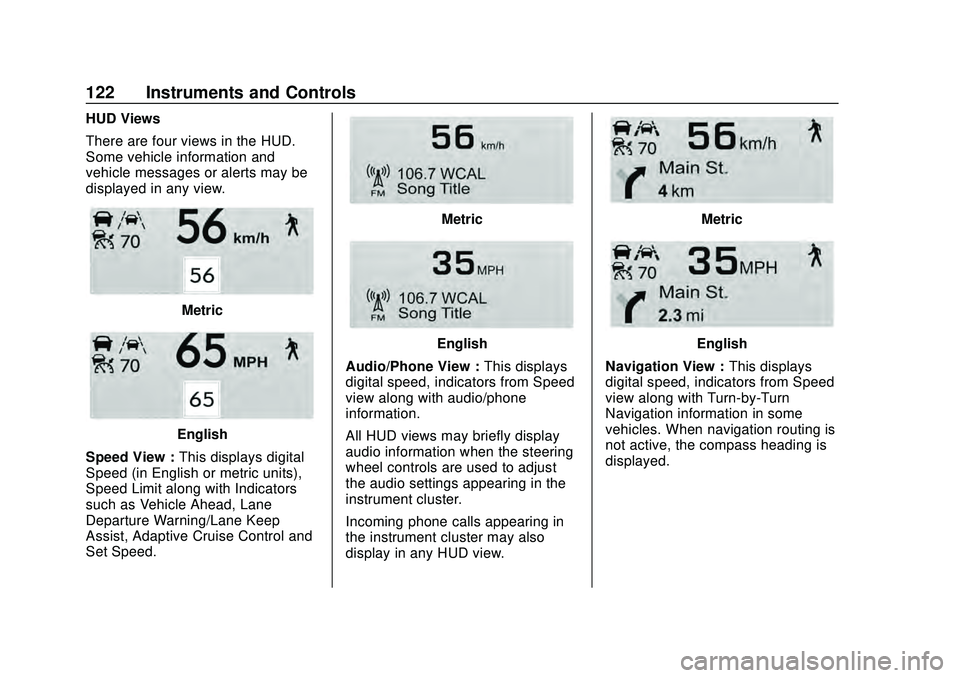
There are four views in the HUD.
Some vehicle information and
vehicle messages or alerts may be
displayed in any view.
Metric
English
Speed View : This displays digital
Speed (in English or metric units),
Speed Limit along with Indicators
such as Vehicle Ahead, Lane
Departure Warning/Lane Keep
Assist, Adaptive Cruise Control and
Set Speed.
Metric
English
Audio/Phone View : This displays
digital speed, indicators from Speed
view along with audio/phone
information.
All HUD views may briefly display
audio information when the steering
wheel controls are used to adjust
the audio settings appearing in the
instrument cluster.
Incoming phone calls appearing in
the instrument cluster may also
display in any HUD view.
Metric
English
Navigation View : This displays
digital speed, indicators from Speed
view along with Turn-by-Turn
Navigation information in some
vehicles. When navigation routing is
not active, the compass heading is
displayed.
Page 130 of 361
Chevrolet Camaro Owner Manual (GMNA-Localizing-U.S./Canada/Mexico-
13556304) - 2020 - CRC - 9/3/19
Instruments and Controls 129
Remote Left in Vehicle Alert
This feature sounds an alert when
the RKE transmitter is left in the
vehicle. This menu also enables
Remote No Longer in Vehicle Alert.
Touch Off or On.
Seating Position
Touch and the following may
display:
.Seat Entry Memory
. Seat Exit Memory
Seat Entry Memory
This feature automatically recalls
the previously stored 1 or 2 button
positions when the ignition is
changed from off to on or ACC/
ACCESSORY. See Memory Seats
0 44.
Touch Off or On.
Seat Exit Memory
This feature automatically recalls
the previously stored exit button
positions when the ignition is
changed from on or ACC/ ACCESSORY to off if the driver
door is open or opened. See
Memory Seats
044.
Touch Off or On.
Teen Driver
See “Teen Driver” under“Settings”
in the infotainment manual.
Valet Mode
This will lock the infotainment
system and steering wheel controls.
It may also limit access to vehicle
storage locations, if equipped.
To enable valet mode:
1. Enter a four-digit code on the keypad.
2. Touch Enter to go to the confirmation screen.
3. Re-enter the four-digit code.
Touch Lock or Unlock to lock or
unlock the system. Touch Back to
go back to the previous menu.
Page 131 of 361
Chevrolet Camaro Owner Manual (GMNA-Localizing-U.S./Canada/Mexico-
13556304) - 2020 - CRC - 9/3/19
130 Lighting
Lighting
Exterior Lighting
Exterior Lamp Controls . . . . . . . 130
Headlamp High/Low-BeamChanger . . . . . . . . . . . . . . . . . . . . 130
Flash-to-Pass . . . . . . . . . . . . . . . . 131
Daytime Running Lamps (DRL) . . . . . . . . . . . . . . . 131
Automatic Headlamp System . . . . . . . . . . . . . . . . . . . . . . 131
Hazard Warning Flashers . . . . . 132
Turn and Lane-Change Signals . . . . . . . . . . . . . . . . . . . . . . 133
Interior Lighting
Instrument Panel IlluminationControl . . . . . . . . . . . . . . . . . . . . . . 133
Interior Lamps . . . . . . . . . . . . . . . . 134
Reading Lamps . . . . . . . . . . . . . . 134
Lighting Features
Entry Lighting . . . . . . . . . . . . . . . . 134
Exit Lighting . . . . . . . . . . . . . . . . . . 134
Theater Dimming . . . . . . . . . . . . . 135
Battery Load Management . . . 135
Battery Power Protection . . . . . 135
Exterior Lighting Battery Saver . . . . . . . . . . . . . . . . . . . . . . . 135
Exterior Lighting
Exterior Lamp Controls
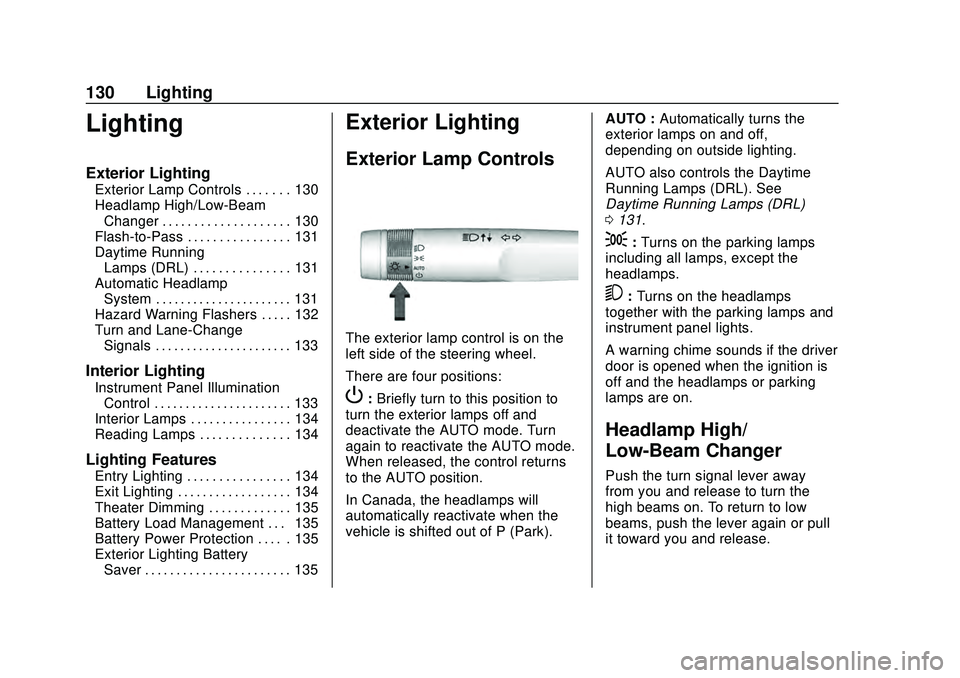
The exterior lamp control is on the
left side of the steering wheel.
There are four positions:
P: Briefly turn to this position to
turn the exterior lamps off and
deactivate the AUTO mode. Turn
again to reactivate the AUTO mode.
When released, the control returns
to the AUTO position.
In Canada, the headlamps will
automatically reactivate when the
vehicle is shifted out of P (Park). AUTO :
Automatically turns the
exterior lamps on and off,
depending on outside lighting.
AUTO also controls the Daytime
Running Lamps (DRL). See
Daytime Running Lamps (DRL)
0 131.
;:Turns on the parking lamps
including all lamps, except the
headlamps.
5: Turns on the headlamps
together with the parking lamps and
instrument panel lights.
A warning chime sounds if the driver
door is opened when the ignition is
off and the headlamps or parking
lamps are on.
Headlamp High/
Low-Beam Changer
Push the turn signal lever away
from you and release to turn the
high beams on. To return to low
beams, push the lever again or pull
it toward you and release.
Page 139 of 361
Chevrolet Camaro Owner Manual (GMNA-Localizing-U.S./Canada/Mexico-
13556304) - 2020 - CRC - 9/3/19
138 Infotainment System
.Notify other drivers of your
vehicle of the above rules and
require them to comply.
. General Motors does not accept
any responsibility or liability in
connection with use that is not
permitted.
. Law enforcement authorities
may have the right to seize
video recordings and use them
as evidence of criminal/driving
offenses against you or third
parties.
The PDR records video, audio, and
vehicle data. This data is stored on
a removable SD card. The SD card
reader is below the instrument panel
to the left of the steering wheel and
just above the hood release.
The recorded data is not stored
anywhere else and is only
accessible from the SD card.
To begin, insert a FAT32 formatted
SD card, Class 10 required, 8, 16,
or 32 GB recommended, into the SD
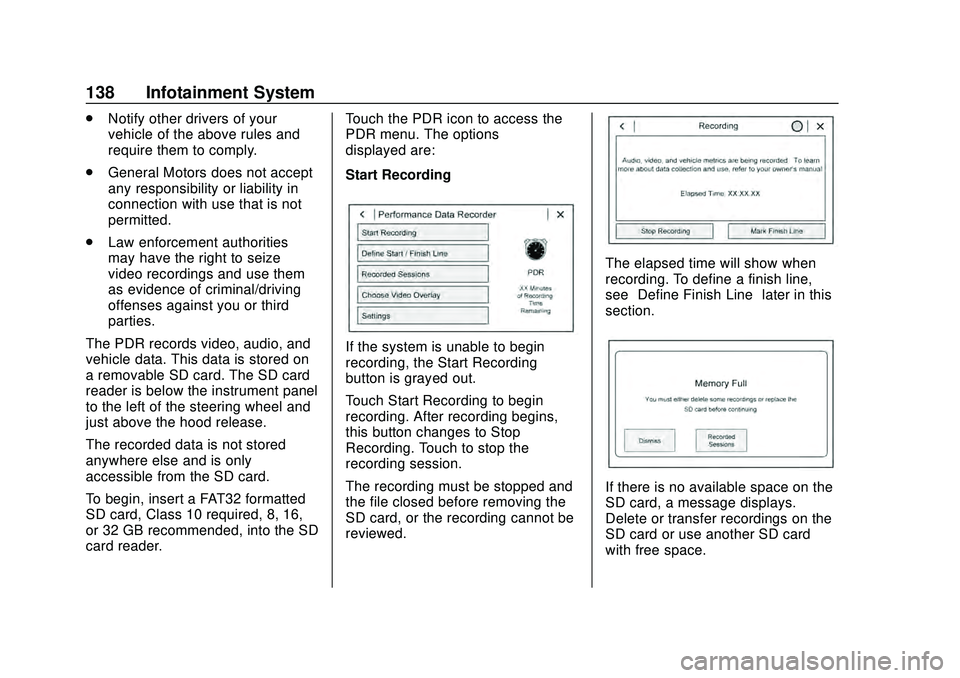
card reader. Touch the PDR icon to access the
PDR menu. The options
displayed are:
Start Recording
If the system is unable to begin
recording, the Start Recording
button is grayed out.
Touch Start Recording to begin
recording. After recording begins,
this button changes to Stop
Recording. Touch to stop the
recording session.
The recording must be stopped and
the file closed before removing the
SD card, or the recording cannot be
reviewed.
The elapsed time will show when
recording. To define a finish line,
see
“Define Finish Line” later in this
section.
If there is no available space on the
SD card, a message displays.
Delete or transfer recordings on the
SD card or use another SD card
with free space.