torque CHEVROLET CAMARO 2020 Get To Know Guide
[x] Cancel search | Manufacturer: CHEVROLET, Model Year: 2020, Model line: CAMARO, Model: CHEVROLET CAMARO 2020Pages: 361, PDF Size: 3.27 MB
Page 158 of 361
Chevrolet Camaro Owner Manual (GMNA-Localizing-U.S./Canada/Mexico-
13556304) - 2020 - CRC - 9/3/19
Driving and Operating 157
Defensive drivers avoid most skids
by taking reasonable care suited to
existing conditions, and by not
overdriving those conditions. But
skids are always possible.
If the vehicle starts to slide, follow
these suggestions:
.Ease your foot off the
accelerator pedal and steer the
way you want the vehicle to go.
The vehicle may straighten out.
Be ready for a second skid if it
occurs.
. Slow down and adjust your
driving according to weather
conditions. Stopping distance
can be longer and vehicle
control can be affected when
traction is reduced by water,
snow, ice, gravel, or other
material on the road. Learn to
recognize warning clues —such
as enough water, ice, or packed
snow on the road to make a
mirrored surface —and slow
down when you have any doubt. .
Try to avoid sudden steering,
acceleration, or braking,
including reducing vehicle speed
by shifting to a lower gear. Any
sudden changes could cause
the tires to slide.
Remember: Antilock brakes help
avoid only the braking skid.
Track Events and
Competitive Driving
{Danger
High-performance features are
intended for use only on closed
tracks by experienced and
qualified drivers and should not
be used on public roads.
High-speed driving, aggressive
cornering, hard braking, and other
high-performance driving can be
dangerous. Improper driver inputs
for the conditions may result in
loss of control of the vehicle,
which could injure or kill you or
others. Always drive safely. If the vehicle is a Camaro High
Performance model, see the
additional items in the Camaro High
Performance supplement.
Track events or competitive driving
may affect the vehicle warranty. See
the warranty manual before using
the vehicle for racing or other
competitive driving.
The Engine Sound Management
setting (if equipped) should not be
set to Stealth Mode during track
events and competitive driving. See
Driver Mode Control
0196.
{Warning
Prior to each track event and
again before returning to public
roads, tighten the wheel nuts with
a torque wrench to the proper
torque specification. Wheel nuts
that are improperly or incorrectly
tightened can cause the wheels
to become loose or come off,
(Continued)
Page 159 of 361

Chevrolet Camaro Owner Manual (GMNA-Localizing-U.S./Canada/Mexico-
13556304) - 2020 - CRC - 9/3/19
158 Driving and Operating
Warning (Continued)
resulting in a crash. See
Capacities and Specifications
0320 for wheel nut torque
specifications.
Engine Oil
Caution
If you use the vehicle for racing or
other competitive driving, the
engine may use more oil than it
would with normal use. Low oil
levels can damage the engine.
For information on how to add oil,
seeEngine Oil 0229.
Be sure to check the oil level
often during racing or other
competitive driving and keep the
level at or near the upper mark
that shows the proper operating
range on the engine oil dipstick. 3.6L (LGX) V6 Engine
Change the engine oil to 0W-40 or
5W-40 that meets the dexos2
specification. If this oil is not
available, the following oil can be
used as an alternative: Valvoline
SYNPOWER MST 5W-40.
For LS/LT 1LE, add 0.9 L (1.0 qt) of
oil over the nominal fill level for a
track event. After the competitive
driving, remove the excess oil so
that the level on the dipstick is not
above the upper mark that shows
the proper operating range.
During track usage, do not follow
the Engine Oil Life System status.
Change the engine oil after four
hours of accumulative track usage.
Fuel
Use premium unleaded gasoline
with a posted octane rating of 93 at
a track event. Unleaded gasoline
with a posted octane rating of
91 may be used, but performance
will be degraded.
Automatic Transmission Fluid
Have the transmission fluid set to
the track specific oil level prior to
track usage. Transmission fluid
should be changed after every
15 hours of track usage. Any
transmission level set or change
should be performed at your dealer.
Manual Transmission Fluid
Manual transmission fluid should be
changed after every 15 hours of
track usage.
Rear Axle Fluid
Axles must have 2 400 km
(1,500 mi) before being used in
track driving.
The rear axle fluid temperatures
may be higher than when driving in
severe conditions. Drain and refill
with new fluid after the first racing or
competitive driving event, and then
after every 24 hours of racing or
competitive driving. See
Recommended Fluids and
Lubricants
0315.
Page 162 of 361
Chevrolet Camaro Owner Manual (GMNA-Localizing-U.S./Canada/Mexico-
13556304) - 2020 - CRC - 9/3/19
Driving and Operating 161
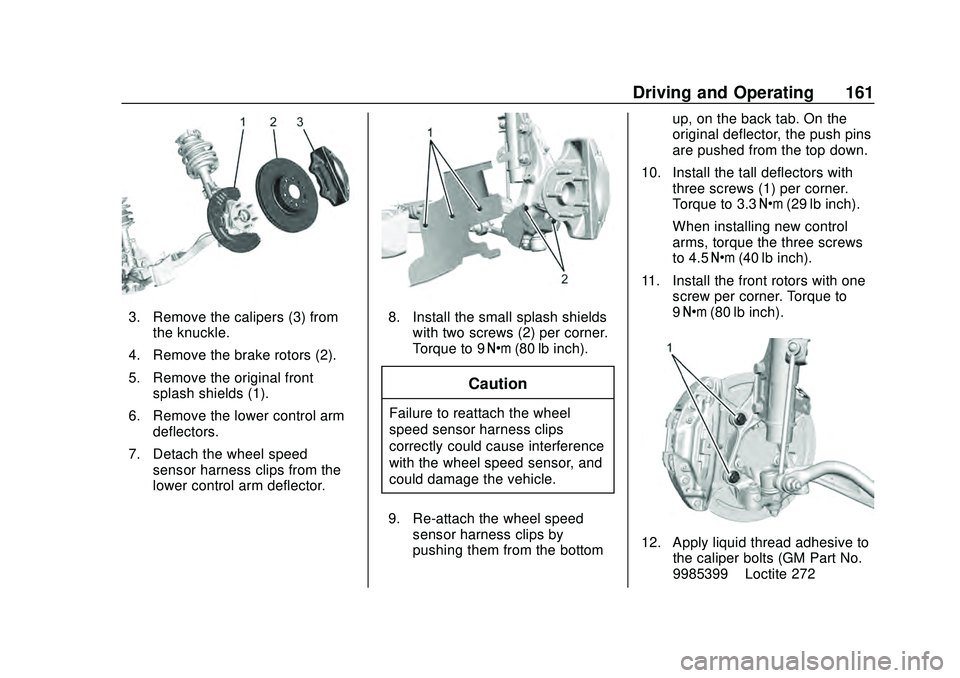
3. Remove the calipers (3) fromthe knuckle.
4. Remove the brake rotors (2).
5. Remove the original front splash shields (1).
6. Remove the lower control arm deflectors.
7. Detach the wheel speed sensor harness clips from the
lower control arm deflector.8. Install the small splash shieldswith two screws (2) per corner.
Torque to 9 Y(80 lb inch).
Caution
Failure to reattach the wheel
speed sensor harness clips
correctly could cause interference
with the wheel speed sensor, and
could damage the vehicle.
9. Re-attach the wheel speed sensor harness clips by
pushing them from the bottom up, on the back tab. On the
original deflector, the push pins
are pushed from the top down.
10. Install the tall deflectors with three screws (1) per corner.
Torque to 3.3 Y(29 lb inch).
When installing new control
arms, torque the three screws
to 4.5 Y(40 lb inch).
11. Install the front rotors with one screw per corner. Torque to
9Y (80 lb inch).
12. Apply liquid thread adhesive to
the caliper bolts (GM Part No.
9985399 –Loctite 272 –
Page 163 of 361
Chevrolet Camaro Owner Manual (GMNA-Localizing-U.S./Canada/Mexico-
13556304) - 2020 - CRC - 9/3/19
162 Driving and Operating
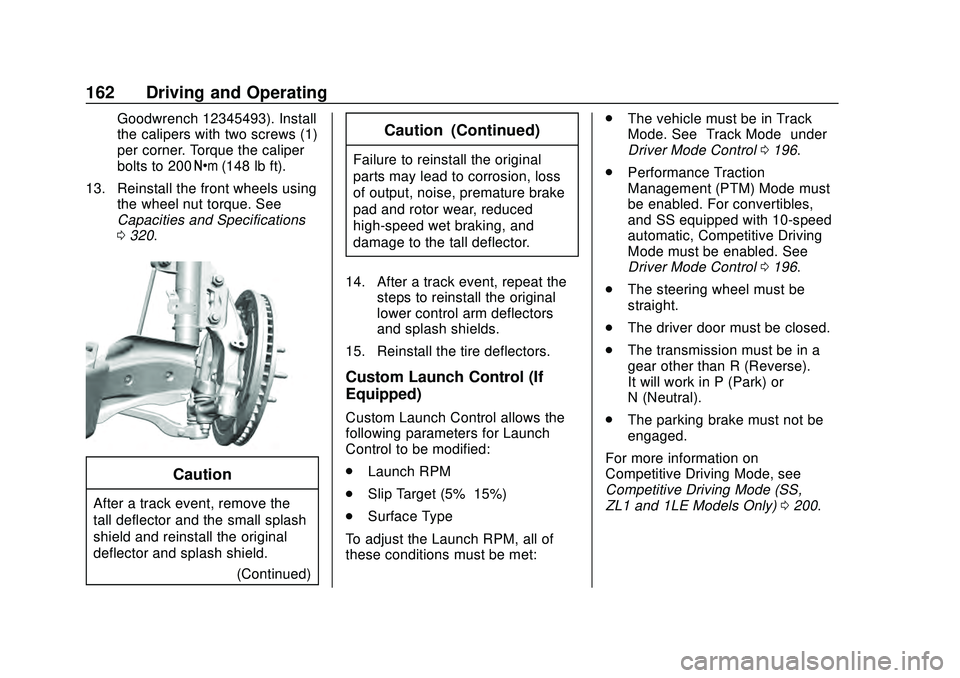
Goodwrench 12345493). Install
the calipers with two screws (1)
per corner. Torque the caliper
bolts to 200Y(148 lb ft).
13. Reinstall the front wheels using the wheel nut torque. See
Capacities and Specifications
0320.
Caution
After a track event, remove the
tall deflector and the small splash
shield and reinstall the original
deflector and splash shield.
(Continued)
Caution (Continued)
Failure to reinstall the original
parts may lead to corrosion, loss
of output, noise, premature brake
pad and rotor wear, reduced
high-speed wet braking, and
damage to the tall deflector.
14. After a track event, repeat the steps to reinstall the original
lower control arm deflectors
and splash shields.
15. Reinstall the tire deflectors.
Custom Launch Control (If
Equipped)
Custom Launch Control allows the
following parameters for Launch
Control to be modified:
. Launch RPM
. Slip Target (5%–15%)
. Surface Type
To adjust the Launch RPM, all of
these conditions must be met: .
The vehicle must be in Track
Mode. See “Track Mode” under
Driver Mode Control 0196.
. Performance Traction
Management (PTM) Mode must
be enabled. For convertibles,
and SS equipped with 10-speed
automatic, Competitive Driving
Mode must be enabled. See
Driver Mode Control 0196.
. The steering wheel must be
straight.
. The driver door must be closed.
. The transmission must be in a
gear other than R (Reverse).
It will work in P (Park) or
N (Neutral).
. The parking brake must not be
engaged.
For more information on
Competitive Driving Mode, see
Competitive Driving Mode (SS,
ZL1 and 1LE Models Only) 0200.
Page 167 of 361

Chevrolet Camaro Owner Manual (GMNA-Localizing-U.S./Canada/Mexico-
13556304) - 2020 - CRC - 9/3/19
166 Driving and Operating
2. Useworxto navigate to the
Launch Control menu.
3. Usepto open the Launch
Control menu.
Select Automatic or Custom.
4. Usexto highlight Line Lock.
5. Press SEL to select Line Lock.
6. Press the brake pedal firmly to move the bar graph to 100%.
7. Release the brake pedal.
8. There are 15 seconds to
complete the burnout and exit.
9. To release the brakes and roll out, press
1and SEL at the
same time.
If the burnout is not completed in
15 seconds, torque will be reduced
to idle, the parking brake will be
Page 181 of 361

Chevrolet Camaro Owner Manual (GMNA-Localizing-U.S./Canada/Mexico-
13556304) - 2020 - CRC - 9/3/19
180 Driving and Operating
.Sunroof (during RAP this
functionality will be lost when
any door is opened)
. Auxiliary Power Outlet
. Audio System
. OnStar System
Shifting Into Park
To shift into P (Park):
1. Hold the brake pedal down and set the parking brake.
See Electric Parking Brake
0 192.
2. Hold the button on the shift lever and push the shift lever
toward the front of the vehicle
into P (Park).
3. Turn the ignition off.
Leaving the Vehicle with the
Engine Running
{Warning
It can be dangerous to leave the
vehicle with the engine running.
It could overheat and catch fire.
It is dangerous to get out of the
vehicle if the shift lever is not fully
in P (Park) with the parking brake
firmly set. The vehicle can roll.
Do not leave the vehicle when the
engine is running. If you have left
the engine running, the vehicle
can move suddenly. You or others
could be injured. To be sure the
vehicle will not move, even when
you are on fairly level ground,
always set the parking brake and
move the shift lever to P (Park).
See Shifting Into Park 0180.
If you have to leave the vehicle with
the engine running, the vehicle must
be in P (Park) and the parking
brake set. Release the button and check that
the shift lever cannot be moved out
of P (Park).
Torque Lock
Torque lock is when the weight of
the vehicle puts too much force on
the parking pawl in the
transmission. This happens when
parking on a hill and shifting the
transmission into P (Park) is not
done properly and then it is difficult
to shift out of P (Park). To prevent
torque lock, set the parking brake
and then shift into P (Park). To find
out how, see
“Shifting Into Park”
previously in this section.
If torque lock does occur, the
vehicle may need to be pushed
uphill by another vehicle to relieve
the parking pawl pressure, so you
can shift out of P (Park).
Shifting out of Park
This vehicle is equipped with an
electronic shift lock control system.
The shift lock release is designed to
Page 189 of 361

Chevrolet Camaro Owner Manual (GMNA-Localizing-U.S./Canada/Mexico-
13556304) - 2020 - CRC - 9/3/19
188 Driving and Operating
Manual Transmission
Shift Pattern–V8 Engine
Shift Pattern –L4 and V6 Engines
These are the shift patterns for the
6-speed manual transmissions.
Caution
The message MANUAL
TRANSMISSION —RELEASE
CLUTCH PEDAL displays and a
chime sounds if the manual
transmission clutch pedal is
partially applied for an extended
period of time while the vehicle is
being driven. Driving with the
clutch pedal applied can reduce
(Continued)
Caution (Continued)
the life of the clutch and/or
damage it. Fully release the
clutch pedal after each gear
change.
Caution
The message REDUCED
PERFORMANCE—REDUCE
CLUTCH USE displays and
engine torque is momentarily
limited if excessive manual
transmission clutch slip is
detected while the clutch pedal is
fully released. This could be
caused by a hot clutch. Apply less
pressure on the accelerator pedal
when accelerating from a stop.
Also, fully release the accelerator
pedal during gear changes. This
will allow the clutch to cool and
should prevent further clutch slip
while the clutch pedal is fully
(Continued)
Page 197 of 361
Chevrolet Camaro Owner Manual (GMNA-Localizing-U.S./Canada/Mexico-
13556304) - 2020 - CRC - 9/3/19
196 Driving and Operating
Caution
Do not repeatedly brake or
accelerate heavily when TCS is
off. The vehicle driveline could be
damaged.
To turn off only TCS, press and
release
Y. The traction off lighti
displays in the instrument cluster.
To turn TCS on again, press
Y.
The traction off light
idisplayed in
the instrument cluster will turn off.
If TCS is limiting wheel spin when
Yis pressed, the system will not
turn off until the wheels stop
spinning.
To turn off both TCS and StabiliTrak/
ESC, press and hold
Yuntil the
traction off light
iand StabiliTrak/
ESC OFF light
gcome on and stay
on in the instrument cluster. To turn TCS and StabiliTrak/ESC on
again, press
Y. The traction off
light
iand StabiliTrak/ESC OFF
light
gin the instrument cluster
turn off.
Adding accessories can affect the
vehicle performance. See
Accessories and Modifications
0 221.
Engine Drag Control (EDC)
EDC improves vehicle stability by
sensing if there is a difference in
speed between the free rolling front
wheels and the rear drive wheels
that often occurs when the driver
takes their foot off the accelerator
pedal on slippery surfaces (snow,
ice, etc.). When this is detected,
EDC sends more torque to the rear
wheels to make sure all four wheels
are spinning at similar speeds,
making the vehicle more stable.
Driver Mode Control
Driver Mode Control adds a sportier
feel, provide a more comfortable
ride, or assist in different weather conditions or terrain. This system
simultaneously changes the
software calibration of various
sub-systems to optimize driving
performance. Depending on the
option package, available features,
and mode selected, the exhaust,
suspension, steering, and
powertrain will change calibrations
to achieve the desired mode
characteristics. If the vehicle is
equipped with Magnetic Ride
Control, selecting the various Driver
Modes adjusts the ride of the
vehicle to enhance the ride
performance for the road conditions
and the selected mode.
While in the Sport and/or Track
Modes, the vehicle monitors driving
behavior and automatically enables
Performance Shift Features in the
automatic transmission when
spirited driving is detected. These
features maintain lower
transmission gears to increase
available engine braking and
improve acceleration response. The
vehicle will exit these features and
Page 245 of 361

Chevrolet Camaro Owner Manual (GMNA-Localizing-U.S./Canada/Mexico-
13556304) - 2020 - CRC - 9/3/19
244 Vehicle Care
{Warning
The brake wear warning sound
means that soon the brakes will
not work well. That could lead to
a crash. When the brake wear
warning sound is heard, have the
vehicle serviced.
Caution
Continuing to drive with worn-out
brake pads could result in costly
brake repair.
Some driving conditions or climates
can cause a brake squeal when the
brakes are first applied or lightly
applied. This does not mean
something is wrong with the brakes.
If equipped with high performance
brake linings, there could be an
increased build-up of brake dust as
well as minor noises as compared
to standard brake linings. Properly torqued wheel nuts are
necessary to help prevent brake
pulsation. When tires are rotated,
inspect brake pads for wear and
evenly tighten wheel nuts in the
proper sequence to torque
specifications. See
Capacities and
Specifications 0320.
Brake pads should be replaced as
complete sets.
Brake Pedal Travel
See your dealer if the brake pedal
does not return to normal height,
or if there is a rapid increase in
pedal travel. This could be a sign
that brake service may be required.
Replacing Brake System Parts
Always replace brake system parts
with new, approved replacement
parts. If this is not done, the brakes
may not work properly. The braking
performance expected can change
in many other ways if the wrong
replacement brake parts are
installed or if parts are improperly
installed.
Cold Weather Brake Operation
(SS Model)
High performance brake
components may bind and clunk
when moving the vehicle. This may
be noticeable after parking when the
brakes have been wet, such as
when driving in the rain or after a
car wash. This is normal for brakes
with high friction pads and does not
affect the operation of the brakes.
Apply the brakes several times until
the binding or clunking stops. Drive
the vehicle and apply the brakes
several times if it is washed before
long-term storage.
Brake Fluid
The brake/clutch master cylinder
reservoir is filled with GM approved
DOT 3 brake fluid as indicated on
Page 276 of 361
Chevrolet Camaro Owner Manual (GMNA-Localizing-U.S./Canada/Mexico-
13556304) - 2020 - CRC - 9/3/19
Vehicle Care 275
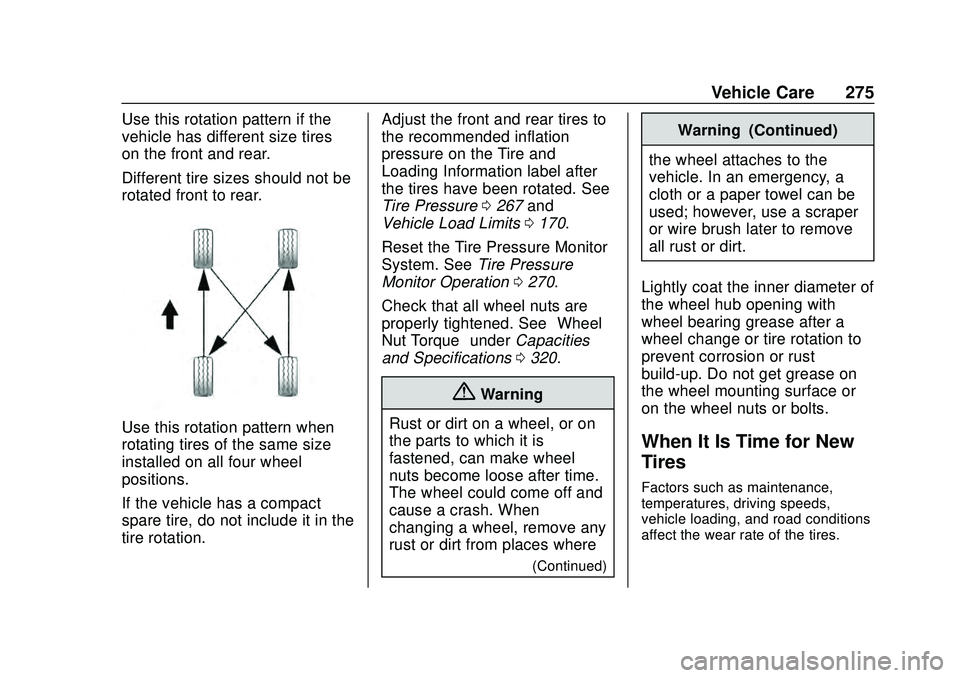
Use this rotation pattern if the
vehicle has different size tires
on the front and rear.
Different tire sizes should not be
rotated front to rear.
Use this rotation pattern when
rotating tires of the same size
installed on all four wheel
positions.
If the vehicle has a compact
spare tire, do not include it in the
tire rotation.Adjust the front and rear tires to
the recommended inflation
pressure on the Tire and
Loading Information label after
the tires have been rotated. See
Tire Pressure
0267 and
Vehicle Load Limits 0170.
Reset the Tire Pressure Monitor
System. See Tire Pressure
Monitor Operation 0270.
Check that all wheel nuts are
properly tightened. See “Wheel
Nut Torque” underCapacities
and Specifications 0320.
{Warning
Rust or dirt on a wheel, or on
the parts to which it is
fastened, can make wheel
nuts become loose after time.
The wheel could come off and
cause a crash. When
changing a wheel, remove any
rust or dirt from places where
(Continued)
Warning (Continued)
the wheel attaches to the
vehicle. In an emergency, a
cloth or a paper towel can be
used; however, use a scraper
or wire brush later to remove
all rust or dirt.
Lightly coat the inner diameter of
the wheel hub opening with
wheel bearing grease after a
wheel change or tire rotation to
prevent corrosion or rust
build-up. Do not get grease on
the wheel mounting surface or
on the wheel nuts or bolts.
When It Is Time for New
Tires
Factors such as maintenance,
temperatures, driving speeds,
vehicle loading, and road conditions
affect the wear rate of the tires.