remote start CHEVROLET CAMARO SS 2010 User Guide
[x] Cancel search | Manufacturer: CHEVROLET, Model Year: 2010, Model line: CAMARO SS, Model: CHEVROLET CAMARO SS 2010Pages: 372, PDF Size: 1.91 MB
Page 121 of 372

Remote Lock/Unlock/Start
Select Remote Lock/Unlock/Start
and the following will be displayed:
•Unlock Feedback (Lights)
•Locking Feedback
•Door Unlock Options
•Remote Vehicle Start
Unlock Feedback (Lights)
When on, the exterior lamps will
flash when unlocking the vehicle
with the RKE transmitter.
Press the MENU / SELECT knob
when Unlock Feedback (Lights)
is highlighted. Turn the knob
to select Flash Lights or Off.
Press the knob to confirm and
go back to the last menu.Locking Feedback
This allows selection of what type of
feedback is given when unlocking
the vehicle with the RKE transmitter.
Press the MENU / SELECT knob
when Locking Feedback is
highlighted. Turn the knob to select
Lights and Horn, Lights Only,
Horn Only, or Off. Press the knob
to confirm and go back to the
last menu.
Door Unlock Options
This allows selection of which
doors will unlock when pressing
the unlock button on the RKE
transmitter.
Press the MENU / SELECT knob
when Door Unlock Options is
highlighted. Turn the knob to select
All Doors or Driver Door Only.
Press the knob to confirm and go
back to the last menu.Remote Vehicle Start
This allows the Remote Vehicle
Start to be turned on or off,
if the vehicle has this feature.
Press the MENU / SELECT knob
when Remote Vehicle Start is
highlighted. Turn the knob to
select On or Off. Press the knob
to confirm and go back to the
last menu.
Return to Factory Settings
Select Return to Factory
Settings to return all of the vehicle
personalization to the default
settings. Turn the knob to select
Yes or No. Press the knob to
confirm and go back to the
last menu.
Instruments and Controls 4-41
Page 126 of 372

It is also recommended that upon
the sale of the vehicle, the
programmed Universal Home
Remote buttons should be erased
for security purposes. See “Erasing
Universal Home Remote Buttons”
later in this section.
When programming a garage door,
park outside of the garage. Park
directly in line with and facing
the garage door opener motor-head
or gate motor-head. Be sure that
people and objects are clear of the
garage door or gate that is being
programmed.
It is recommended that a new
battery be installed in your
hand-held transmitter for quicker
and more accurate transmission
of the radio-frequency signal.Programming the Universal
Home Remote System
For questions or help programming
the Universal Home Remote
System, call 1-800-355-3515
or go to www.homelink.com.
Programming a garage door opener
involves time-sensitive actions,
so read the entire procedure before
starting. Otherwise, the device
will time out and the procedure will
have to be repeated.
To program up to three devices:
1. Hold the end of your hand-held
transmitter about 3 to 8 cm
(1 to 3 inches) away from the
Universal Home Remote buttons
while keeping the indicator
light in view. The hand-held
transmitter was supplied by
the manufacturer of your
garage door opener receiver
(motor-head unit).2. At the same time, press and hold
both the hand-held transmitter
button and one of the three
Universal Home Remote buttons
to be used to operate the
garage door. Do not release
the Universal Home Remote
button or the hand-held
transmitter button until the
indicator light changes from
a slow to a rapidly flashing
light. You now may release
both buttons.
Some entry gates and garage
door openers may require
substitution of Step 2 with
the procedure noted in “Gate
Operator and Canadian
Programming” later in this
section.
4-46 Instruments and Controls
Page 127 of 372

3. Press and hold for five seconds
the newly-trained Universal
Home Remote button (selected
button from Step 2) while
observing the indicator light
and garage door activation.
•If the indicator light stays on
continuously or the garage
door starts to move when
the Universal Home
Remote button is pressed
and released, then the
programming is complete.
There is no need to continue
programming Steps 4
through 6.
•If the Universal Home Remote
indicator light blinks rapidly
for two seconds, then turns to
a constant light and the garage
door does not move, continue
with the programming Steps 4
through 6.
It may be helpful to have
another person to assist
with the remaining Steps 4
through 6.4. After Steps 1 through 3 have
been completed, locate inside
the garage the garage door
opener receiver (motor-head
unit). Locate the “Learn” or
“Smart” button. The name and
color of the button may vary
by manufacturer.
5. Firmly press and release the
“Learn” or “Smart” button.
After you press this button,
you will have 30 seconds
to complete Step 6.6. Immediately return to the vehicle.
Firmly press and hold for
two seconds the Universal Home
Remote button, selected in
Step 2 to control the garage door,
and then release it. If the garage
door does not move or the garage
door lamp does not flash, press
and hold the same button a
second time for two seconds, and
then release it. Again, if the door
does not move or the garage door
lamp does not flash, press and
hold the same button a third time
for two seconds, and then
release.
The Universal Home Remote should
now activate the garage door.
To program the remaining
two Universal Home Remote
buttons, begin with Step 1 of
“Programming the Universal
Home Remote System”.
Instruments and Controls 4-47
Page 160 of 372

Controlling a Bluetooth®
Device
Bluetooth devices that support
AVRCP (Audio/Video Remote
Control Profile) version 1.0 may
be able to be controlled by the
Infotainment System.
Press and release
gSEEK /
lSEEK to skip tracks. Press and
hold
gSEEK /lSEEK to fast
forward or fast reverse within
a track.
Other Information
The Bluetooth®word mark and
logos are owned by the Bluetooth®
SIG, Inc. and any use of such
marks by General Motors is under
license. Other trademarks and
trade names are those of their
respective owners.
SeeRadio Frequency Statement
(US, Can) on page 12-15for
FCC information.
Phone
Bluetooth (Overview)
Vehicles with a Bluetooth system
can use a Bluetooth capable
cell phone with a Hands Free Profile
to make and receive phone calls.
The infotainment system and
voice recognition are used to
control the system. The system
can be used while in ON/RUN or
ACC/ACCESSORY. The range
of the Bluetooth system can be up
to 9.1 m (30 ft.). Not all phones
support all functions and not
all phones work with the Bluetooth
system. See www.gm.com/bluetooth
for more information about
compatible phones.
Bluetooth Controls
Use the buttons located on the
infotainment system and the
steering wheel to operate the
Bluetooth system.Steering Wheel Controls
b/g(Push To Talk):Press to
answer incoming calls, to confirm
system information, and to start
voice recognition.
c/$(End Call / Mute):Press
to end a call, reject a call, or to
cancel an operation.
Infotainment System Controls
MENU/SELECT:Press and turn
to navigate the menu screens.
SeeOperation on page 6-4for
more information.
PHONE:Press to enter the Phone
main menu.
CONFIG:Press to enter the
System Configuration menu.
6-22 Infotainment System
Page 318 of 372

{WARNING
Fans or other moving engine
parts can injure you badly. Keep
your hands away from moving
parts once the engine is running.
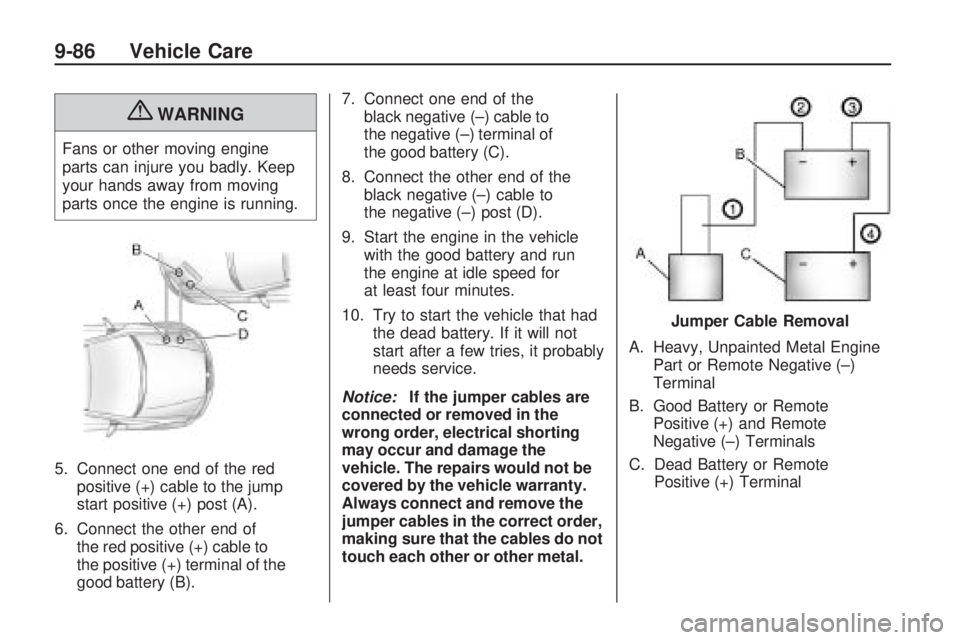
5. Connect one end of the red
positive (+) cable to the jump
start positive (+) post (A).
6. Connect the other end of
the red positive (+) cable to
the positive (+) terminal of the
good battery (B).7. Connect one end of the
black negative (–) cable to
the negative (–) terminal of
the good battery (C).
8. Connect the other end of the
black negative (–) cable to
the negative (–) post (D).
9. Start the engine in the vehicle
with the good battery and run
the engine at idle speed for
at least four minutes.
10. Try to start the vehicle that had
the dead battery. If it will not
start after a few tries, it probably
needs service.
Notice:If the jumper cables are
connected or removed in the
wrong order, electrical shorting
may occur and damage the
vehicle. The repairs would not be
covered by the vehicle warranty.
Always connect and remove the
jumper cables in the correct order,
making sure that the cables do not
touch each other or other metal.A. Heavy, Unpainted Metal Engine
Part or Remote Negative (–)
Terminal
B. Good Battery or Remote
Positive (+) and Remote
Negative (–) Terminals
C. Dead Battery or Remote
Positive (+) Terminal
Jumper Cable Removal
9-86 Vehicle Care
Page 359 of 372

GM will not access this data or
share it with others except: with the
consent of the vehicle owner or,
if the vehicle is leased, with
the consent of the lessee; in
response to an official request of
police or similar government office;
as part of GM’s defense of
litigation through the discovery
process; or, as required by law.
Data that GM collects or receives
may also be used for GM research
needs or may be made available
to others for research purposes,
where a need is shown and the data
is not tied to a specific vehicle or
vehicle owner.OnStar®
If your vehicle has OnStar and you
subscribe to the OnStar services,
please refer to the OnStar
Terms and Conditions for
information on data collection and
use. See alsoOnStar
®System
on page 4-42in this manual
for more information.
Radio Frequency
Identi�cation (RFID)
RFID technology is used in some
vehicles for functions such as
tire pressure monitoring and ignition
system security, as well as in
connection with conveniences such
as key fobs for remote door
locking/unlocking and starting, and
in-vehicle transmitters for garage
door openers. RFID technology in
GM vehicles does not use or record
personal information or link with
any other GM system containing
personal information.
Radio Frequency
Statement (US, Can)
This vehicle has systems that
operate on a radio frequency that
comply with Part 15 of the Federal
Communications Commission
(FCC) Rules and with RSS-210/211
of Industry and Science Canada.
Operation is subject to the following
two conditions:
1. The device may not cause
interference.
2. The device must accept any
interference received, including
interference that may cause
undesired operation of the
device.
Changes or modifications to any of
these systems by other than an
authorized service facility could void
authorization to use this equipment.
Customer Information 12-15
Page 368 of 372

Passenger Sensing System . . . 2-28
Perchlorate Materials
Requirements, California...... 9-3
Phone
Bluetooth.........6-22, 6-23, 6-26
Power
Door Locks........................ 1-7
Mirrors............................1-12
Protection, Battery.............. 5-7
Retained
Accessory (RAP)...........8-19
Seat Adjustment................. 2-4
Steering Fluid...................9-25
Windows.........................1-14
Pregnancy, Using
Safety Belts.....................2-19
Privacy
Radio Frequency
Identification (RFID).....12-15
Program
Courtesy Transportation.....12-8
Proposition 65 Warning,
California.......................... 9-2R
Radio Frequency
Identification (RFID).........12-15
Statement......................12-15
Radios
AM-FM Radio.................... 6-8
Reception........................6-13
Satellite...........................6-10
Rear Axle...........................9-30
Limited-Slip......................8-38
Rear Seats........................... 2-6
Rearview Mirrors..................1-13
Automatic Dimming...........1-13
Reclining Seatbacks............... 2-4
Recommended Fluids and
Lubricants........................10-7
Recommended Fuel.............8-44
Records
Maintenance...................10-10
Recreational Vehicle Towing . . . 9-87
Reimbursement Program,
GM Mobility.....................12-5
Remote Keyless Entry (RKE)
System............................. 1-3Remote Vehicle Start............. 1-5
Replacement Bulbs..............9-41
Replacement Parts
Airbags...........................2-34
Maintenance....................10-9
Replacing Airbag System......2-34
Replacing LATCH System
Parts After a Crash...........2-48
Replacing Safety Belt System
Parts After a Crash............2-21
Reporting Safety Defects
Canadian Government.....12-13
General Motors...............12-13
U.S. Government............12-13
Retained Accessory Power
(RAP) .............................8-19
Ride Control Systems
Limited Slip Rear Axle.......8-38
Messages........................4-34
Roadside Assistance
Program..........................12-6
Roof
Sunroof...........................1-16
Rotation, Tires.....................9-61
Routing, Engine Drive Belt....11-4
Running the Vehicle While
Parked............................8-26
i-8 INDEX
Page 369 of 372

S
Safety Belts.......................... 2-6
Care ...............................2-20
Extender.........................2-20
How to Wear Safety Belts
Properly.......................2-10
Lap-Shoulder Belt.............2-16
Messages........................4-35
Reminders.......................4-16
Replacing After a Crash.....2-21
Use During Pregnancy......2-19
Safety Defects Reporting
Canadian Government.....12-13
General Motors...............12-13
U.S. Government............12-13
Safety System Check...........2-20
Satellite Radio.....................6-10
Satellite Radio Antenna.........6-14
Scheduled Maintenance........10-2
Scheduling Appointments.......12-8
Sealant Kit, Tire...................9-71
Seatback Latches.................. 2-5Seats
Adjustment, Front............... 2-3
Head Restraints................. 2-2
Heated Front..................... 2-6
Power Adjustment, Front..... 2-4
Rear ................................. 2-6
Reclining Seatbacks............ 2-4
Securing Child
Restraints................2-48, 2-50
Security
Vehicle............................1-10
Service
Accessories and
Modifications.................. 9-3
Doing Your Own Work........ 9-4
Engine Soon Lamp...........4-19
Maintenance, General
Information...................10-1
Maintenance Records......10-10
Parts Identification Label....11-1
Publications Ordering
Information.................12-12Service (cont.)
Scheduling Appointments . . . 12-8
Vehicle Messages.............4-35
Servicing the Airbag-Equipped
Vehicle............................2-32
Shifting
Into Park.........................8-21
Out of Park.....................8-22
Signals, Turn and
Lane-Change..................... 5-4
Spare Tire
Compact.........................9-83
Specifications and
Capacities.......................11-2
Speedometer.......................4-11
StabiliTrak
OFF Light........................4-24
StabiliTrak System................8-36
Start Vehicle, Remote............. 1-5
Starter Switch Check............9-31
Starting the Engine..............8-19
INDEX i-9
Page 371 of 372

Tires (cont.)
Uniform Tire Quality
Grading.......................9-65
Wheel Alignment and Tire
Balance.......................9-67
Wheel Replacement..........9-67
When It Is Time for New
Tires............................9-62
Winter.............................9-48
Towing
Driving Characteristics.......8-49
Equipment.......................8-55
General Information...........8-48
Recreational Vehicle..........9-87
Trailer.............................8-53
Vehicle............................9-87
Traction..............................4-24
Control OFF/StabiliTrak
OFF Light....................4-24
Control System (TCS).......8-34
Control System (TCS)/
StabiliTrak
®Light...........4-24
Limited-Slip Rear Axle.......8-38
Off Light..........................4-23Trailer Towing......................8-53
Transmission
Automatic........................8-26
Fluid, Automatic................9-14
Fluid, Manual...................9-15
Messages........................4-36
Temperature Gage............4-14
Transportation Program,
Courtesy.........................12-8
Trip Odometer.....................4-11
Trunk................................... 1-8
Turn and Lane-Change
Signals............................. 5-4
U
Ultrasonic Parking Assist.......8-41
Uniform Tire Quality
Grading...........................9-65
Universal Remote System.....4-45
Operation........................4-48
Programming...................4-45
Using this Manual.................... iv
V
Vehicle
Canadian Owners................. iii
Control............................. 8-3
Load Limits......................8-12
Messages........................4-37
Personalization.................4-38
Remote Start..................... 1-5
Security...........................1-10
Speed Messages..............4-37
Towing ............................9-87
Vehicle Care
Storing the Tire Sealant
and Compressor Kit.......9-77
Tire Pressure...................9-54
Vehicle Identification
Number (VIN)...................11-1
Service Parts Identification
Label...........................11-1
Vehicle Reminder
Messages........................4-37
Ventilation, Air....................... 7-3
Visors.................................1-16
Voltmeter Gage....................4-15
INDEX i-11