check engine CHEVROLET CAMARO SS 2010 Owner's Manual
[x] Cancel search | Manufacturer: CHEVROLET, Model Year: 2010, Model line: CAMARO SS, Model: CHEVROLET CAMARO SS 2010Pages: 372, PDF Size: 1.91 MB
Page 225 of 372
Driving Characteristics
and Towing Tips
{WARNING
The driver can lose control
when pulling a trailer if the correct
equipment is not used or the
vehicle is not driven properly.
For example, if the trailer is too
heavy, the brakes may not work
well — or even at all. The driver
and passengers could be seriously
injured. The vehicle may also be
damaged; the resulting repairs
would not be covered by the
vehicle warranty. Pull a trailer only
if all the steps in this section have
been followed. Ask your dealer/
retailer for advice and information
about towing a trailer with the
vehicle.The vehicle can tow a trailer if it
is equipped with the proper trailer
towing equipment. To identify the
trailering capacity of the vehicle,
seeTrailer Towing on page 8-53.
Trailering changes handling,
acceleration, braking, durability
and fuel economy. With the added
weight, the engine, transmission,
wheel assemblies and tires are
forced to work harder and under
greater loads. The trailer also adds
wind resistance, increasing the
pulling requirements. For safe
trailering, correctly use the proper
trailering equipment.
The following information has
important trailering tips and rules
for your safety and that of your
passengers. Read this section
carefully before pulling a trailer.
Pulling A Trailer
Here are some important points:
•There are many laws, including
speed limit restrictions that apply
to trailering. Check for legal
requirements with state or
provincial police.
•Do not tow a trailer at all during
the first 1 600 km (1,000 miles)
the new vehicle is driven.
The engine, axle or other
parts could be damaged.
•During the first 800 km
(500 miles) that a trailer is
towed, do not drive over 80 km/h
(50 mph) and do not make starts
at full throttle. This reduces wear
on the vehicle.
Driving and Operating 8-49
Page 227 of 372
Backing Up
Hold the bottom of the steering
wheel with one hand. Then, to move
the trailer to the left, move that
hand to the left. To move the trailer
to the right, move your hand to
the right. Always back up slowly
and, if possible, have someone
guide you.
Making Turns
Notice:Making very sharp turns
while trailering could cause the
trailer to come in contact with the
vehicle. The vehicle could be
damaged. Avoid making very
sharp turns while trailering.
When turning with a trailer, make
wider turns than normal. Do this so
the trailer won’t strike soft shoulders,
curbs, road signs, trees or other
objects. Avoid jerky or sudden
maneuvers. Signal well in advance.
Turn Signals When Towing a
Trailer
The arrows on the instrument panel
flash whenever signaling a turn
or lane change. Properly hooked up,
the trailer lamps also flash, telling
other drivers the vehicle is turning,
changing lanes or stopping.
When towing a trailer, the arrows on
the instrument panel flash for turns
even if the bulbs on the trailer are
burned out. For this reason you
may think other drivers are seeing
the signal when they are not. It is
important to check occasionally to be
sure the trailer bulbs are still working.
Driving On Grades
Reduce speed and shift to a lower
gear before starting down a long or
steep downgrade. If the transmission
is not shifted down, the brakes might
have to be used so much that they
would get hot and no longer
work well.Vehicles with an automatic
transmission can tow in D (Drive).
Shift the transmission to a lower
gear if the transmission shifts
too often under heavy loads and/or
hilly conditions. For vehicles with
a manual transmission, it is
better not to use the highest gear.
When towing at high altitude on
steep uphill grades, consider the
following: Engine coolant will boil at
a lower temperature than at normal
altitudes. If the engine is turned off
immediately after towing at high
altitude on steep uphill grades,
the vehicle may show signs similar
to engine overheating. To avoid
this, let the engine run while
parked, preferably on level ground,
with the automatic transmission
in P (Park) for a few minutes
before turning the engine off.
Driving and Operating 8-51
Page 229 of 372

Maintenance When Trailer
Towing
The vehicle needs service more
often when pulling a trailer. See this
manual’s Maintenance Schedule or
Index for more information. Things
that are especially important in trailer
operation are automatic transmission
fluid, engine oil, axle lubricant, belts,
cooling system and brake system.
It is a good idea to inspect these
before and during the trip.
Check periodically to see that all
hitch nuts and bolts are tight.
Engine Cooling When Trailer
Towing
The cooling system may temporarily
overheat during severe operating
conditions. SeeEngine Overheating
on page 9-24.
Trailer Towing
Before pulling a trailer, there are
three important considerations that
have to do with weight:
•The weight of the trailer.
•The weight of the trailer tongue.
•The total weight on your
vehicle’s tires.
Weight of the Trailer
How heavy can a trailer safely be?
It should never weigh more than
1,000 lbs (454 kg). But even
that can be too heavy.
It depends on how the rig is used.
For example, speed, altitude, road
grades, outside temperature and
how much the vehicle is used to pull
a trailer are all important. It candepend on any special equipment
on the vehicle, and the amount of
tongue weight the vehicle can carry.
See “Weight of the Trailer Tongue”
later in this section for more
information.
Maximum trailer weight is calculated
assuming only the driver is in the tow
vehicle and it has all the required
trailering equipment. The weight
of additional optional equipment,
passengers and cargo in the tow
vehicle must be subtracted from
the maximum trailer weight.
Ask your dealer/retailer for our
trailering information or advice, or
you can write us at our Customer
Assistance Offices. SeeCustomer
Assistance Offices on page 12-3
for more information.
Driving and Operating 8-53
Page 231 of 372
Towing Equipment
Hitches
Use the correct hitch equipment.
See your dealer/retailer or a
hitch dealer for assistance.
•The rear bumper on the vehicle
is not intended for hitches.
Do not attach rental hitches
or other bumper-type hitches to
it. Use only a frame-mounted
hitch that does not attach to
the bumper.
•Will any holes be made in the
body of the vehicle when the
trailer hitch is installed? If there
are, seal the holes when the hitch
is removed. If the holes are not
sealed, dirt, water, and deadly
carbon monoxide (CO) from the
exhaust can get into the vehicle.
SeeEngine Exhaust on
page 8-25.
Safety Chains
Always attach chains between the
vehicle and the trailer. Cross the
safety chains under the tongue of
the trailer to help prevent the tongue
from contacting the road if it
becomes separated from the hitch.
Leave enough slack so the rig can
turn. Never allow safety chains to
drag on the ground.
Trailer Brakes
Does the trailer have its own
brakes? Be sure to read and follow
the instructions for the trailer brakes
so they are installed, adjusted and
maintained properly.
Because the vehicle has antilock
brakes, do not tap into the vehicle’s
brake system. If this is done,
both brake systems will not work
well, or at all.
Conversions and
Add-Ons
Add-On Electrical
Equipment
Notice:Do not add anything
electrical to the vehicle unless you
check with your dealer/retailer
�rst. Some electrical equipment
can damage the vehicle and the
damage would not be covered
by the vehicle’s warranty. Some
add-on electrical equipment can
keep other components from
working as they should.
Add-on equipment can drain the
vehicle battery, even if the vehicle
is not operating.
The vehicle has an airbag system.
Before attempting to add anything
electrical to the vehicle, see
Servicing the Airbag-Equipped
Vehicle on page 2-32andAdding
Equipment to the Airbag-Equipped
Vehicle on page 2-33.
Driving and Operating 8-55
Page 233 of 372
Vehicle Care
General InformationGeneral Information...............9-2
California Proposition 65
Warning.............................9-2
California Perchlorate
Materials Requirements........9-3
Accessories and
Modifications.......................9-3
Vehicle ChecksDoing Your Own
Service Work......................9-4
Hood...................................9-5
Engine Compartment
Overview............................9-6
Engine Cover.......................9-9
Engine Oil..........................9-10
Engine Oil Life System.........9-13
Automatic Transmission
Fluid................................9-14
Manual Transmission Fluid. . . .9-15
Hydraulic Clutch..................9-15
Engine Air Cleaner/Filter.......9-16
Cooling System...................9-17
Engine Coolant...................9-19
Engine Overheating.............9-24
Power Steering Fluid............9-25Washer Fluid......................9-26
Brakes...............................9-27
Brake Fluid.........................9-28
Battery...............................9-29
Rear Axle...........................9-30
Starter Switch Check............9-31
Automatic Transmission
Shift Lock Control
System Check...................9-32
Ignition Transmission
Lock Check.......................9-32
Park Brake and P (Park)
Mechanism Check..............9-32
Wiper Blade Replacement......9-33Headlamp AimingHeadlamp Aiming................9-34
Bulb ReplacementBulb Replacement...............9-37
Halogen Bulbs....................9-37
High Intensity Discharge
(HID) Lighting....................9-37
Headlamps, Front Turn
Signal and Parking Lamps
(Base Vehicle)...................9-37
Headlamps, Front Turn
Signal and Parking Lamps
(Up-Level Vehicle)..............9-38
Daytime Running
Lamps (DRL)....................9-39
Fog Lamps.........................9-40Taillamps, Turn Signal, and
Stoplamps.........................9-40
License Plate Lamp.............9-40
Replacement Bulbs..............9-41
Electrical SystemElectrical System
Overload...........................9-41
Fuses and Circuit
Breakers...........................9-42
Engine Compartment
Fuse Block.......................9-42
Instrument Panel
Fuse Block.......................9-45
Rear Compartment
Fuse Block.......................9-46
Wheels and TiresTires..................................9-48
Winter Tires........................9-48
Tire Sidewall Labeling..........9-49
Tire Designations.................9-51
Tire Terminology and
Definitions.........................9-52
Tire Pressure......................9-54
Tire Pressure for
High-Speed Operation........9-56
Tire Pressure Monitor
System.............................9-56
Tire Pressure Monitor
Operation..........................9-57
Tire Inspection....................9-61
Vehicle Care 9-1
Page 242 of 372
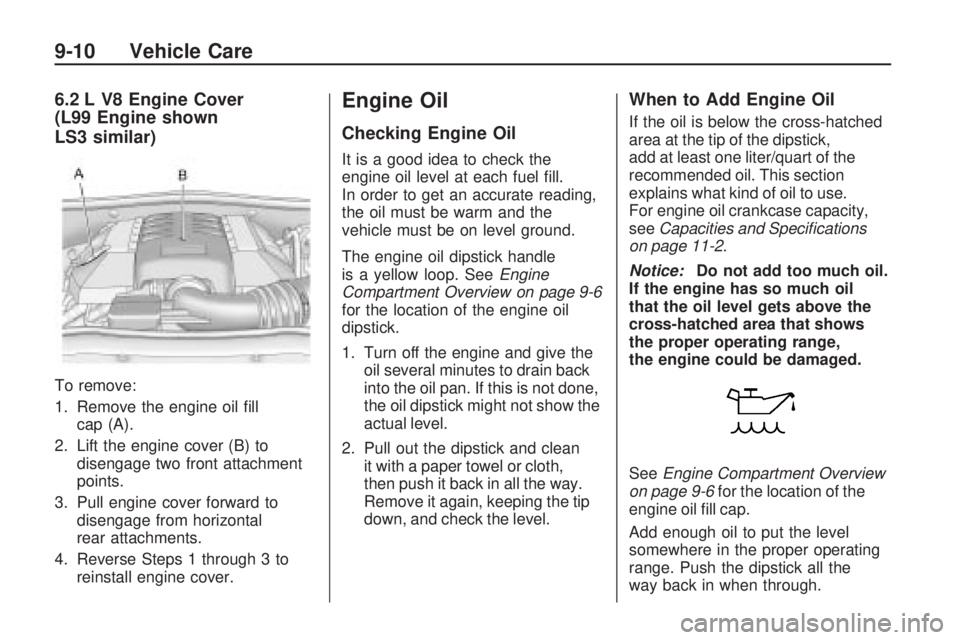
6.2 L V8 Engine Cover
(L99 Engine shown
LS3 similar)
To remove:
1. Remove the engine oil fill
cap (A).
2. Lift the engine cover (B) to
disengage two front attachment
points.
3. Pull engine cover forward to
disengage from horizontal
rear attachments.
4. Reverse Steps 1 through 3 to
reinstall engine cover.
Engine Oil
Checking Engine Oil
It is a good idea to check the
engine oil level at each fuel fill.
In order to get an accurate reading,
the oil must be warm and the
vehicle must be on level ground.
The engine oil dipstick handle
is a yellow loop. SeeEngine
Compartment Overview on page 9-6
for the location of the engine oil
dipstick.
1. Turn off the engine and give the
oil several minutes to drain back
into the oil pan. If this is not done,
the oil dipstick might not show the
actual level.
2. Pull out the dipstick and clean
it with a paper towel or cloth,
then push it back in all the way.
Remove it again, keeping the tip
down, and check the level.
When to Add Engine Oil
If the oil is below the cross-hatched
area at the tip of the dipstick,
add at least one liter/quart of the
recommended oil. This section
explains what kind of oil to use.
For engine oil crankcase capacity,
seeCapacities and Speci�cations
on page 11-2.
Notice:Do not add too much oil.
If the engine has so much oil
that the oil level gets above the
cross-hatched area that shows
the proper operating range,
the engine could be damaged.
SeeEngine Compartment Overview
on page 9-6for the location of the
engine oil fill cap.
Add enough oil to put the level
somewhere in the proper operating
range. Push the dipstick all the
way back in when through.
9-10 Vehicle Care
Page 245 of 372
Engine Oil Additives / Engine
Oil Flushes
Do not add anything to the oil.
The recommended oils with
the starburst symbol that meet
GM Standard GM6094M are all
that is needed for good performance
and engine protection.
Engine oil system flushes are not
recommended and could cause
engine damage not covered by
the vehicle warranty.
Engine Oil Life System
When to Change Engine Oil
This vehicle has a computer system
that indicates when to change the
engine oil and filter. This is based
on engine revolutions and engine
temperature, and not on mileage.
Based on driving conditions, the
mileage at which an oil change is
indicated can vary considerably.
For the oil life system to work
properly, the system must be reset
every time the oil is changed.When the system has calculated
that oil life has been diminished,
it indicates that an oil change is
necessary. A CHANGE ENGINE
OIL SOON message comes on.
SeeEngine Oil Messages on
page 4-32. Change the oil as soon
as possible within the next 1 000 km
(600 miles). It is possible that, if
driving under the best conditions,
the oil life system might not indicate
that an oil change is necessary for
over a year. However, the engine oil
and filter must be changed at least
once a year and at this time the
system must be reset. Your dealer/
retailer has trained service people
who will perform this work using
genuine parts and reset the system.
It is also important to check the oil
regularly and keep it at the proper
level.
If the system is ever reset
accidentally, the oil must be changed
at 5 000 km (3,000 miles) since the
last oil change. Remember to reset
the oil life system whenever the oil is
changed.
How to Reset the Engine Oil
Life System
The Engine Oil Life System
calculates when to change the
engine oil and filter based on vehicle
use. Whenever the oil is changed,
reset the system so it can calculate
when the next oil change is required.
If a situation occurs where the oil is
changed prior to a change engine oil
message being turned on, reset the
system.
After changing the engine oil, reset
the system:
1. Turn the ignition key to ON/RUN
with the engine off.
2. Fully press and release the
accelerator pedal three times
within five seconds.
If the CHANGE ENGINE OIL
SOON message is not on,
the system is reset.
If the CHANGE ENGINE OIL SOON
message comes on again and stays
on for 30 seconds at the next ignition
cycle, it did not reset. The system
needs to be reset again.
Vehicle Care 9-13
Page 246 of 372
What to Do with Used Oil
Used engine oil contains certain
elements that can be unhealthy for
your skin and could even cause
cancer. Do not let used oil stay on
your skin for very long. Clean your
skin and nails with soap and water,
or a good hand cleaner. Wash or
properly dispose of clothing or rags
containing used engine oil. See the
manufacturer’s warnings about the
use and disposal of oil products.
Used oil can be a threat to the
environment. If you change your own
oil, be sure to drain all the oil from the
filter before disposal. Never dispose
of oil by putting it in the trash, pouring
it on the ground, into sewers, or into
streams or bodies of water. Recycle
it by taking it to a place that collects
used oil.
Automatic Transmission
Fluid
How to Check Automatic
Transmission Fluid
It is not necessary to check
the transmission fluid level.
A transmission fluid leak is the
only reason for fluid loss. If a leak
occurs, take the vehicle to your
dealer/retailer service department
and have it repaired as soon as
possible.
There is a special procedure
for checking and changing the
transmission fluid. Because this
procedure is difficult, you should
have this done at your dealer/
retailer service department.Contact your dealer/retailer for
additional information or the
procedure can be found in the
service manual. To purchase a
service manual, seeService
Publications Ordering Information
on page 12-12.
Change the fluid and filter at the
intervals listed inScheduled
Maintenance on page 10-2, and
be sure to use the fluid listed
inRecommended Fluids and
Lubricants on page 10-7.
9-14 Vehicle Care
Page 247 of 372
Manual Transmission
Fluid
It is not necessary to check the
manual transmission fluid level.
A transmission fluid leak is the only
reason for fluid loss. If a leak occurs,
take the vehicle to your dealer/
retailer service department and
have it repaired as soon as possible.
SeeRecommended Fluids and
Lubricants on page 10-7for the
proper fluid to use.
Hydraulic Clutch
It is not necessary to regularly
check brake/clutch fluid unless
you suspect there is a leak in the
system. Adding fluid will not correct
a leak. A fluid loss in this system
could indicate a problem. Have the
system inspected and repaired.
When to Check and What
to Use
The brake/hydraulic clutch fluid
reservoir cap has this symbol
on it. The common hydraulic clutch
and brake master cylinder fluid
reservoir is filled with DOT 3 brake
fluid as indicated on the reservoir
cap. SeeEngine Compartment
Overview on page 9-6for reservoir
location.
How to Check and Add Fluid
Visually check the brake/clutch
fluid reservoir to make sure the
fluid level is at the MIN (minimum)
line on the side of the reservoir.
The brake/hydraulic clutch fluid
system should be closed and
sealed.
Do not remove the cap to check
the fluid level or to top-off the fluid
level. Remove the cap only when
necessary to add the proper fluid
until the level reaches the MIN line.
Vehicle Care 9-15
Page 250 of 372
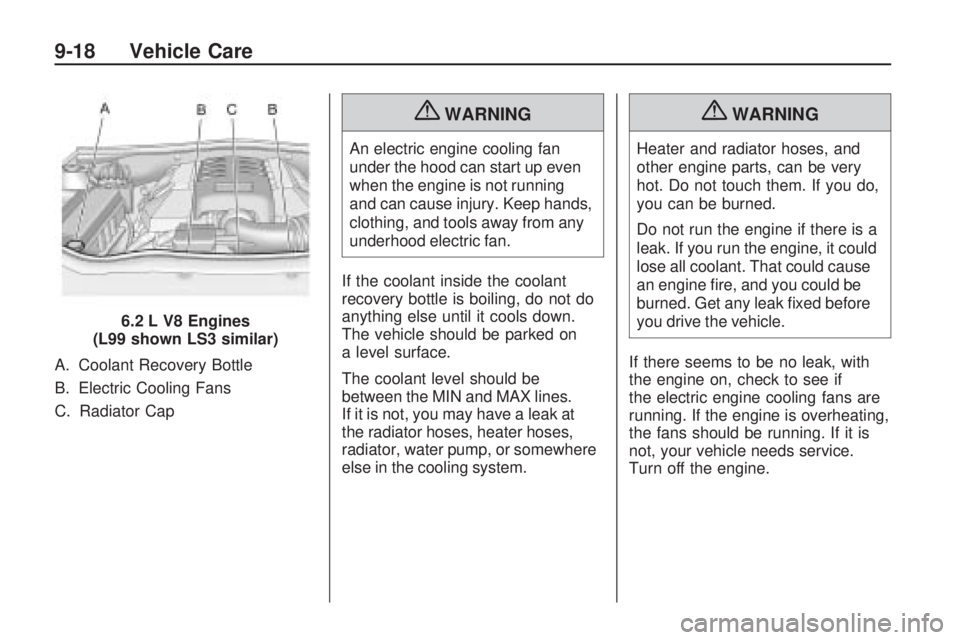
A. Coolant Recovery Bottle
B. Electric Cooling Fans
C. Radiator Cap
{WARNING
An electric engine cooling fan
under the hood can start up even
when the engine is not running
and can cause injury. Keep hands,
clothing, and tools away from any
underhood electric fan.
If the coolant inside the coolant
recovery bottle is boiling, do not do
anything else until it cools down.
The vehicle should be parked on
a level surface.
The coolant level should be
between the MIN and MAX lines.
If it is not, you may have a leak at
the radiator hoses, heater hoses,
radiator, water pump, or somewhere
else in the cooling system.
{WARNING
Heater and radiator hoses, and
other engine parts, can be very
hot. Do not touch them. If you do,
you can be burned.
Do not run the engine if there is a
leak. If you run the engine, it could
lose all coolant. That could cause
an engine fire, and you could be
burned. Get any leak fixed before
you drive the vehicle.
If there seems to be no leak, with
the engine on, check to see if
the electric engine cooling fans are
running. If the engine is overheating,
the fans should be running. If it is
not, your vehicle needs service.
Turn off the engine. 6.2 L V8 Engines
(L99 shown LS3 similar)
9-18 Vehicle Care